XRCC Tutorial - Solar System
Overview
You will build a simulated Solar System using XRCC in this tutorial. This tutorial builds on top of the previous Museum tutorial to teach you more advanced scene building and behaviour techniques. You will learn how to build a multi-scene XR project with gravity by going through this tutorial. We recommend that you do this tutorial after finishing the Museum tutorial.
Techniques Covered
You will learn the following techniques in this tutorial:
| Technique | Specific Techniques Covered |
|---|---|
| Basic Scene Operation |
|
| Advanced Scene Building |
|
| Configure 3D Object |
|
| Advanced Behaviour Building |
|
Tutorial Project
The project used for this tutorial comes in two formats: a starter project for use in this step-by-step tutorial, and a completed project for your reference after you've completed the tutorial.
Project files for the solar system tutorial can be found at:
For this tutorial, the starter project will be used to guide you in building the Solar System in a step-by-step manner. All the necessary assets required for the tutorial are already included in the project, so just open the starter project in XRCC and you are ready to go with the tutorial.
Gameplay Flow
-
The player can observe the orbit of the entire solar system in the main scene.
-
The player can select a planet to transition to the corresponding scene of the selected planet.
-
In the planet's scene, the player can experience the gravity of that planet by grabbing and releasing objects or performing similar actions.
-
The player can press the return button to go back to the main scene and explore all planets.
Assets Provided in the Starter Project
The starter project for the Solar System tutorial provides a comprehensive set of assets and functionalities to get you started. This includes images of different planets in the solar system like Earth and Mars. There are also 3D models of planets like Saturn and the Sun, as well as objects like a rabbit. Inside the project, the entire Solar System is almost fully configured except for the Earth and the Moon.
Set the Scene Environment
In this section, we will configure the basic scene settings to create an environment for the Solar System. By setting the default tool to Wand and extending its interaction scope, users can easily interact with planets from a distance. Disabling gravity creates a realistic space-like environment where users can float freely.
Configure Scene's Gameplay Setting
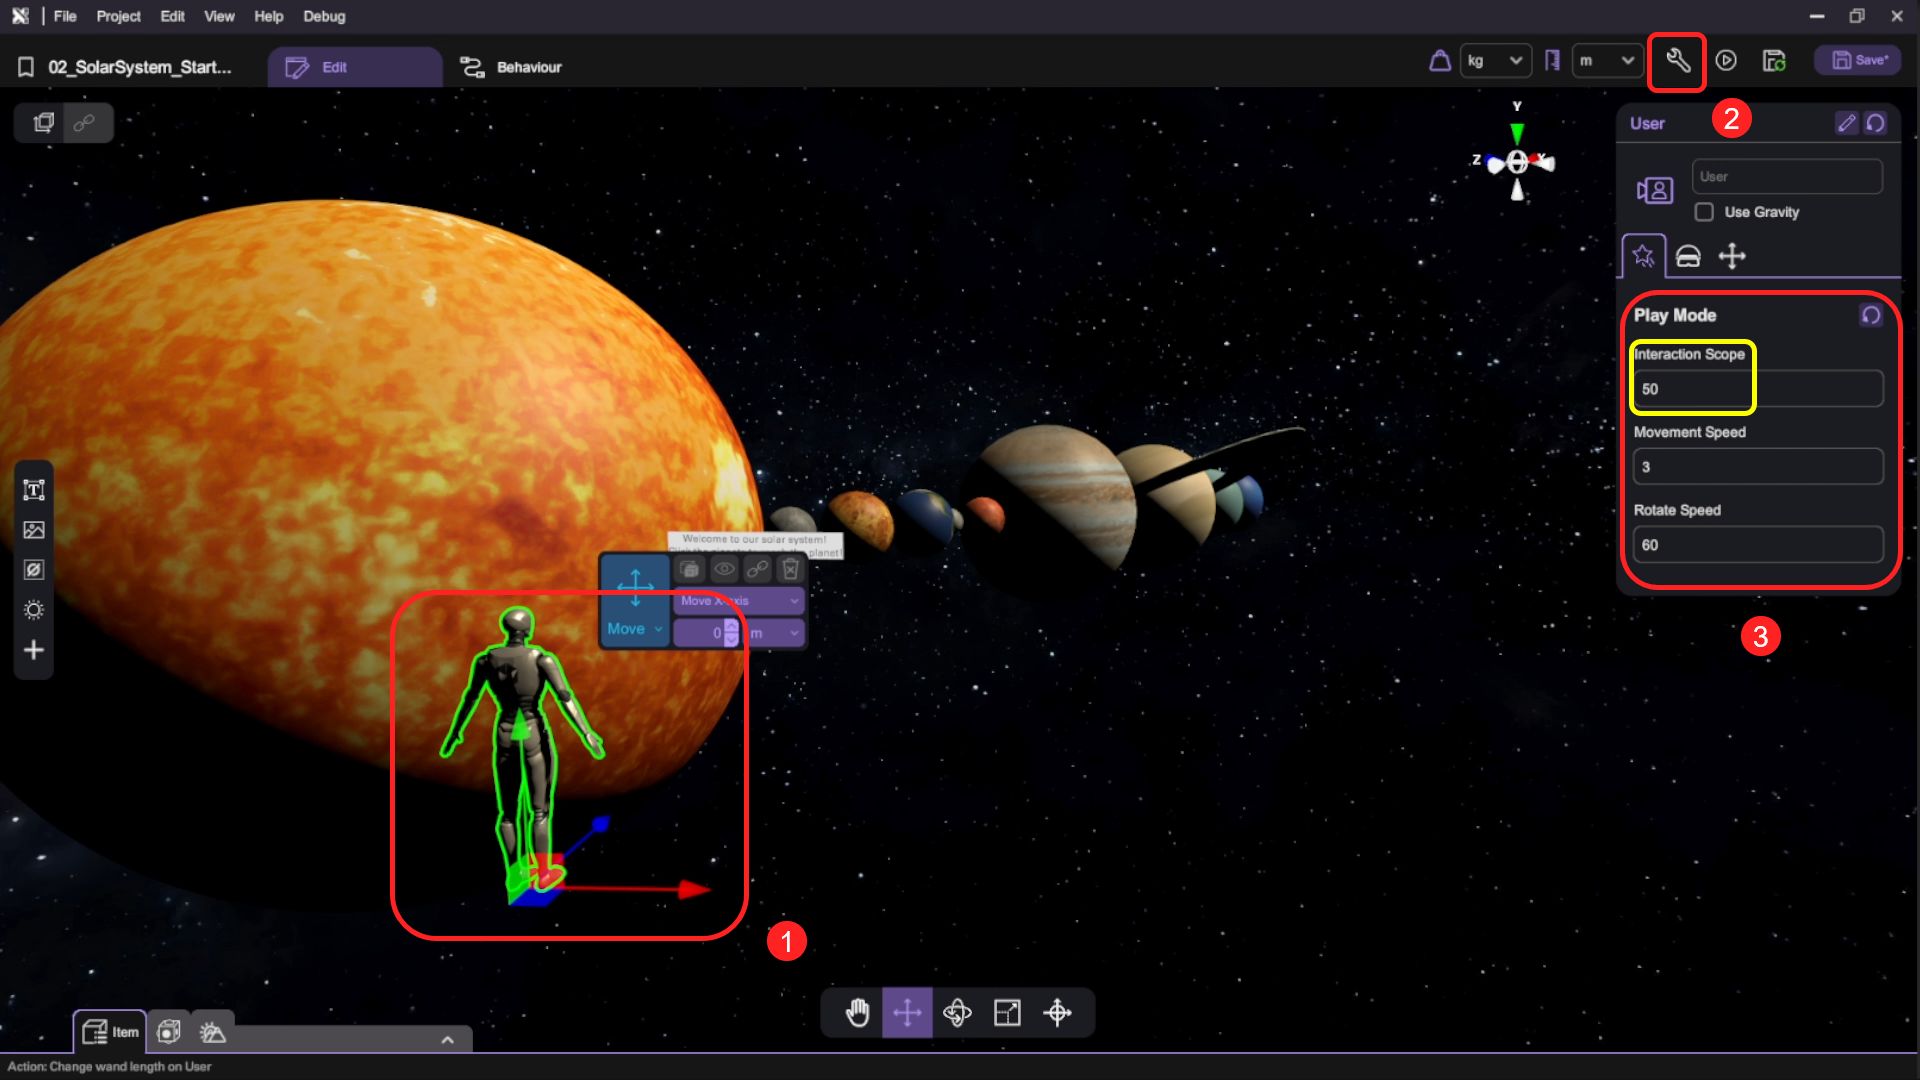
- Select "User Setting" and press "Inspector", set the Default Tool to "Wand" at "XR Setting" tab.
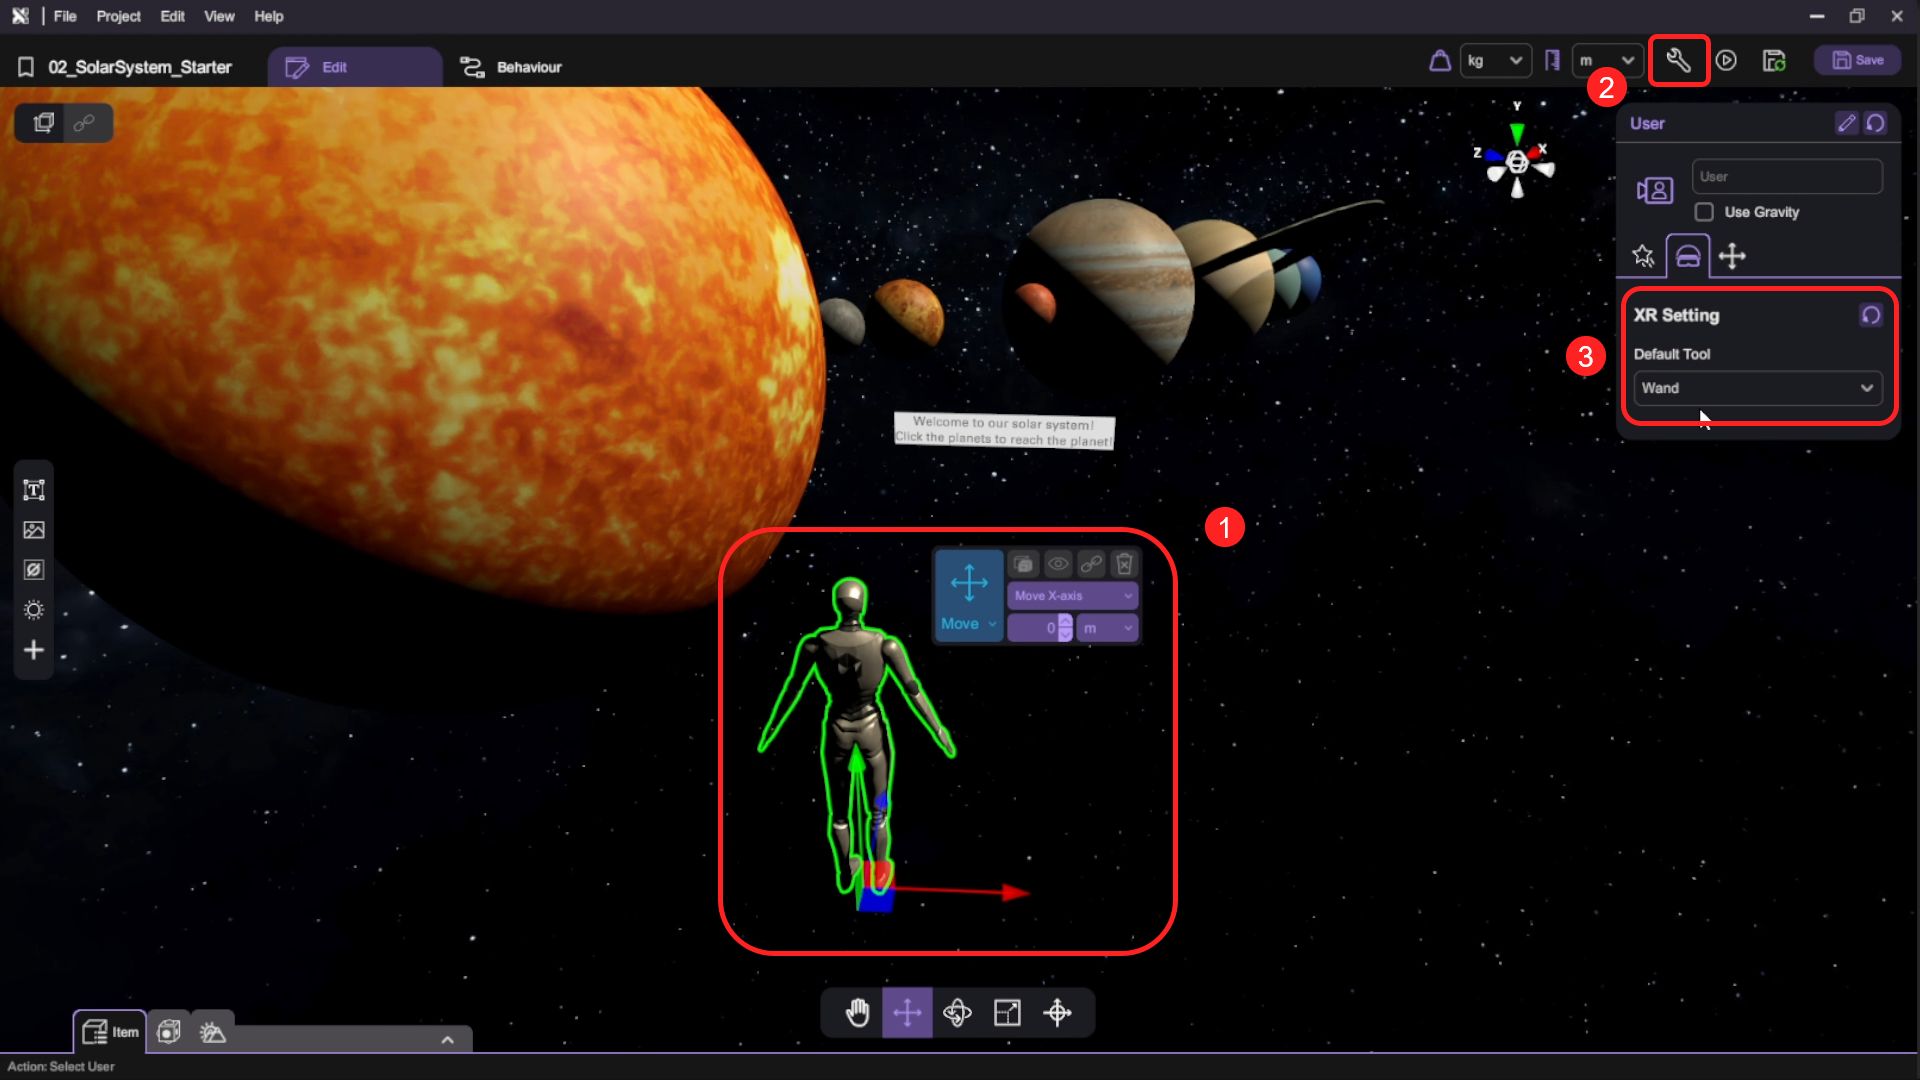
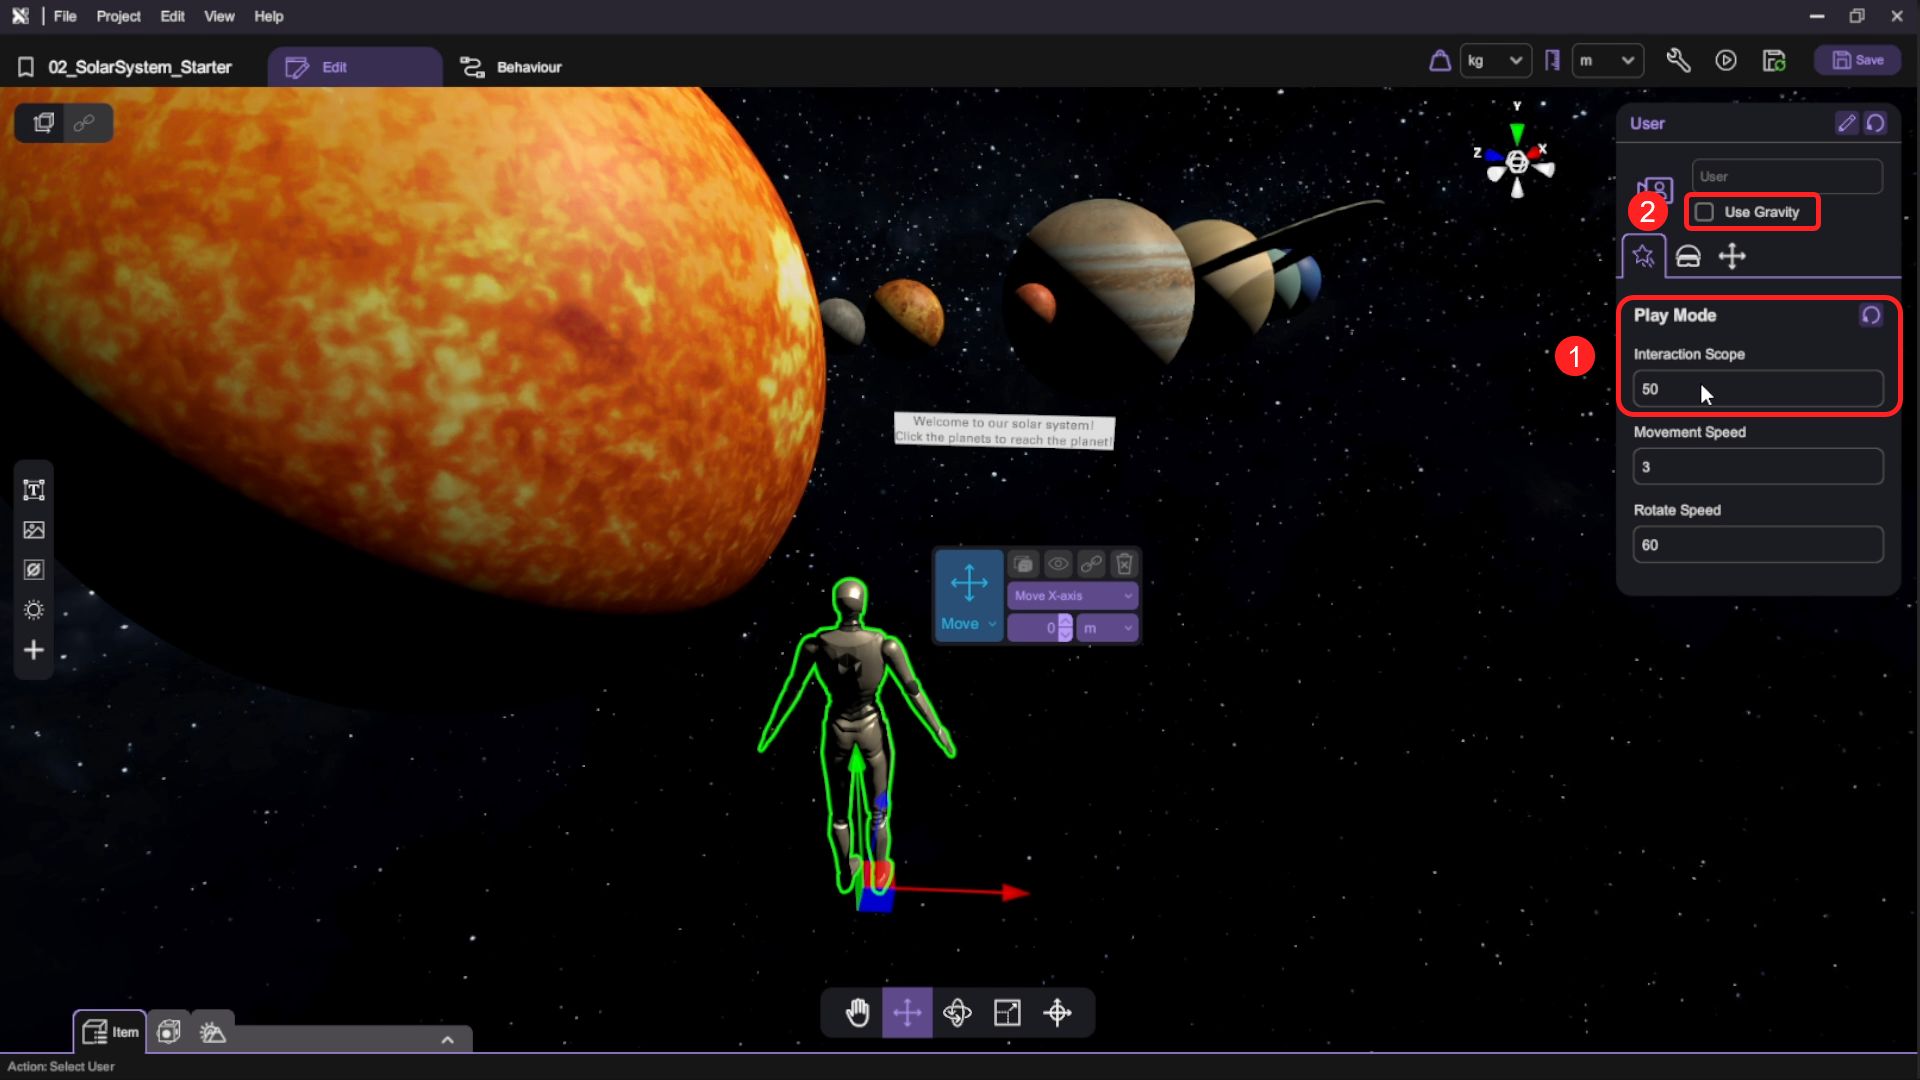
- Select "Play Mode" tab and set "Interaction Scope (Wand Length)" to "50", this allows you to use a longer wand to interact with the virtual environment and teleport to different positions in the scene. Then deselect the "Use Gravity" option so the user can float in space during gameplay.
Create the SOLAR SYSTEM
In this section, we will create the Earth and Moon objects to complete the solar system. We'll use basic 3D sphere models and apply textures to make them look realistic. By following these steps, you will learn how to add, position, scale and texture 3D objects in XRCC.
Add Earth using Sphere Model
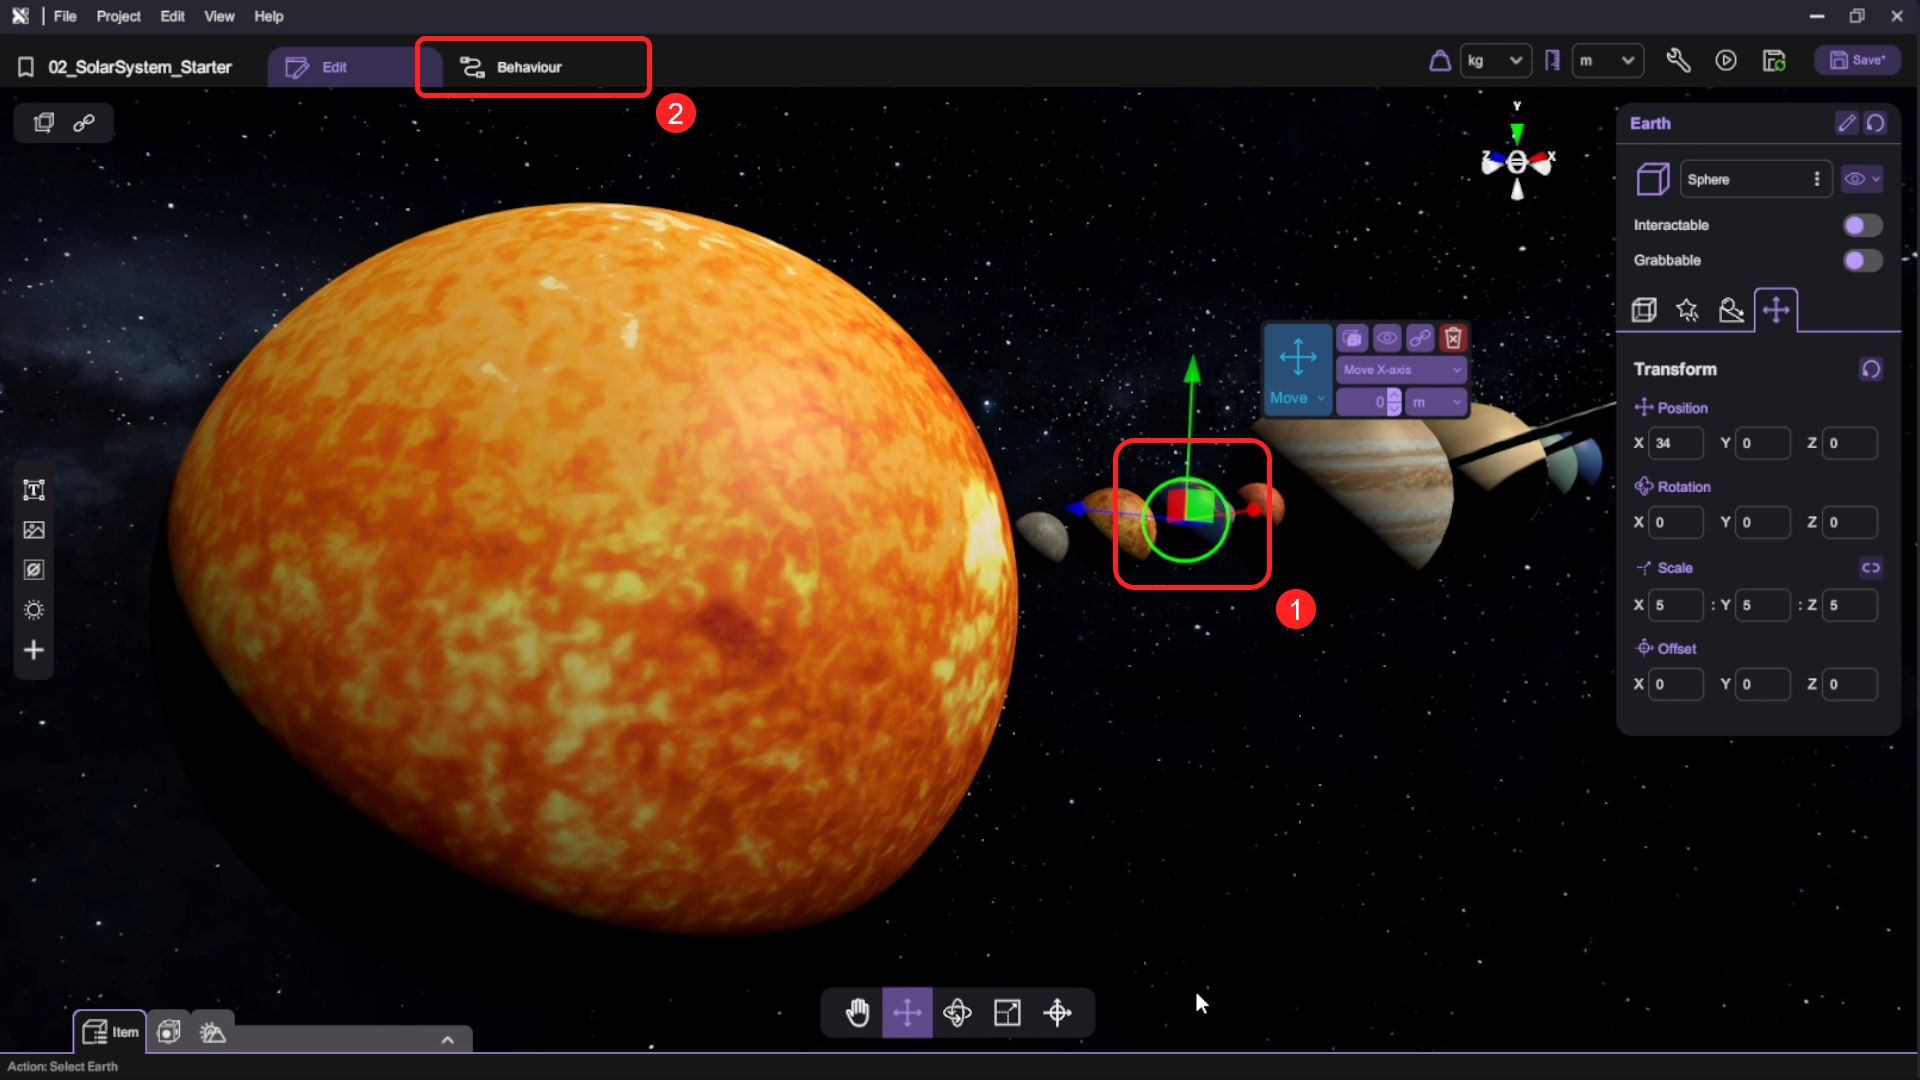
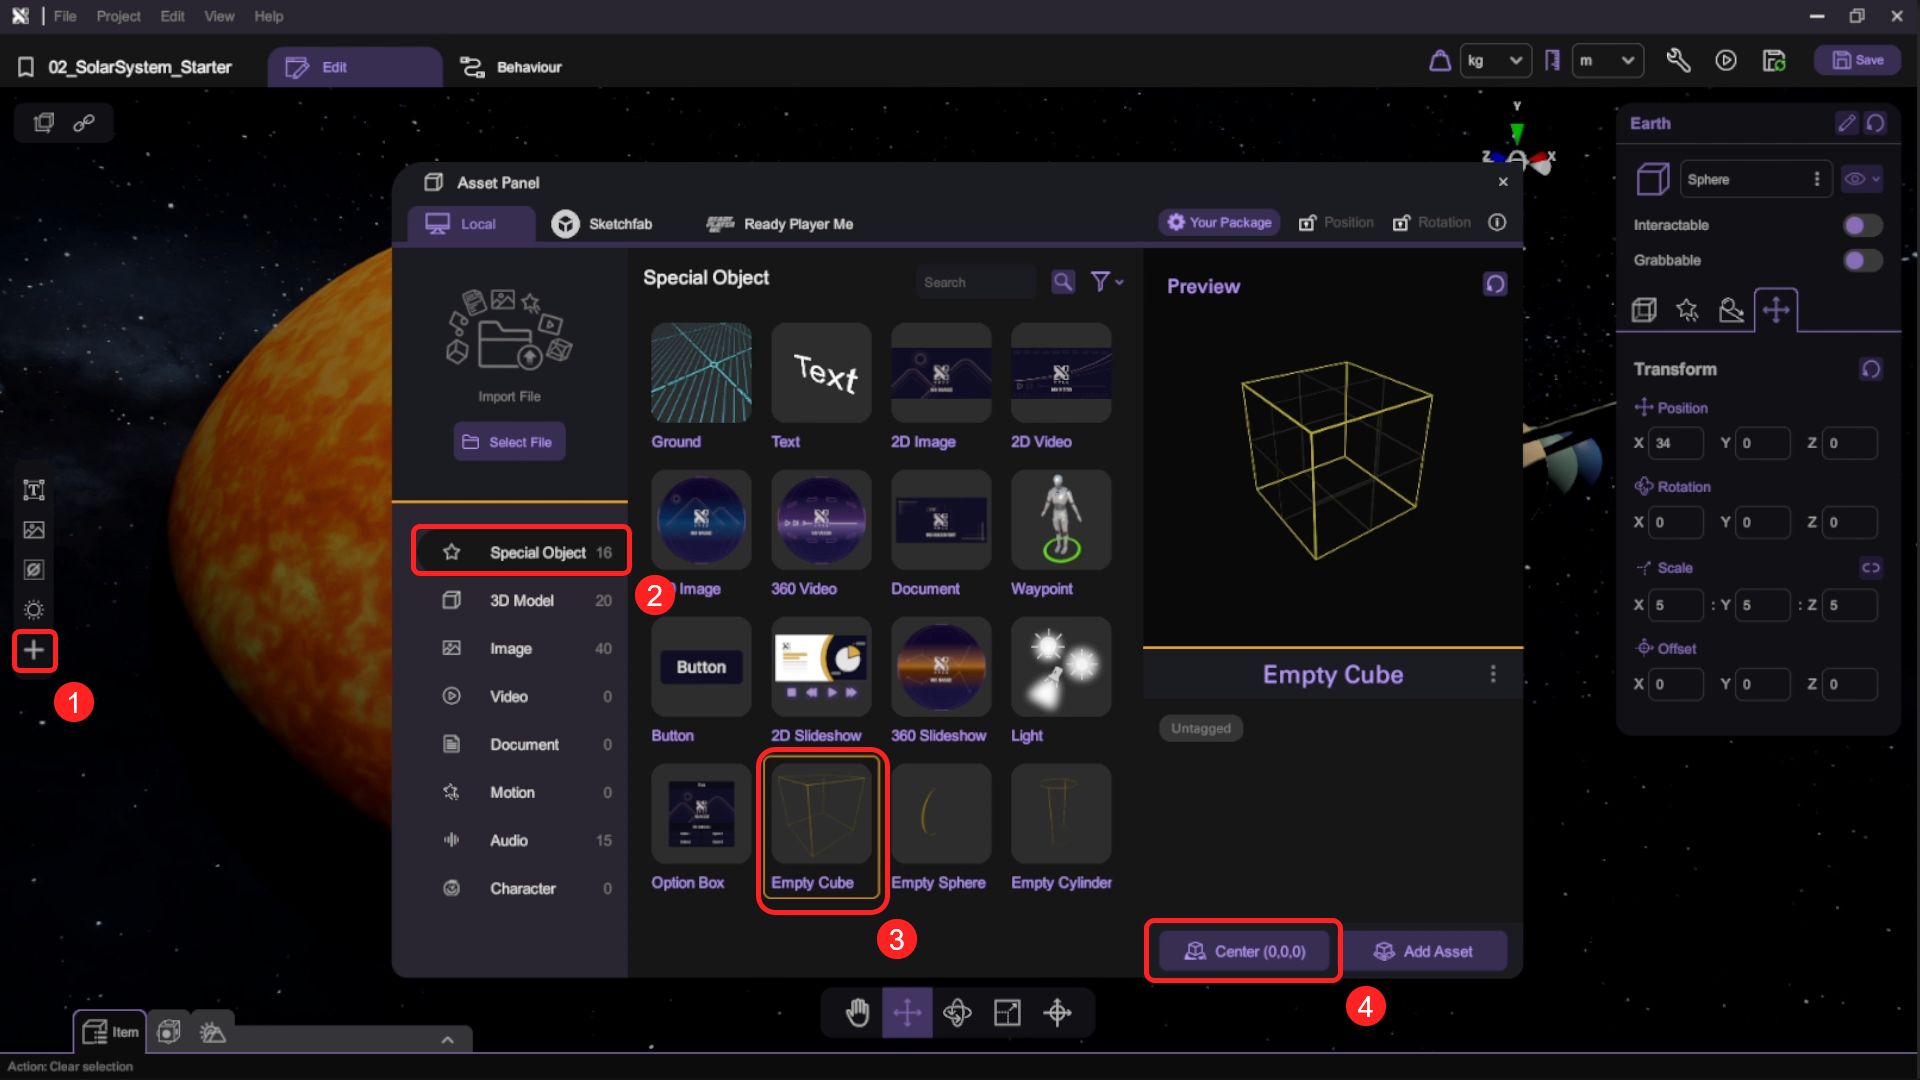
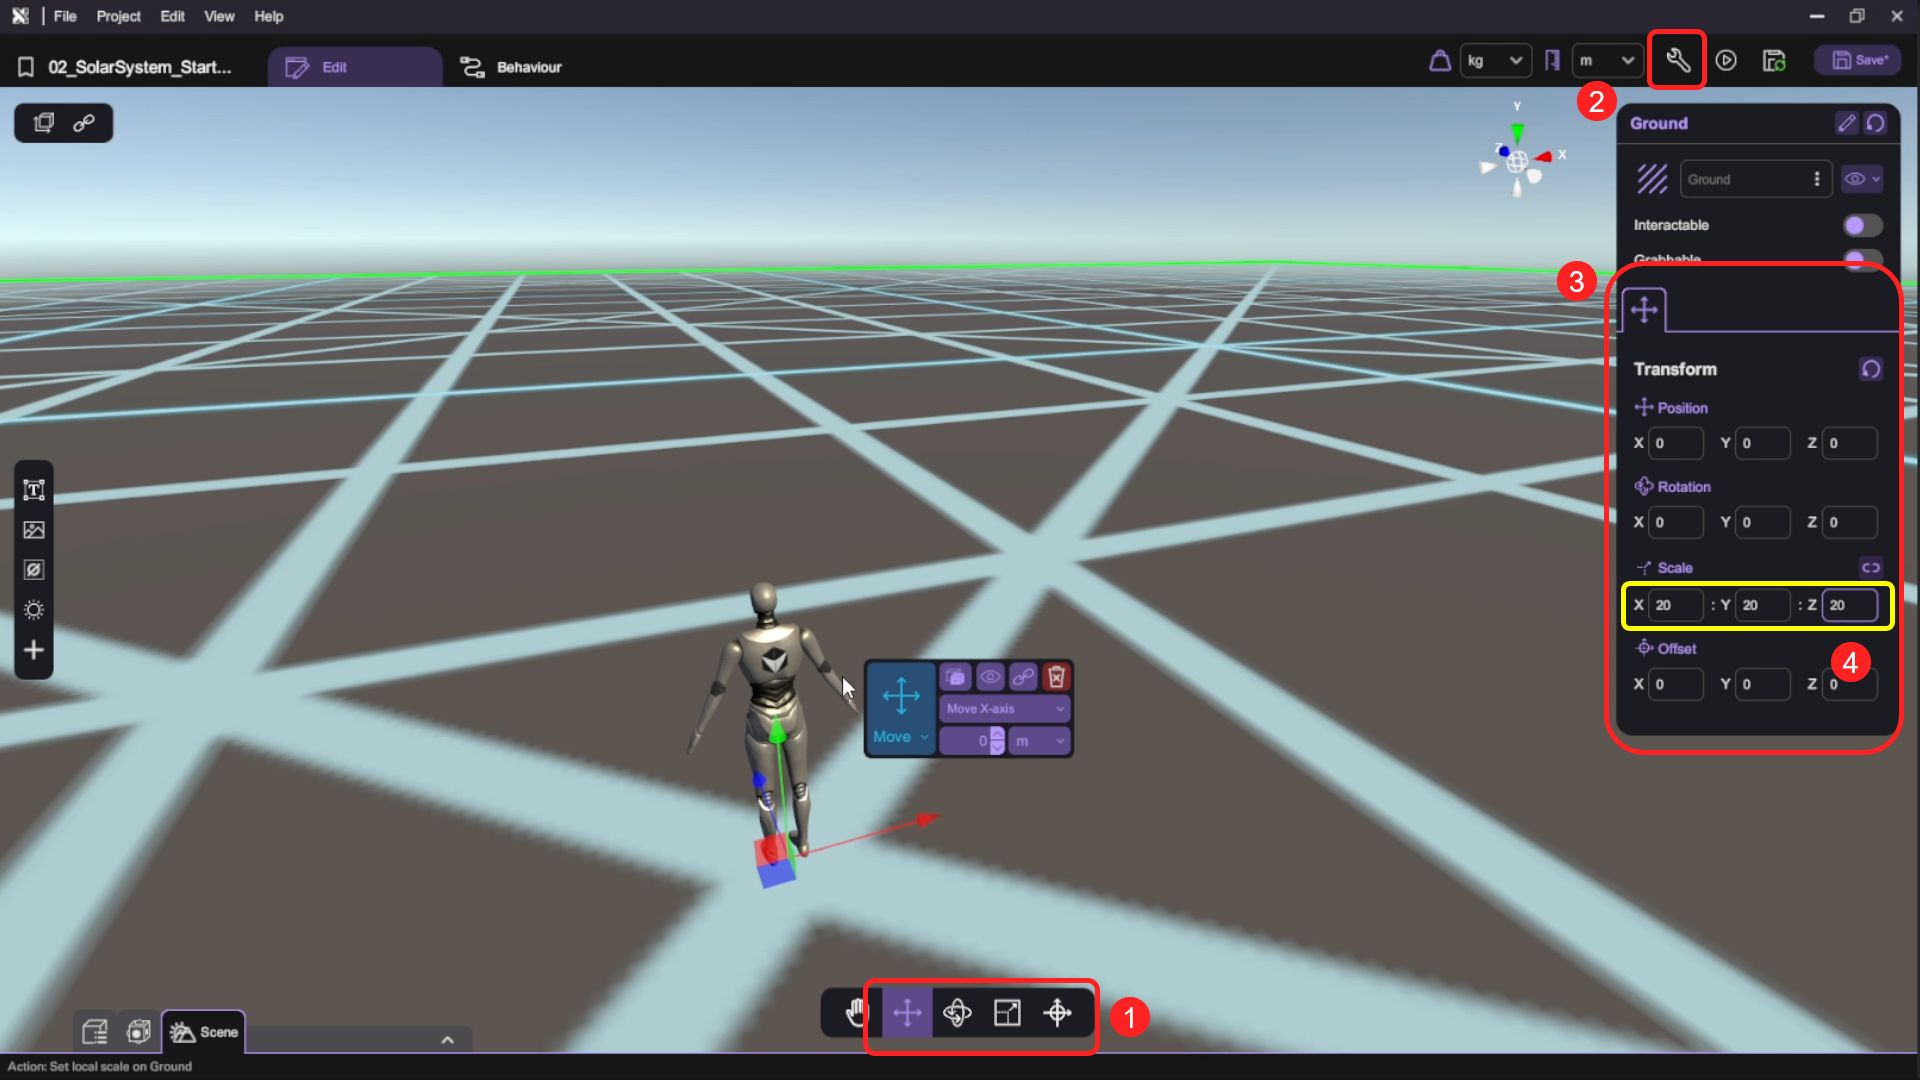
- We will use the Sphere 3D Model to create the Earth, open the "Asset Panel" and from the "3D Model" tab, select and add the "Sphere" object to the scene.
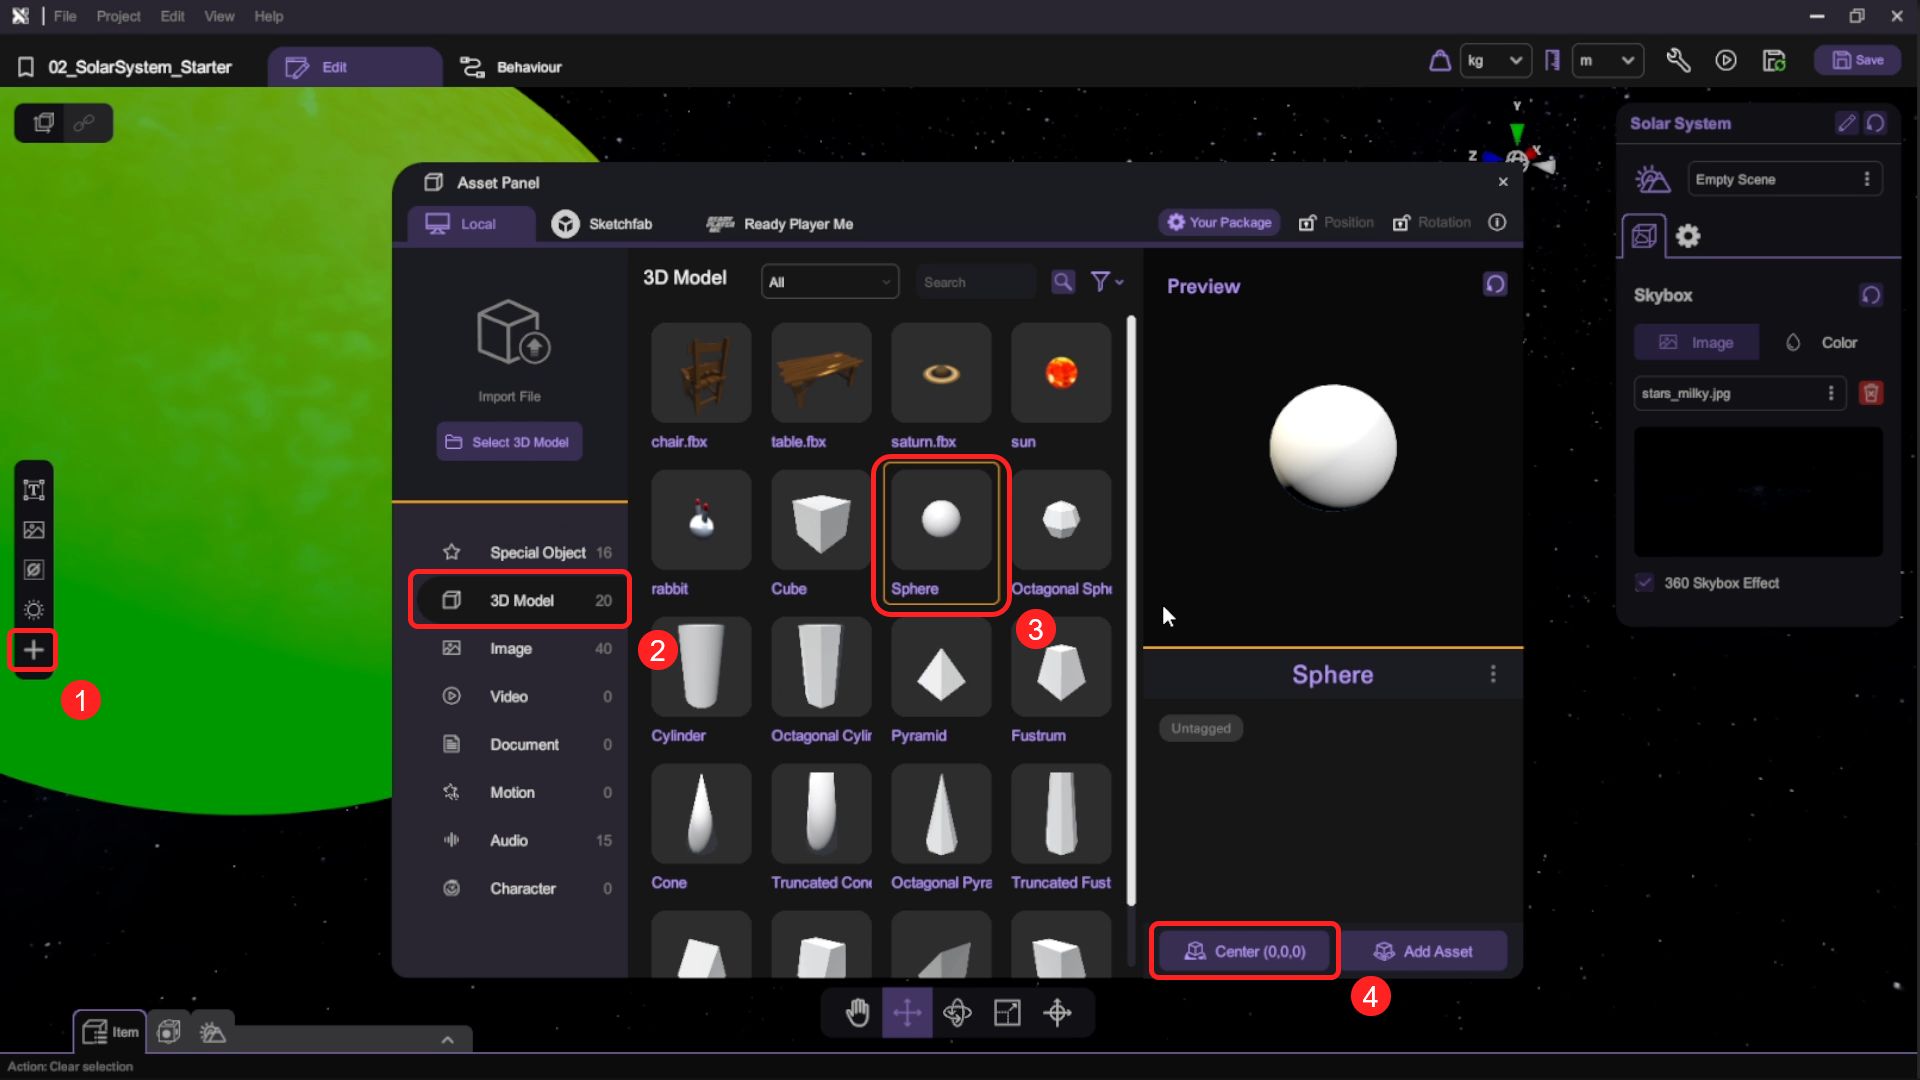
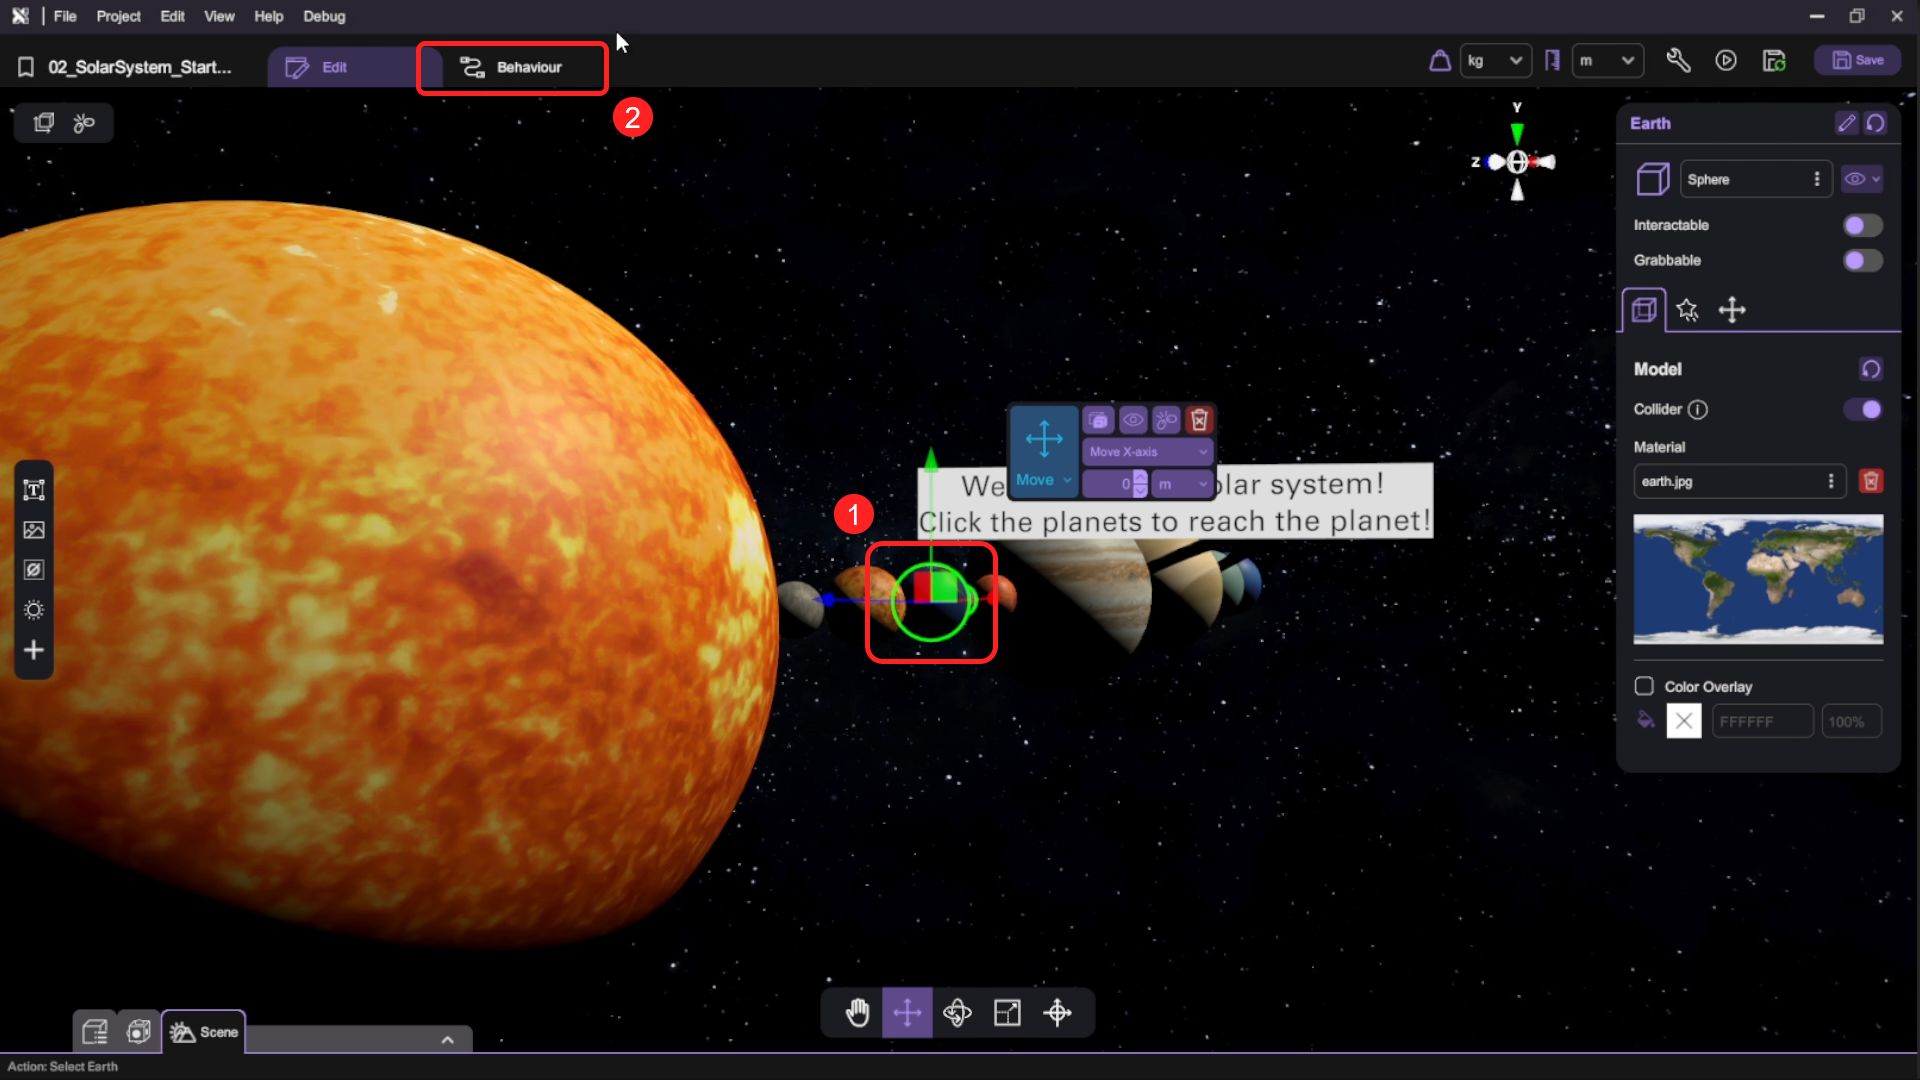
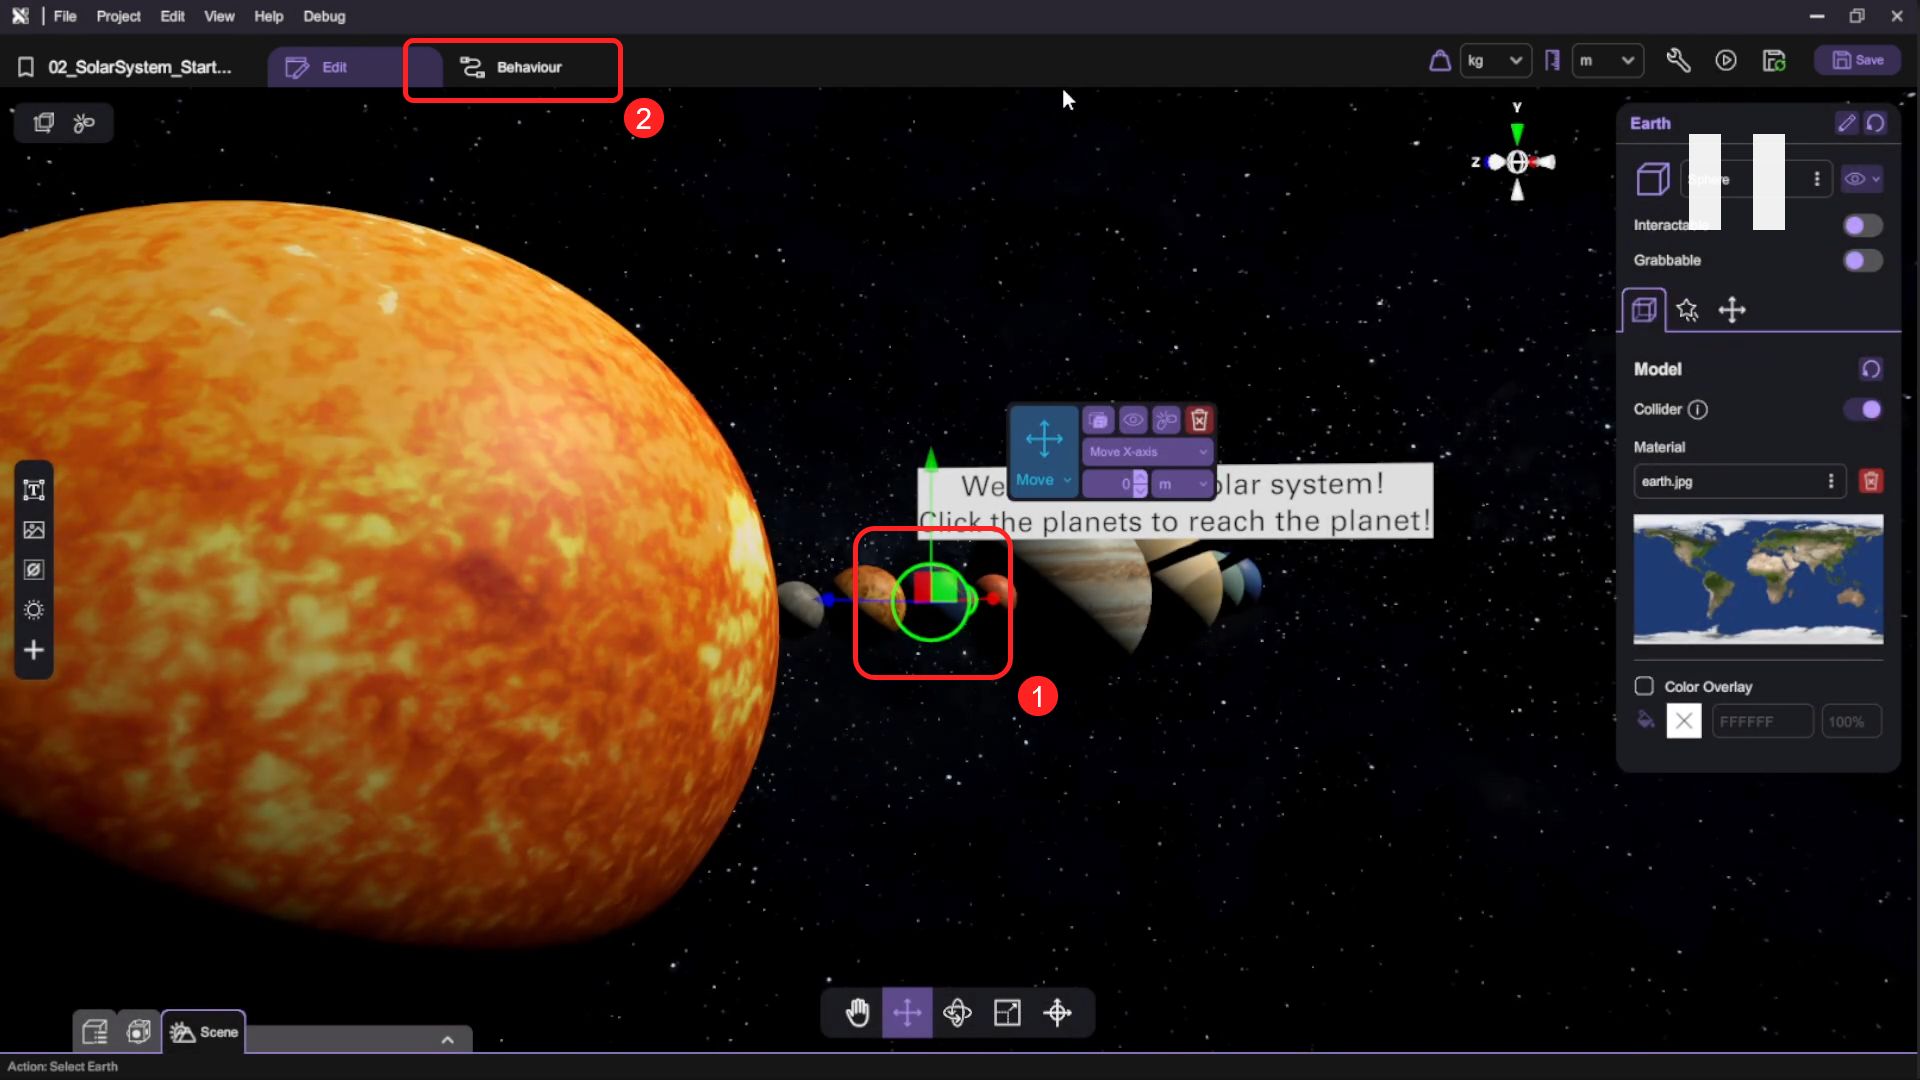
- With the sphere selected, use the transform tools to set up the Earth or reposition the sphere at position to (34, 0, 0) and set the scale to (5, 5, 5) in the "Inspector".
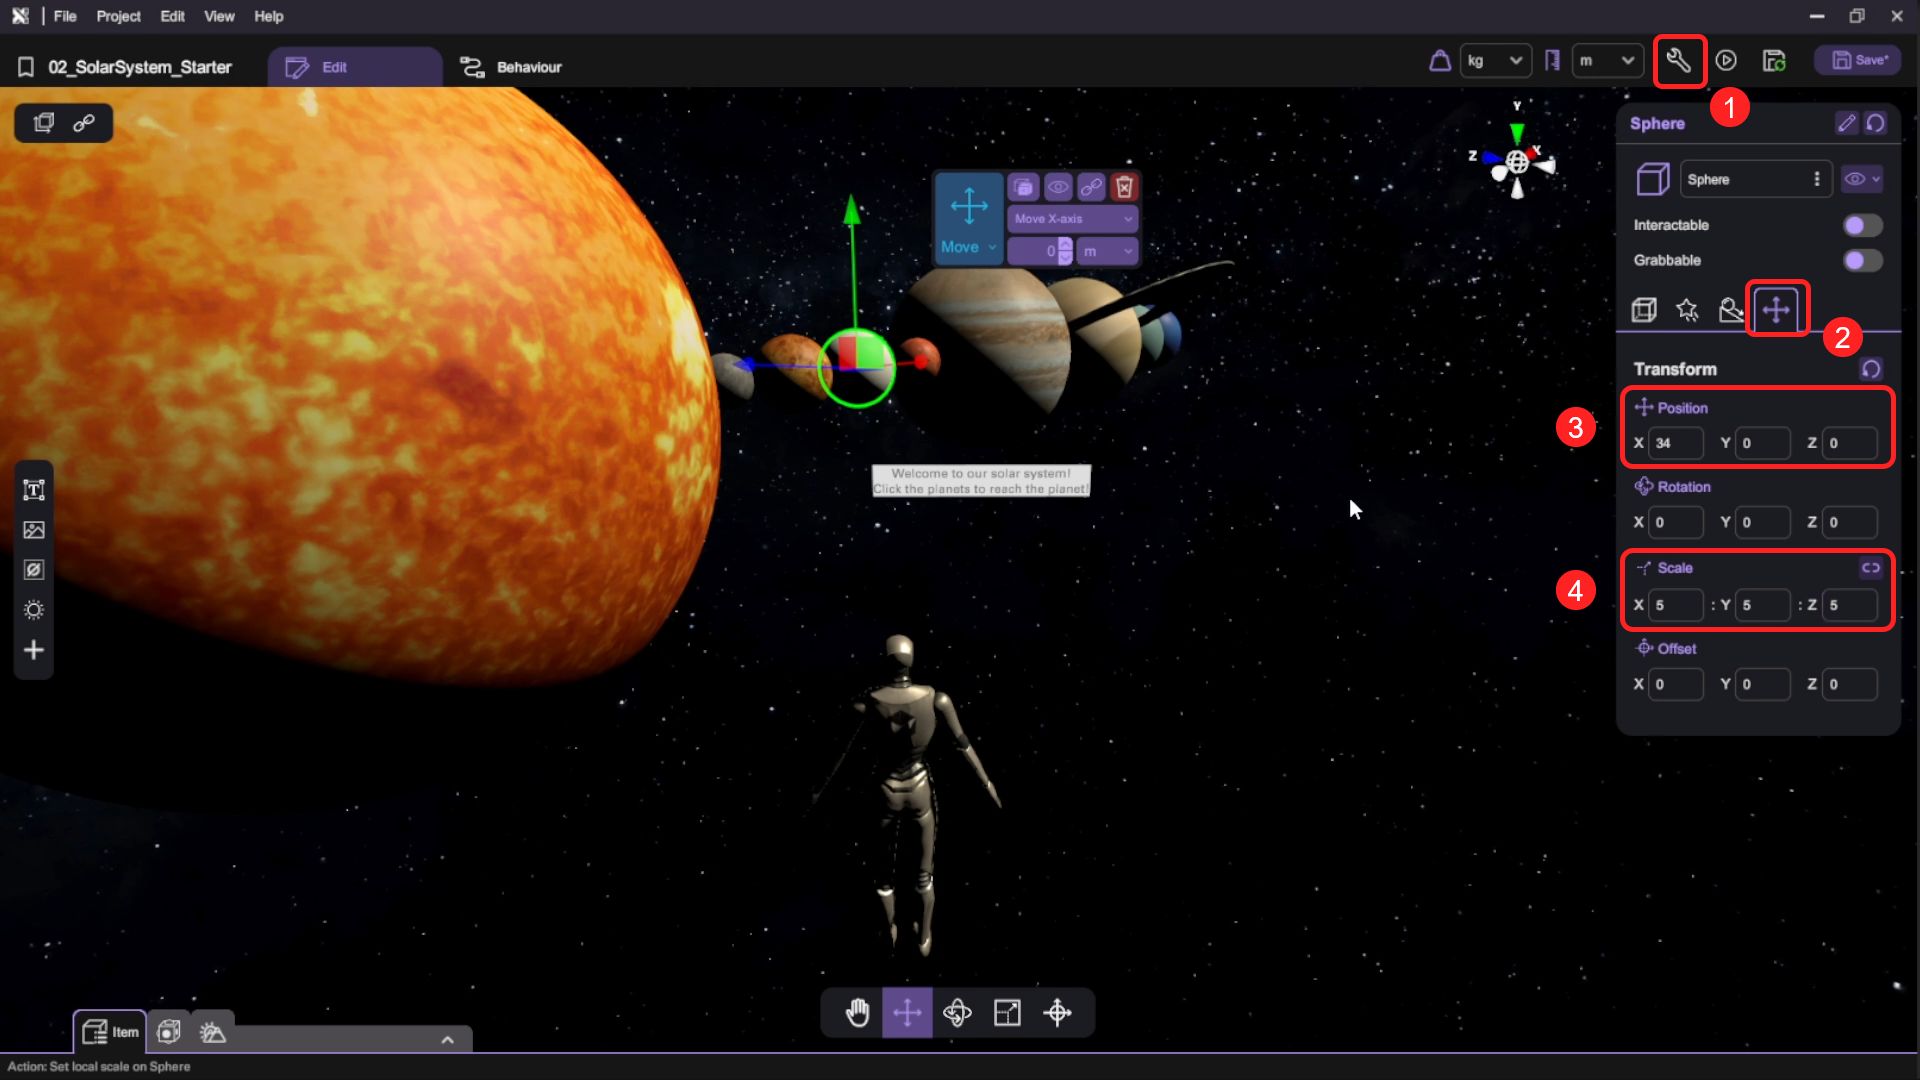
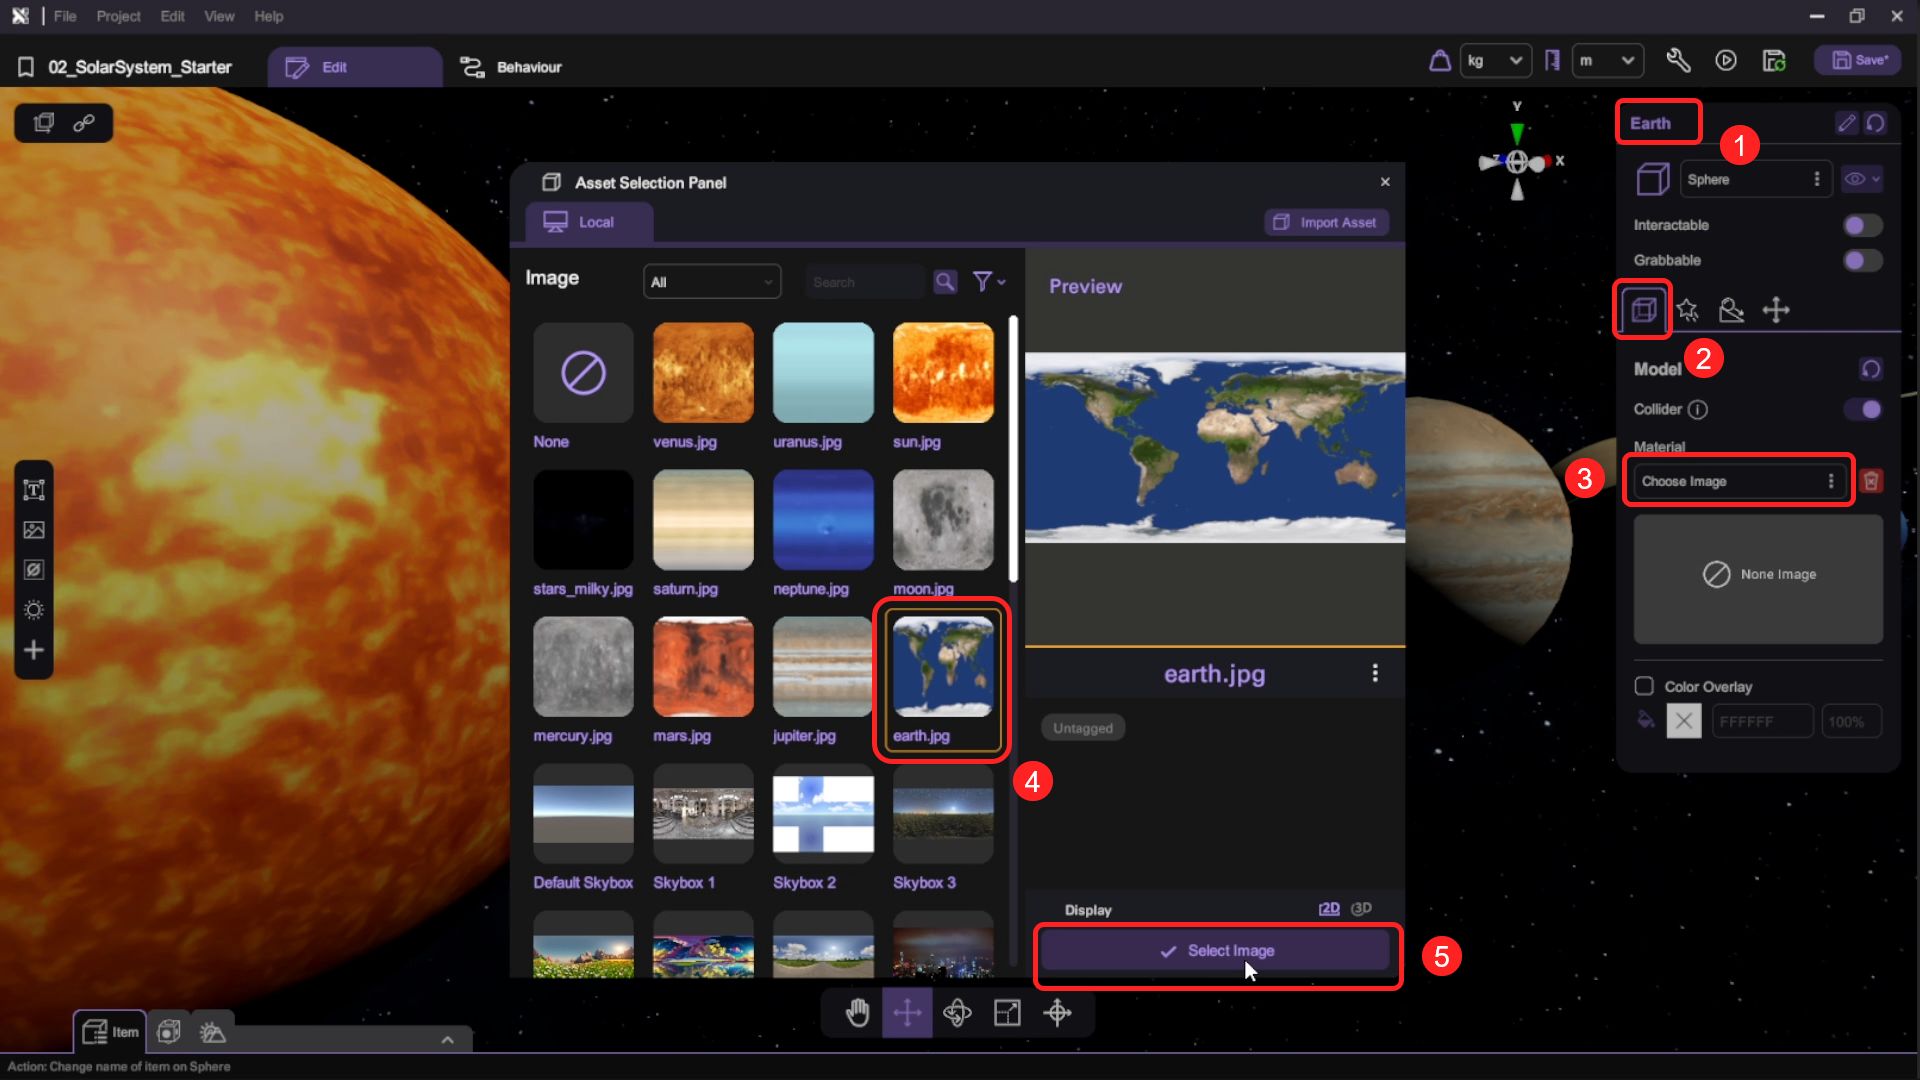
- Select the sphere in the scene and open the "Inspector", under the Model section set the "Material" texture to the "earth.jpg" image in your asset library. Rename the planet to "Earth" in the Inspector.
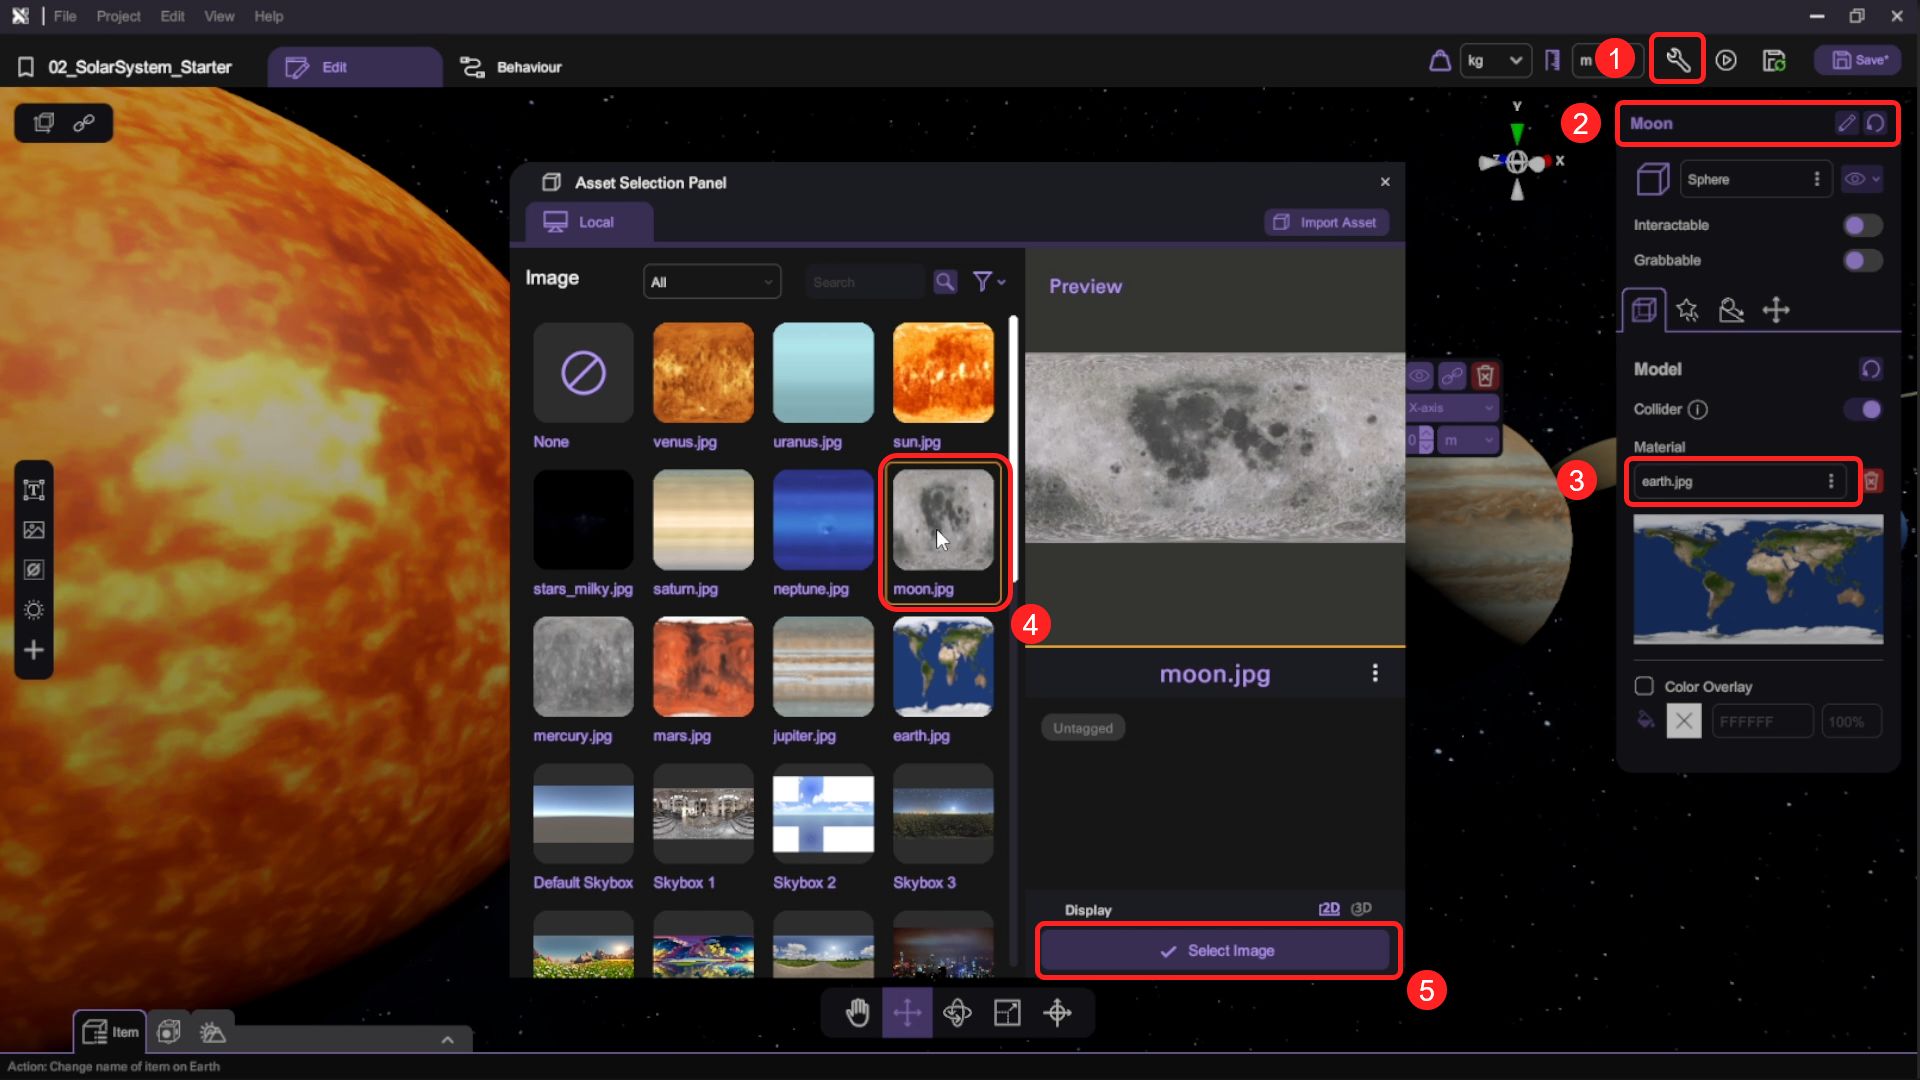
- Duplicate the sphere and change the texture to "moon.jpg" and rename the planet to Moon.
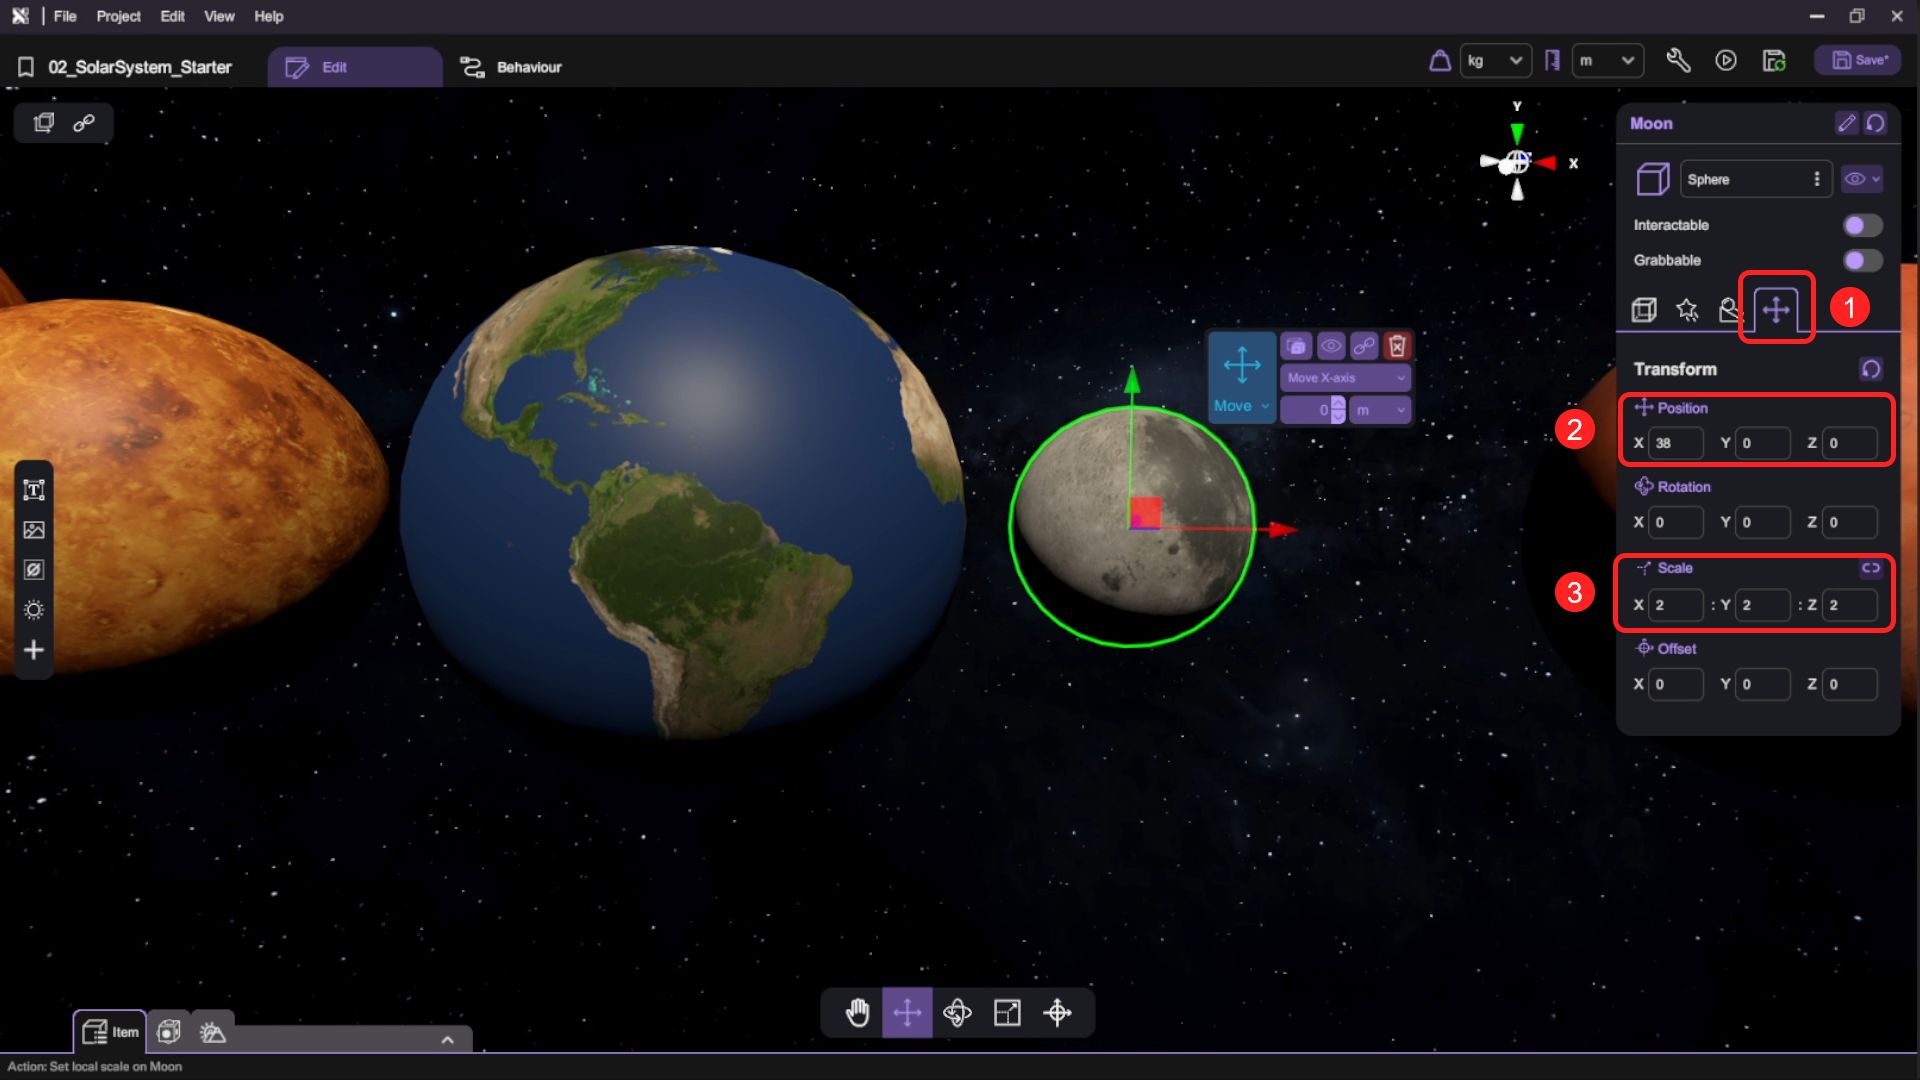
- Reposition the sphere at position (38, 0, 0) and set the scale to (2, 2, 2).
Make the Solar System Orbit and Rotate
In this section, we will create a realistic orbital system where the Earth rotates around its axis while orbiting the Sun, and the Moon orbits around the Earth. We will use XRCC's behaviour system to control the rotation and orbital speeds of celestial bodies, making them move in a coordinated way. By using empty objects as orbital pivots and linking objects together, we will create a hierarchical system that mimics the real solar system's movements. The speed control variables allow users to adjust the simulation speed to better observe the planetary motions.
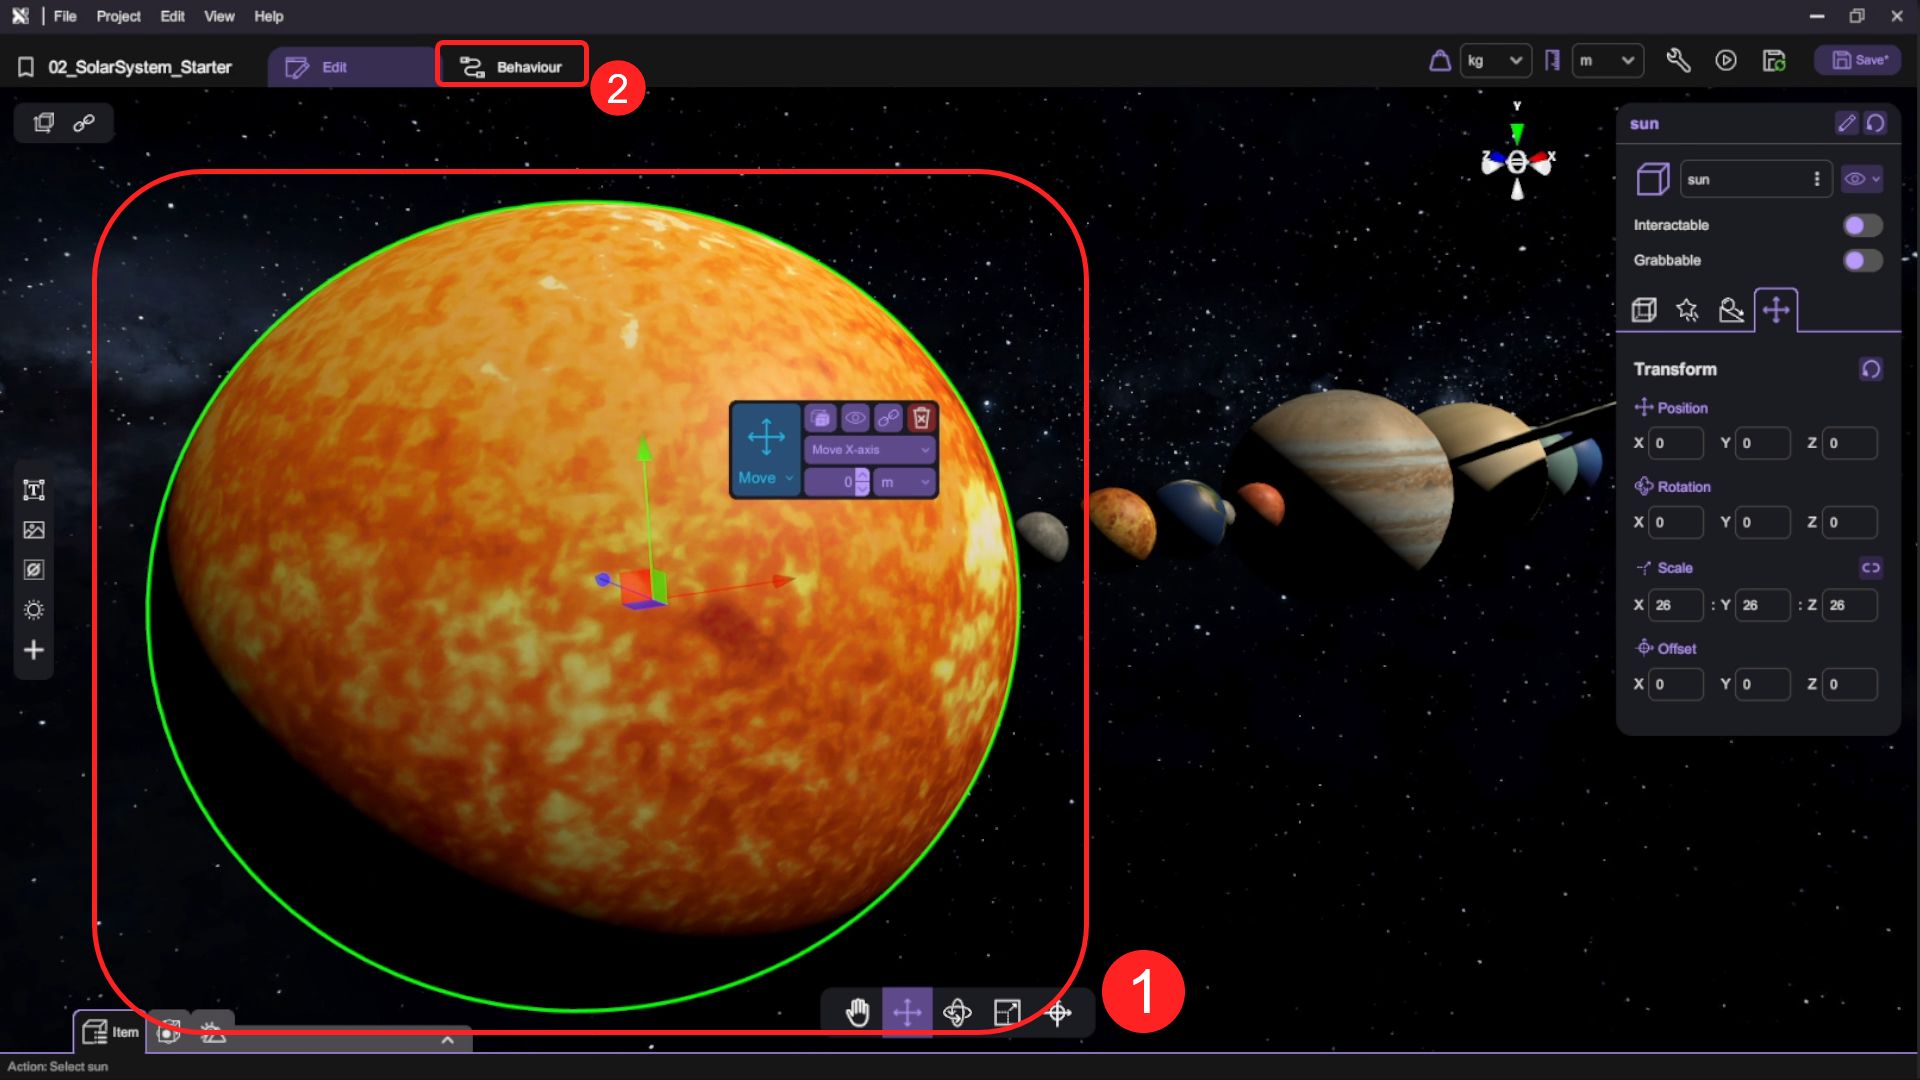
- Select the Sun object and click on the "Behaviour" tab to switch to its behaviour panel. As gravity keeps all planets orbiting around the sun, we will use the Sun object to store the planets' orbital and rotational speed data.
- Select the "Variables" button to open the "Instance Variable Panel". You can see there are different types of variables for each planet.
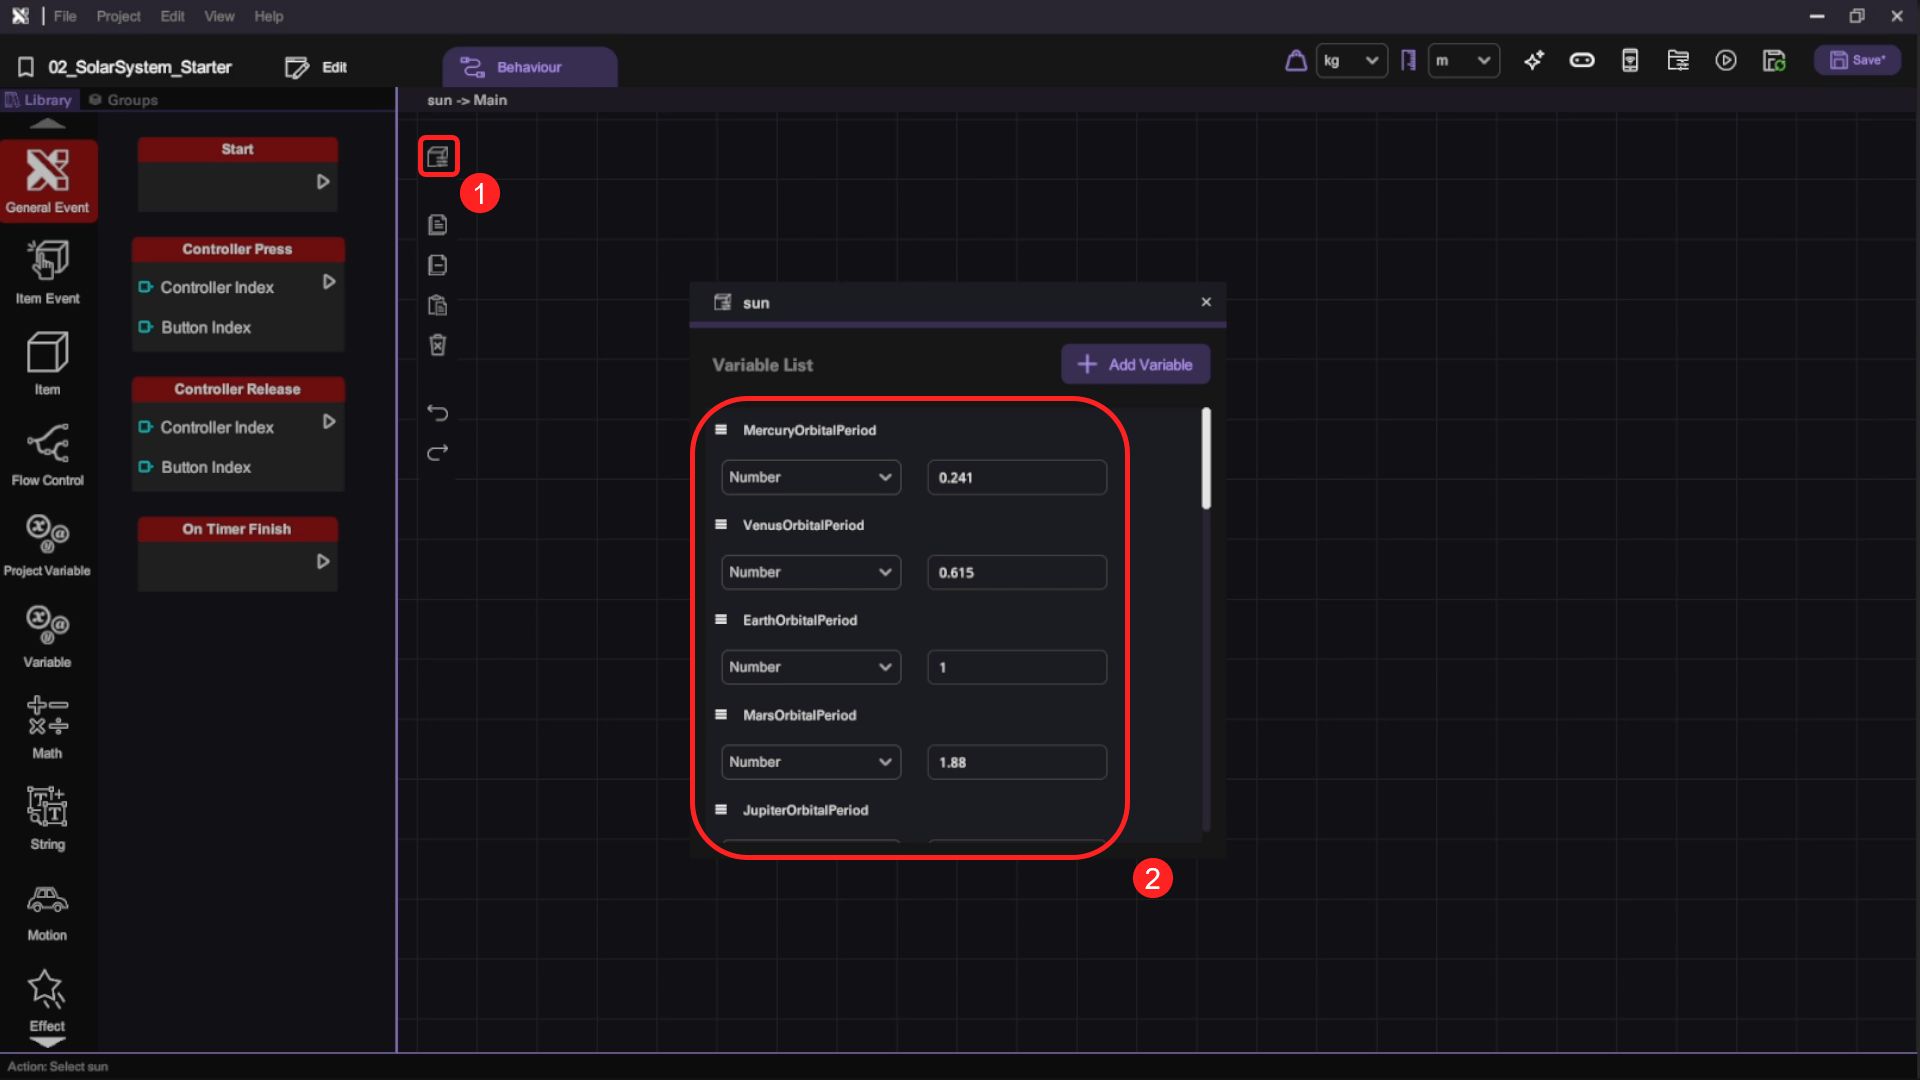
- The variable meanings are defined below:
| Variable Naming | Meaning |
|---|---|
| {PlanetName}OrbitalPeriod | The orbital period of the specific planet. |
| {PlanetName}RotationPeriod | The rotation period of the specific planet. |
| OrbitSpeedControl | To control the orbit speed of all planets. Feel free to change it to a different number. |
| RotateSpeedControl | To control the rotational speed of all planets. Feel free to change it to a different number. |
Set the Earth to Rotate
- Select the Earth object and click on the "Behaviour" tab to switch to its behaviour panel.
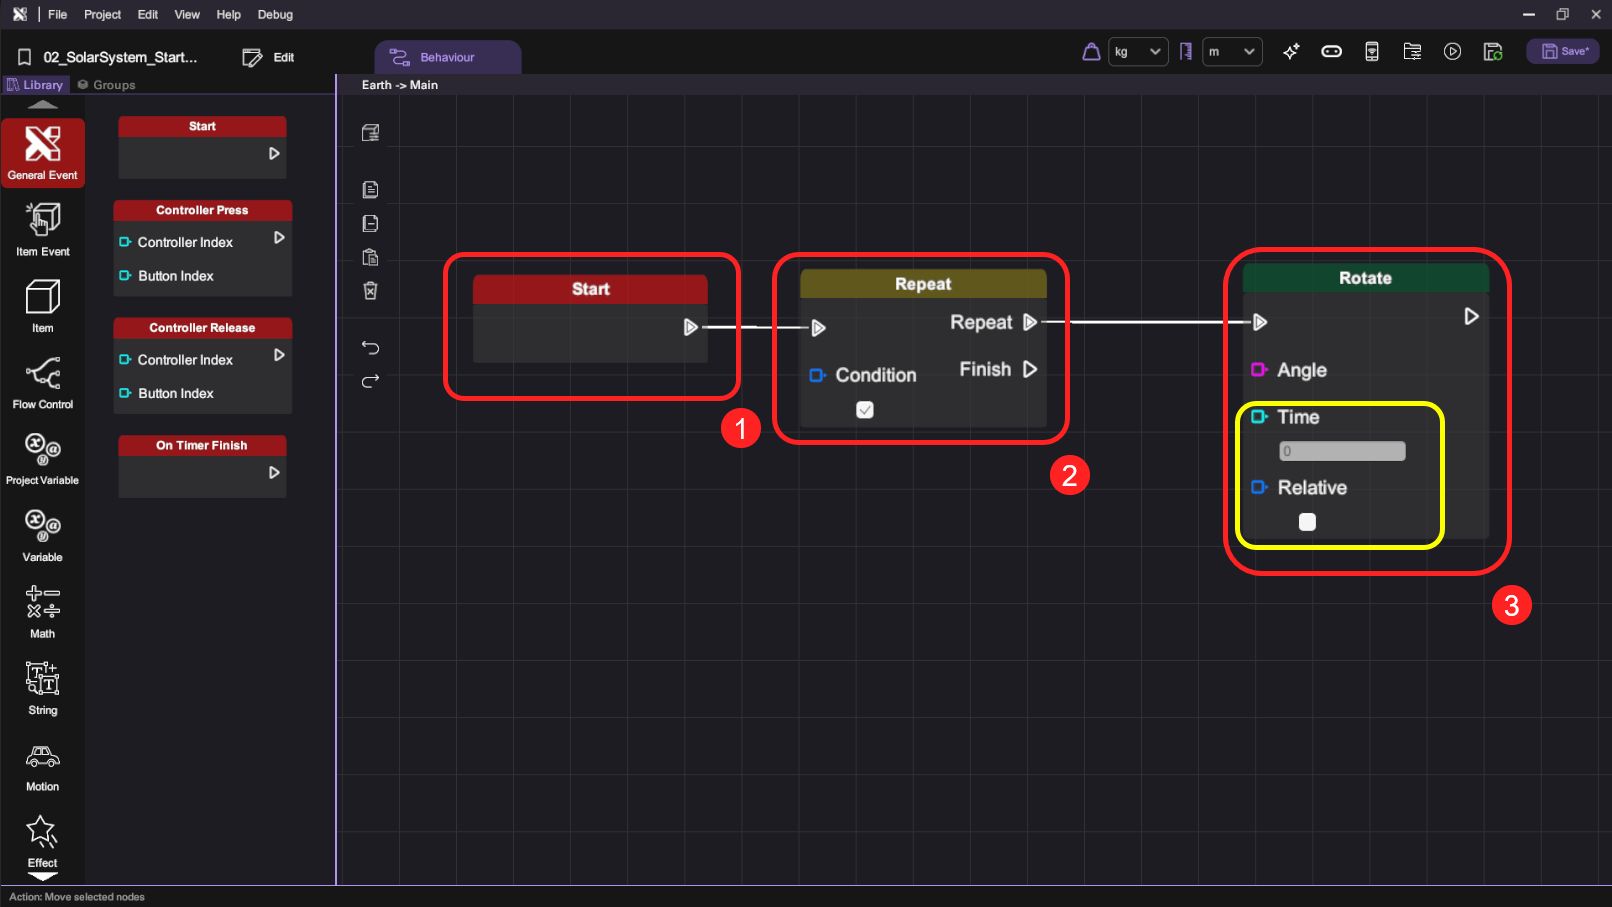
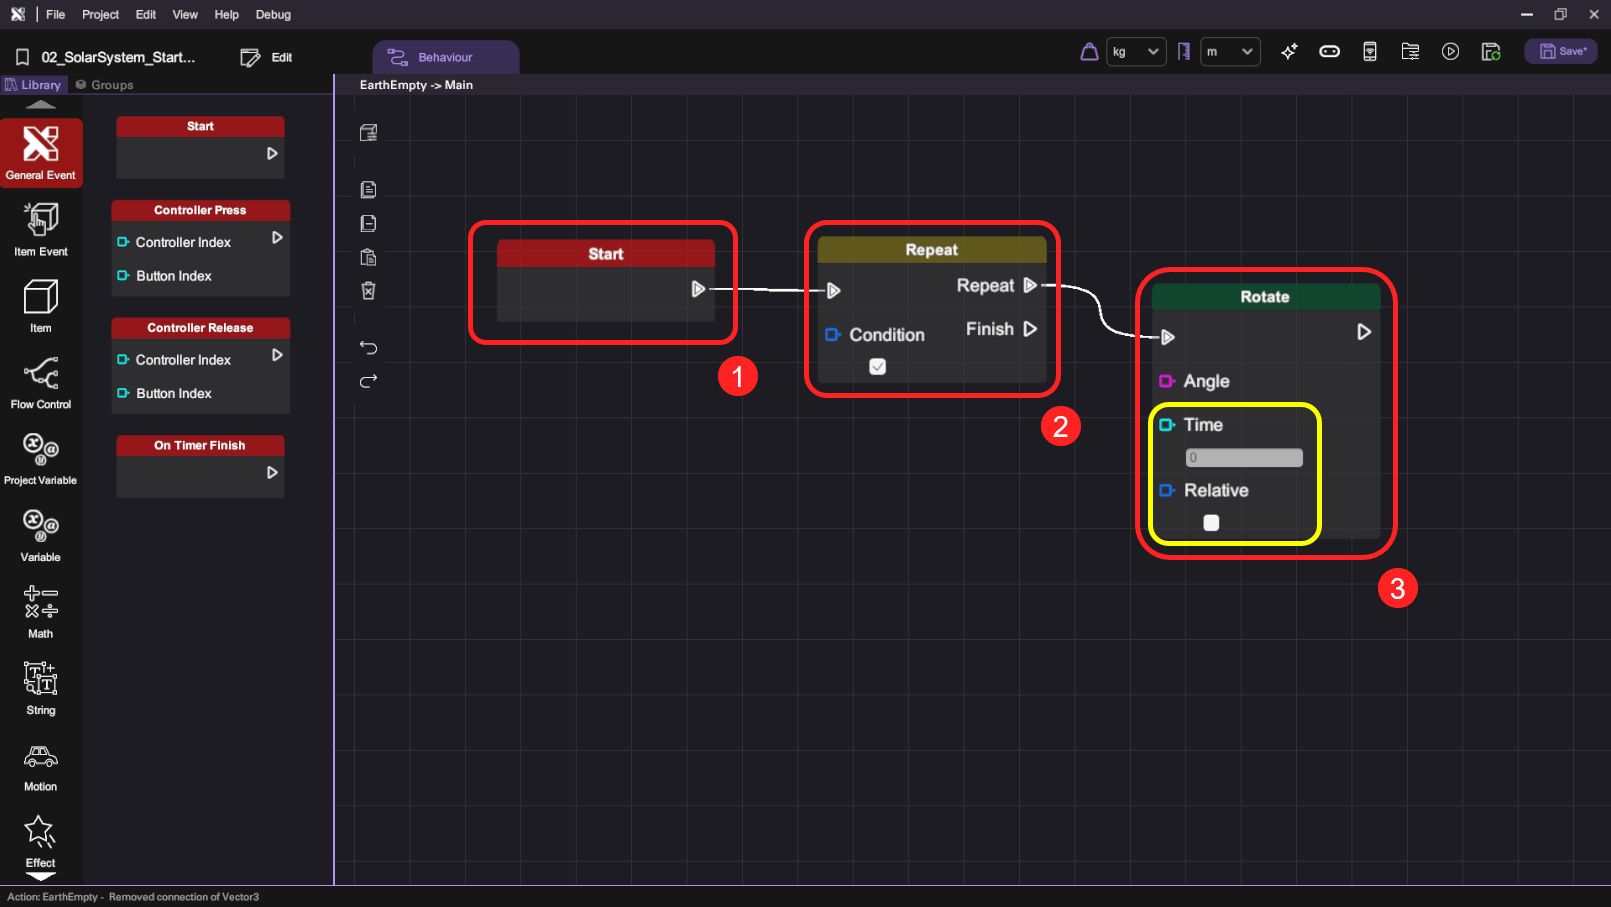
- In the "General Event" category, drag and drop the "Start" event trigger block onto the behaviour canvas. Then switch to the "Flow Control" category, drag and drop the "Repeat" block onto the behaviour canvas, and add the "Rotate" block from "Motion" category to the behaviour canvas as well. Connect the "Start" block's out flow node with the "Repeat" block's in flow node, and "Repeat" block's out flow node with "Rotate" block's in flow node. This sets up the basic logic for the Earth object to repeatedly rotate when the scene starts.
| Category | Behaviour |
|---|---|
 |  |
 |  |
 |  |
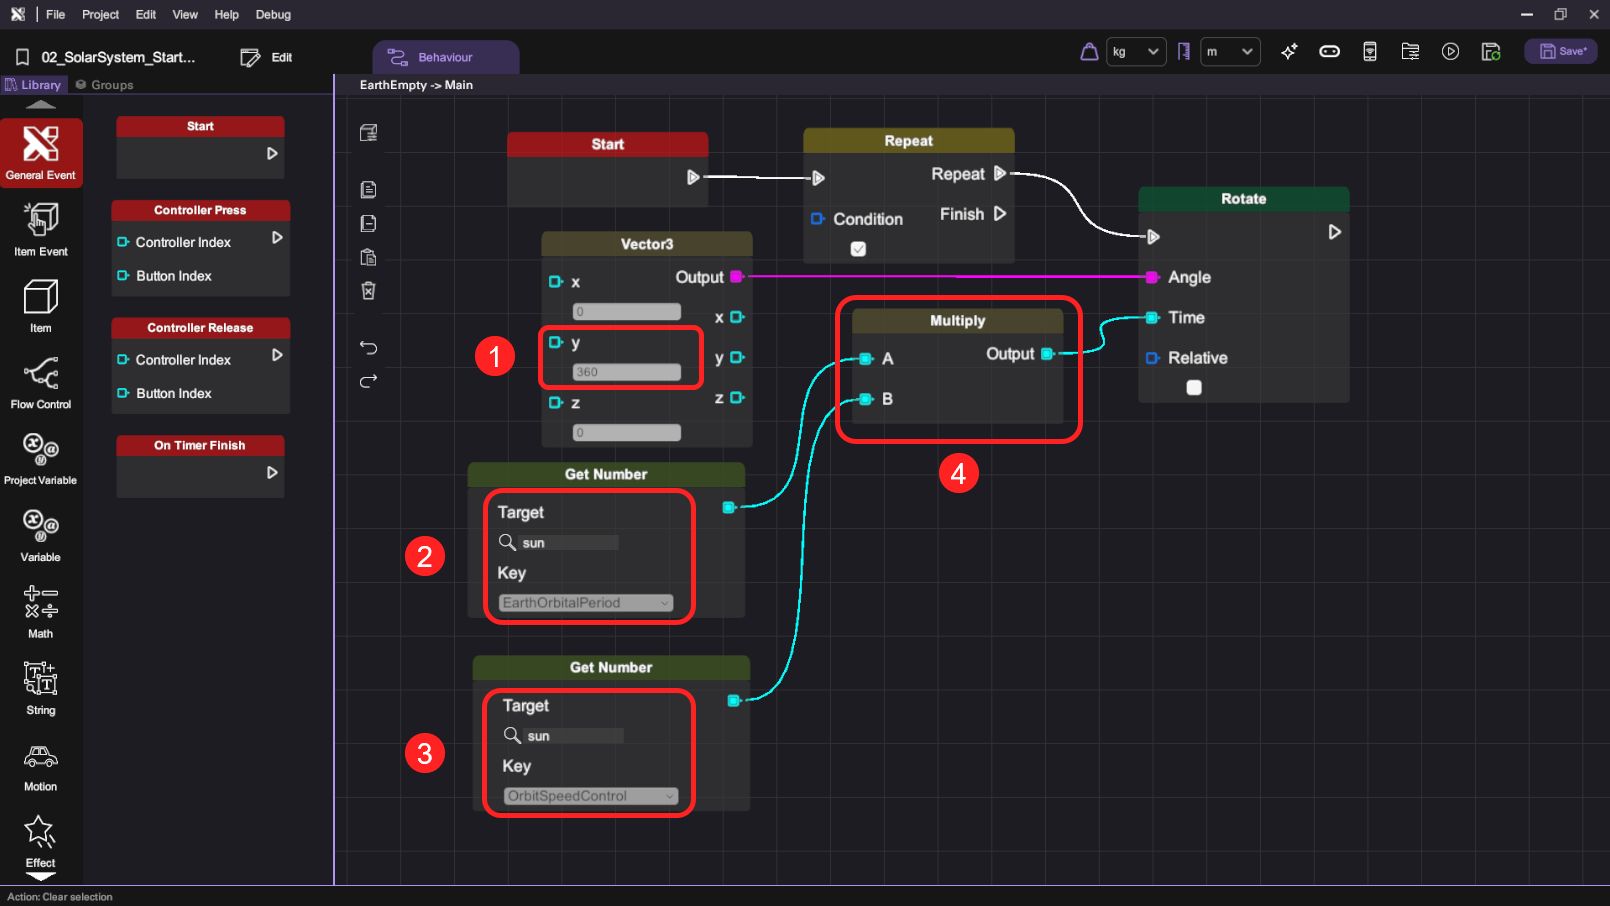
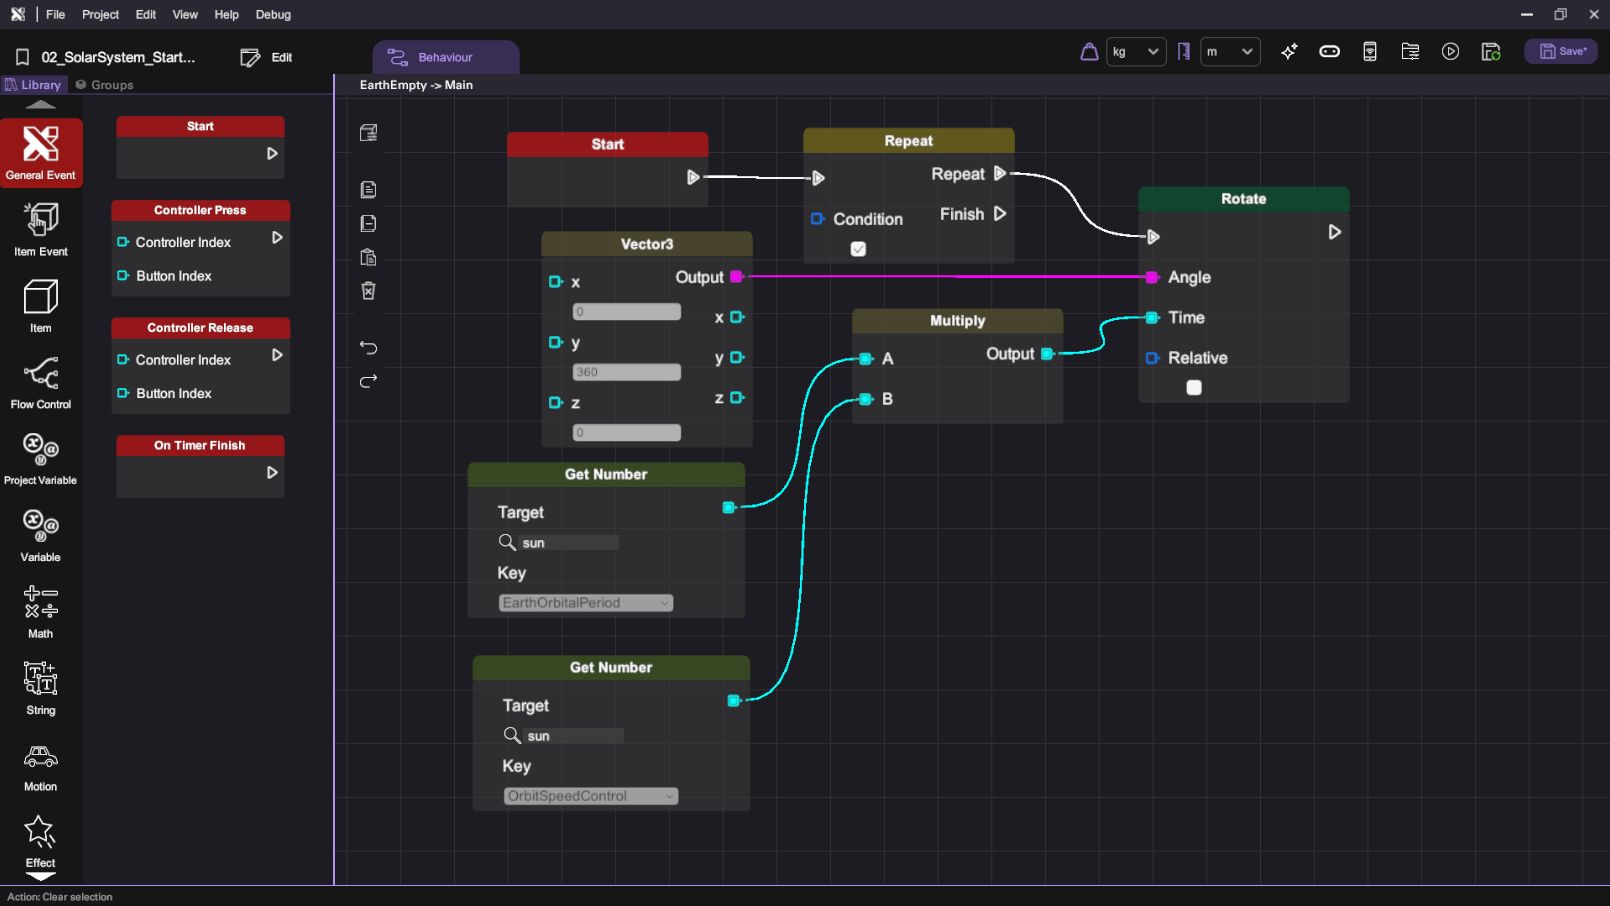
- We then specify how much the object will rotate. In the "Math" category, drag and drop the "Vector3" block onto the behaviour canvas. Then, set the Y value of the "Vector3" block to 360 and connect its Output node with the "Rotate" block's Angle node. We set the planets to rotate 360 degrees repeatedly, yet the rotation will not happen with the Time set to 0.
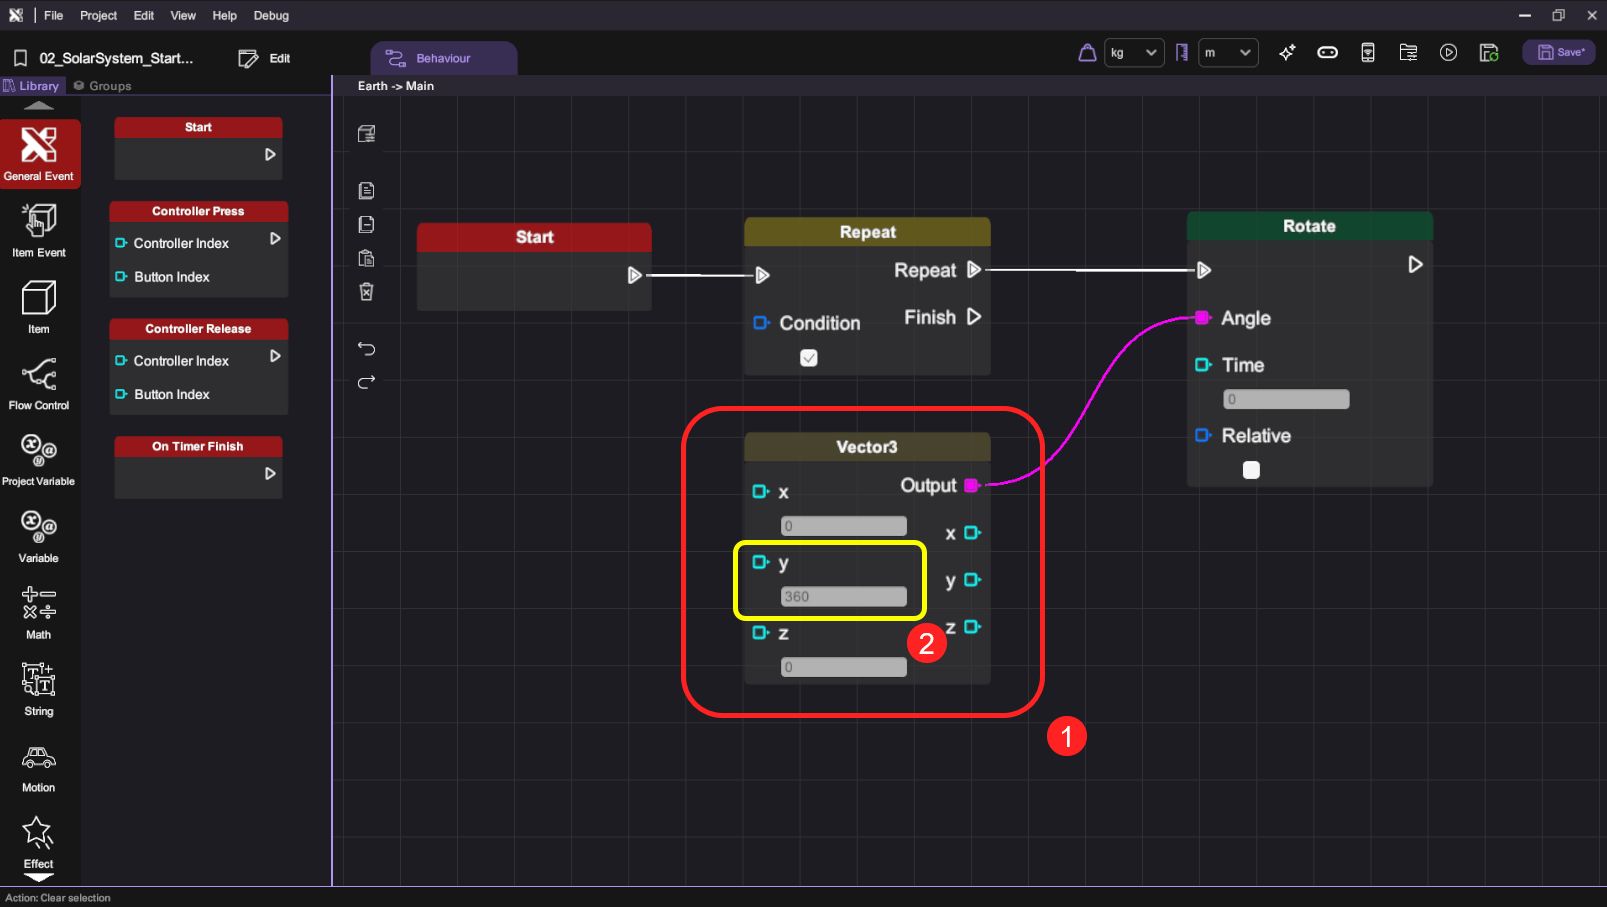
- Drag and drop a "Multiply" block from the "Math" category, then switch to the "Variable" category, drag and drop two "Get Number" blocks onto the behaviour canvas. For both "Get Number" blocks, select "sun" as the "Target", then set one "Key" to "EarthRotationPeriod" and the other to "RotateSpeedControl". Connect one "Get Number" block's Output node with the "Multiply" block's A node and connect the other "Get Number" block's Output node with "Multiply" block's B node. Finally, connect "Multiply" block's Output node with "Rotate" block's Time node.
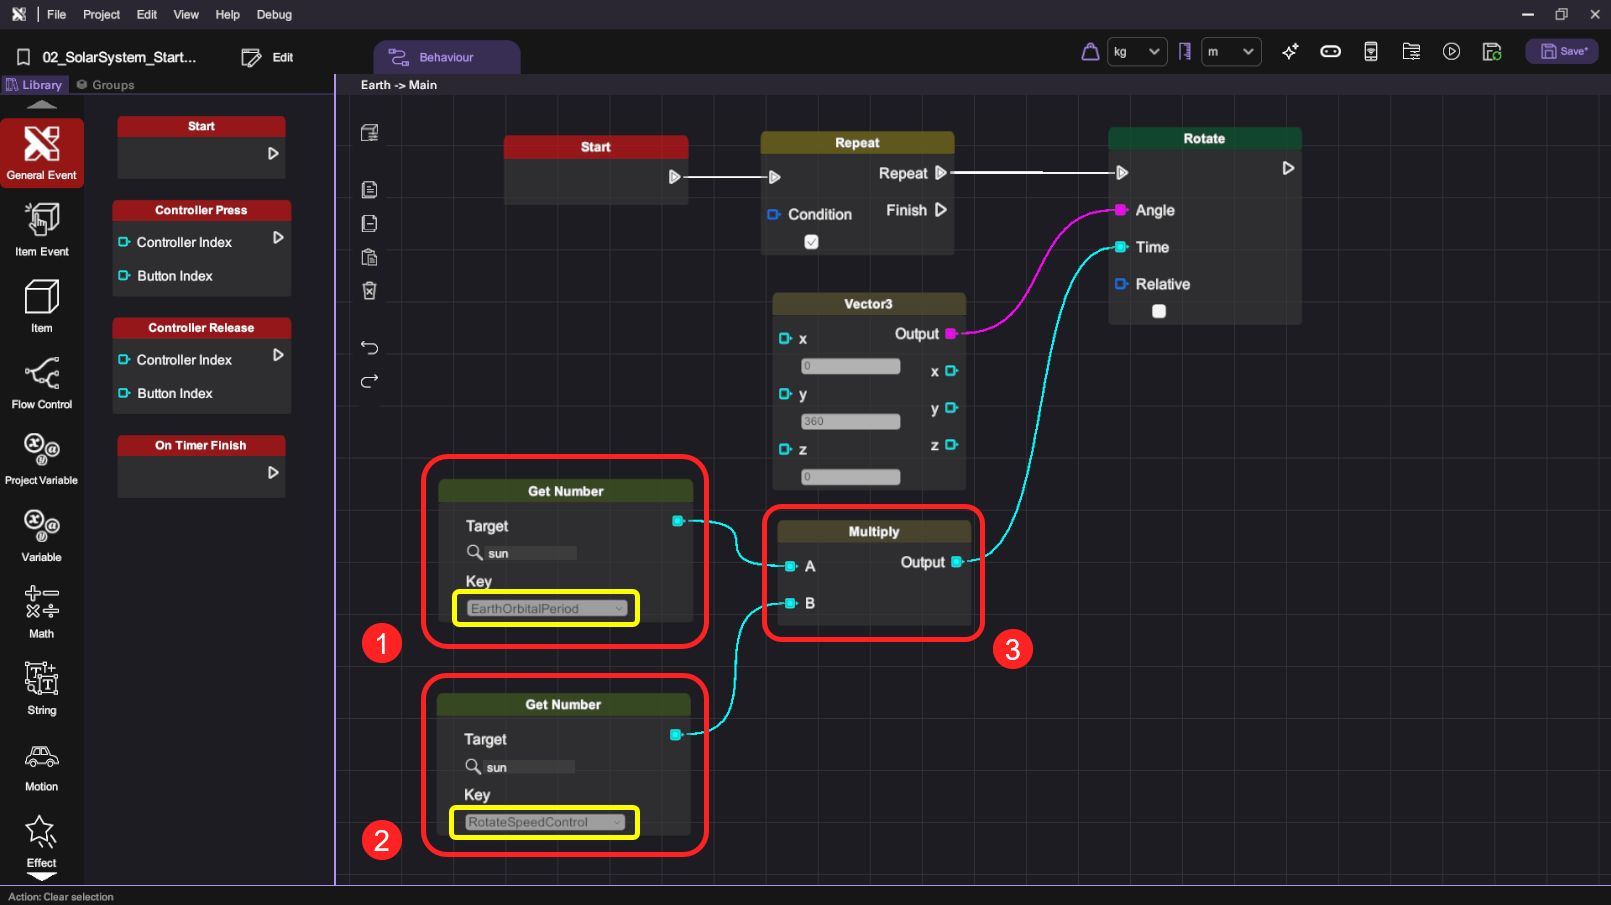
| Category | Behaviour |
|---|---|
 |  |
 |  |
- This is the close-up of the whole behaviour flow of the Earth. This sets the Earth object to rotate 360 degrees against its centre of origin every period, which value is defined as the product of the "EarthRotationPeriod" and the "RotateSpeedControl" values.
- Press the "Play" button to enter play mode, move or teleport to near the Earth planet and check if it's rotating as expected. Then use the "Esc" button to return to scene editing.
Set the Earth to Orbit
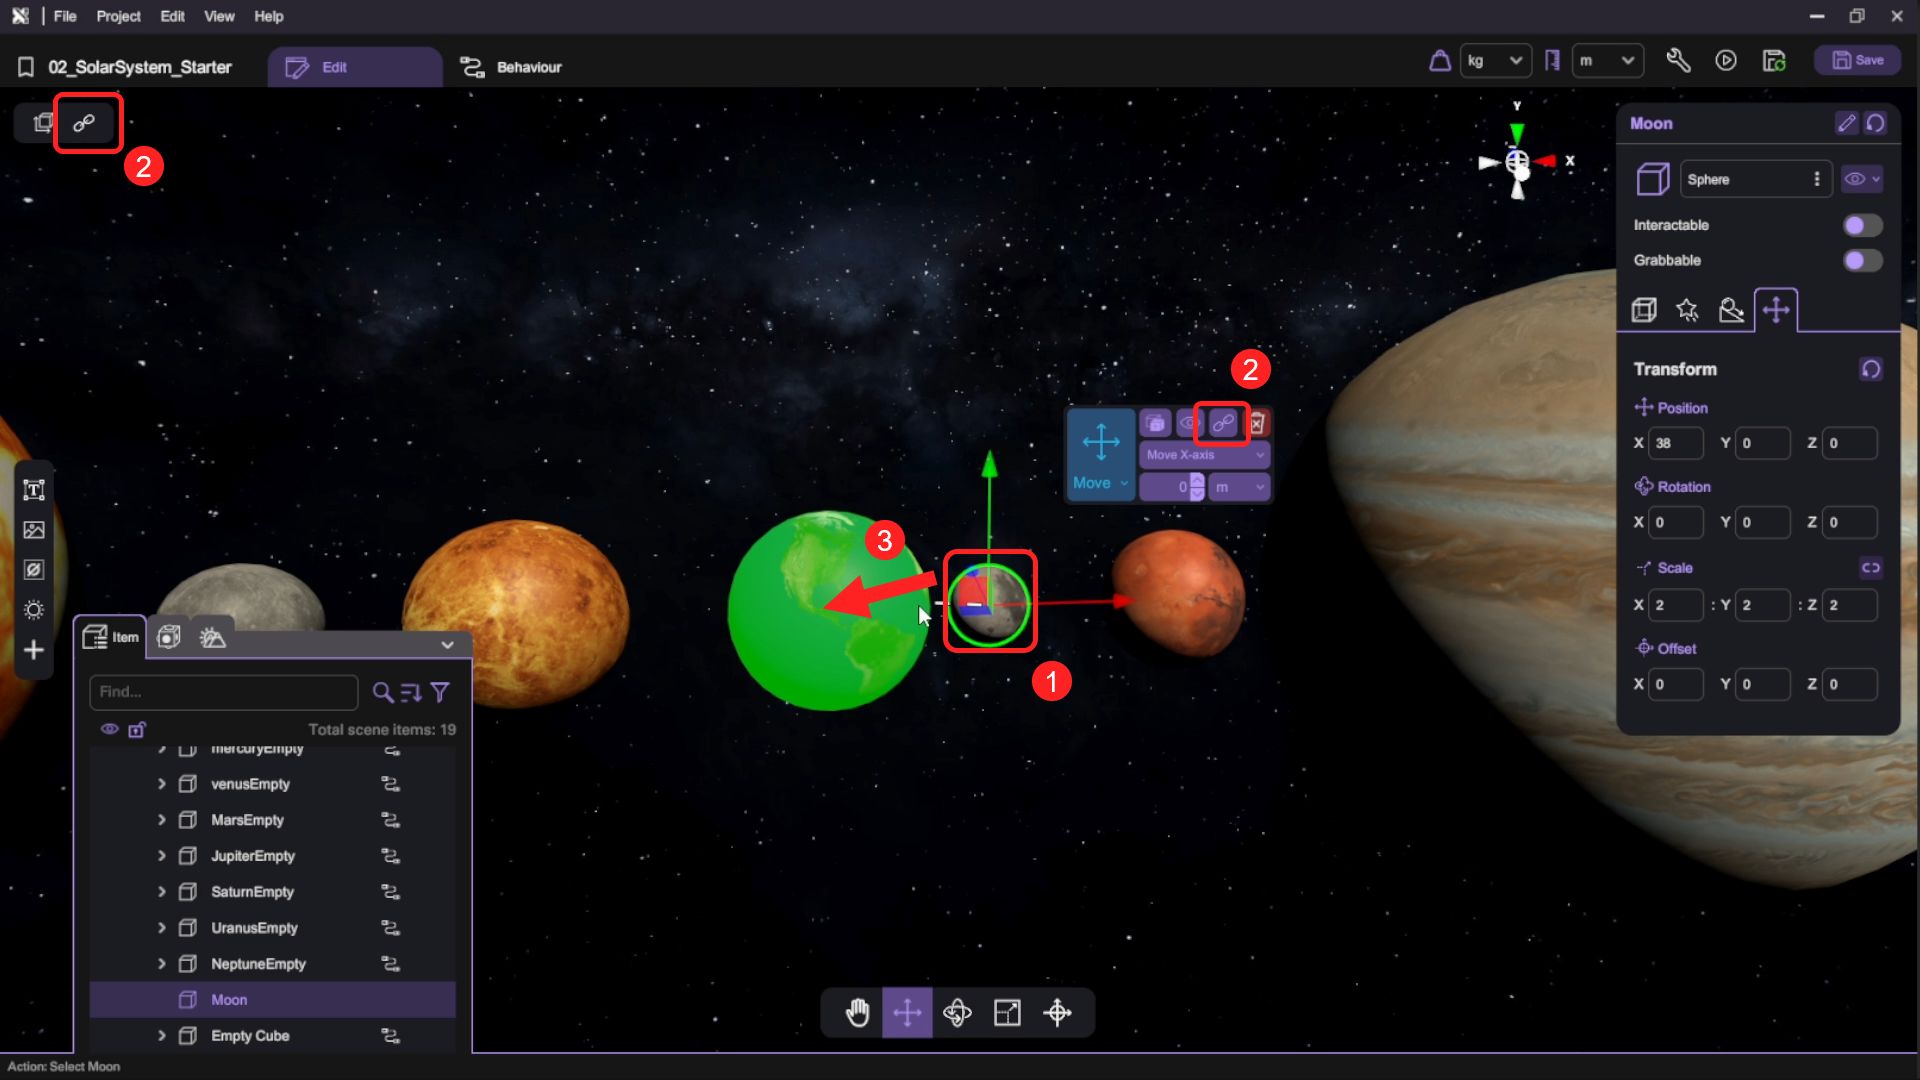
- We will use an empty object Linked to a Planet to create the Orbit effect. First, add an "Empty Object" to the scene and make sure it's spawned at the origin (same position as the Sun). Rename it to "earthEmpty".
- Hide all objects by clicking the "hide All button". Unhide the "earthEmpty" and the "Earth".
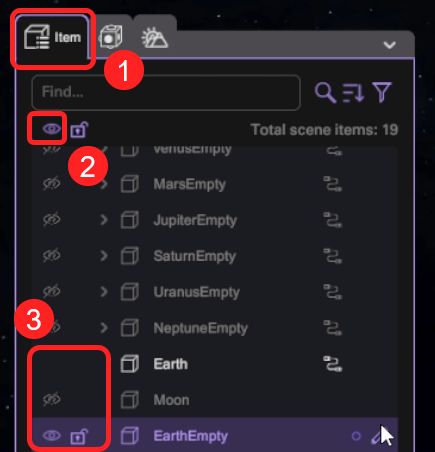
- Select the "Earth" object, press the "Link to another item" button then point and click the earthEmpty object to make earthEmpty a parent of the Earth object. Now the Earth object will move together with the earthEmpty parent object while keeping the same relative position/rotation between them.
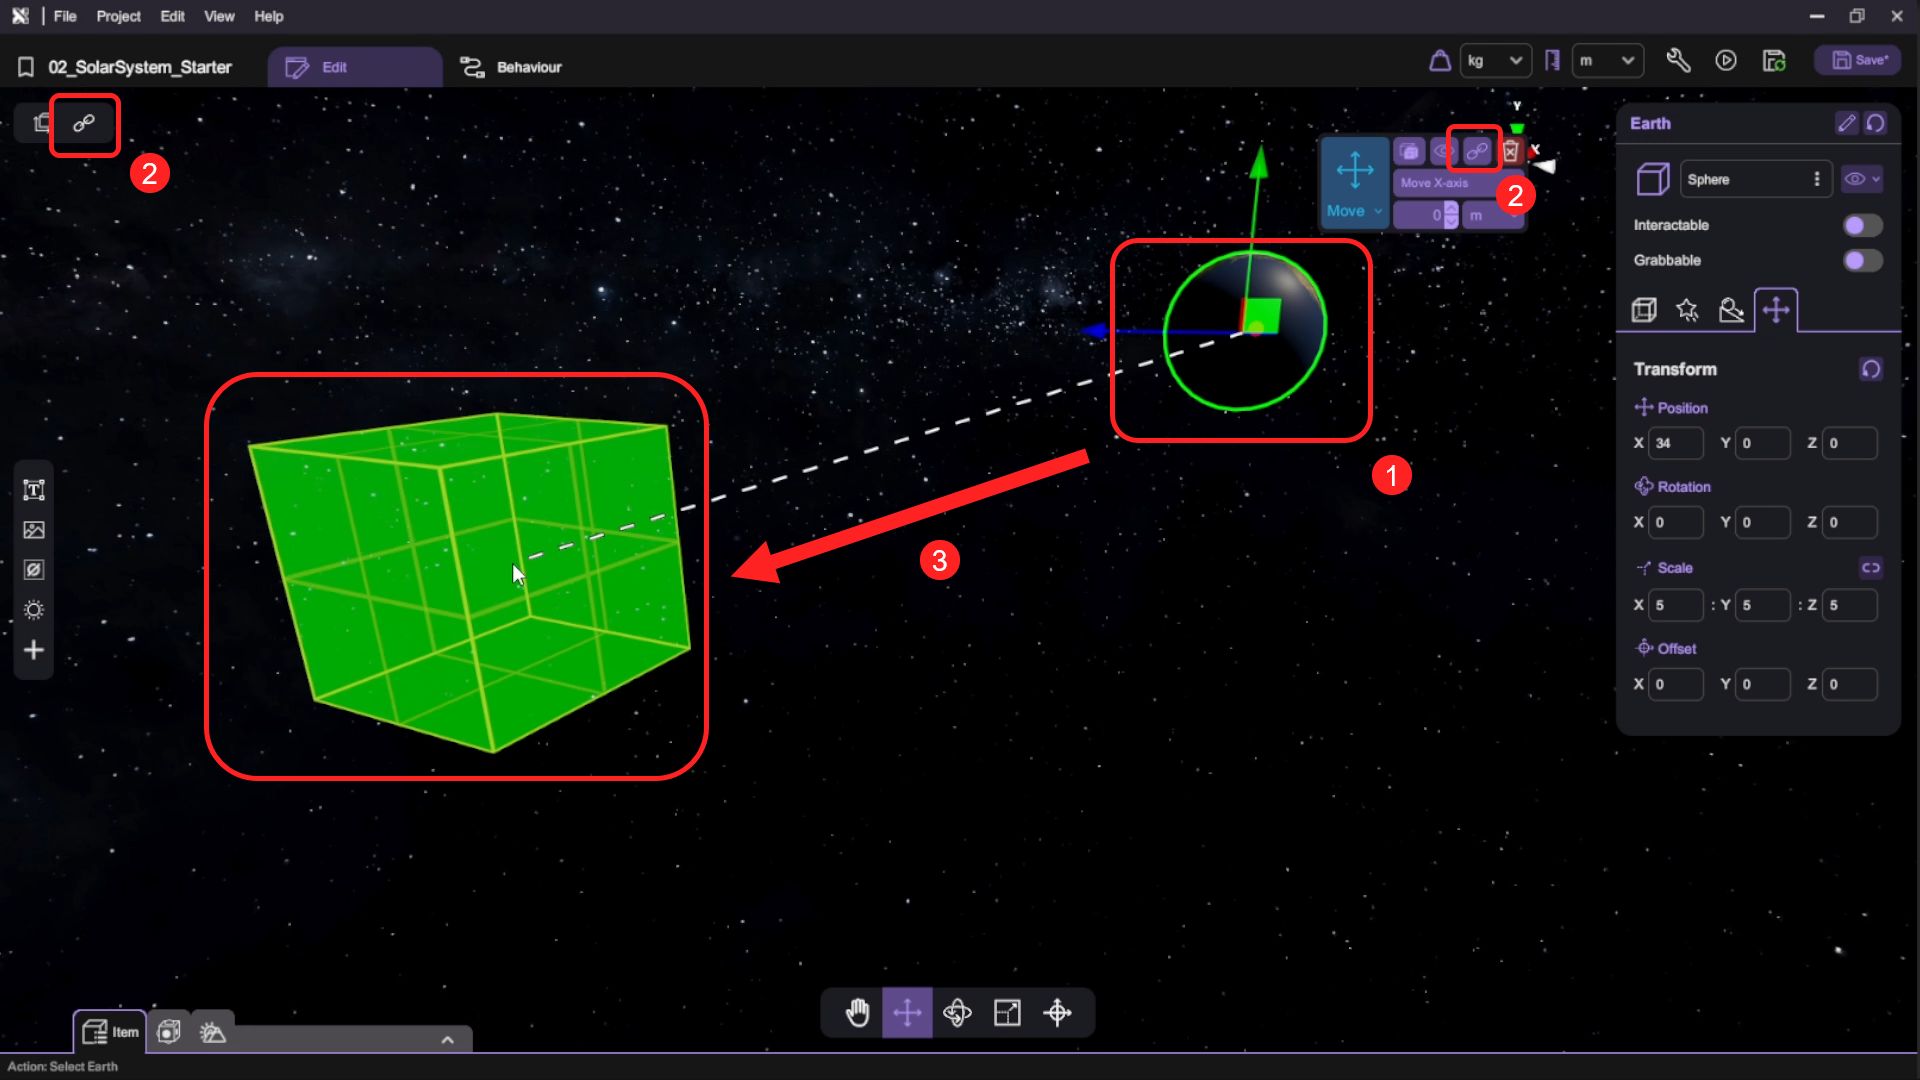
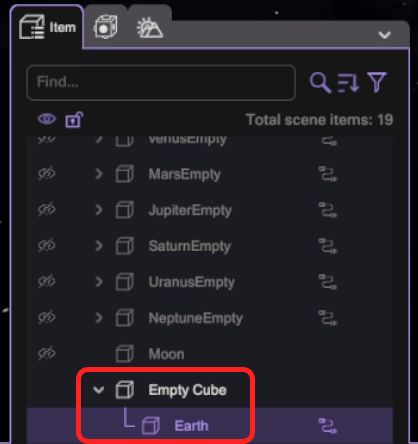
- To confirm the two objects are linked successfully, you can select the "earthEmpty" parent object in the scene and observe that the "Earth" child object is also selected.
- With the earthEmpty object still selected, click on the "Behaviour" tab to switch to its behaviour panel.

- Drag and drop a "Start" event trigger block, a "Repeat" block and a "Rotate" block onto the behaviour canvas in the same way as you did for the Earth object, then connect the blocks sequentially.
| Category | Behaviour |
|---|---|
| |
| |
| |
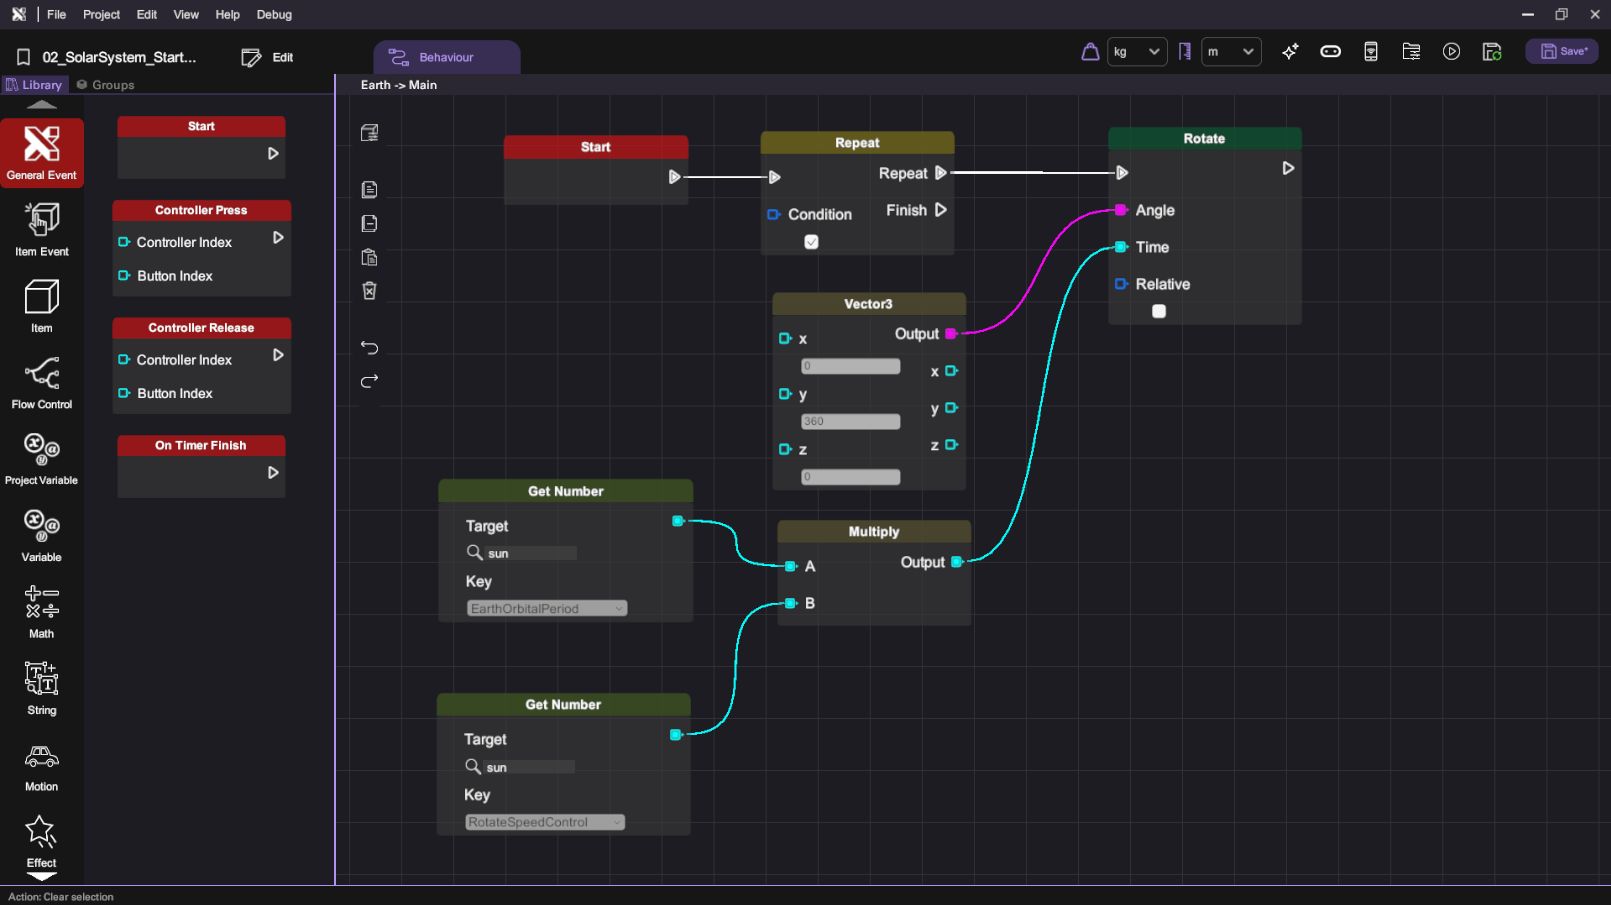
- Following the same logic for rotating the "Earth" object, drag and drop a "Vector3" block and a "Multiply" blocks, then add two "Get Number" blocks onto the behaviour canvas. Set the Y value of the "Vector3" block to 360 and connect its Output node with the "Rotate" block's Angle node. For both "Get Number" blocks, select "sun" as the "Target", then set one "Key" to "EarthOrbitalPeriod" and the other to "OrbitSpeedControl". Connect one "Get Number" block's Output node with the "Multiply" block's A node and connect the other "Get Number" block's Output node with "Multiply" block's B node. Finally, connect "Multiply" block's Output node with "Rotate" block's Time node.
| Category | Behaviour |
|---|---|
| |
|  |
- This is the close-up of the whole behaviour flow of the earthEmpty. This sets the earthEmpty object to rotate 360 degrees against its centre of origin every period, which value is defined as the product of the "EarthOrbitPeriod" and the "OrbitSpeedControl" values.
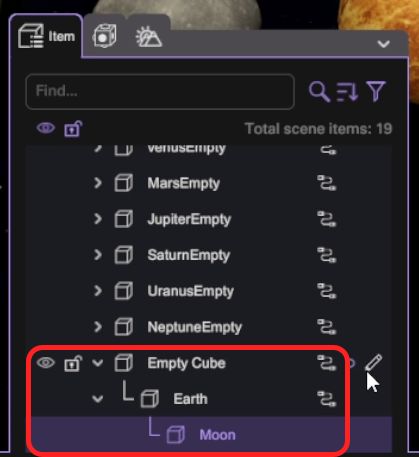
- Now we can link the moon to the earth.
- After linking the Moon to the Earth, open the Item Panel, and you should see the Moon become a child of the Earth, which is also a child of earthEmpty.
- Press the "Play" button to enter play mode. Earth is rotating and orbiting. The Moon is orbiting along with the Earth. Then use the "Esc" button to return to scene editing.
Create New Planet Scene
In this section, you will learn how to create interactive scenes for both the Earth and Moon, complete with grabbable objects and custom gravity settings. We will also implement scene transitions to allow the player to travel between the solar system view and detailed planet scenes. Additionally, adding outline effects will provide clear visual feedback for interactive elements, enhancing the user experience.
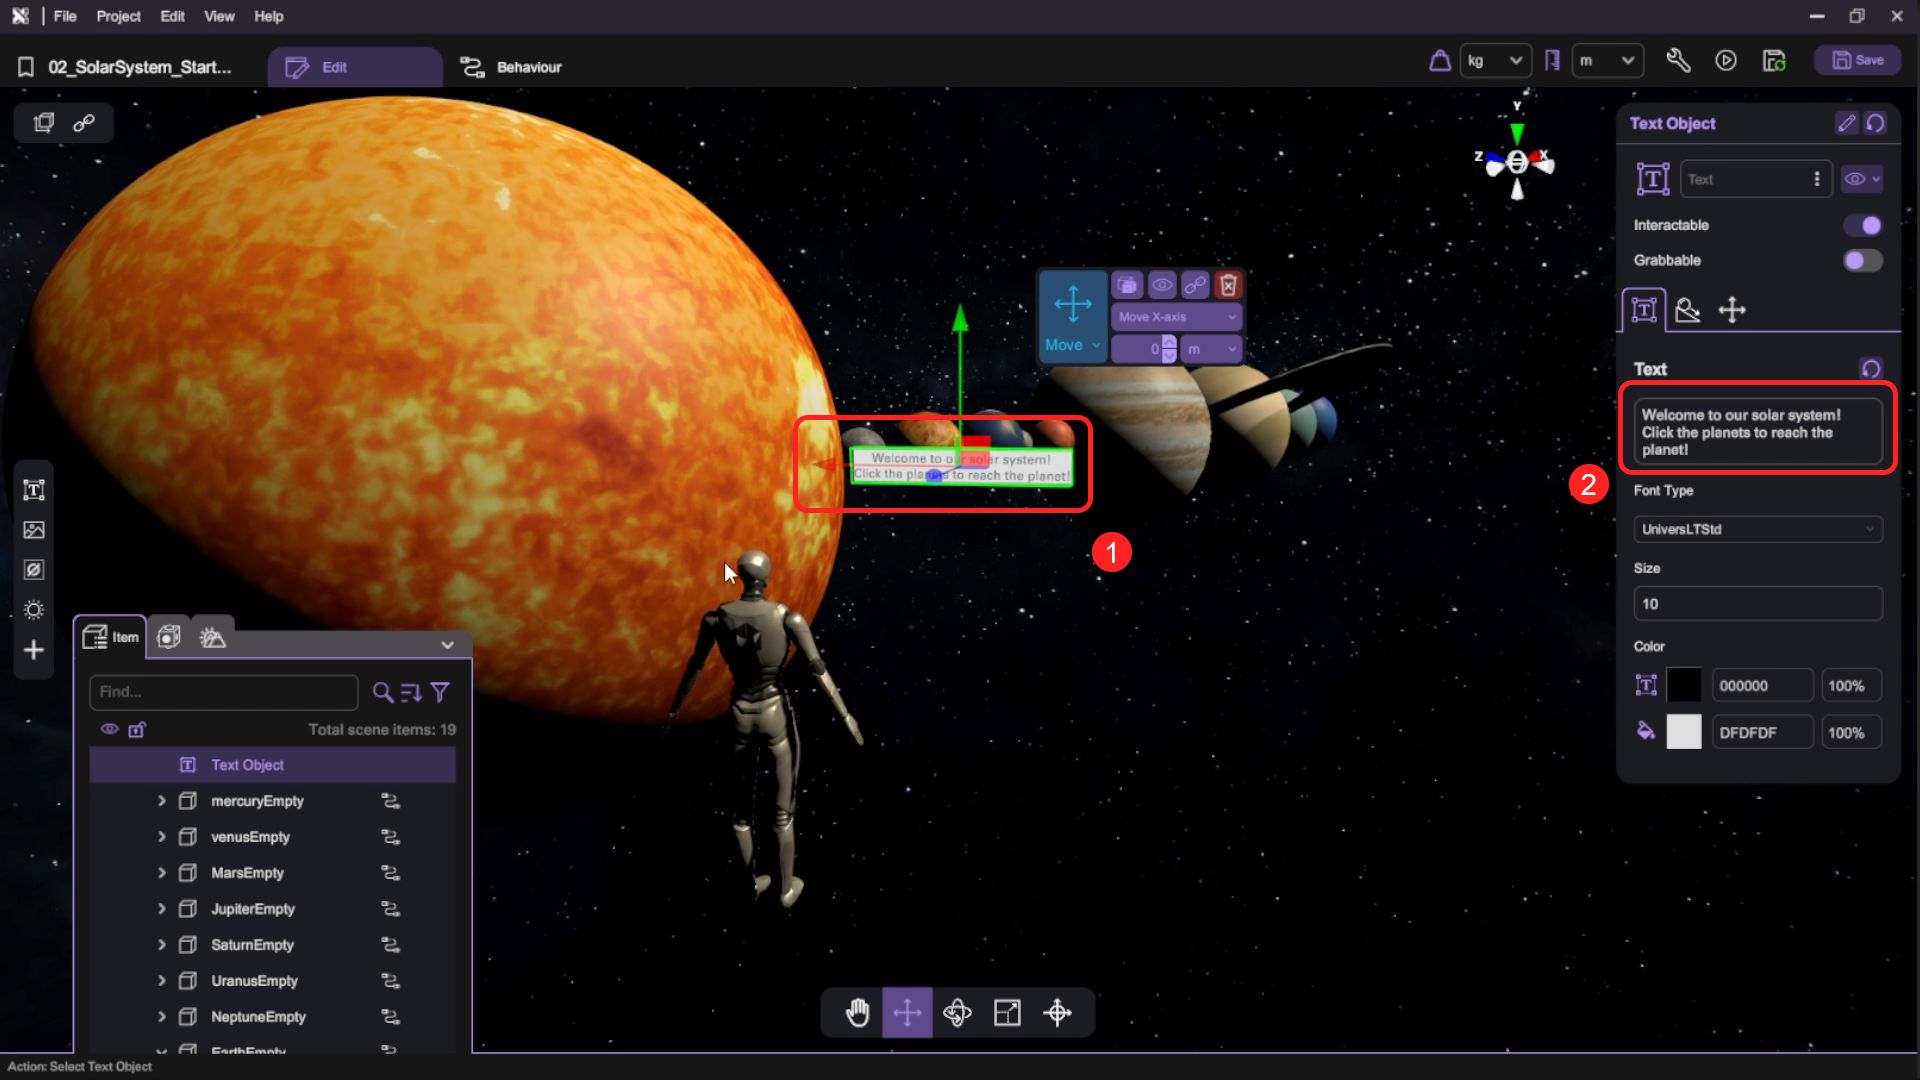
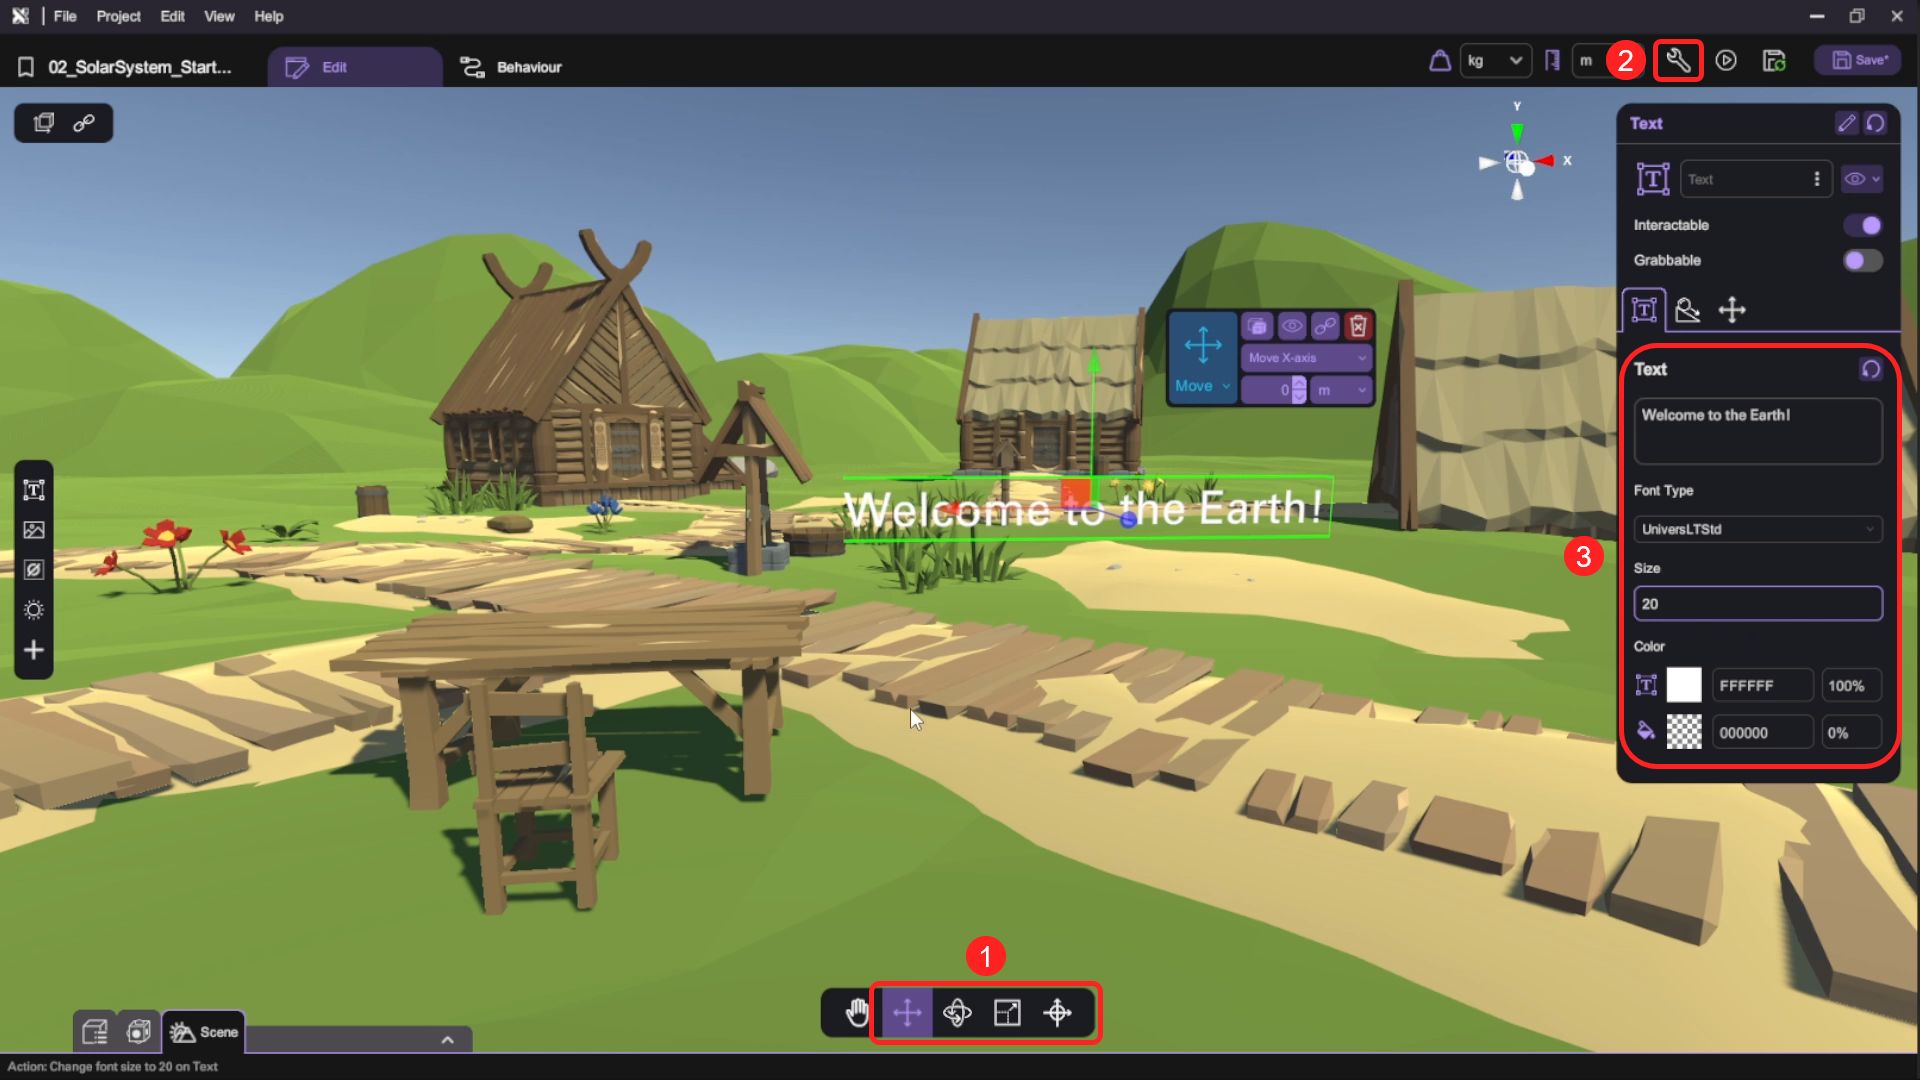
Add the Welcome Text
- Open the "Asset Panel" and from the "Special Objects" tab, select and add "Text" to the scene to create a Welcome Textbox.
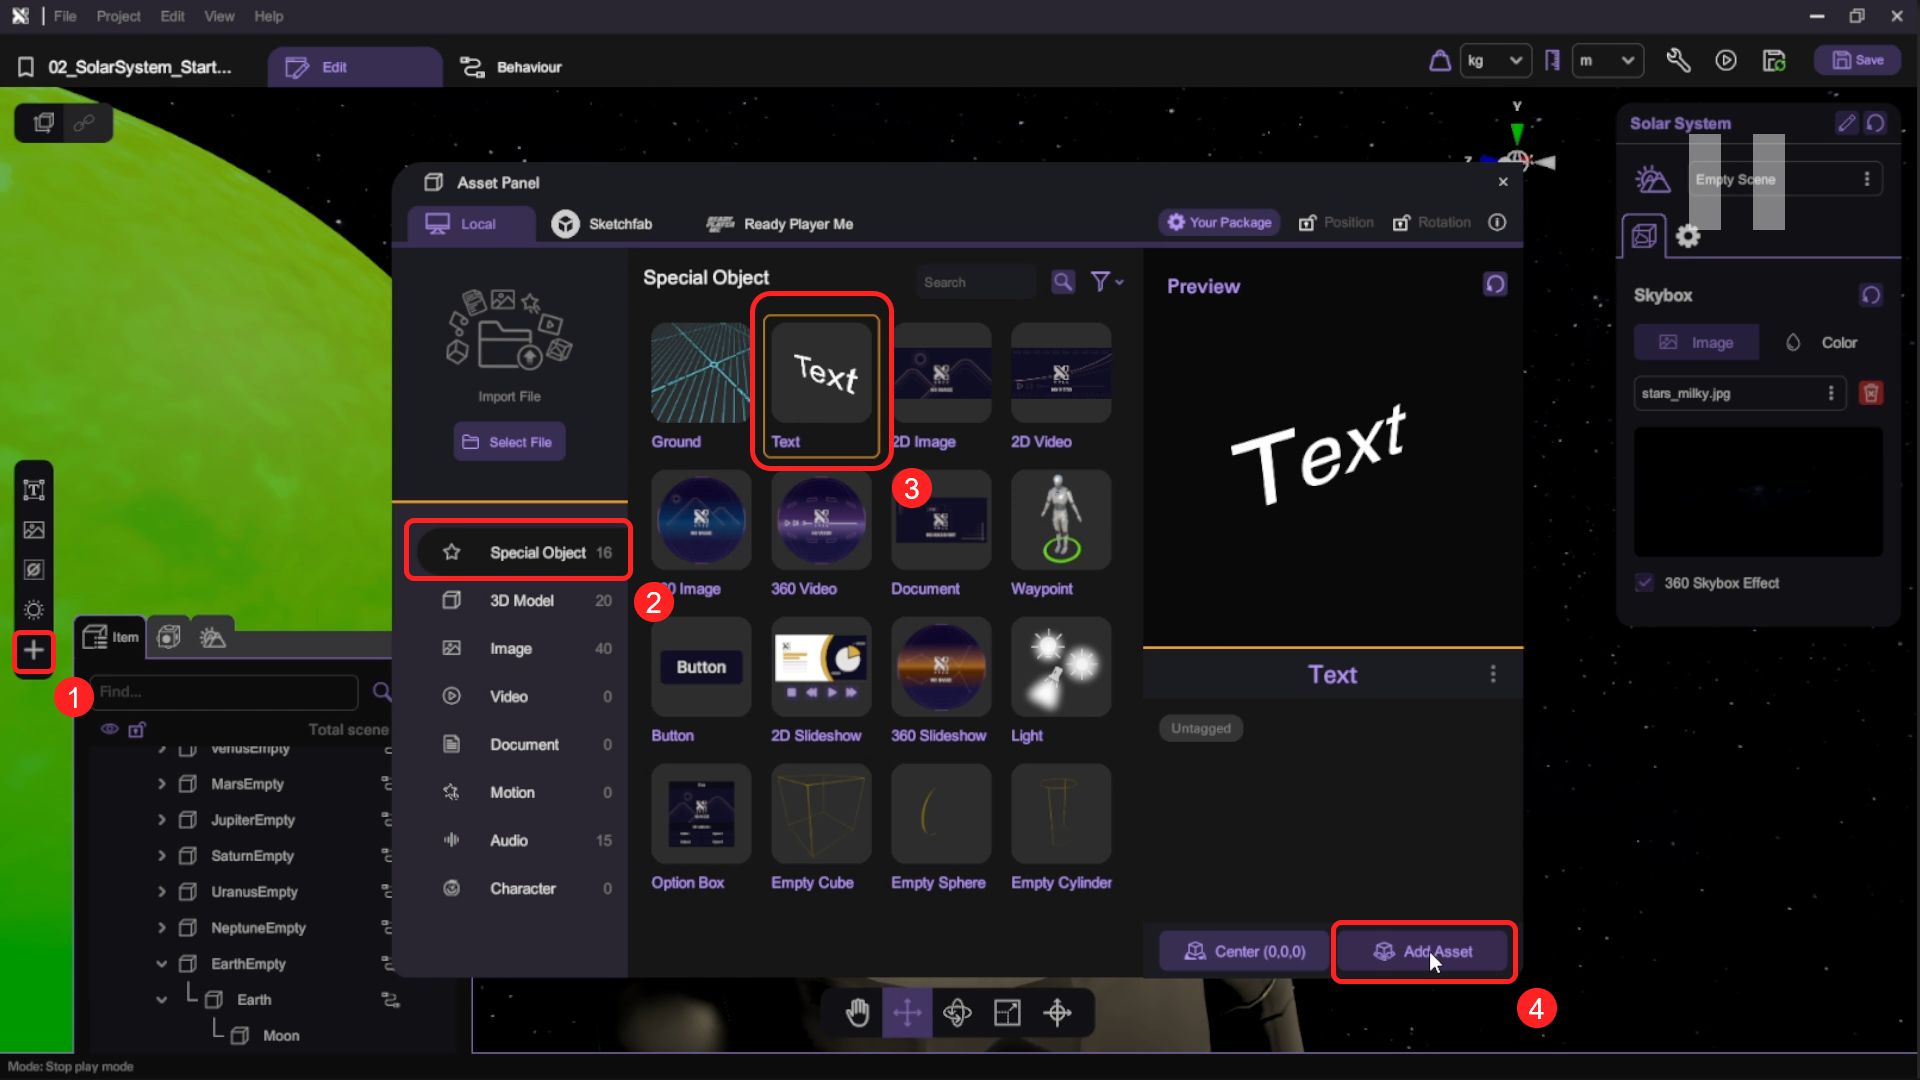
- Use the transform tools (move/rotate/scale) to reposition the text object. Then open the "Inspector" to set up the text content, font size, and color of the text object.
Set up the Moon Scene
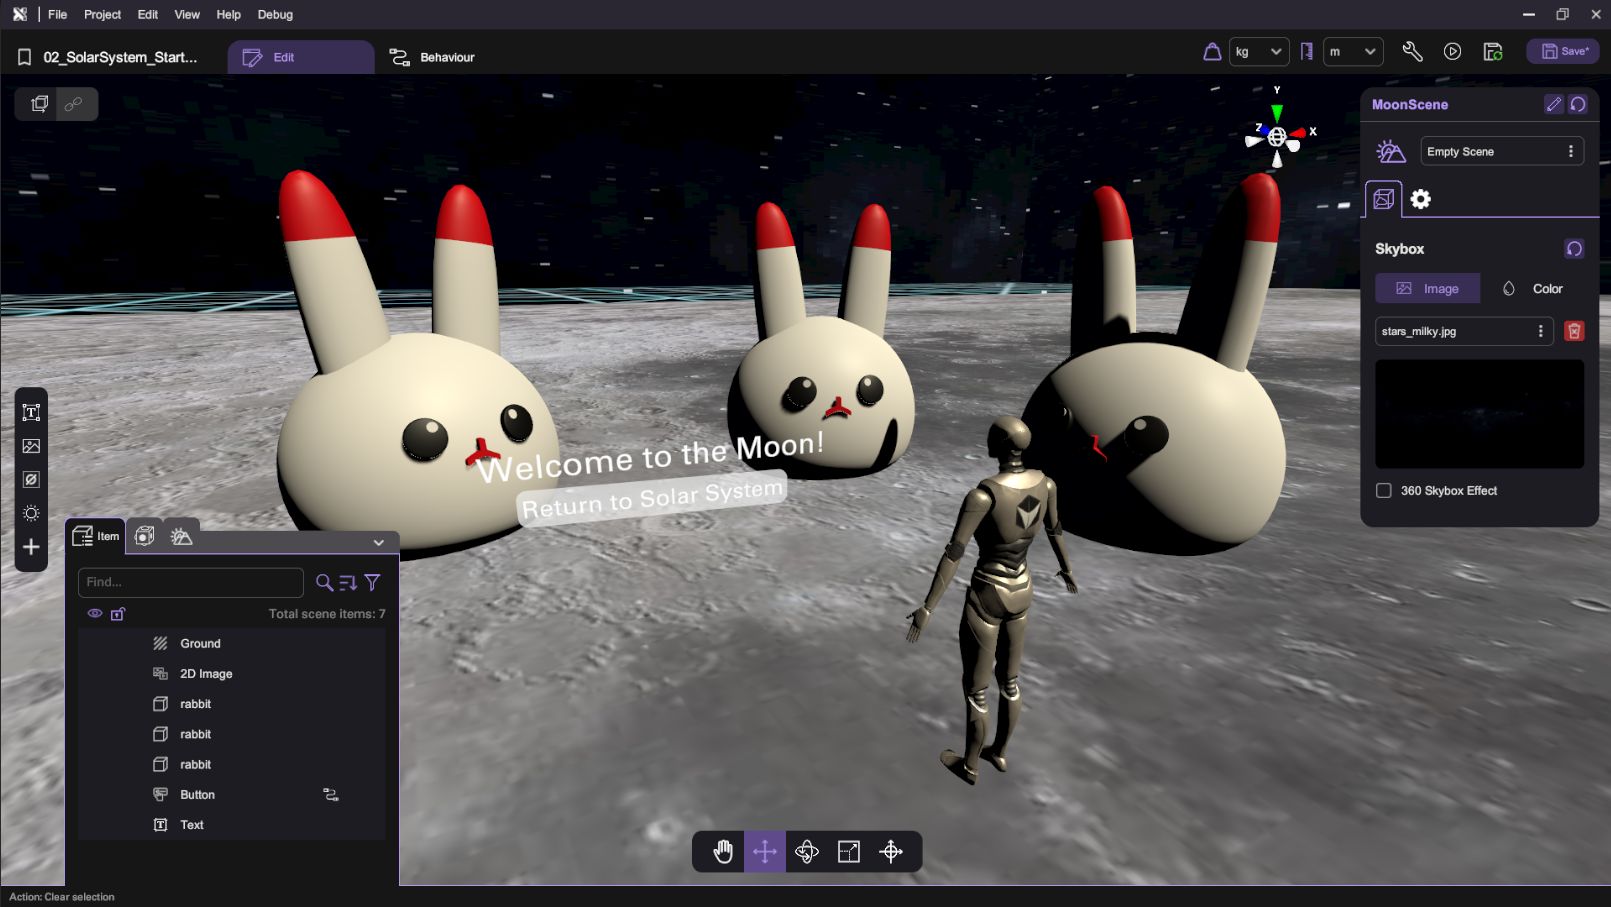
- Open the "Scene Menu", select the "Empty Scene" and click the "Select" button to create a new scene.
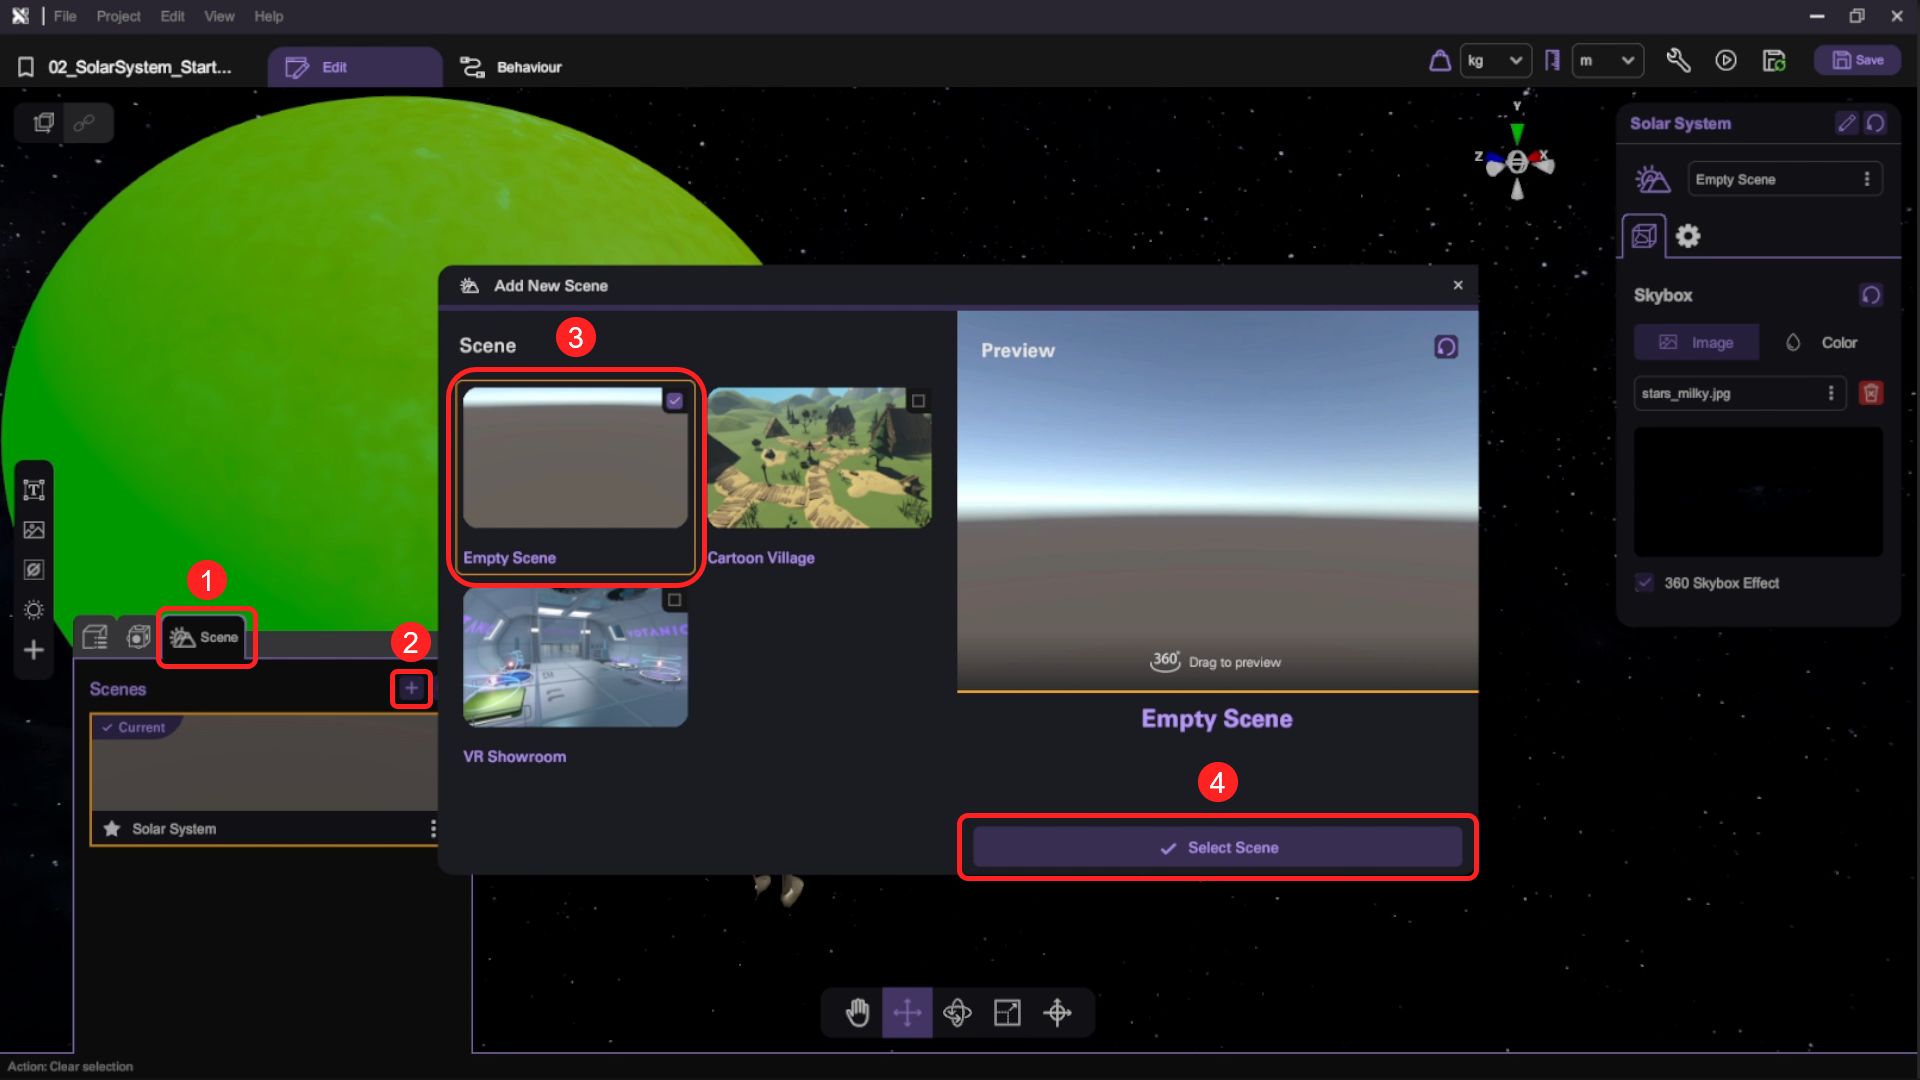
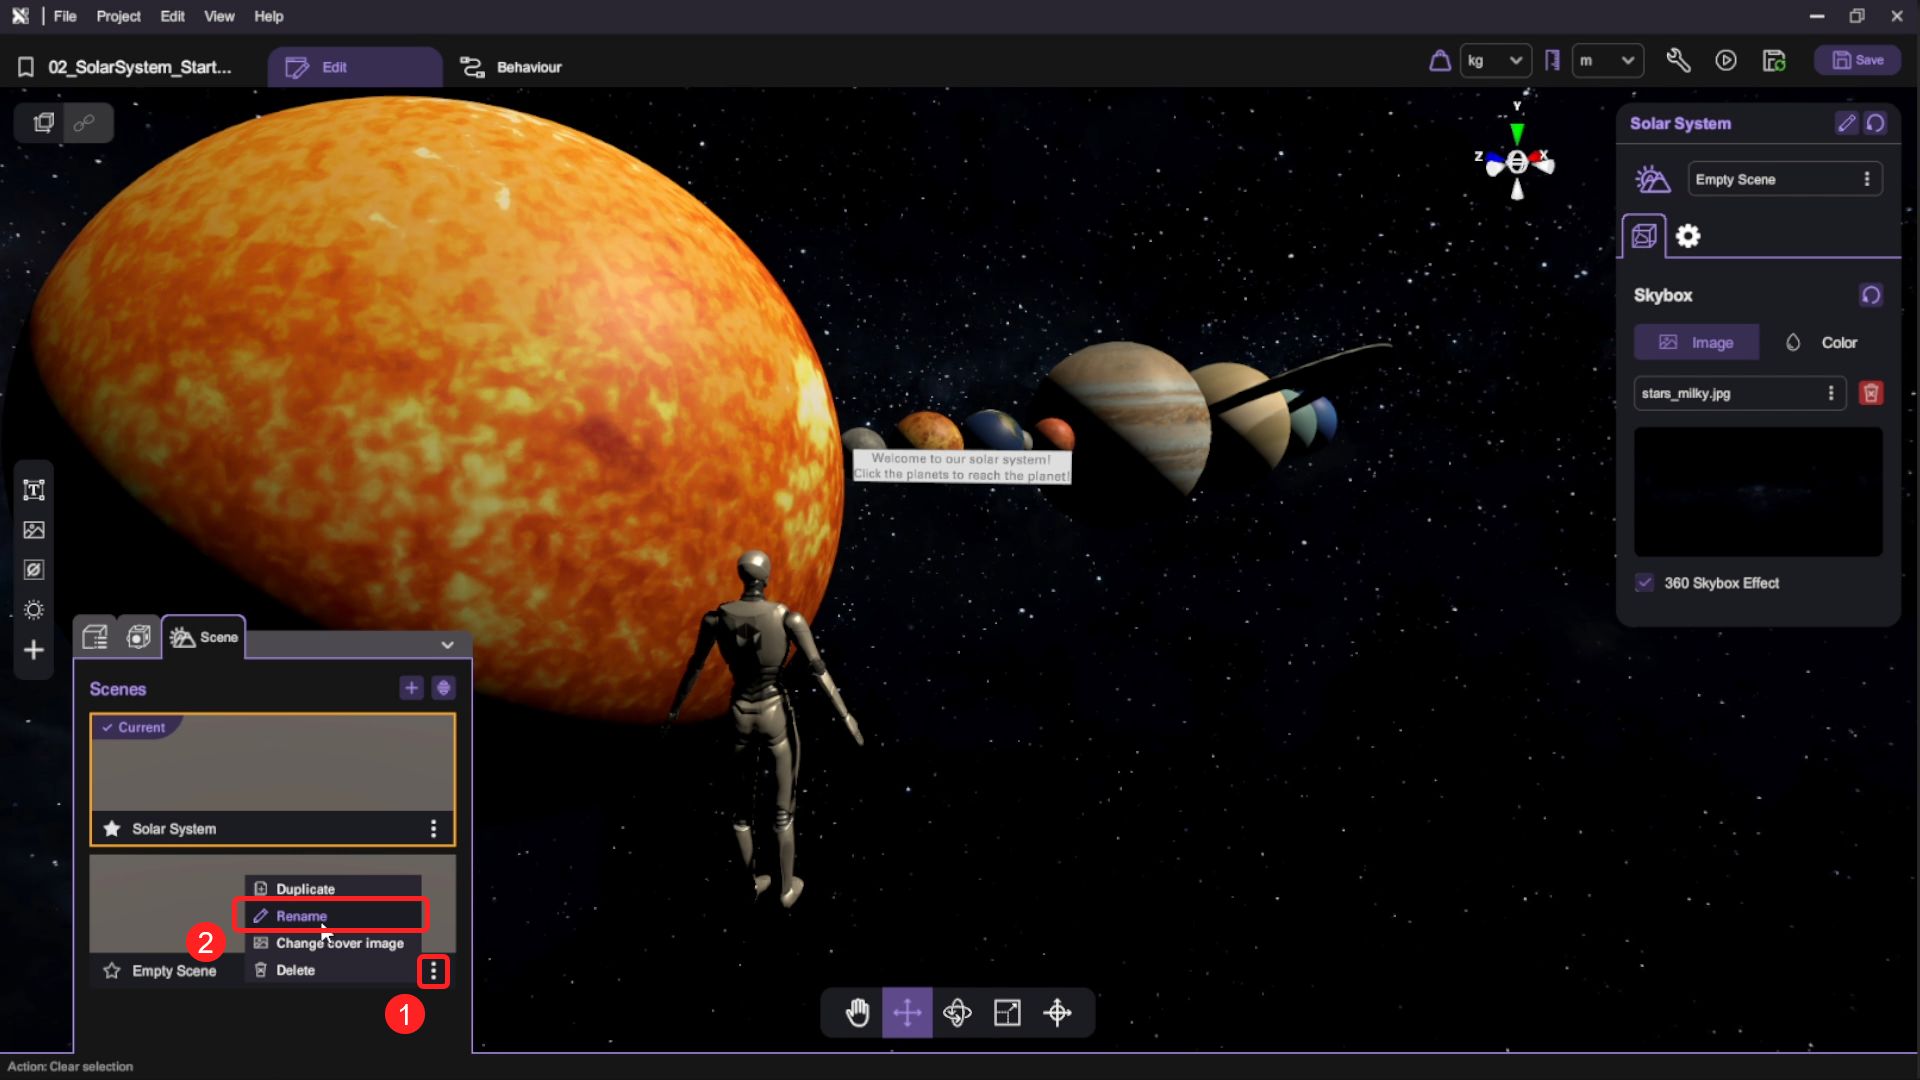
- Rename the Empty Scene as "Moon Scene" and press "Change to" to open the new Moon Scene.
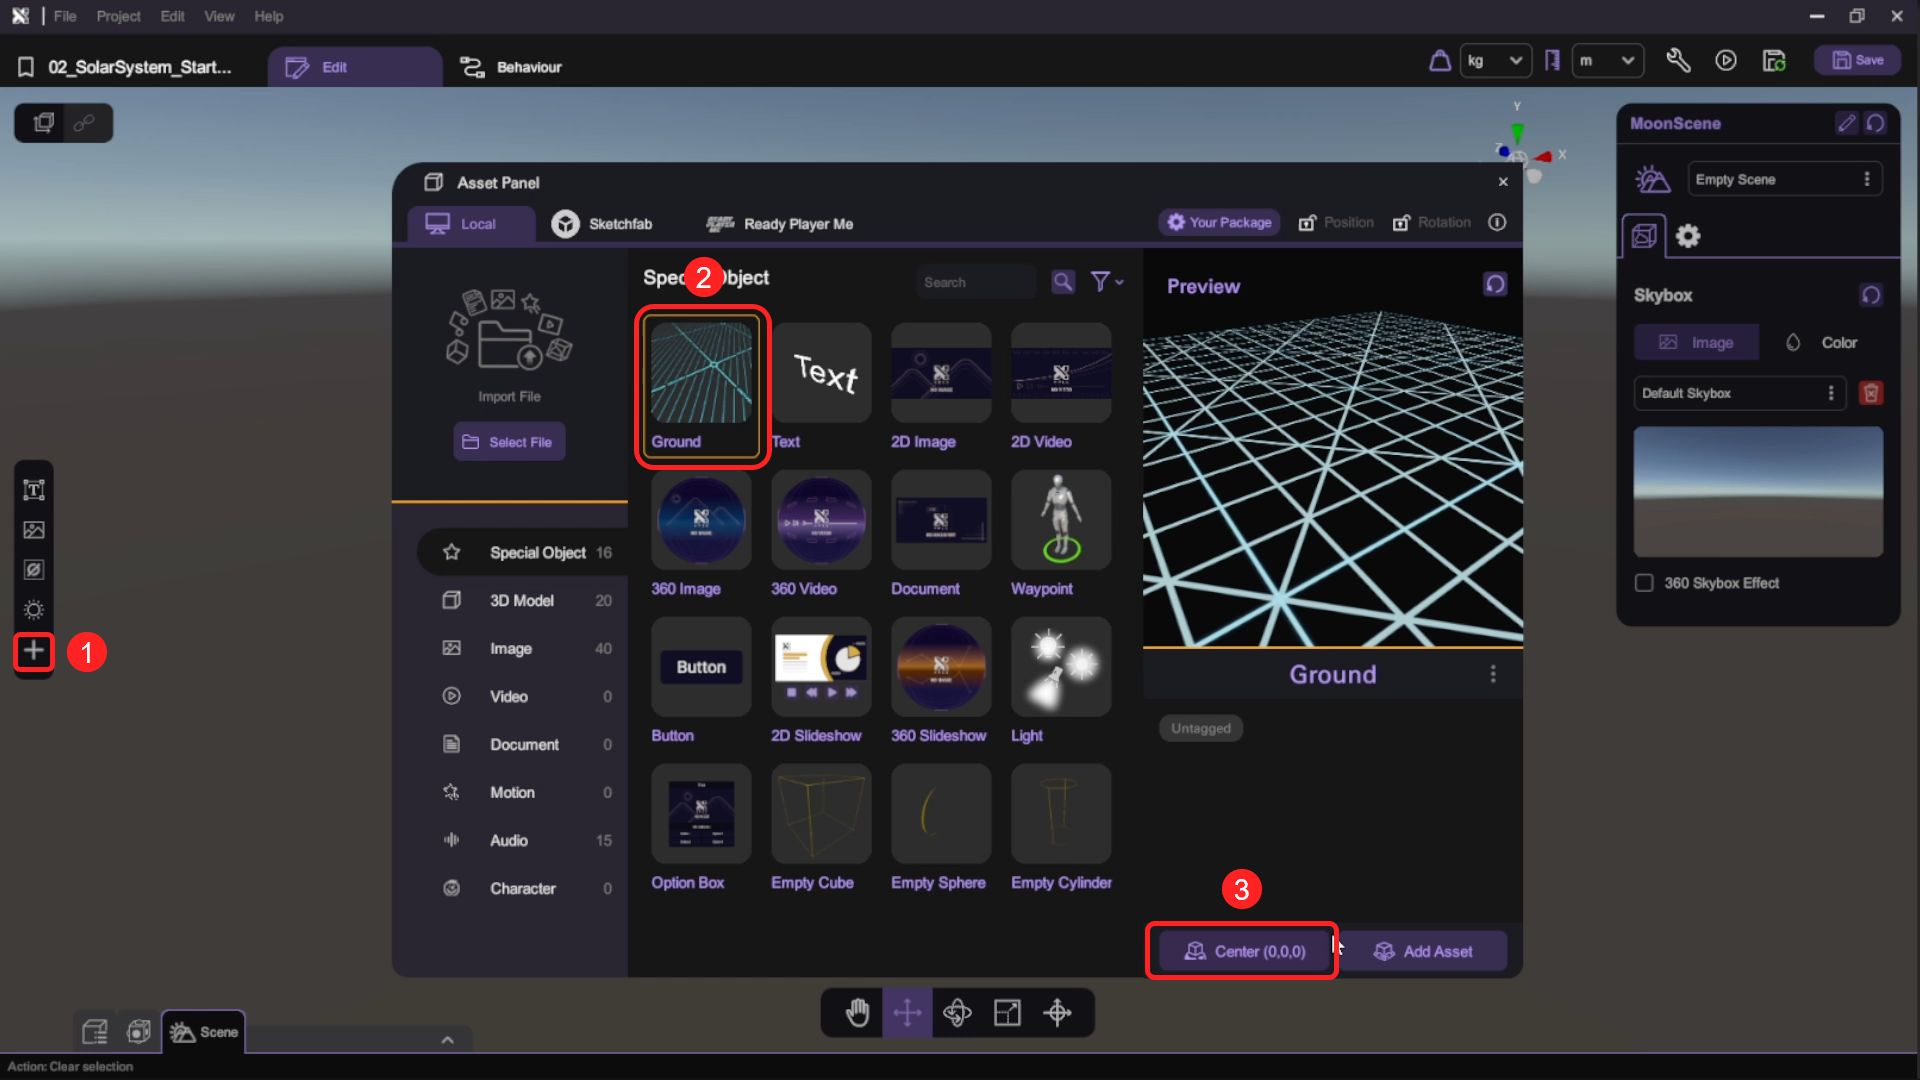
- In the Moon Scene, open the "Asset Panel" and add a "Ground" to the scene.
- Modify the "Scale" of the Ground object using either the transform tools or directly in the "Inspector". We want to have a large enough area for the player to move around.
- Add a "2D Image" to the scene. We will be using this 2D Image to simulate the appearance of the Moon in the scene.
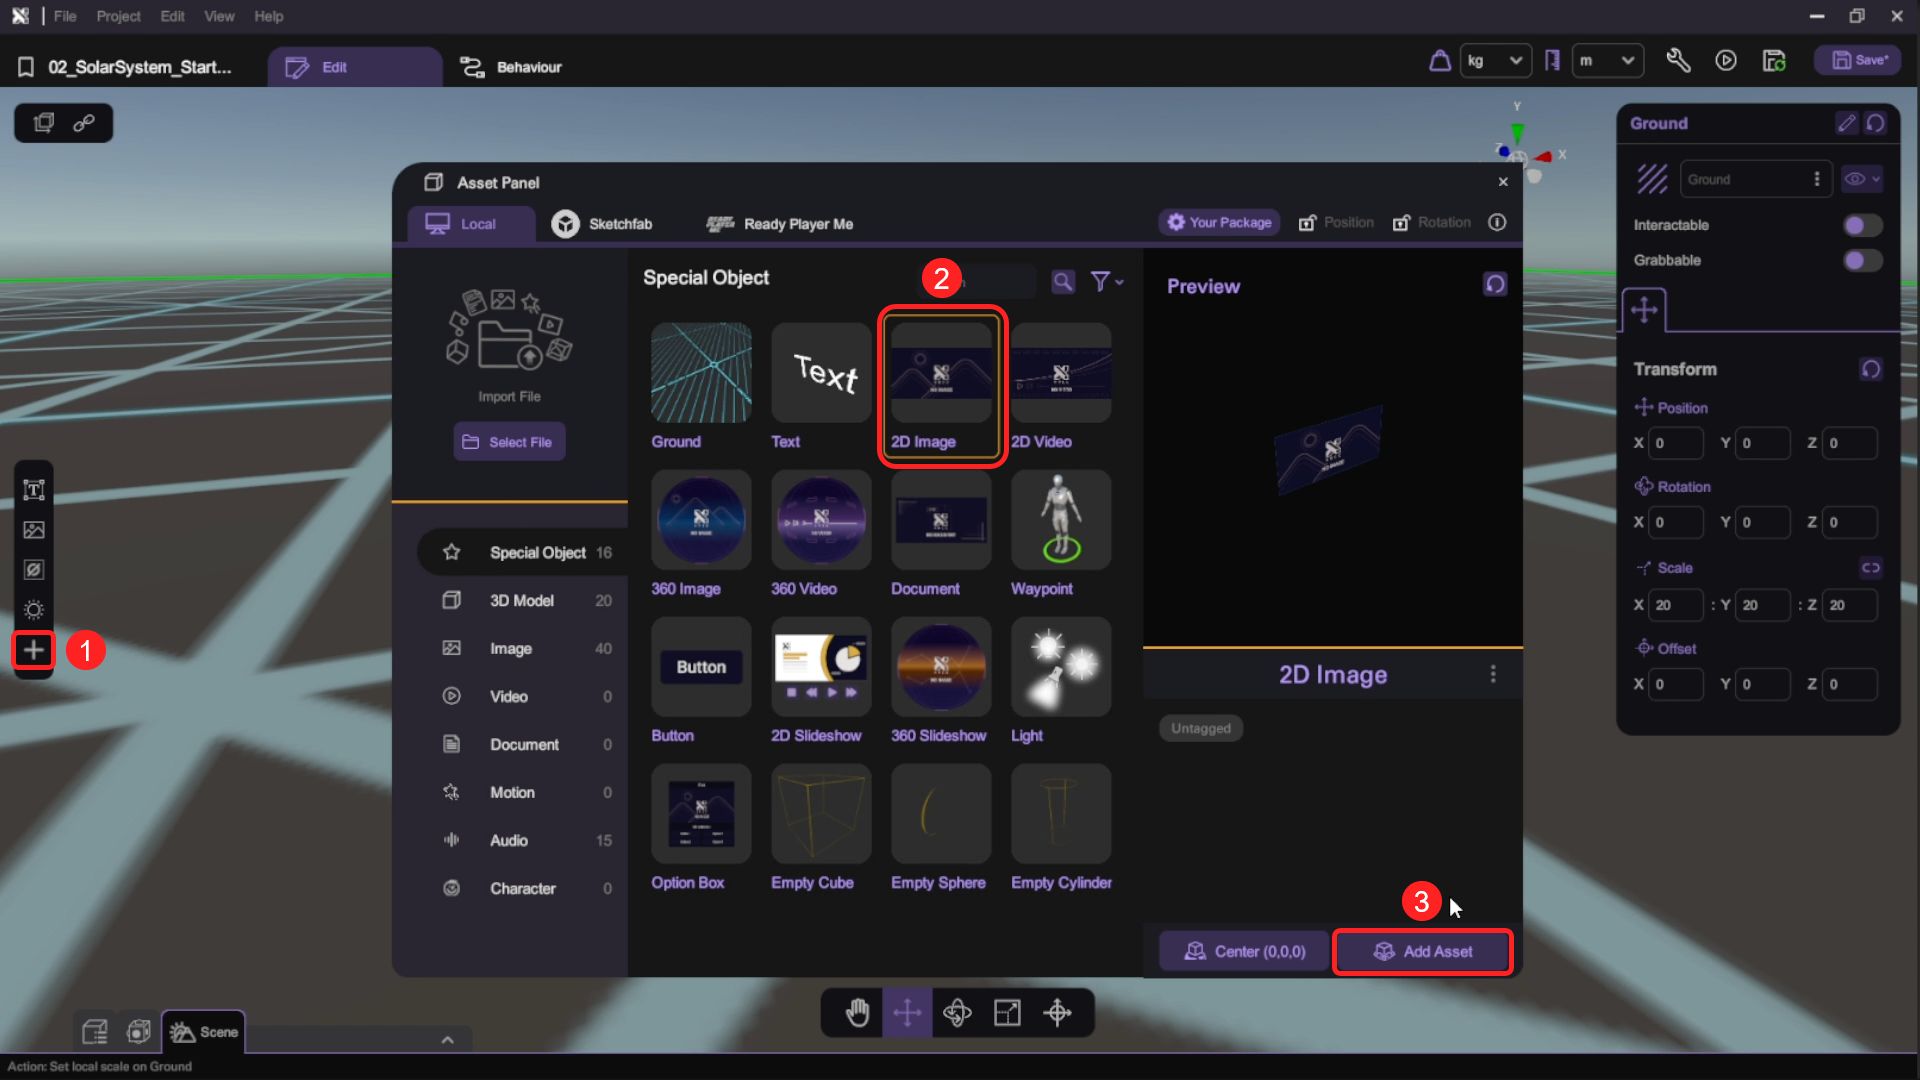
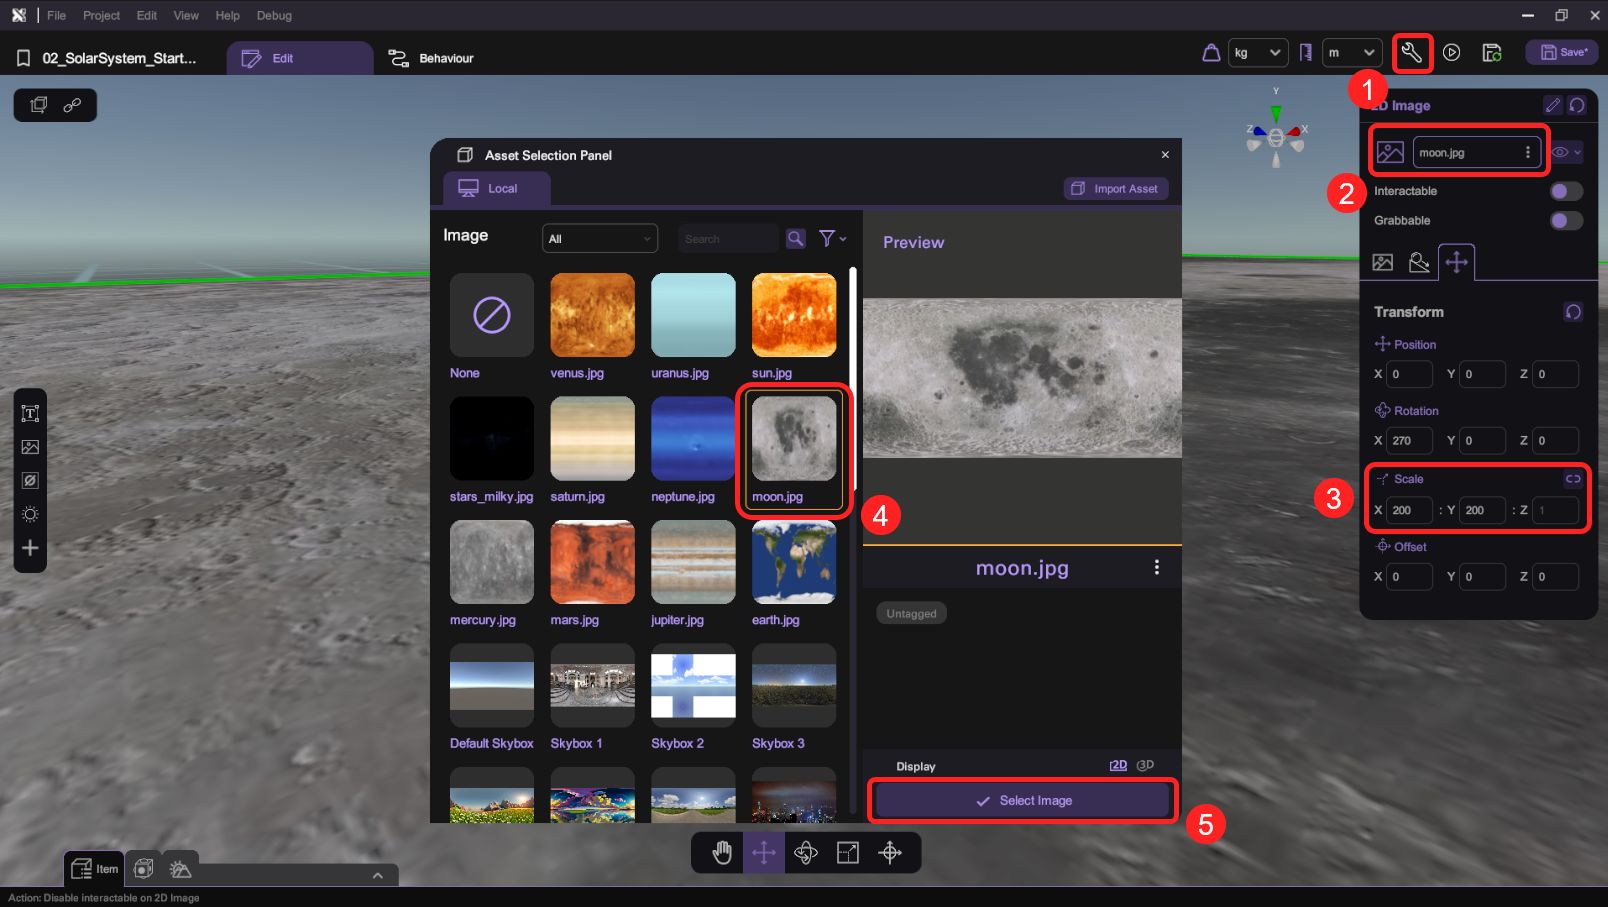
- Open the "Inspector" and modify the "Scale" of the 2D Image so it's in similar size as the Ground. Then, click the selector next to the "Choose Image" option to open the Asset Selection Panel and select the "Moon.jpg" image in your asset library to simulate the Moon's ground appearance. This is the same image used for the Sphere of the Moon planet, but shown in 2D format instead.
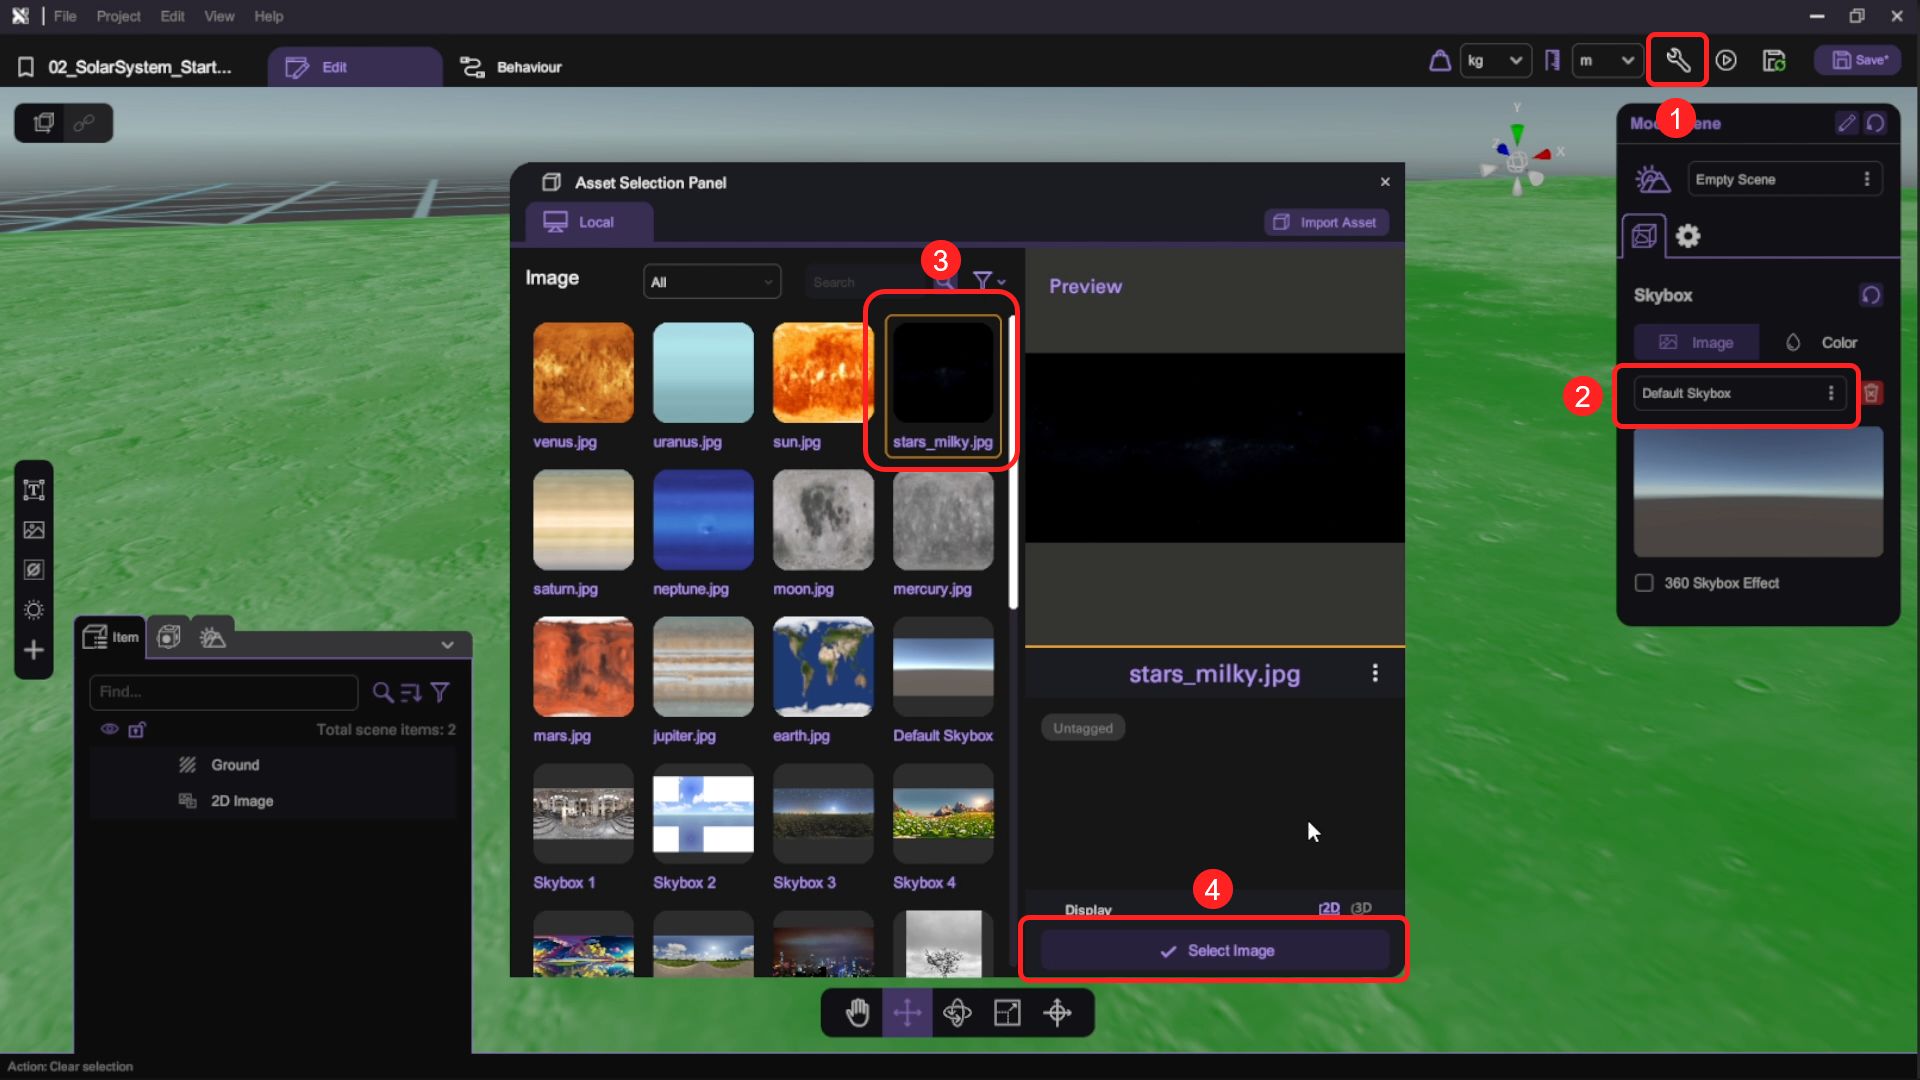
- Click at any empty space in the scene to select the Scene and open its "Inspector". Here we use the same "stars_milky.jpg" in your asset library to set the skybox 360 image.
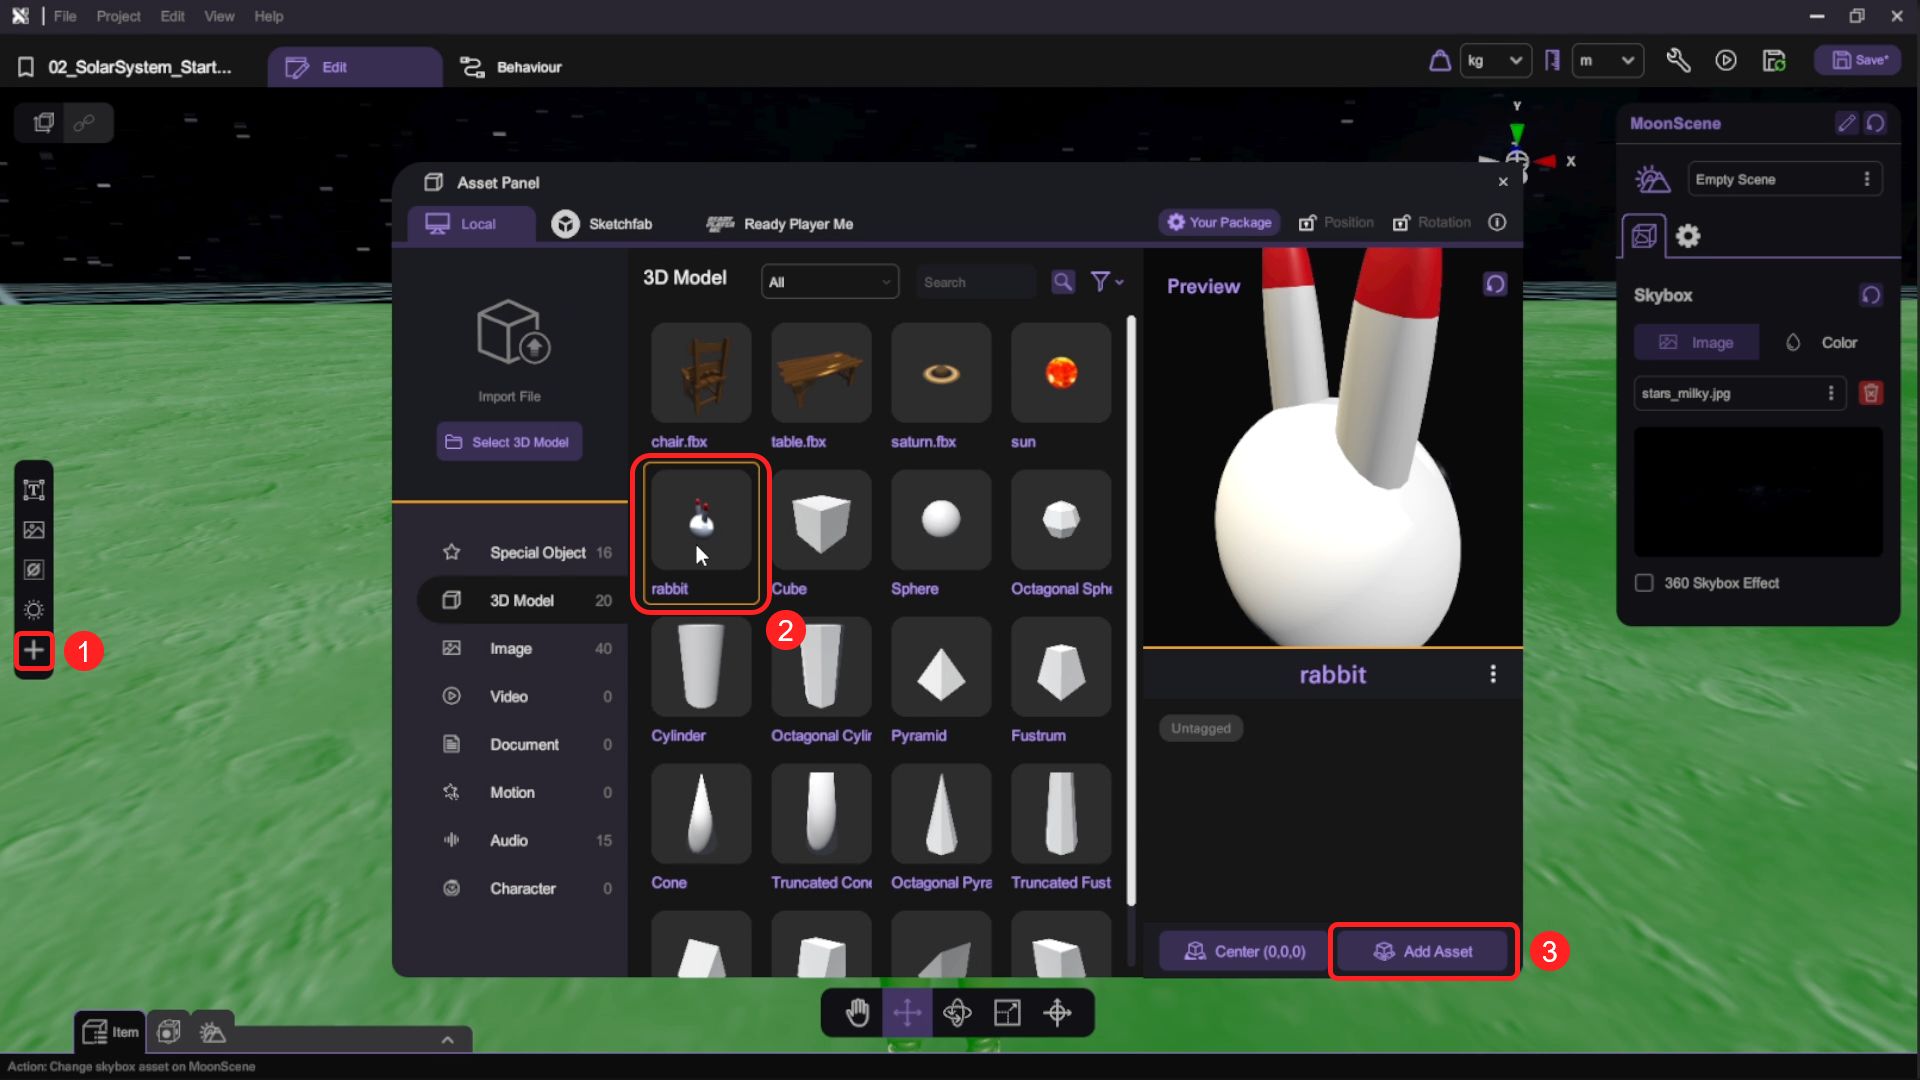
- Open the "Asset Panel" and press the "3D Model" button, select and add 3 "rabbit" objects to the scene. Use the transform tools (move/rotate/scale) to adjust the size and position of the rabbit objects.
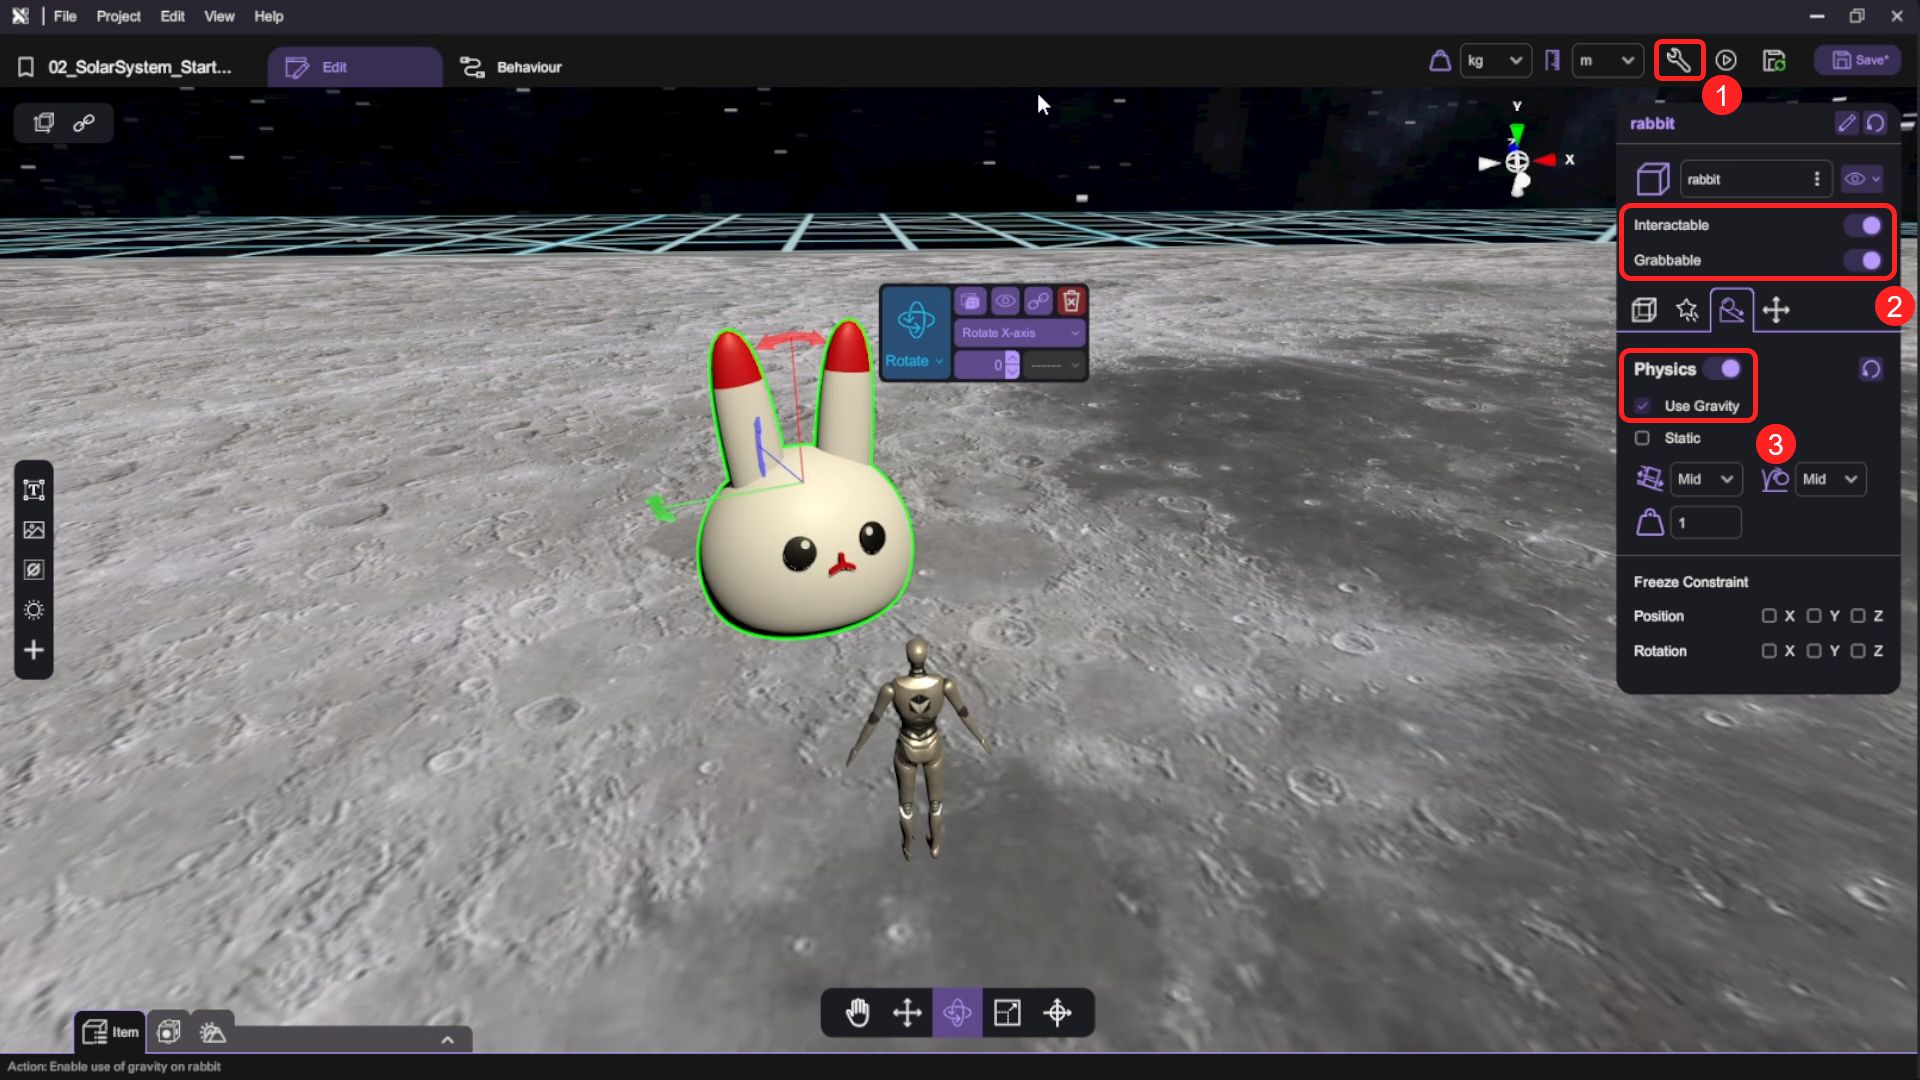
- Select one of the rabbit objects and open its "Inspector". Make sure the "Interactable", "Grabbable" and "Collider" options are all selected. Then, "Enable" the Physics setting as well as the "Use Gravity" option. Repeat these procedures for the other rabbit objects.
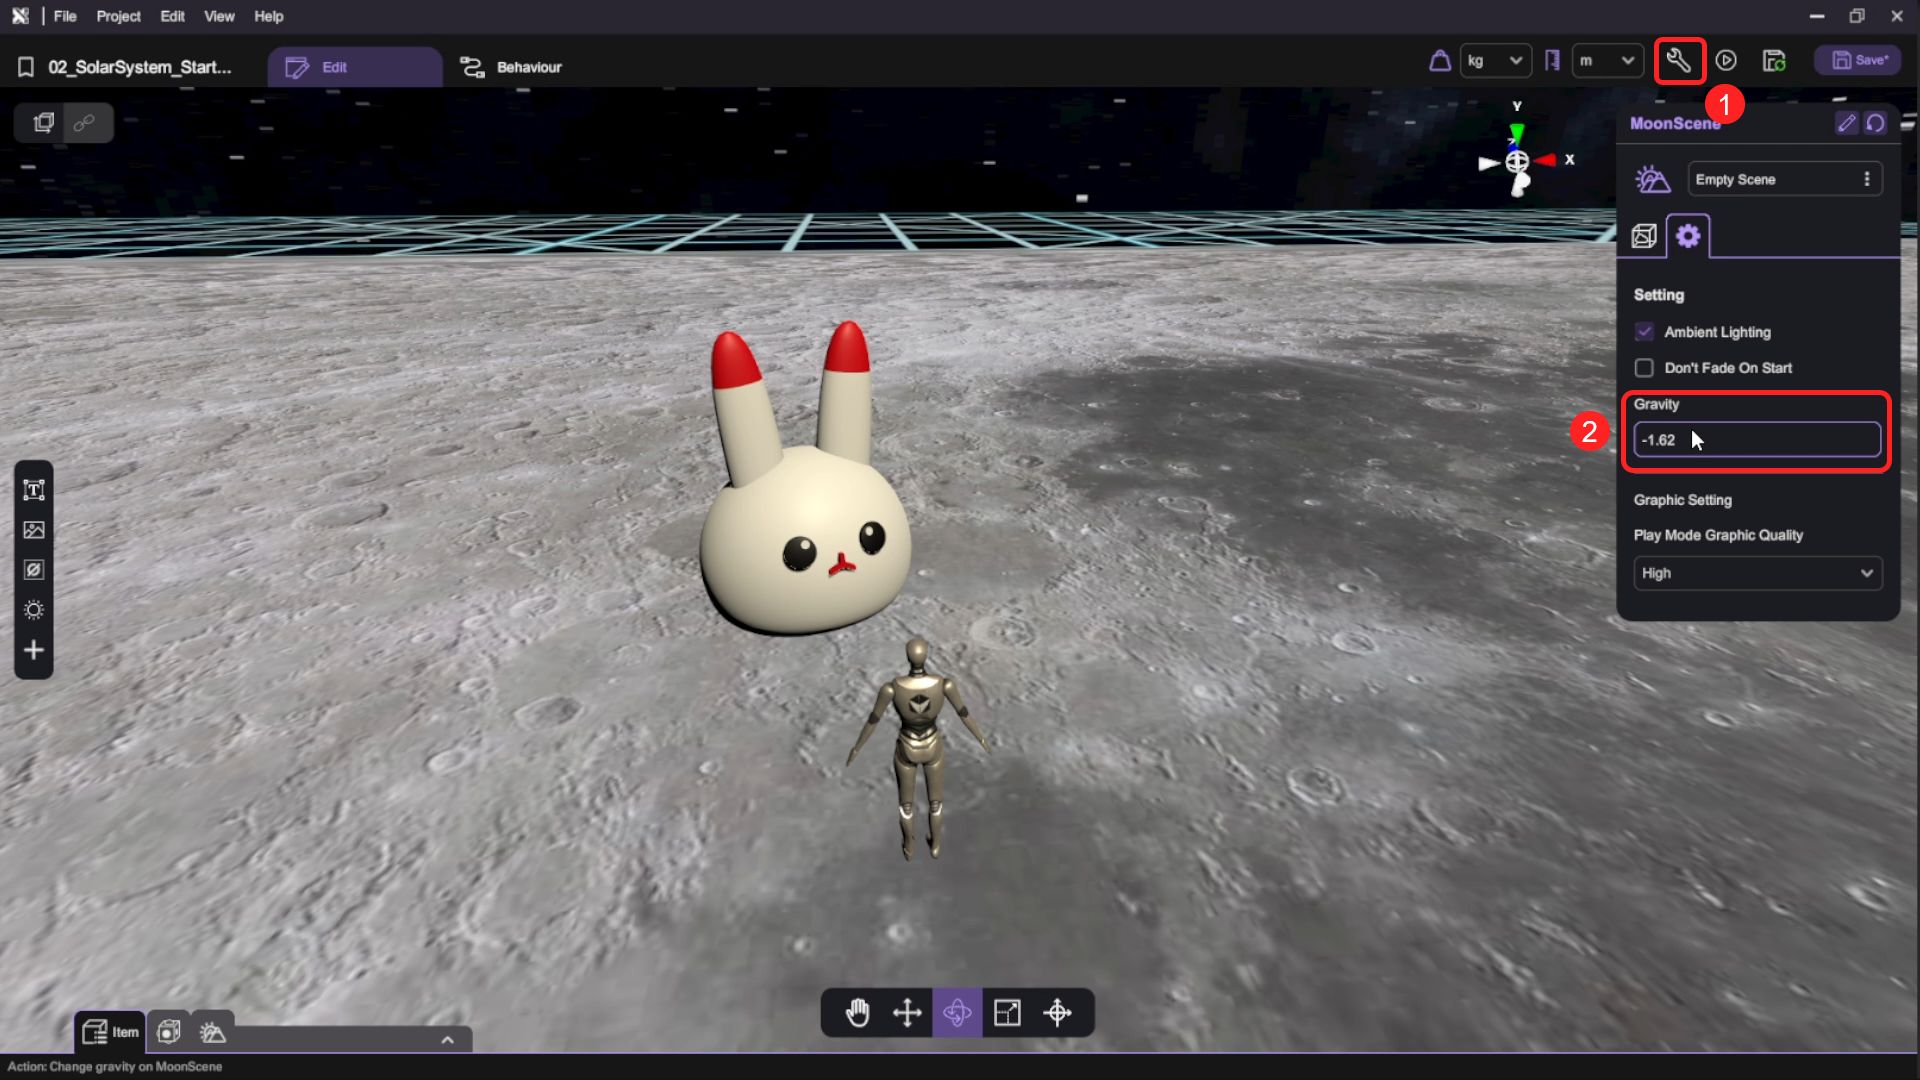
- Click the scene and in the scene's "Inspector", change the gravity to -1.62 (gravity of the Moon).
-
You have now finished setting up the grab interaction and enabled gravity for the rabbit objects. Press the "Play" button and press the right mouse button to grab the rabbits to test. They should fall to the ground with simulated Moon gravity when you release the mouse button.
-
Press "Esc" to exit play mode after you've finished testing your scene.
Set up the Earth Scene
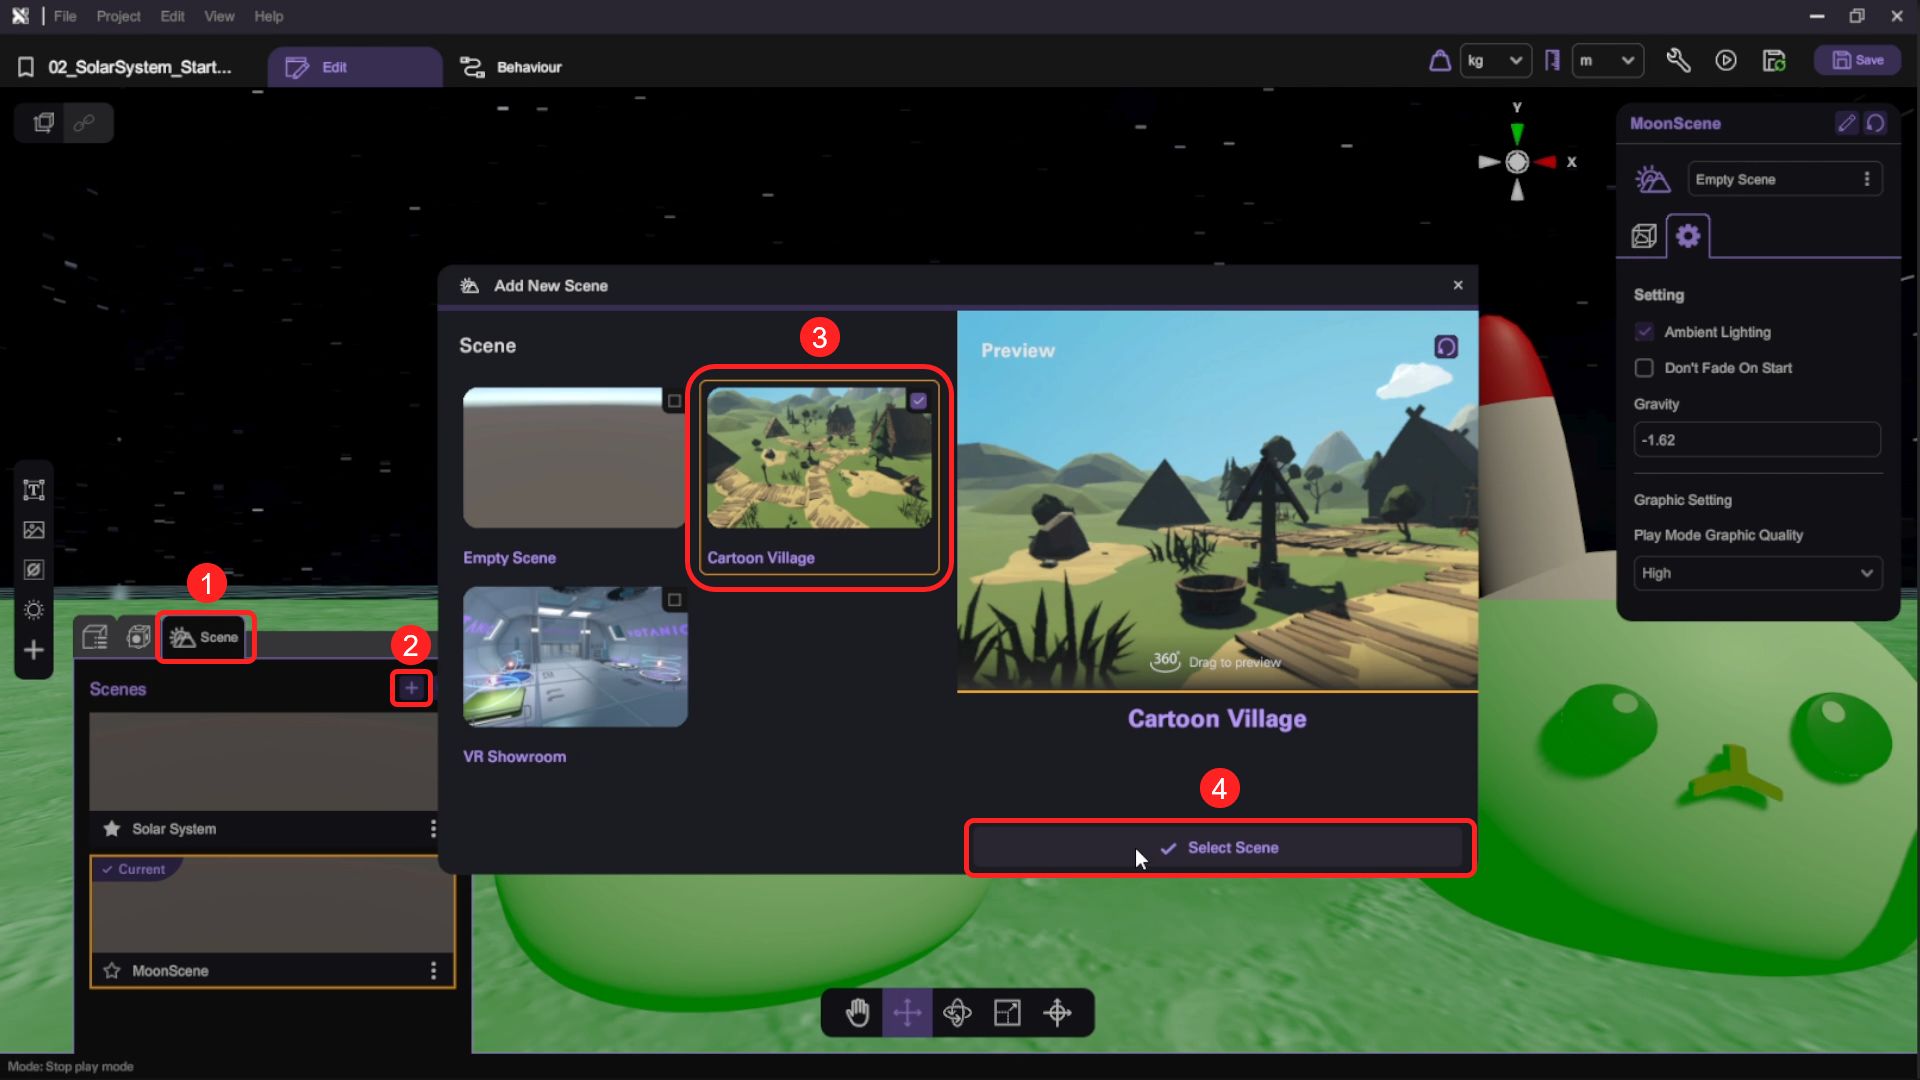
- Open the "Scene Menu", select the "Cartoon Village" scene and click the "Select" button to create a new scene.
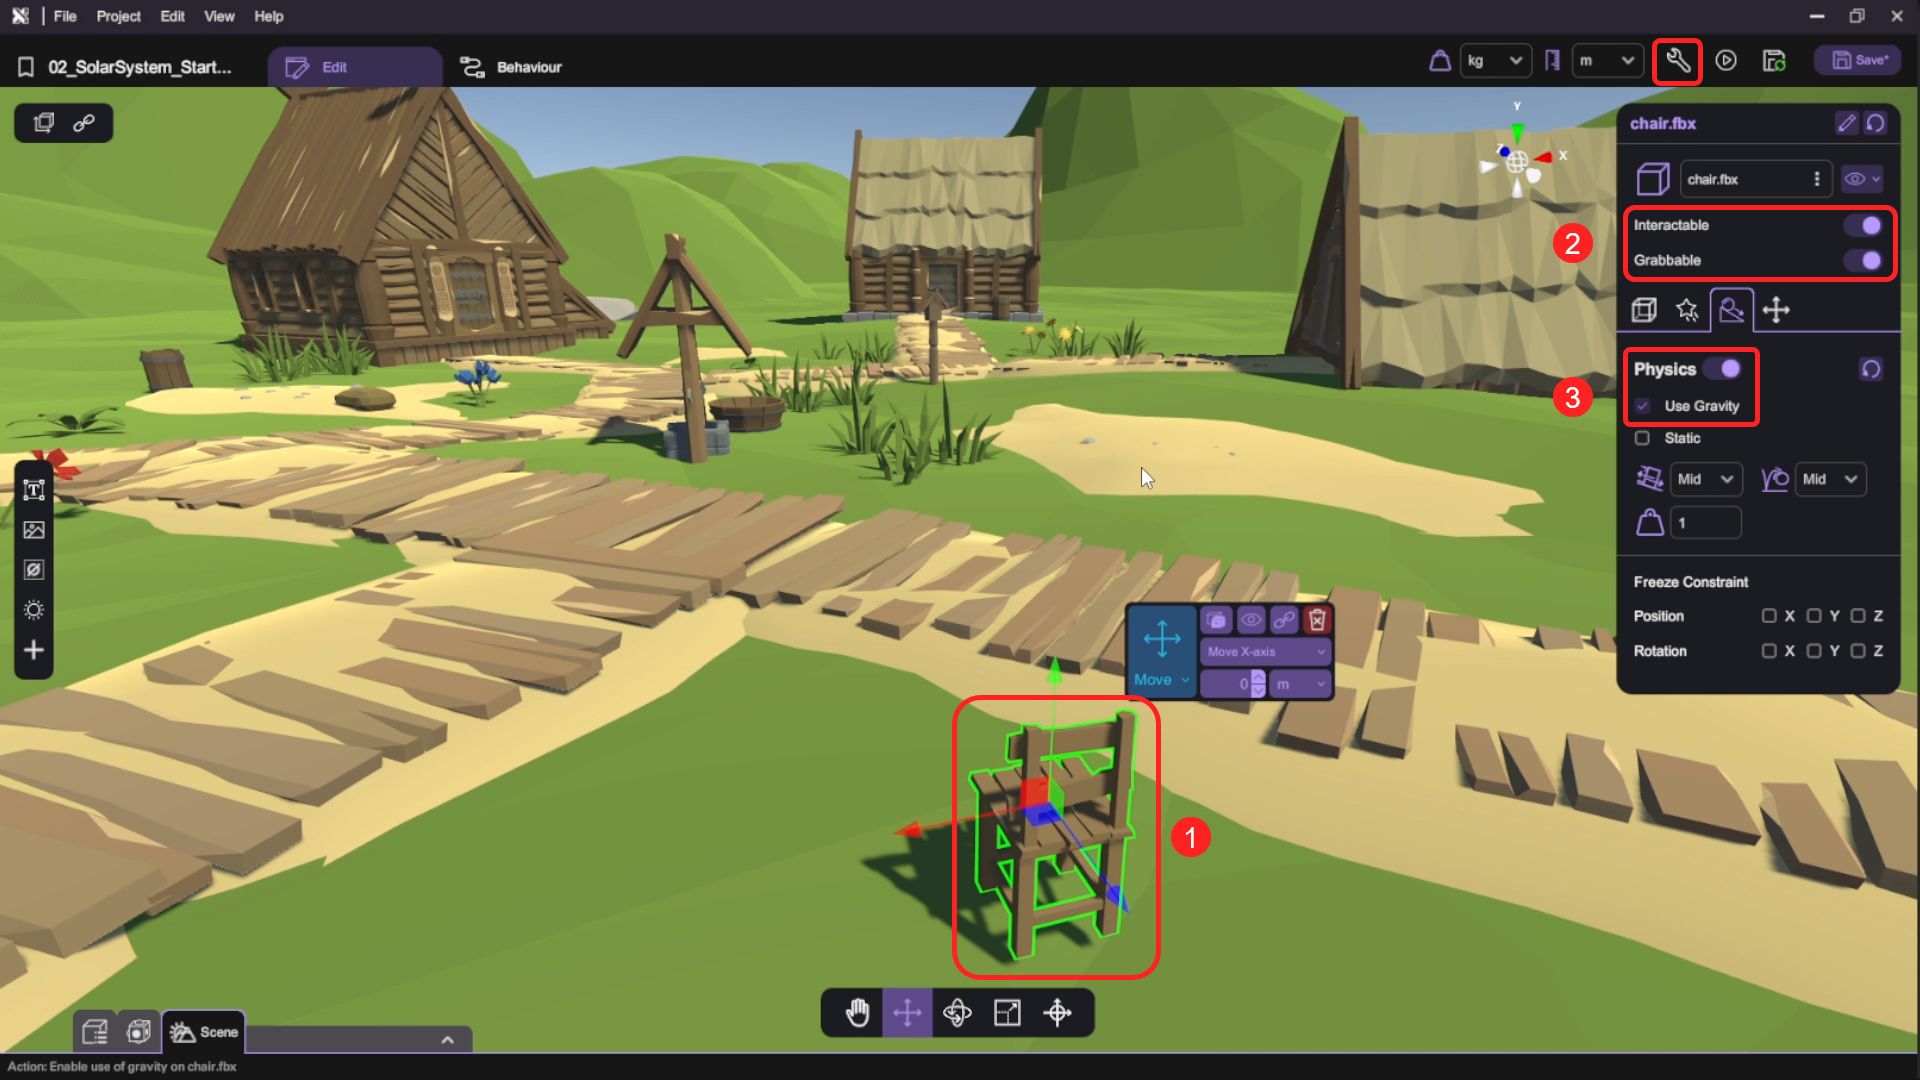
- Similar to the Moon scene, you can add some assets which belong to the Earth props, like the chair and the table in our "3D Model" CCPackage.
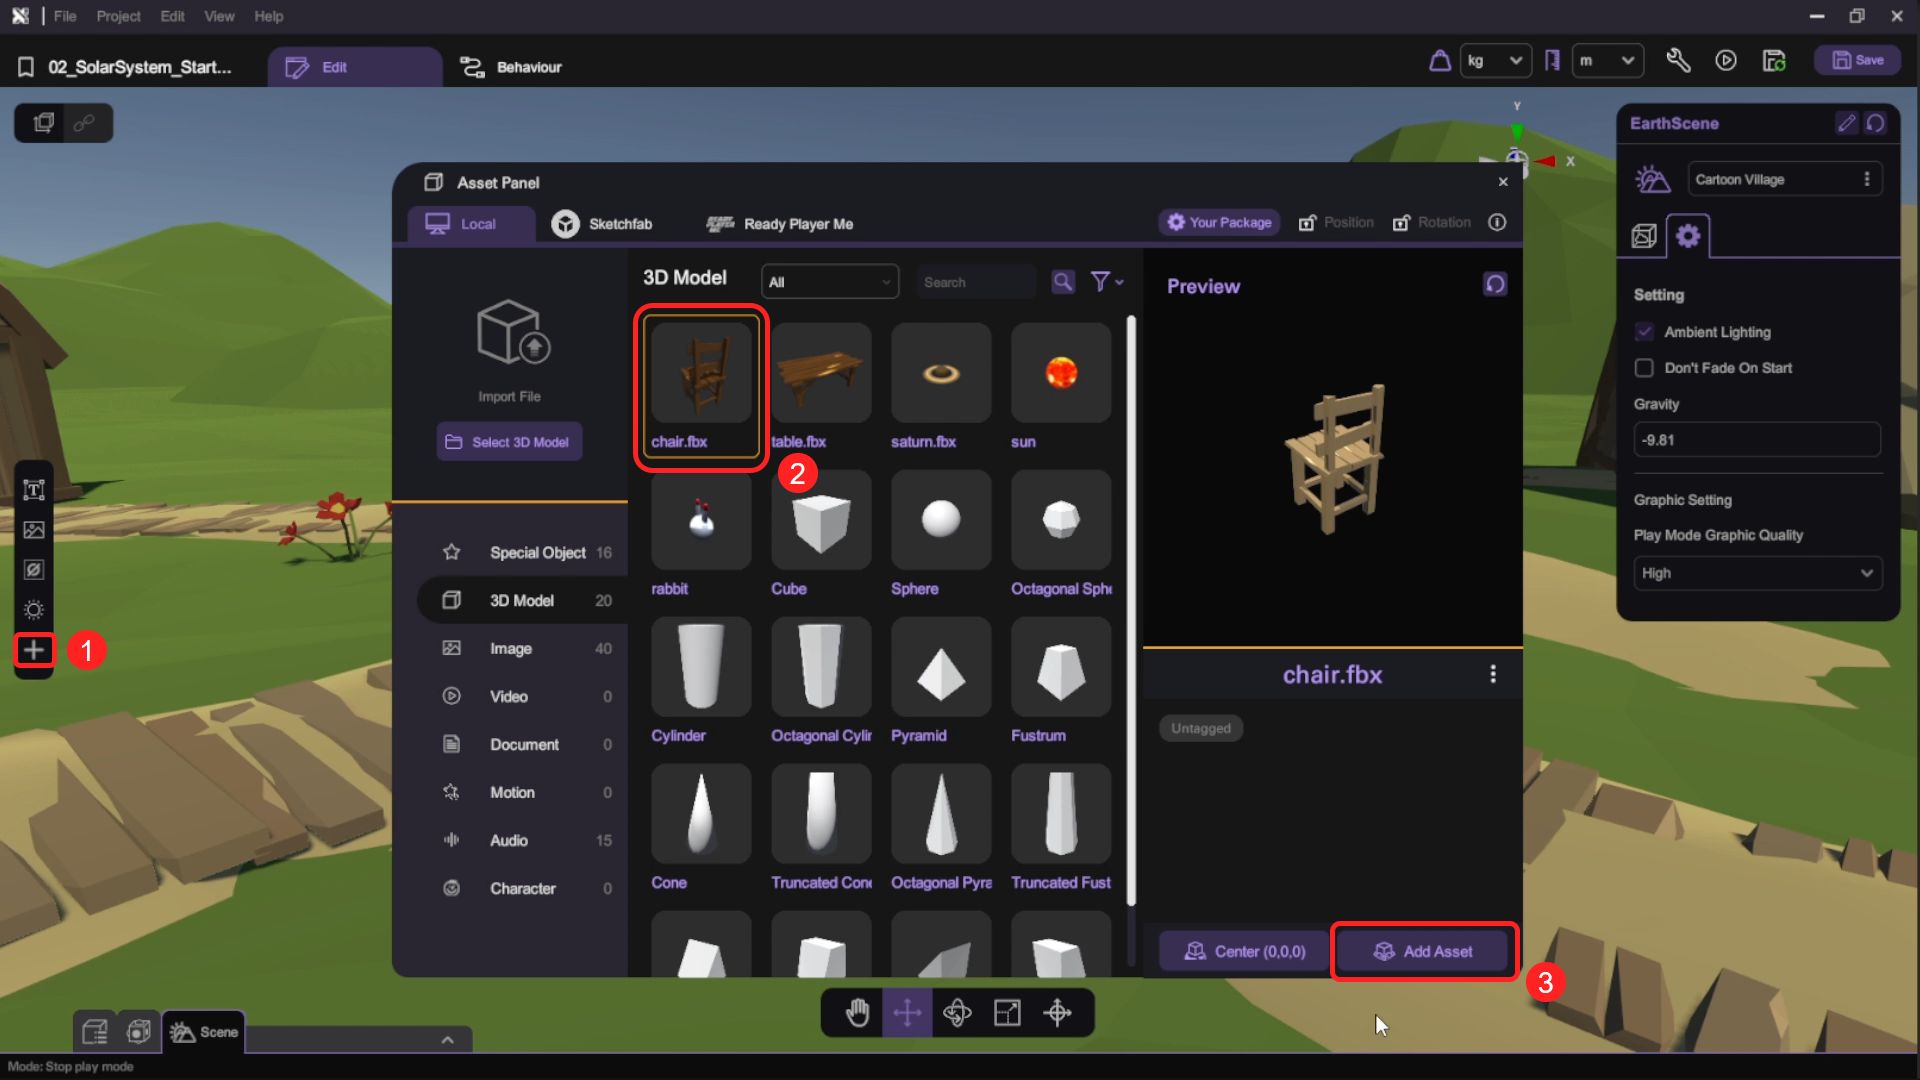
- Select one of the objects and open its "Inspector". Make sure both the "Interactable" and "Grabbable" options are selected. Then, "Enable" the Physics setting as well as the "Use Gravity" option. Repeat these procedures for the other objects.
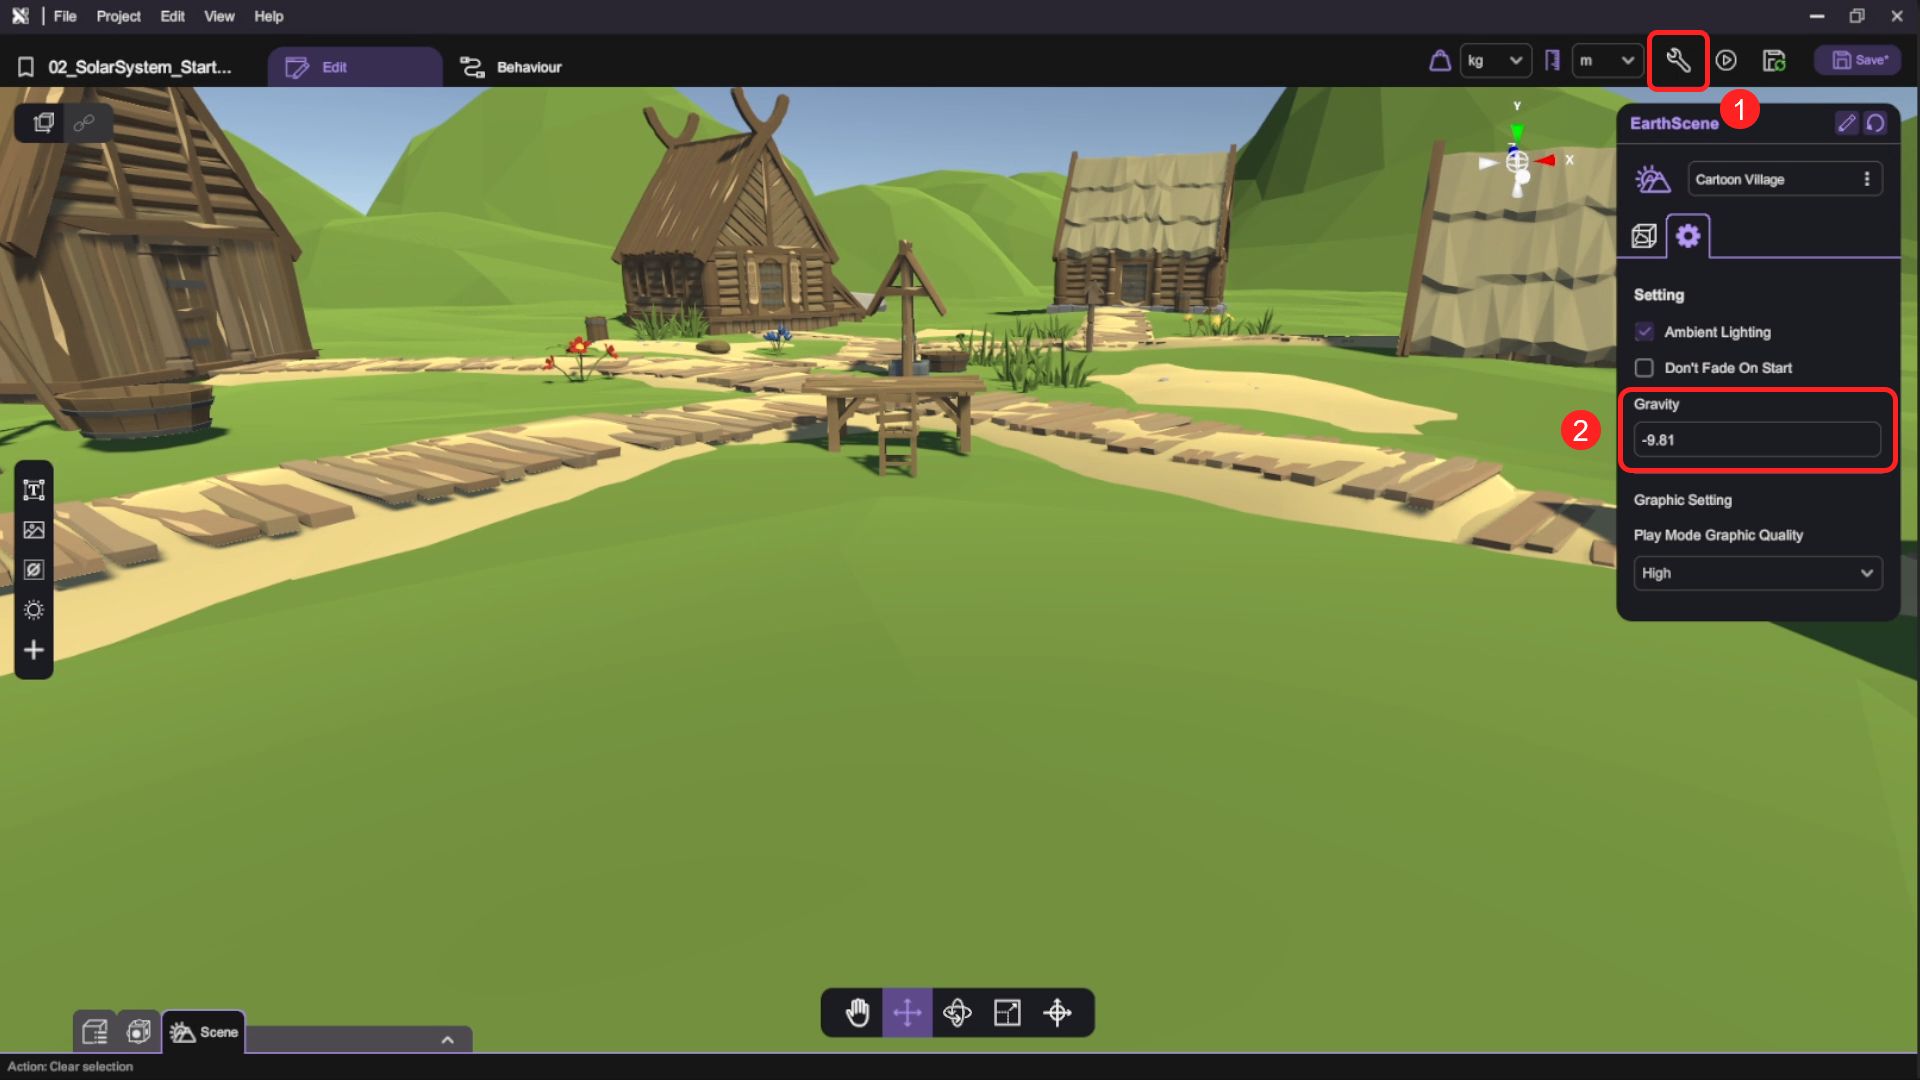
- Since the default gravity is -9.81 (the Earth's gravity), we don't need to change the gravity.
Add Welcome Text and Return Button When Clicked
- Add a "Text" object to the scene.
You can create a "Text" object by pressing the Text-icon button on the left
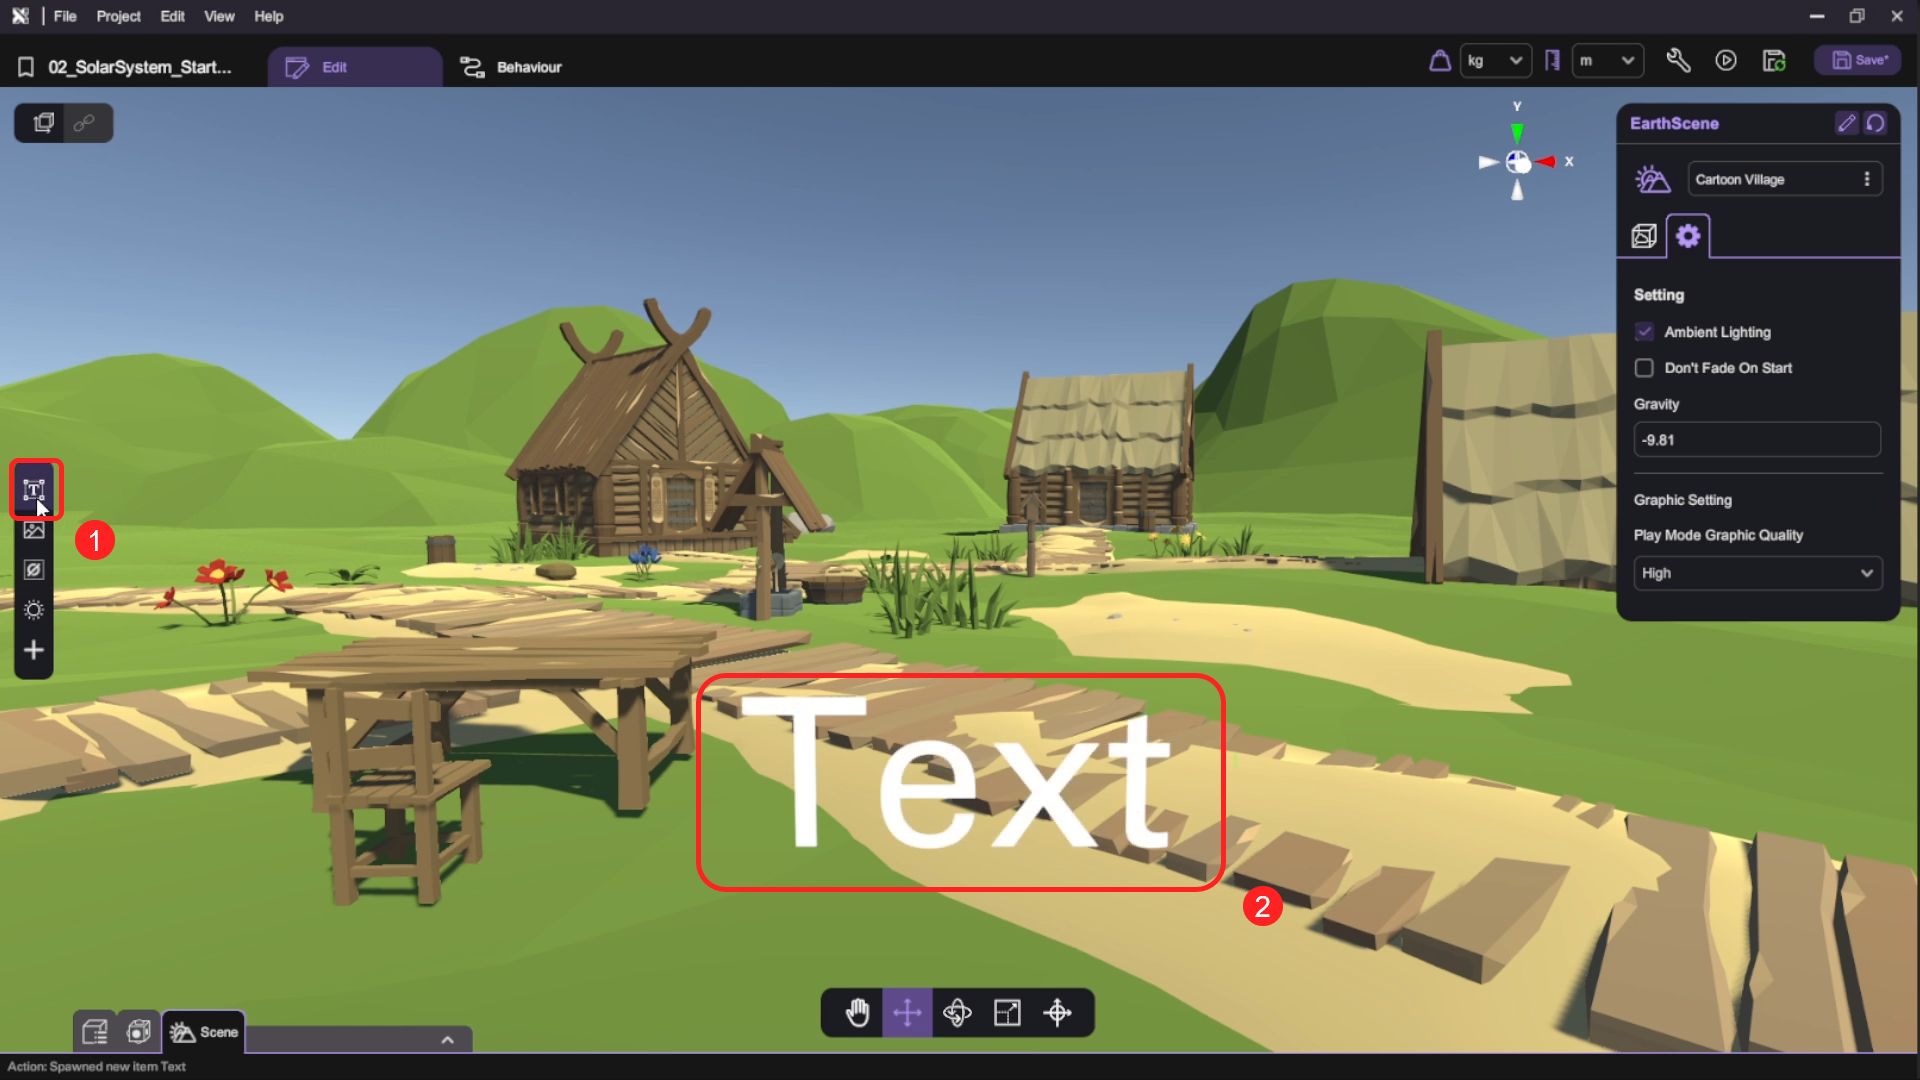
- Use the transform tools (move/rotate/scale) to reposition the text. Then open the "Inspector" to set up the text content, font size, and color of the text.
- Open the "Asset Panel" and from the "Special Objects" tab, select and add "Button" to the scene.
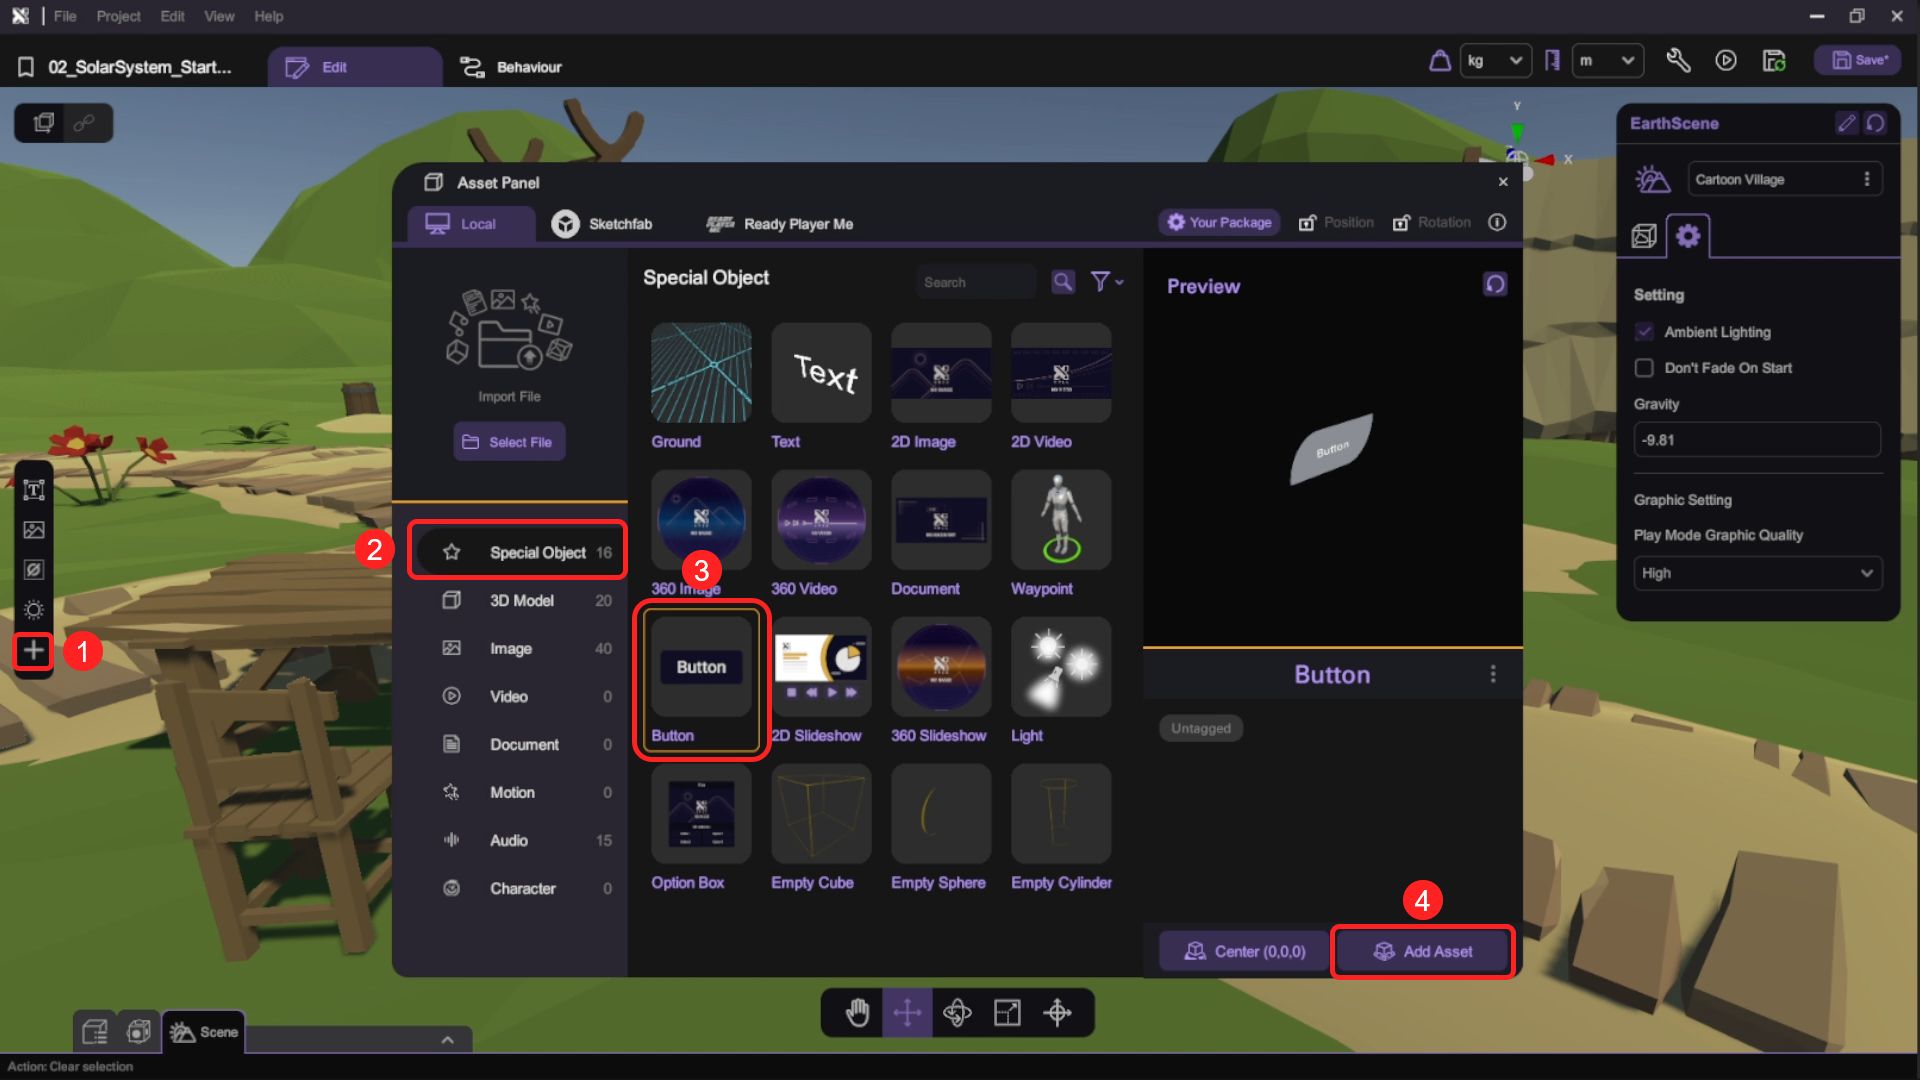
- Use the transform tools (move/rotate/scale) to reposition the button. Then open the "Inspector" to set up the text content, font size, and color of the button object.
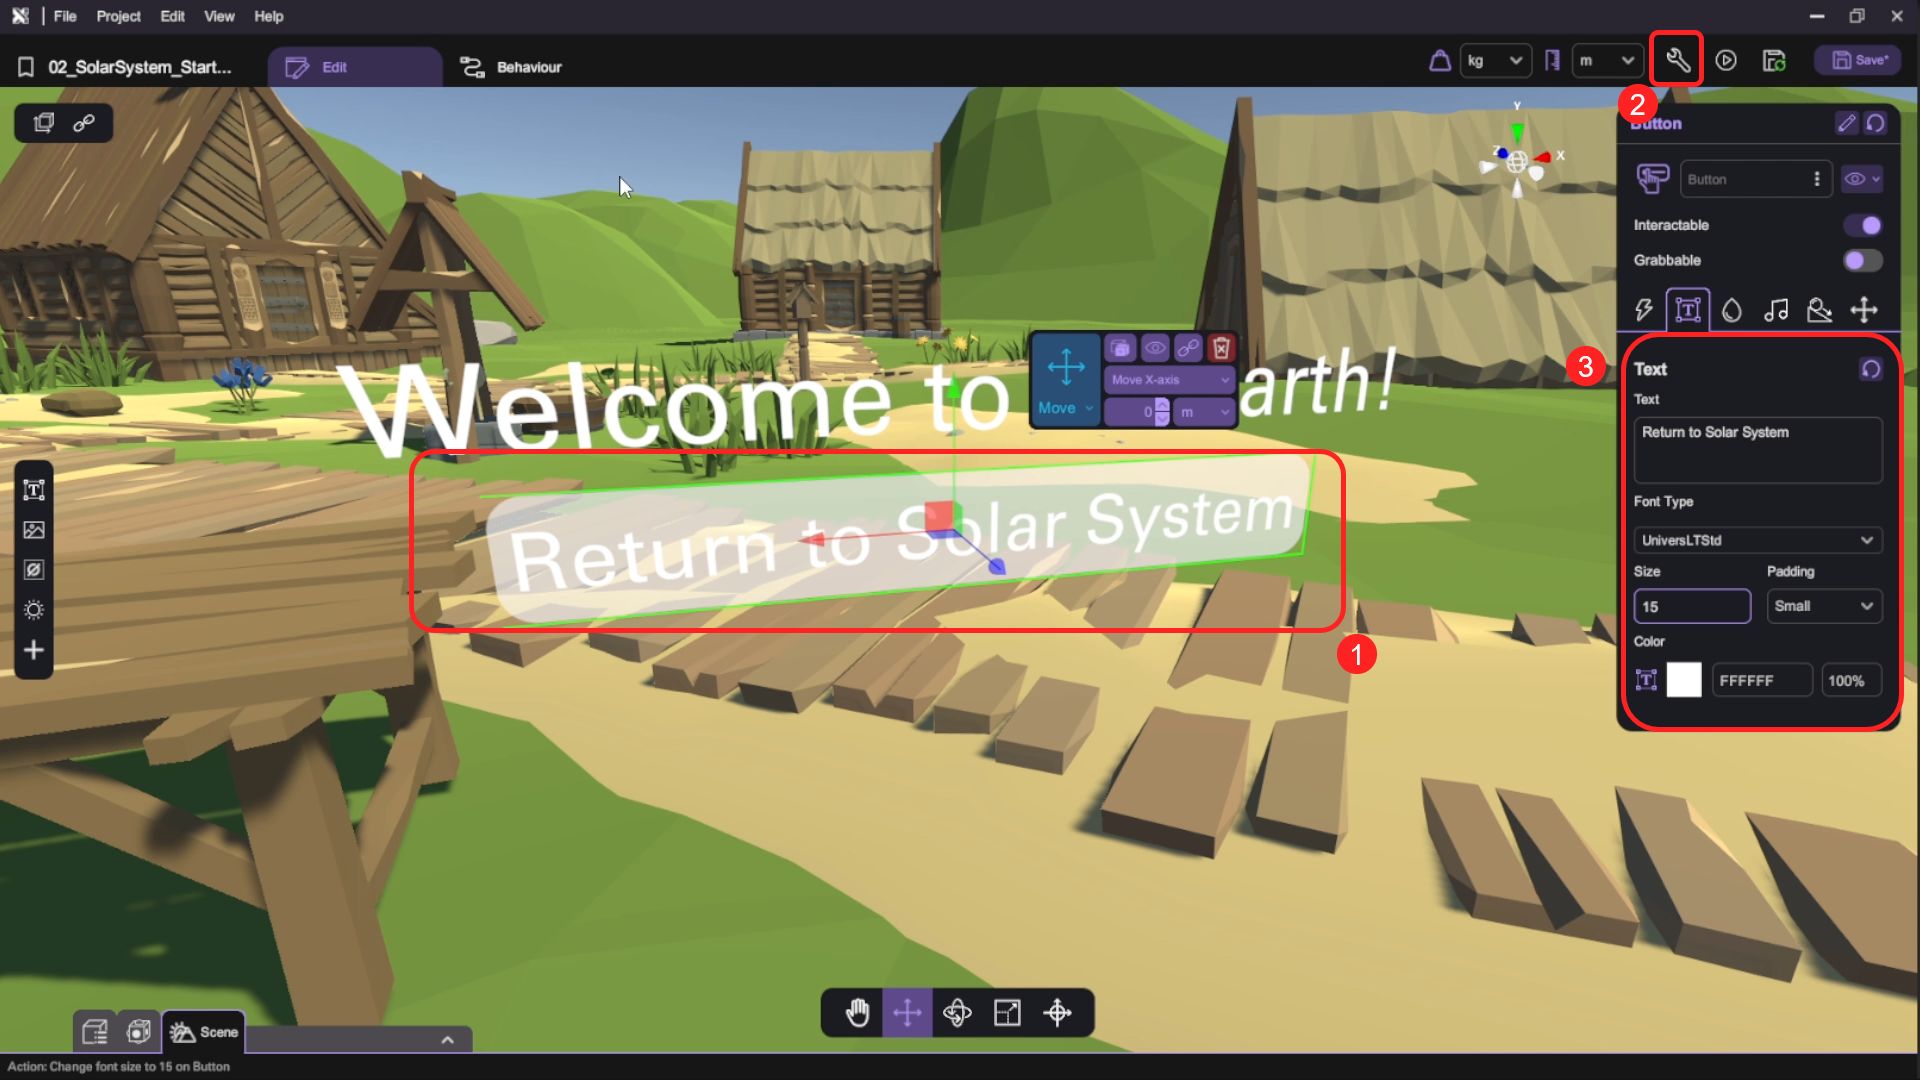
- Select the button object and open its behaviour panel. Under "Groups", add a new behaviour group named "return" and toggle the "Action" button to make it an action that can be called by other objects. An "Action Start" event trigger block will appear on the canvas.
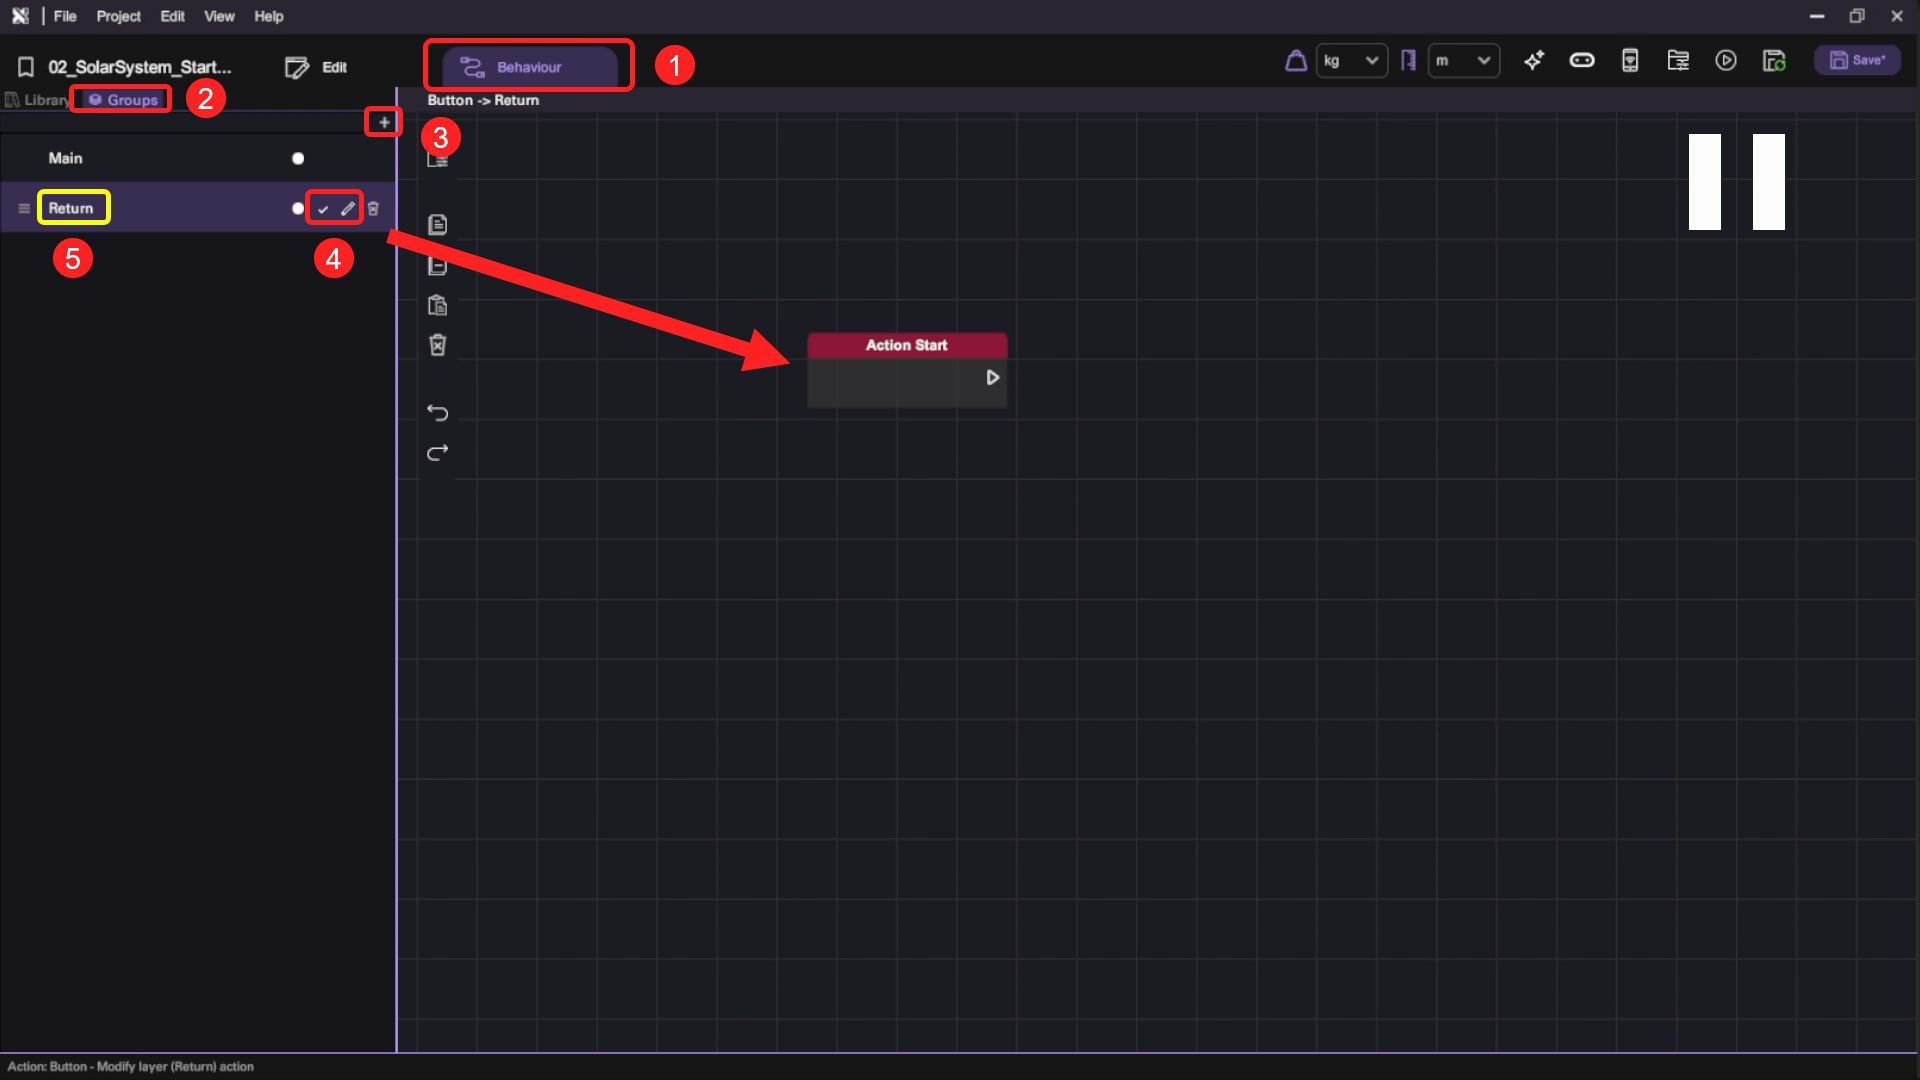
- Switch to the behaviour Library, under the "Scene" category drag the "Change Scene" block and append it behind the "Action Start" block. Select the "Solar System" scene under the "Change Scene" block's "Scene" option, then connect the "Action Start" block and the "Change Scene" block. When this action is called, the scene will be changed back to the Solar System.
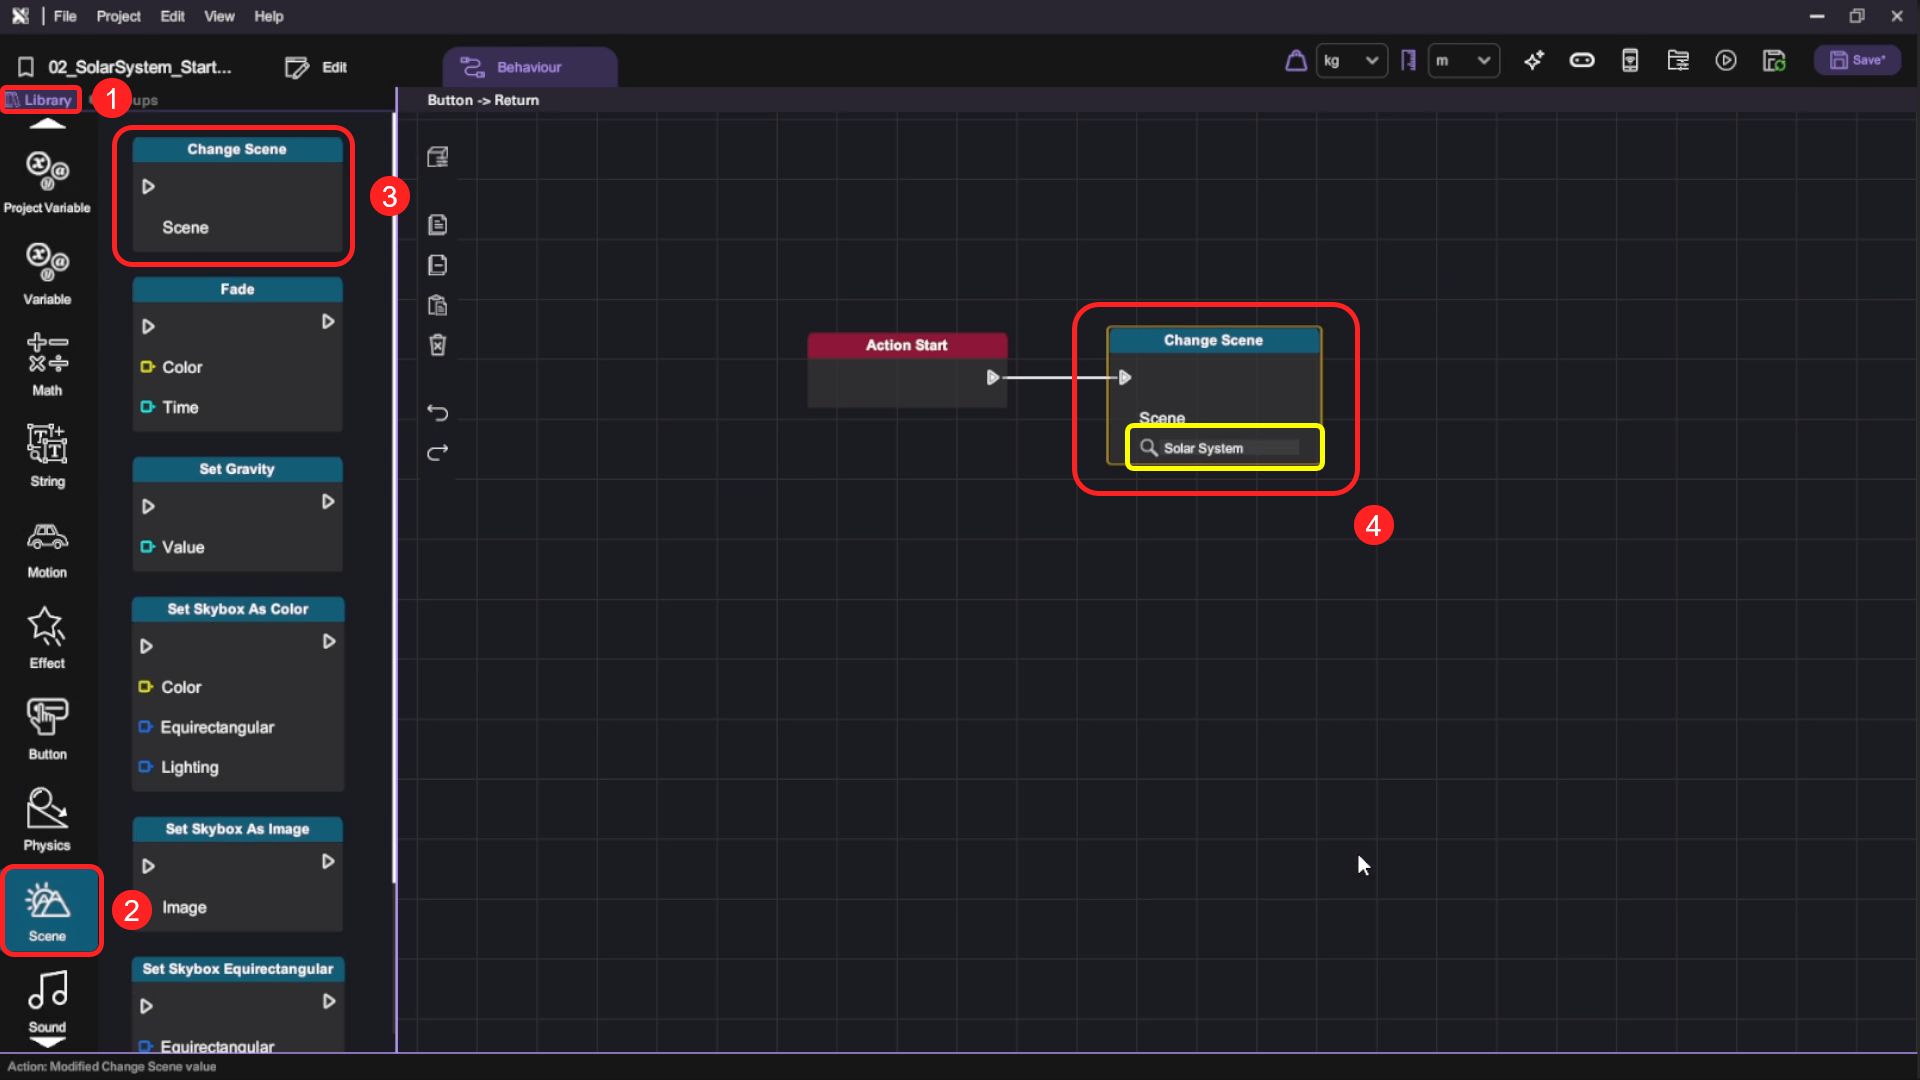
- Select the "Button" and open its "Inspector", then select the "Action" option for the button at the "Action" tab. On the "Select Instance Panel", select the button object from the item list on the left side, then choose the "return" action on the right and select the action. This will set up the "Click here to return solar system" button object to call the "return" action to change back to the "Solar System" scene when the button is clicked.
- Duplicate the Text and Button to the Moon Scene.
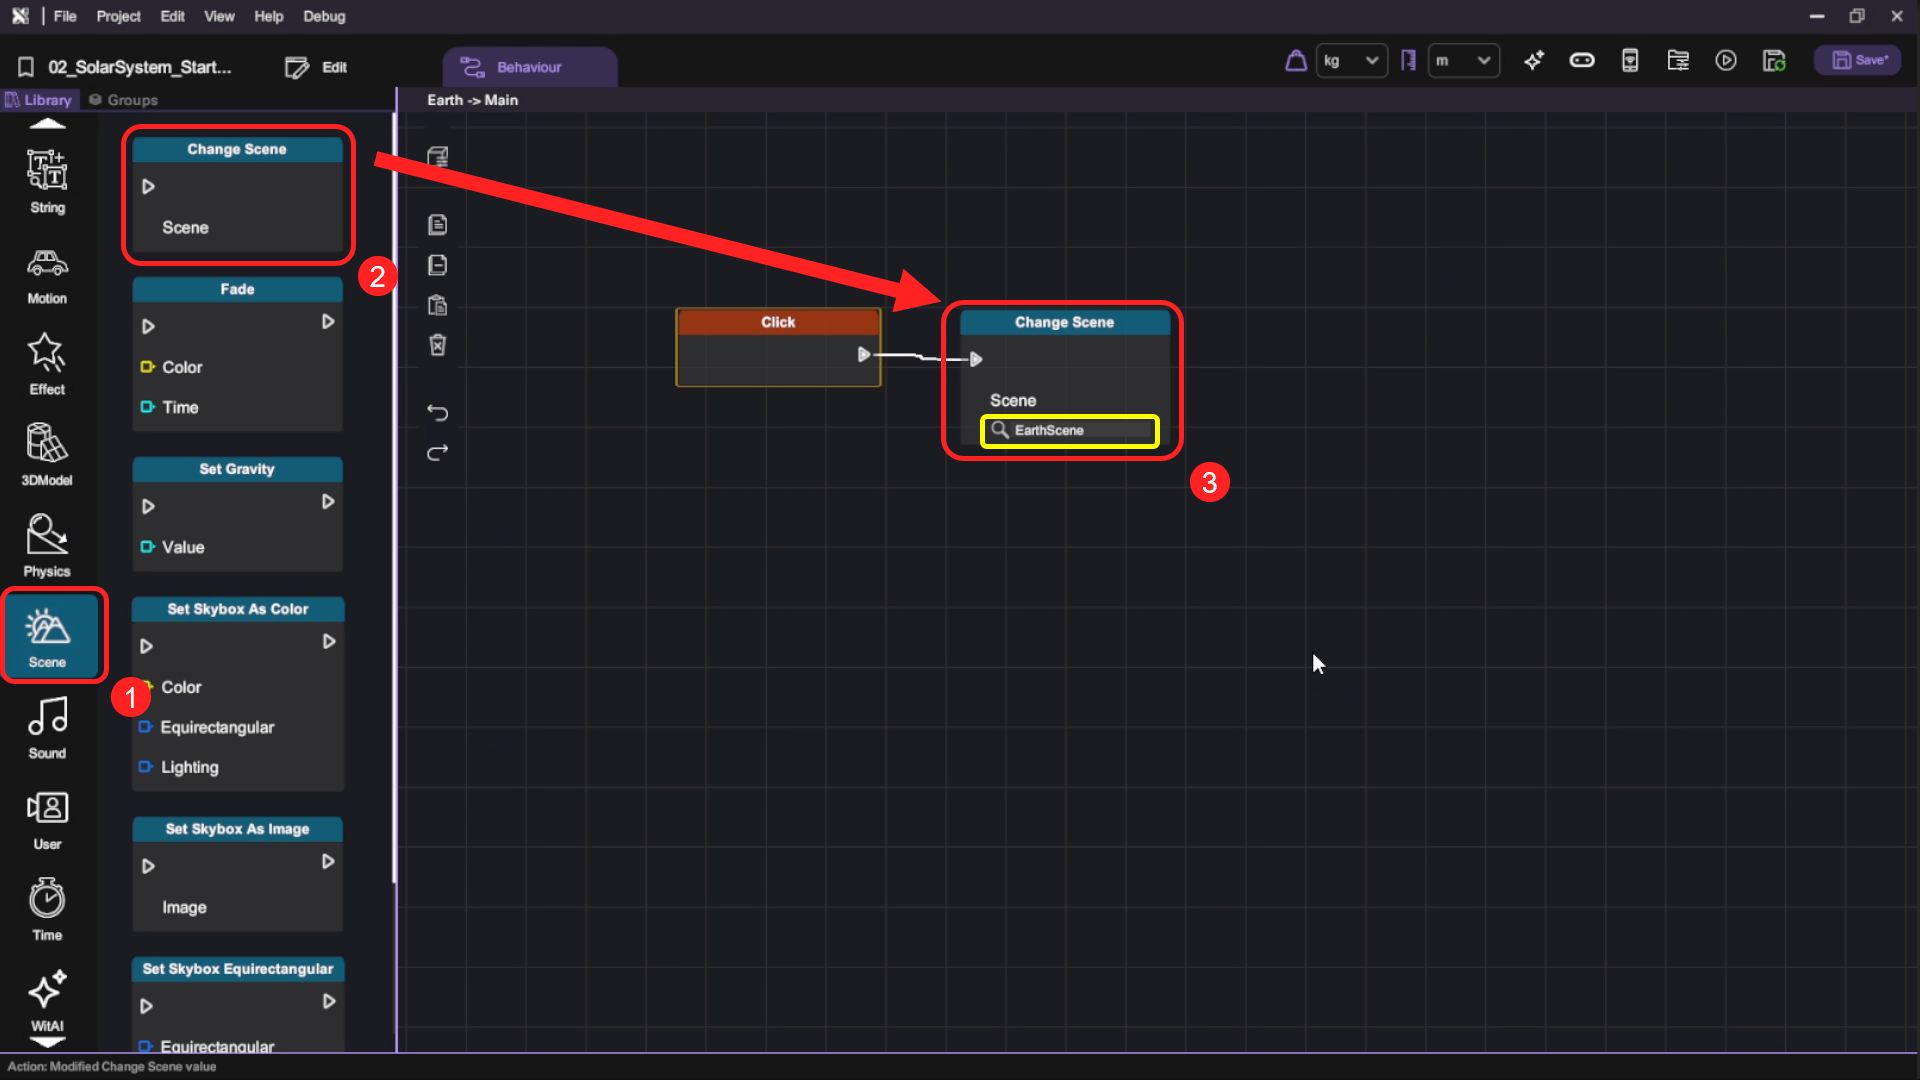
- Go to the Solar System Scene, select the Earth and open the behaviour panel.
- In the behaviour Library, under the "Item Event" category drag the "Click" block.
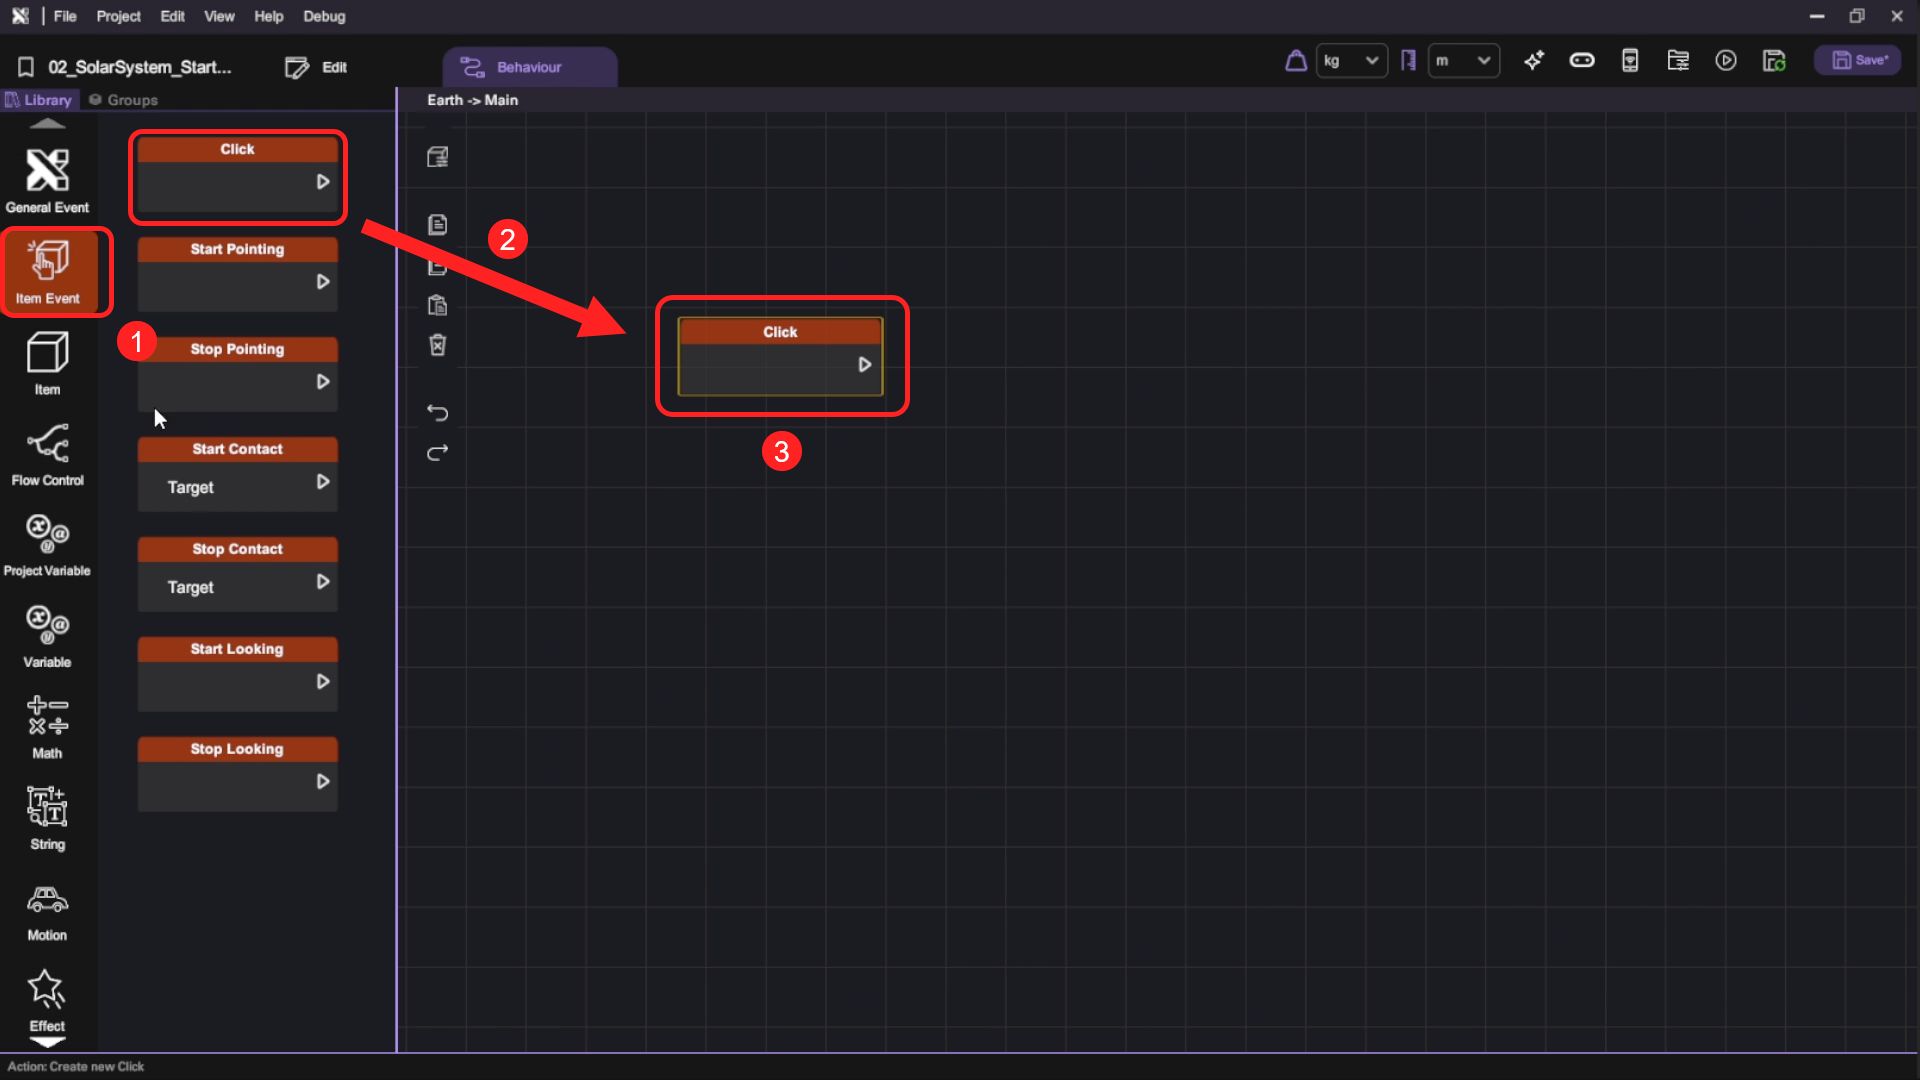
- under the "Scene" category drag the "Change Scene" block. Select the "Earth" scene under "Change Scene" block's "Scene" option, then connect the "Click" block and the "Change Scene" block.
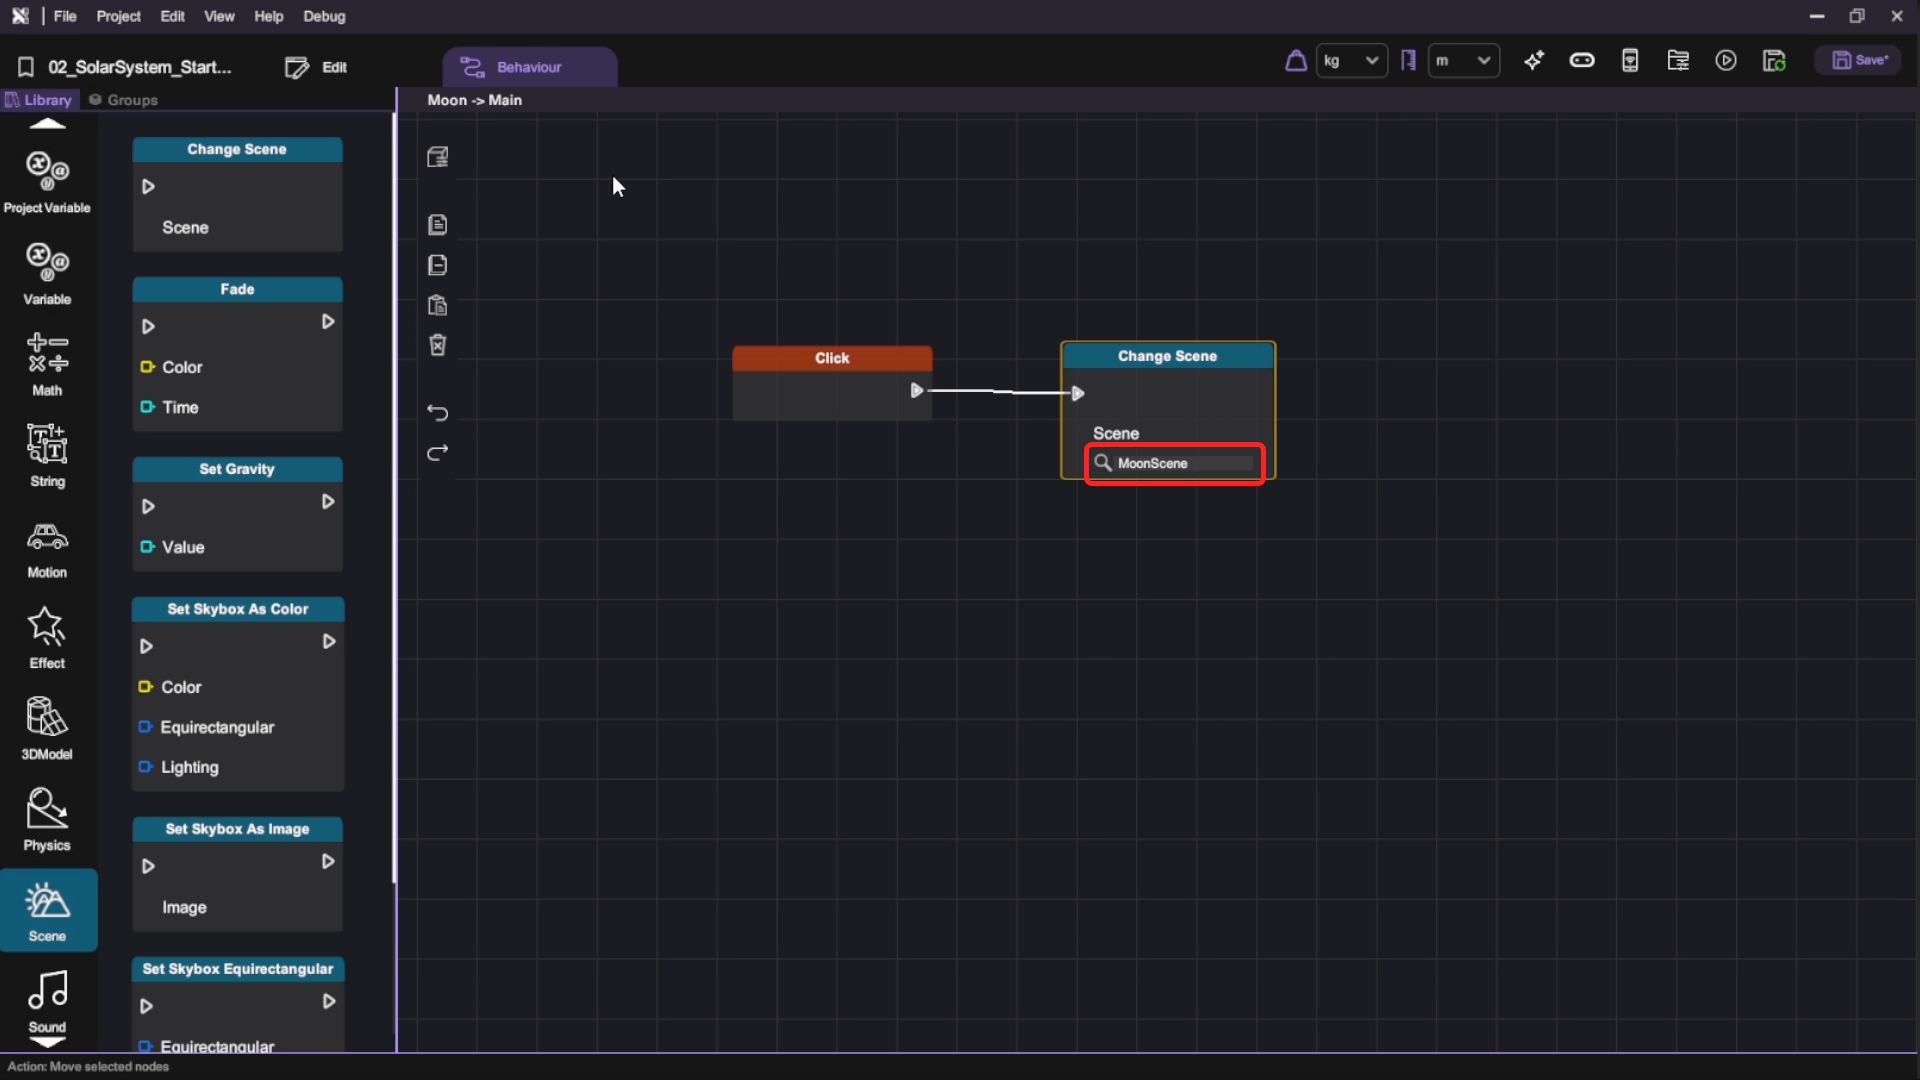
- Then repeat the same procedure in the Moon's behaviour Main layer canvas.
-
Select "User Setting" in the scene and open the "Inspector" to configure the scene settings. Select "Wand" as the "Default Tool". This sets the Wand tool as the default interaction tool in XR mode. Then change the "Interaction Scope (Wand Length)" into "50".
Add Outline Effect to Objects
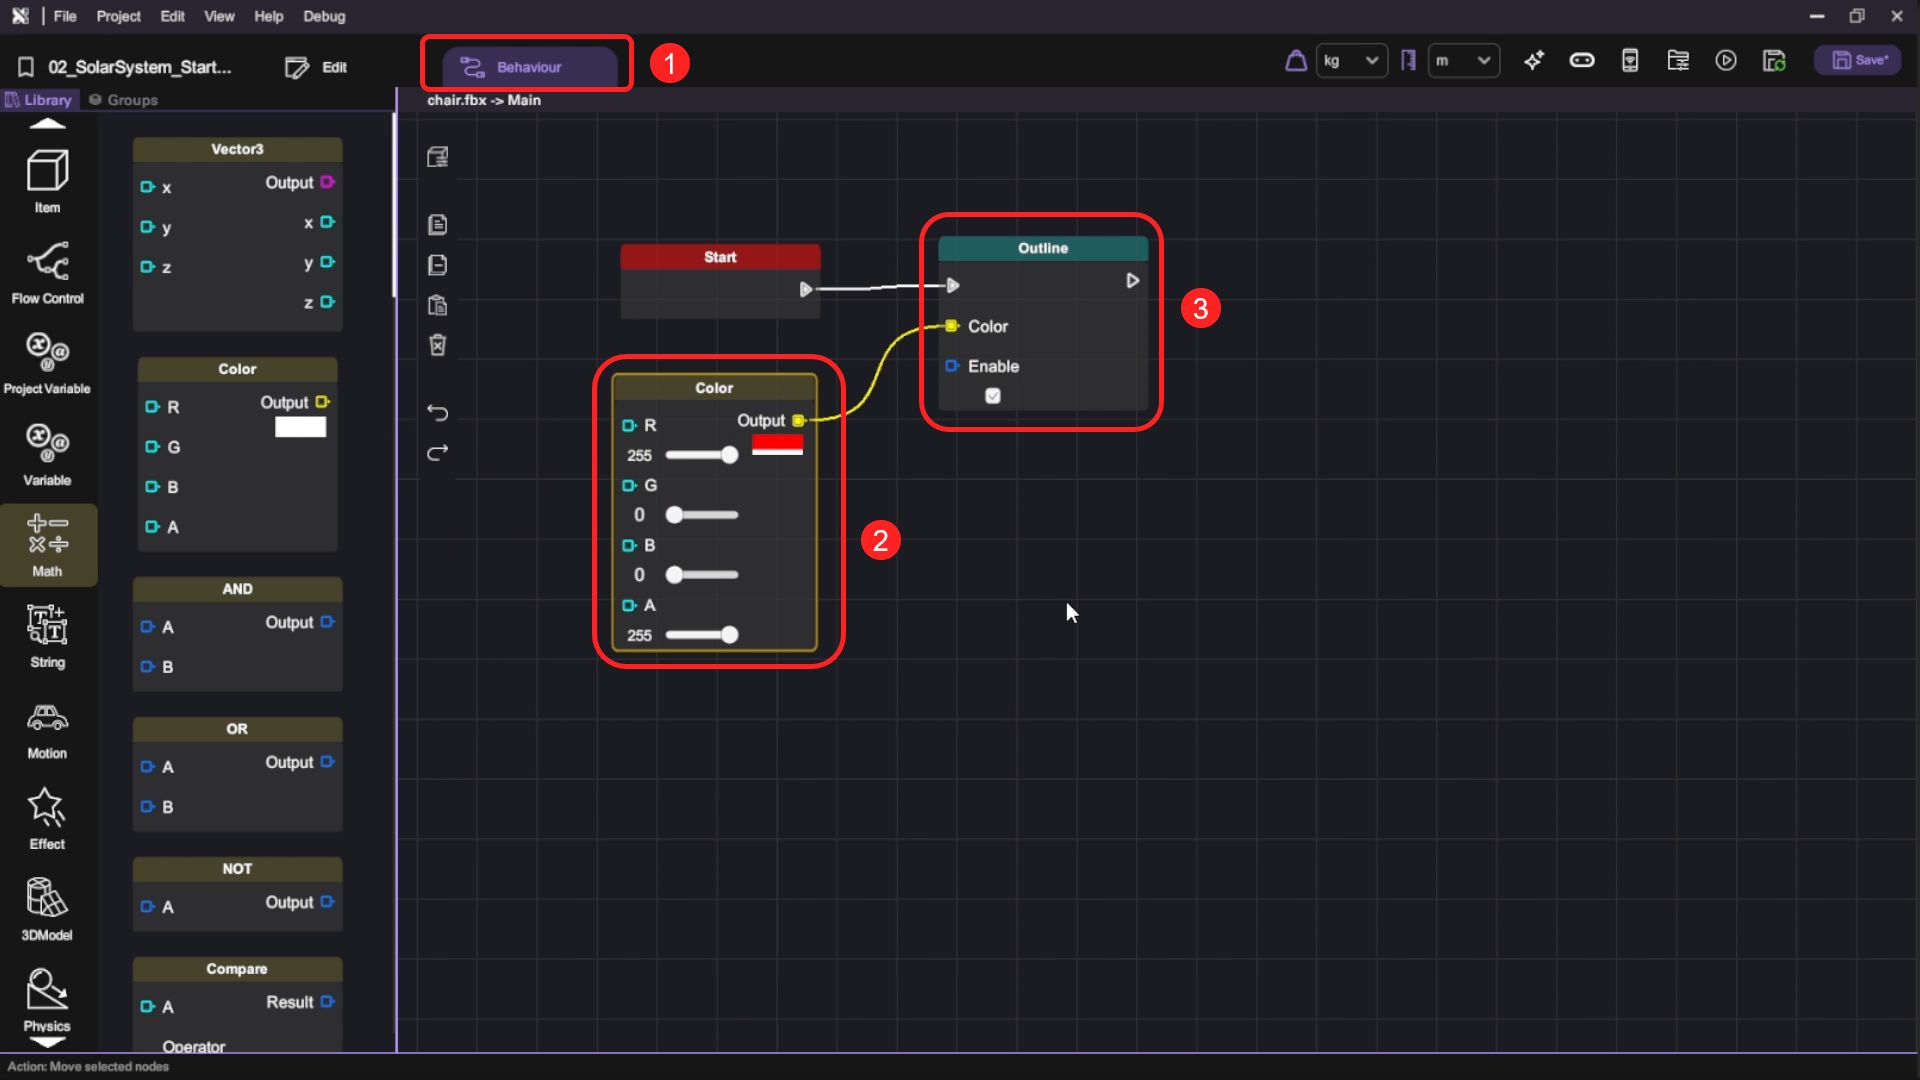
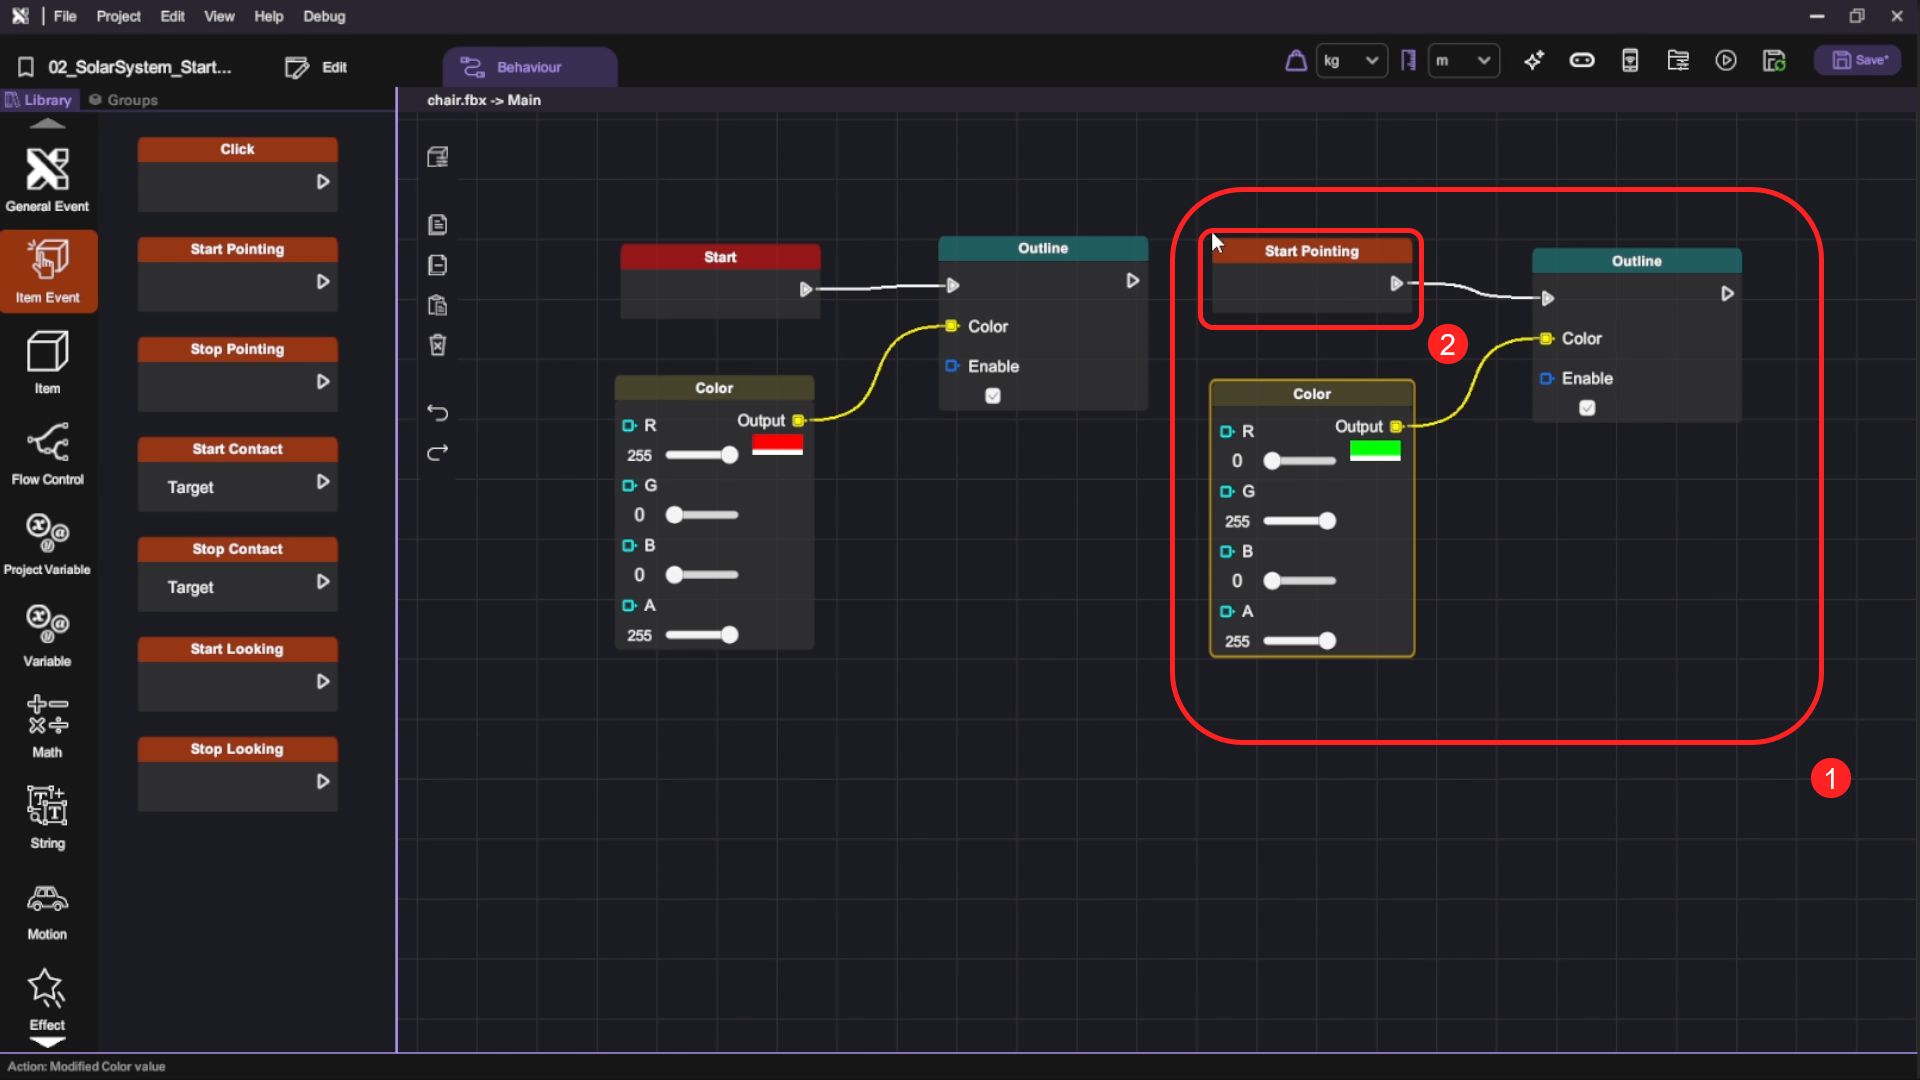
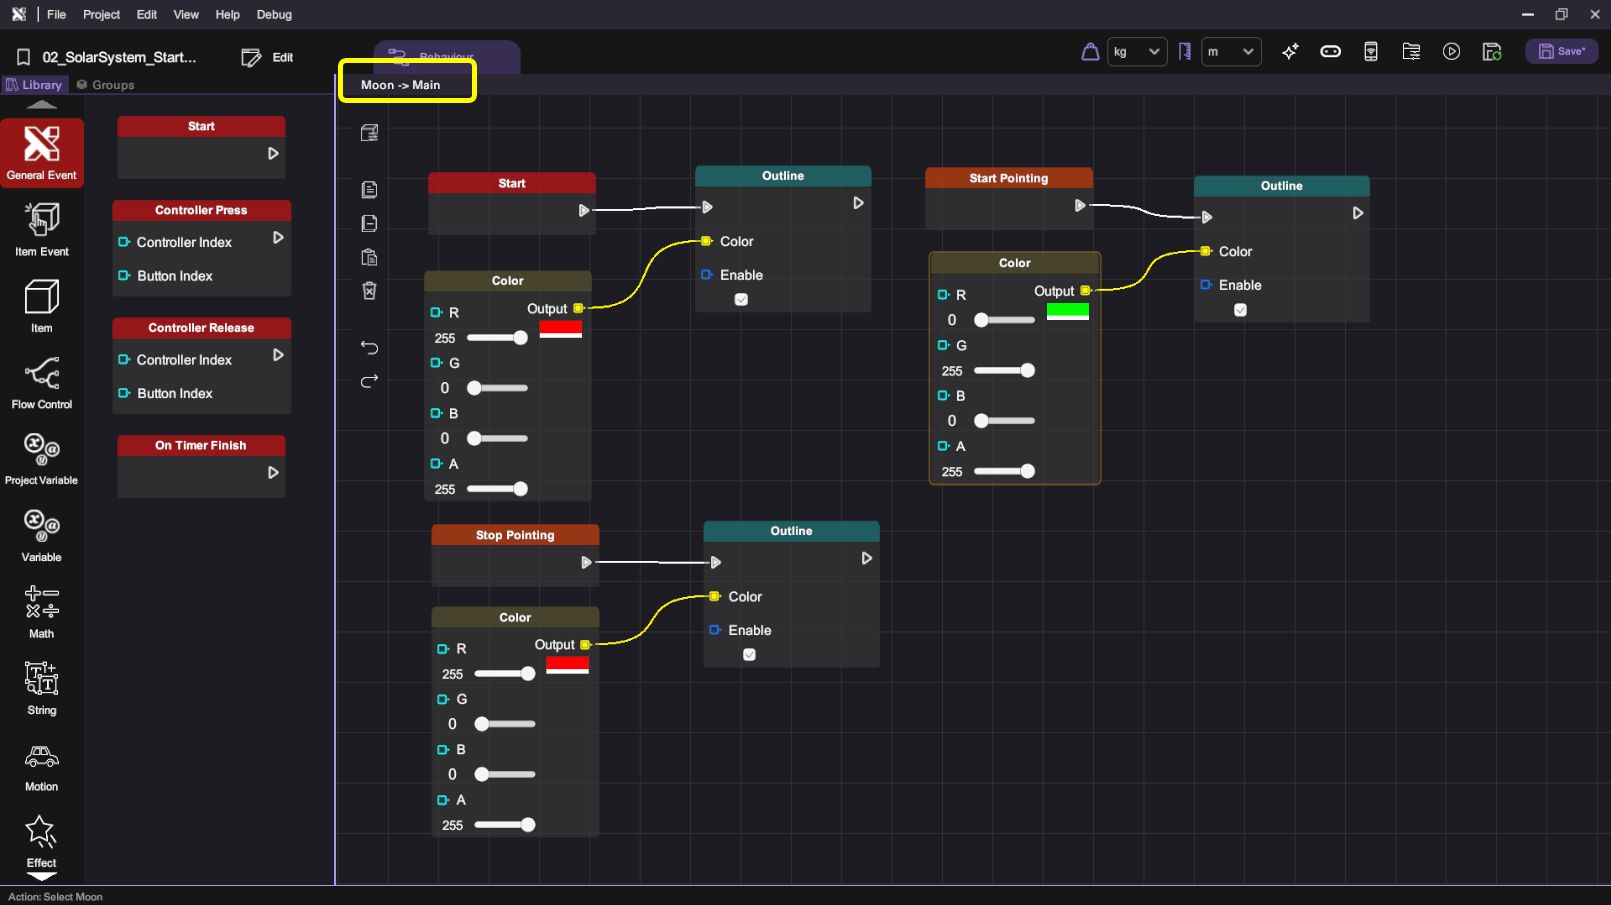
- In the Earth scene, open the behaviour panel for one of the items. Construct a behaviour flow using "Start" event trigger block, "Color" Math block and "Outline" Effect block. Set the "R" (red) value of the Color block to 255 and the "A" (alpha) value of the Color block to 255, and all other values to 0, the color preview under the "Output" node should show a red color. Connect all the blocks in the same manner as shown below. This gives the items a red outline when scene starts.
- Drag the behaviour canvas to an empty space, create another behaviour flow using the "Start Pointing" event trigger block, a "Color" Math block and an "Outline" Effect block. Set the "G" (green) value of the Color block to 255 and the "A" (alpha) value of the Color block to 255, and all other values to 0, the color preview under the "Output" node should show a green color. Connect all the blocks in the same manner as shown below. This gives the objects a green outline when pointed at with the Wand.
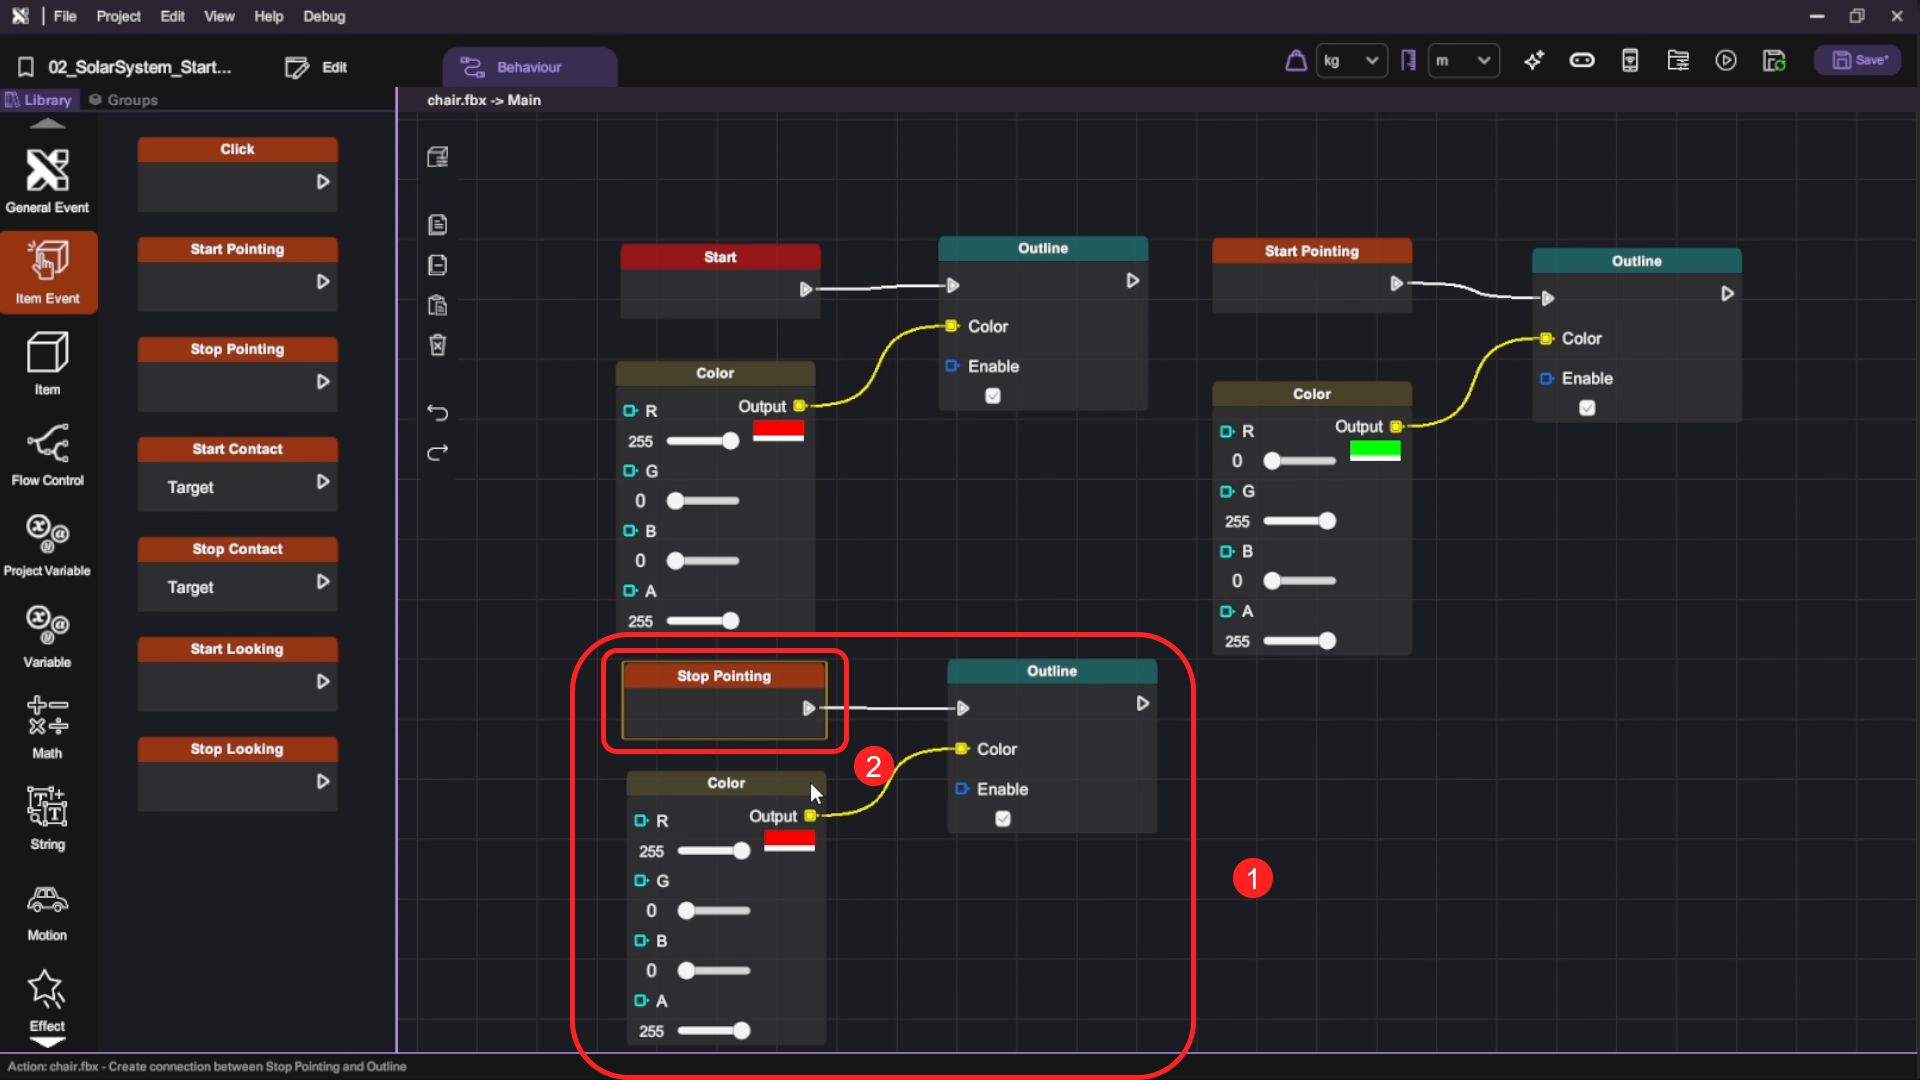
- Copy and paste the above behaviour blocks to another empty space on the canvas, then replace the "Start Pointing" block with a "Stop Pointing" block. Set the "Color" block value to red for this behaviour flow. This time, the objects will again show a red outline when the Wand stops pointing at them.
-
Select the whole outline effects behaviour flow, Copy (Ctrl + C) and Paste (Ctrl + V) all the behaviour flows to the other items.
-
You have now finished setting up the outline effects for the items. Press the "Play" button and test your scene. The items will show a green outline when pointed at and a red outline in other circumstances. Press "Esc" to exit play mode after you've finished testing your scene.
-
We can apply the same technique to add outlines to the planets in the "Solar System" scene. Using the Earth object as an example, we first select it and open its behaviour panel.
- Paste (Ctrl + V) the whole outline
effects behaviour flow onto the Earth object's Main layer canvas. Then
repeat the same procedure for the Moon's behaviour Main layer canvas.
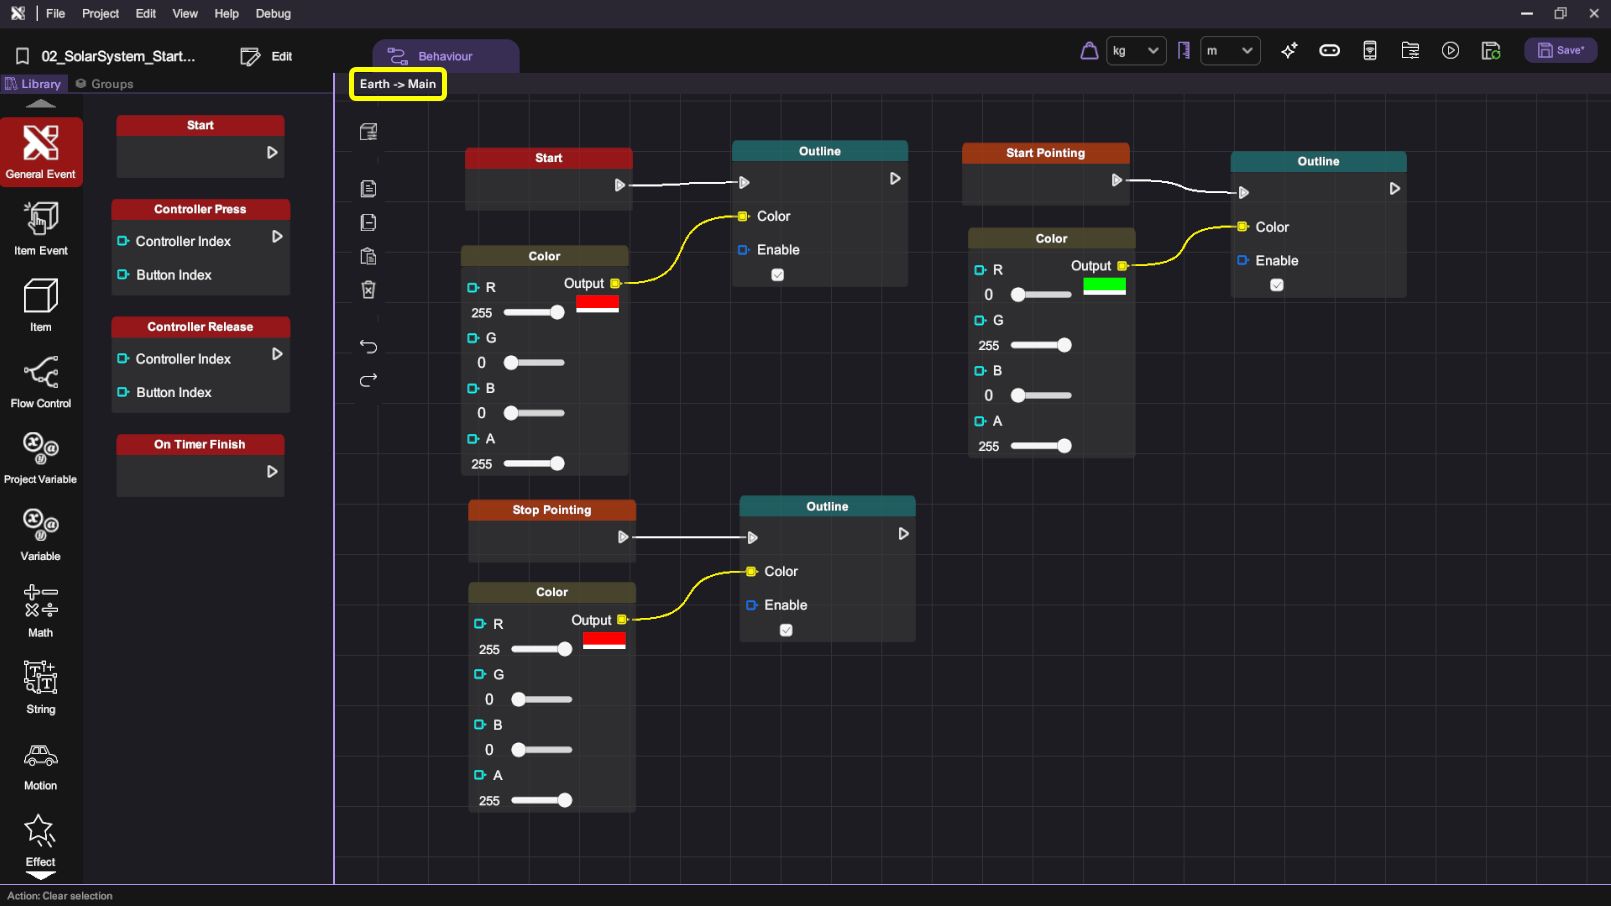
- Repeat the same procedure for the Moon's behaviour Main layer canvas.
-
You have now finished setting up the outline effects for the Earth and Moon planets. Press the "Play" button and test your scene, then use the Wand to click the "Earth" planet to enter the Earth scene.

-
Press "Esc" to exit play mode after you've finished testing the change scene feature.