XRCC Tutorial - Cook and Serve
Overview
You will build an interactive VR game about cooking and serving food using XRCC in this tutorial. This tutorial demonstrates some more advanced ways to control the game flow using behaviours, especially with the Flow Control behaviour blocks. If you are new to XRCC, we recommend that you complete tutorials 1 - 3 first before going through this tutorial.
Techniques Covered
You will learn the following techniques in this tutorial:
| Specific Techniques Covered | |
|---|---|
| |
| |
|
Tutorial Project
The project used for this tutorial comes in two formats: a starter project for use in this step-by-step tutorial, and a completed project for your reference after you've completed the tutorial.
Project files for the cook and serve tutorial can be found at:
For this tutorial, the starter project will be used to guide you in building the VR game in a step-by-step manner. All the necessary assets required for the tutorial are already included in the project, so just open the starter project in XRCC and you are ready to go with the tutorial.
A complimentary video for this tutorial is available from the below link to assist your learning process:
Gameplay Flow
- You are role-playing as a chef in a restaurant.
- Customers will keep ordering food and you need to provide the requested food to them.
- Combine the ingredients on the table to make the required food.
- Serve the food on the plate to the customer.
Assets Provided in the Starter Project
The starter project for the cook and serve tutorial provides a comprehensive set of assets and functionalities to get you started. This includes a 3D model of a restaurant for building the scene. Additionally, the project includes a female adult character for the customer. You'll also find a bread object for making the chicken burger, a chicken object for cooking the chicken burger, and a rubbish bin object for discarding the food. With these assets and functionalities in place, you'll be able to build a complete example of the game flow.
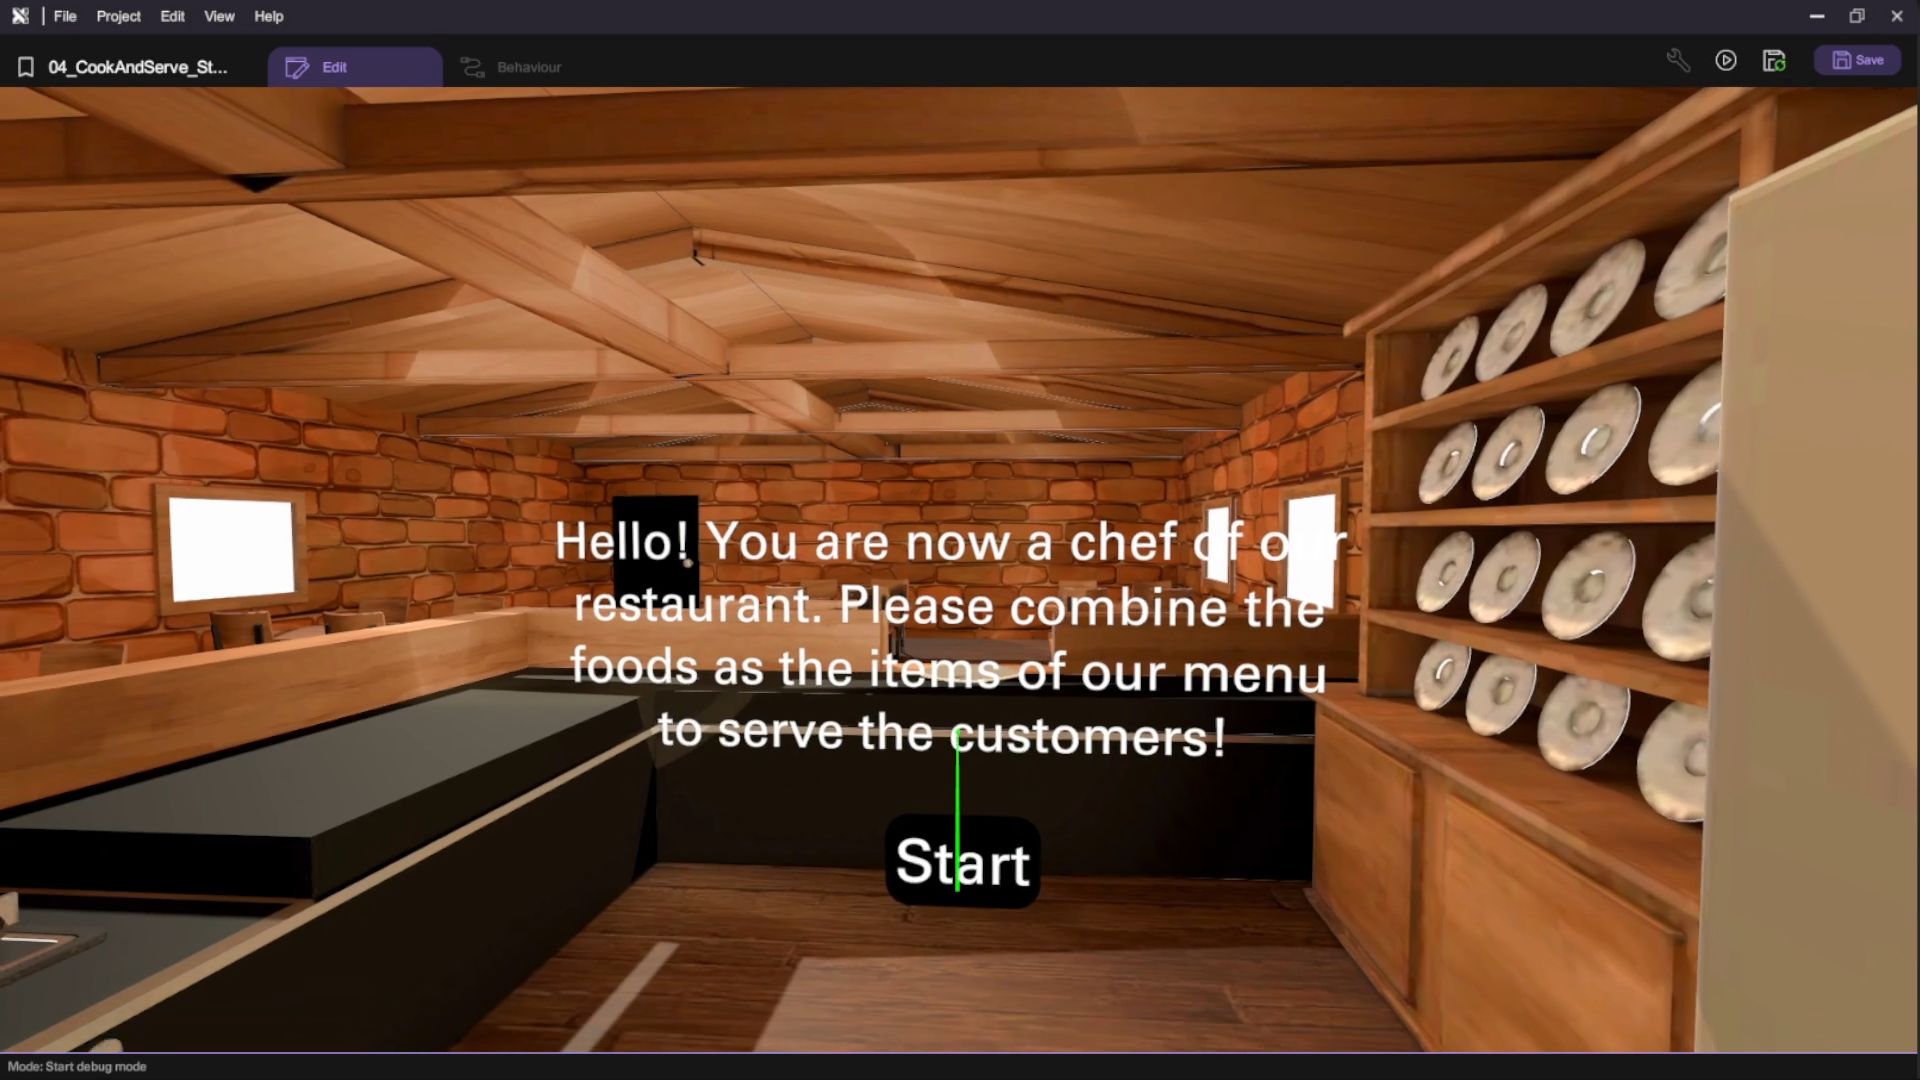
Create Introduction Message
Create an engaging introduction to the gameplay and background for players experiencing the game for the first time.
Set Up the Introduction Text and Button Group
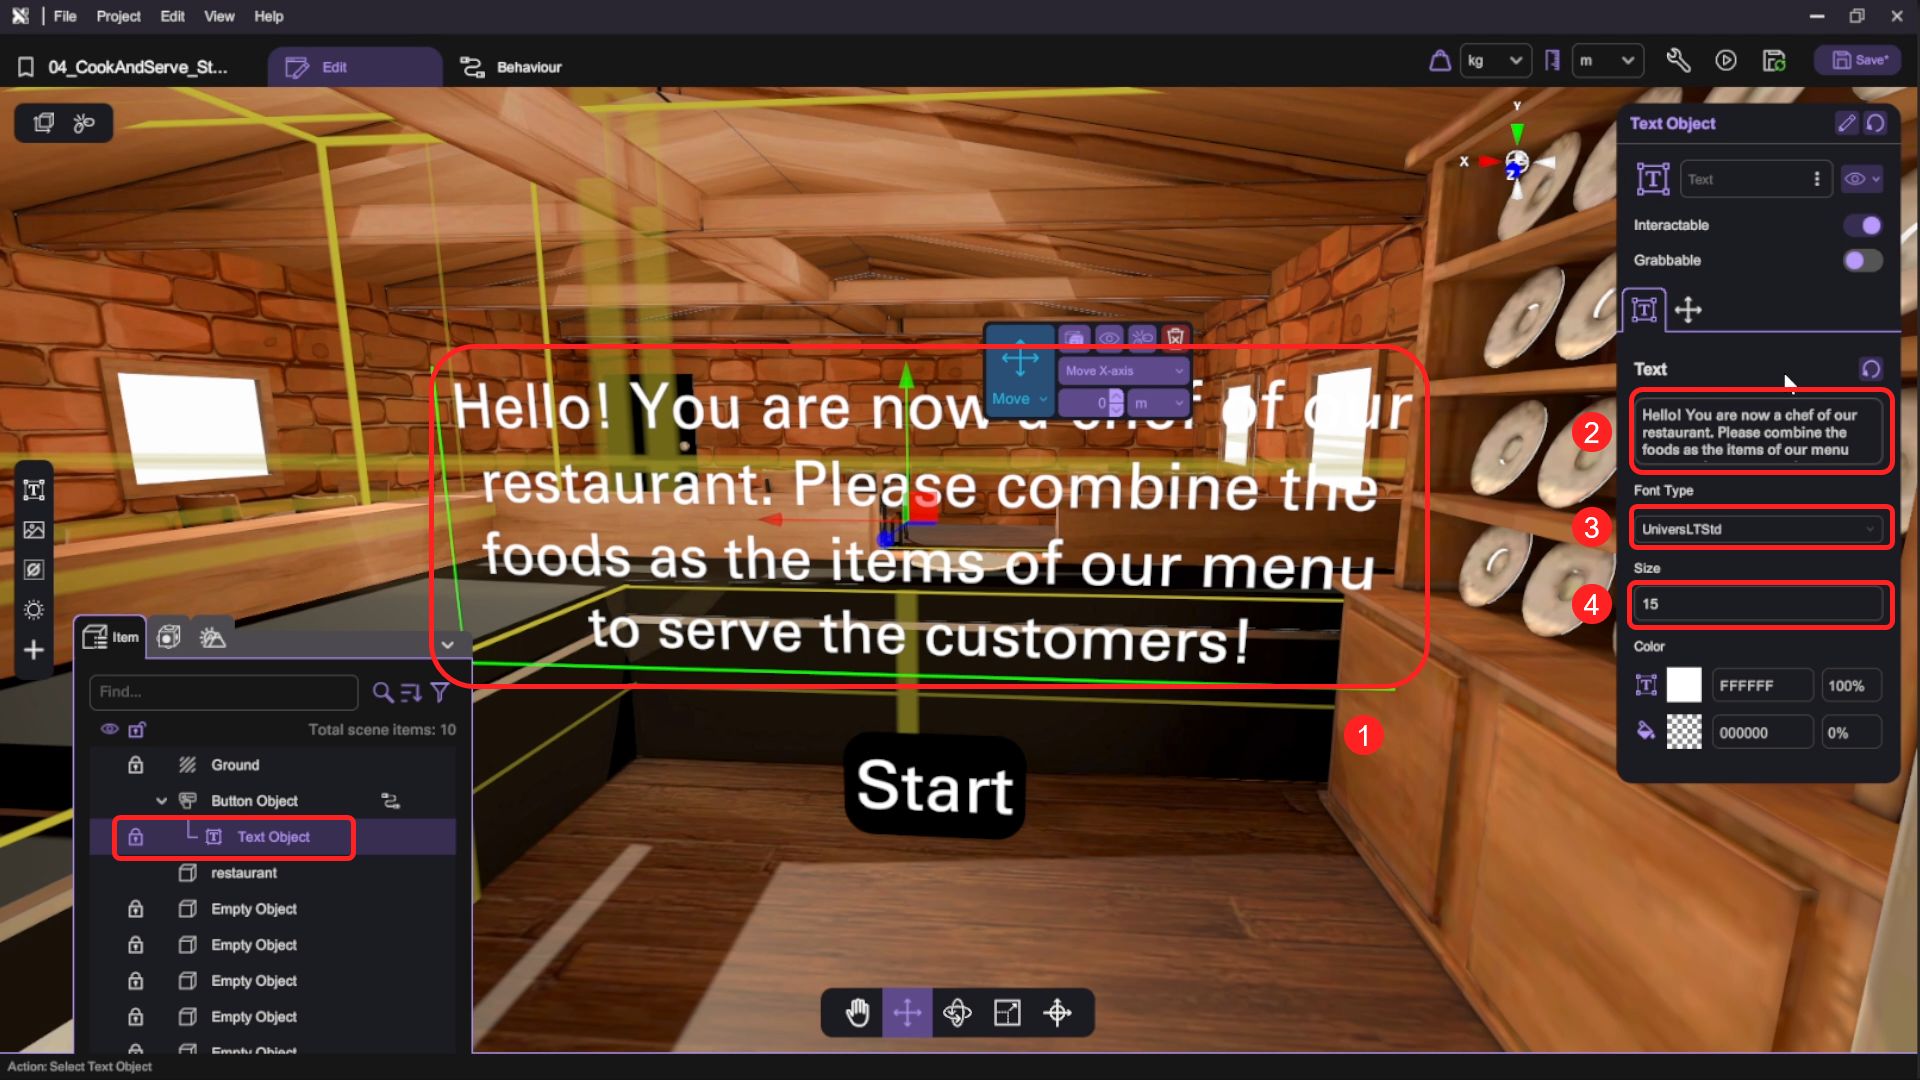
- Add a new "Text Object" to the scene. Reposition the Text Object in front of the player, then open the "Inspector" to set up the text content, font size, and color of the text object.
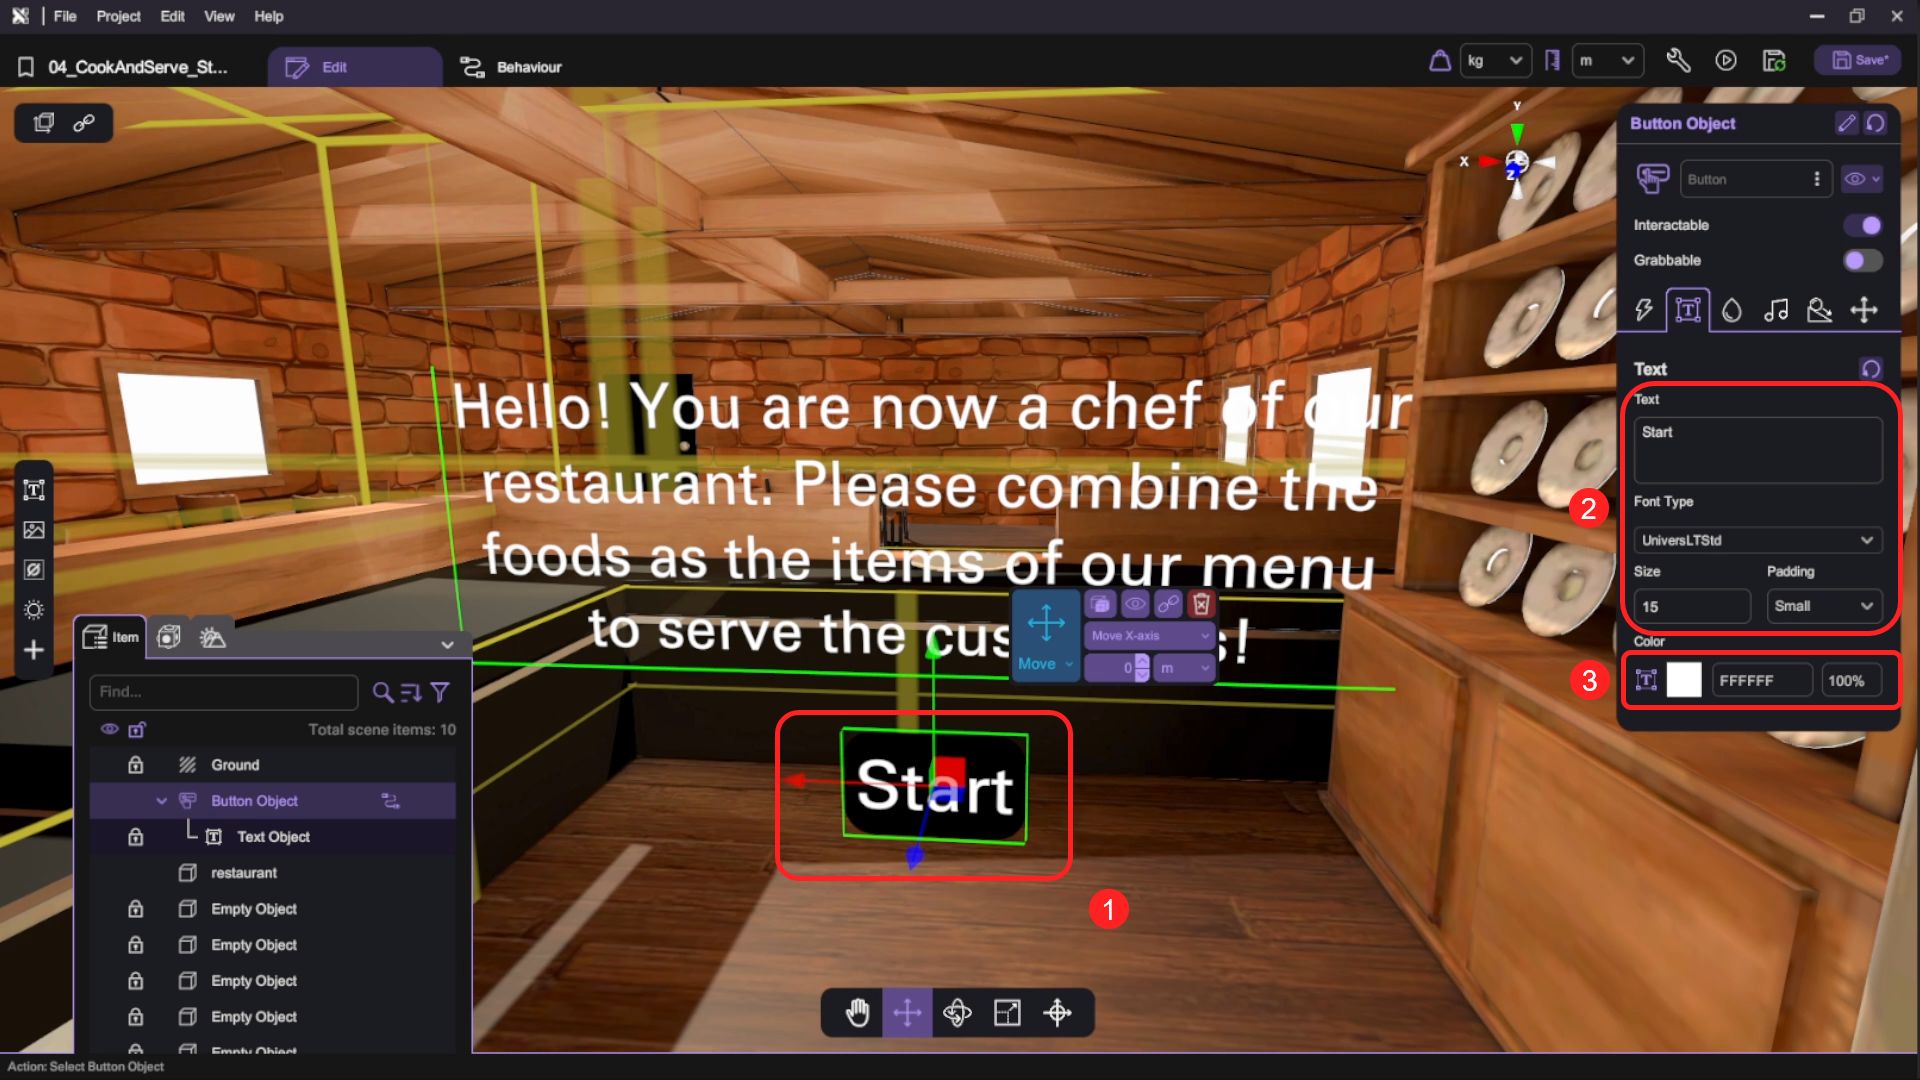
- Add a new "Button Object" to the scene. Reposition the button below the Text Object, then open the "Inspector" to set up the basic properties of the button.
Set up Behaviour to Hide the Introduction Message
-
We would like to configure the Button object, so that it hides the Introduction Message when the button is clicked. This time, we will create a new action from the button object's "Action" option, then proceed to configure it in the behaviour panel.
-
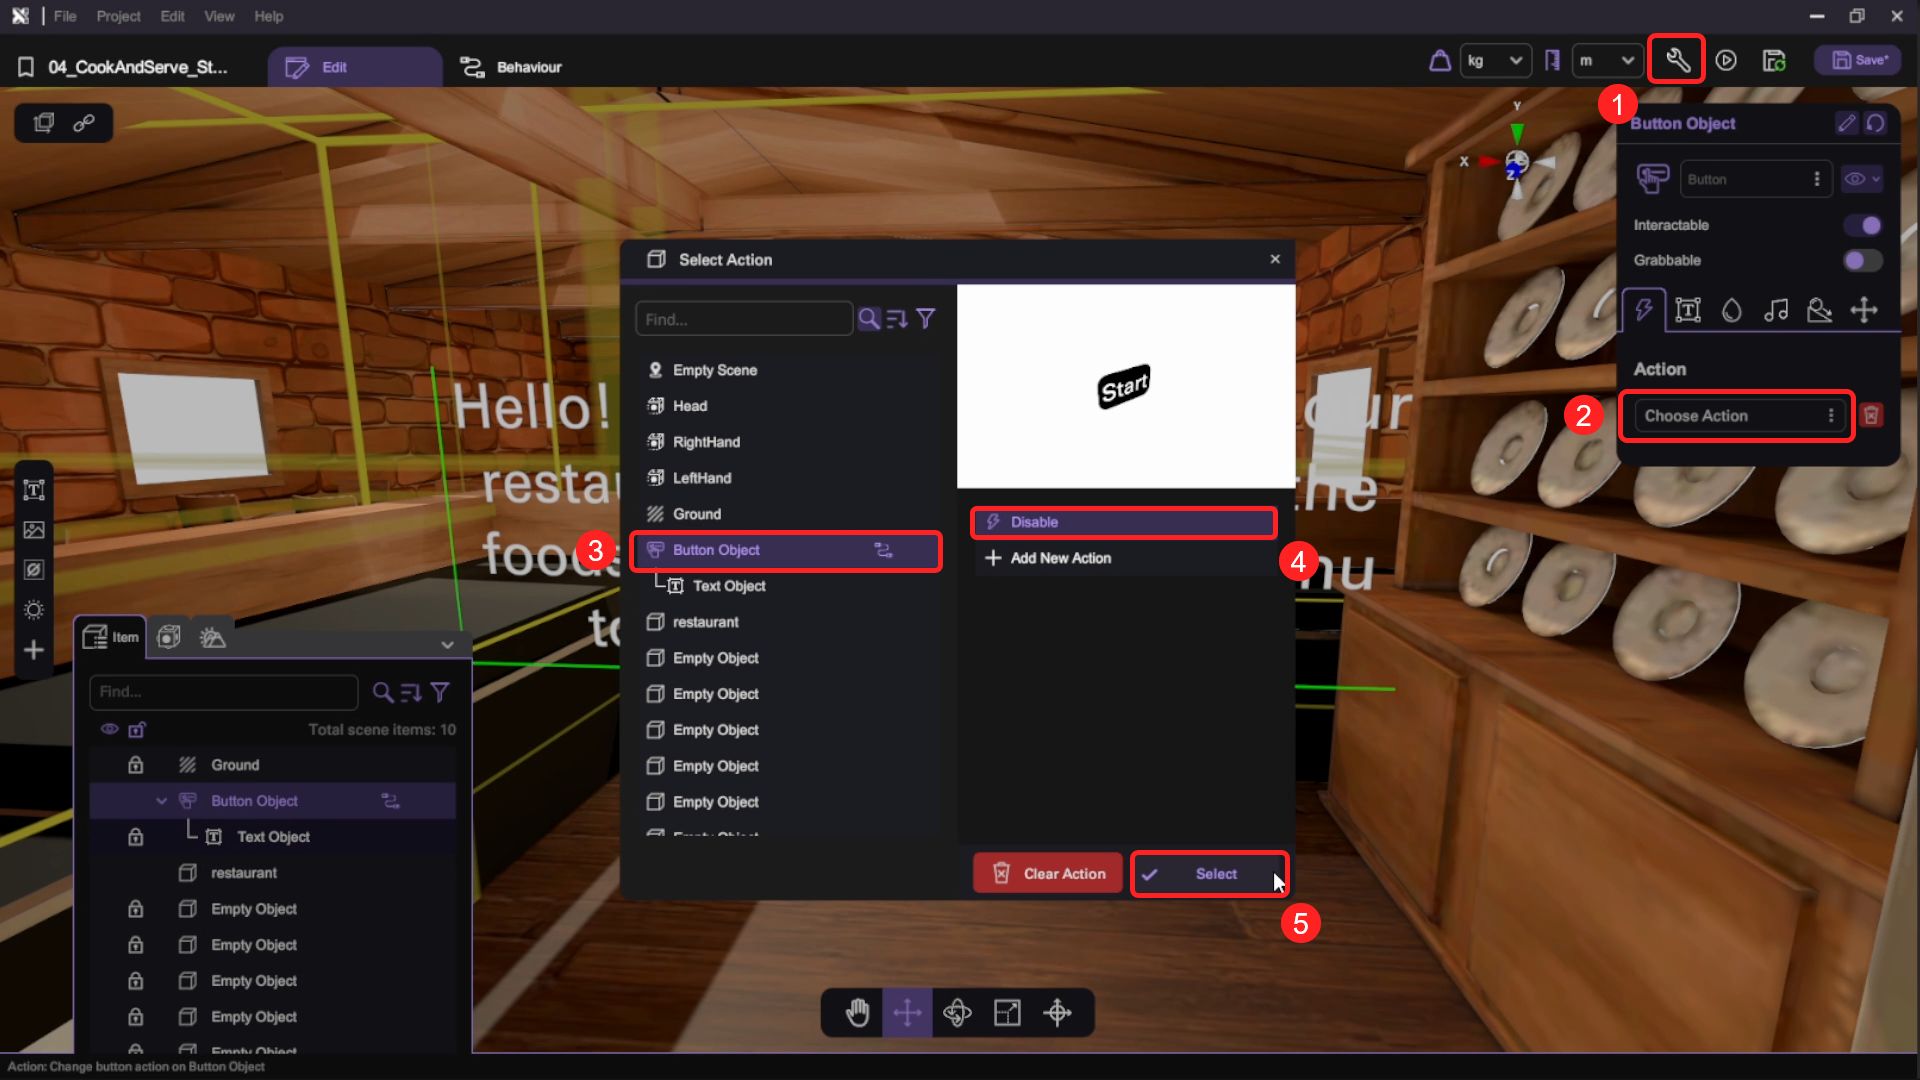
In the Button object's Inspector, open the "Action" selector, in the selection panel choose the "Button Object" and select "Add New Action". A "New Action" will be created, double-click it to assign this action to the button.
- Then switch to the button object's behaviour panel, under "Groups", rename the "New Action" behaviour group action to "Disable".
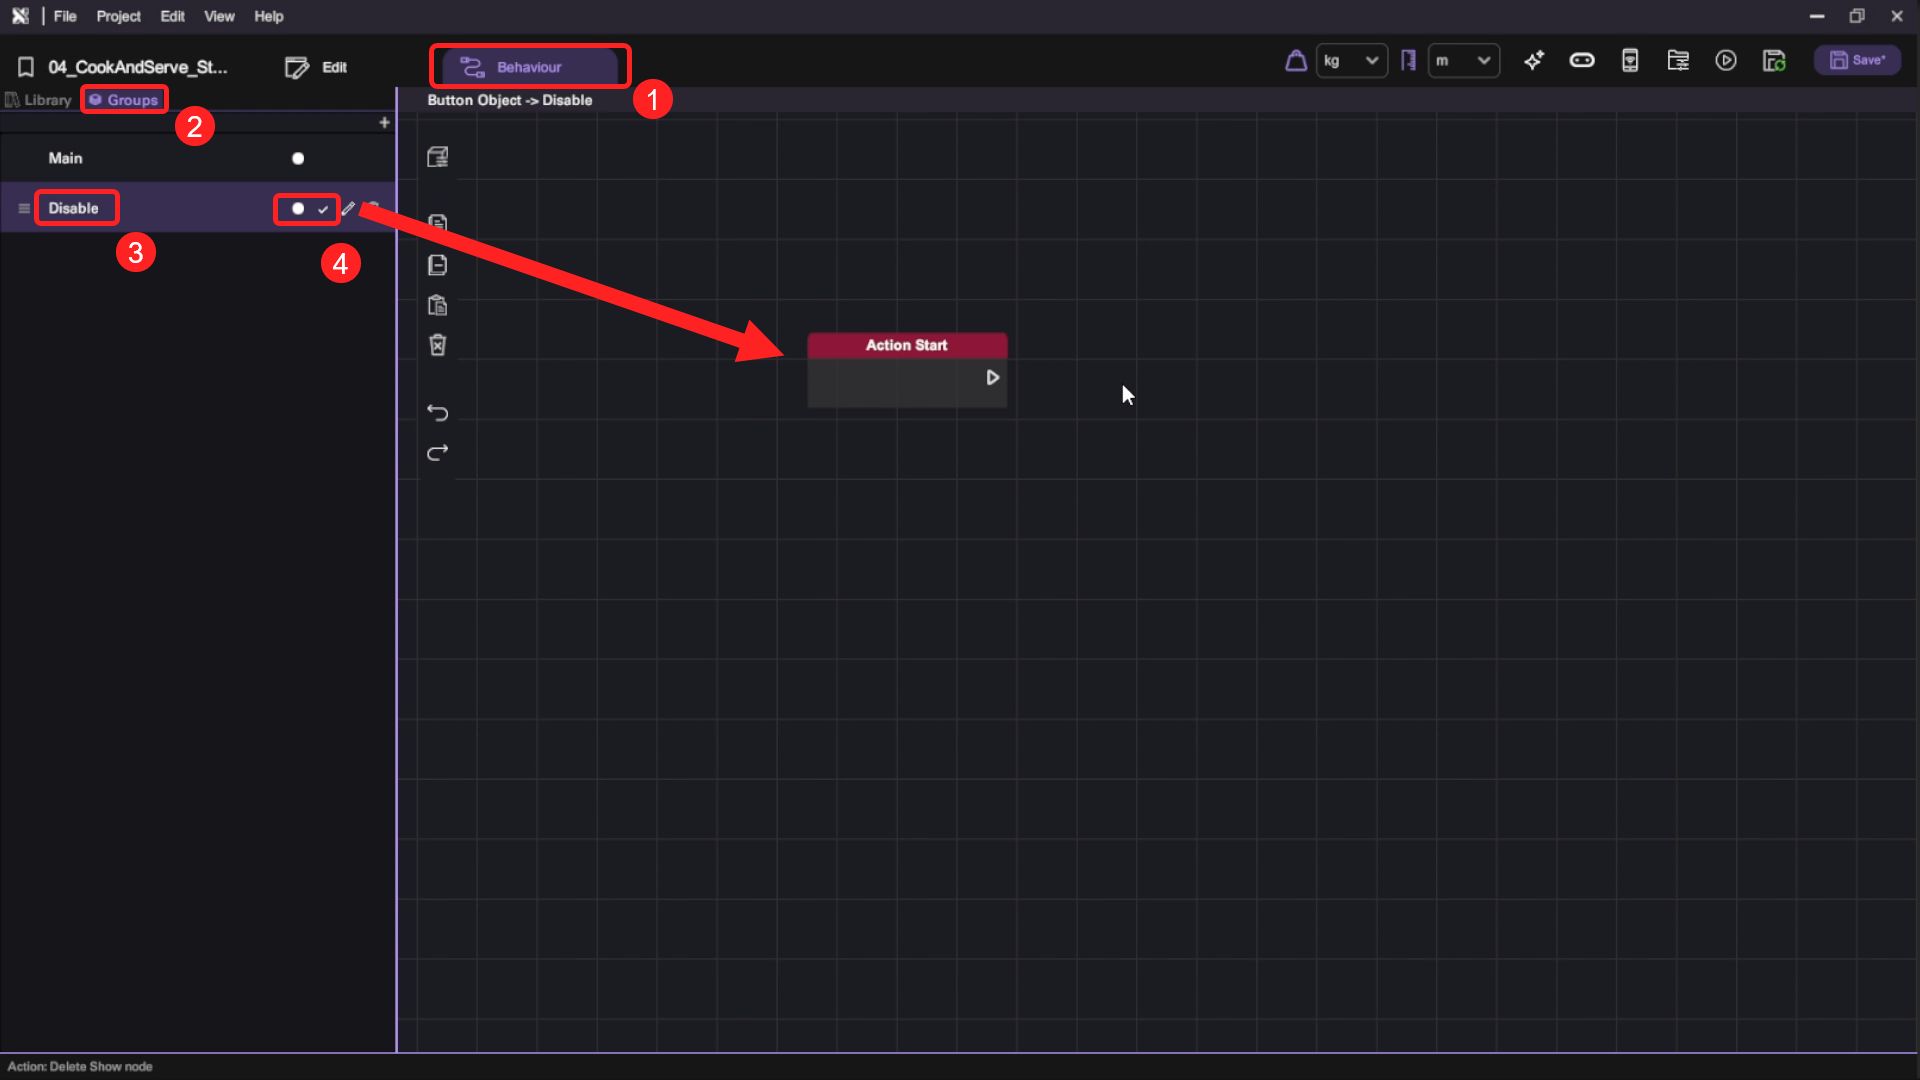
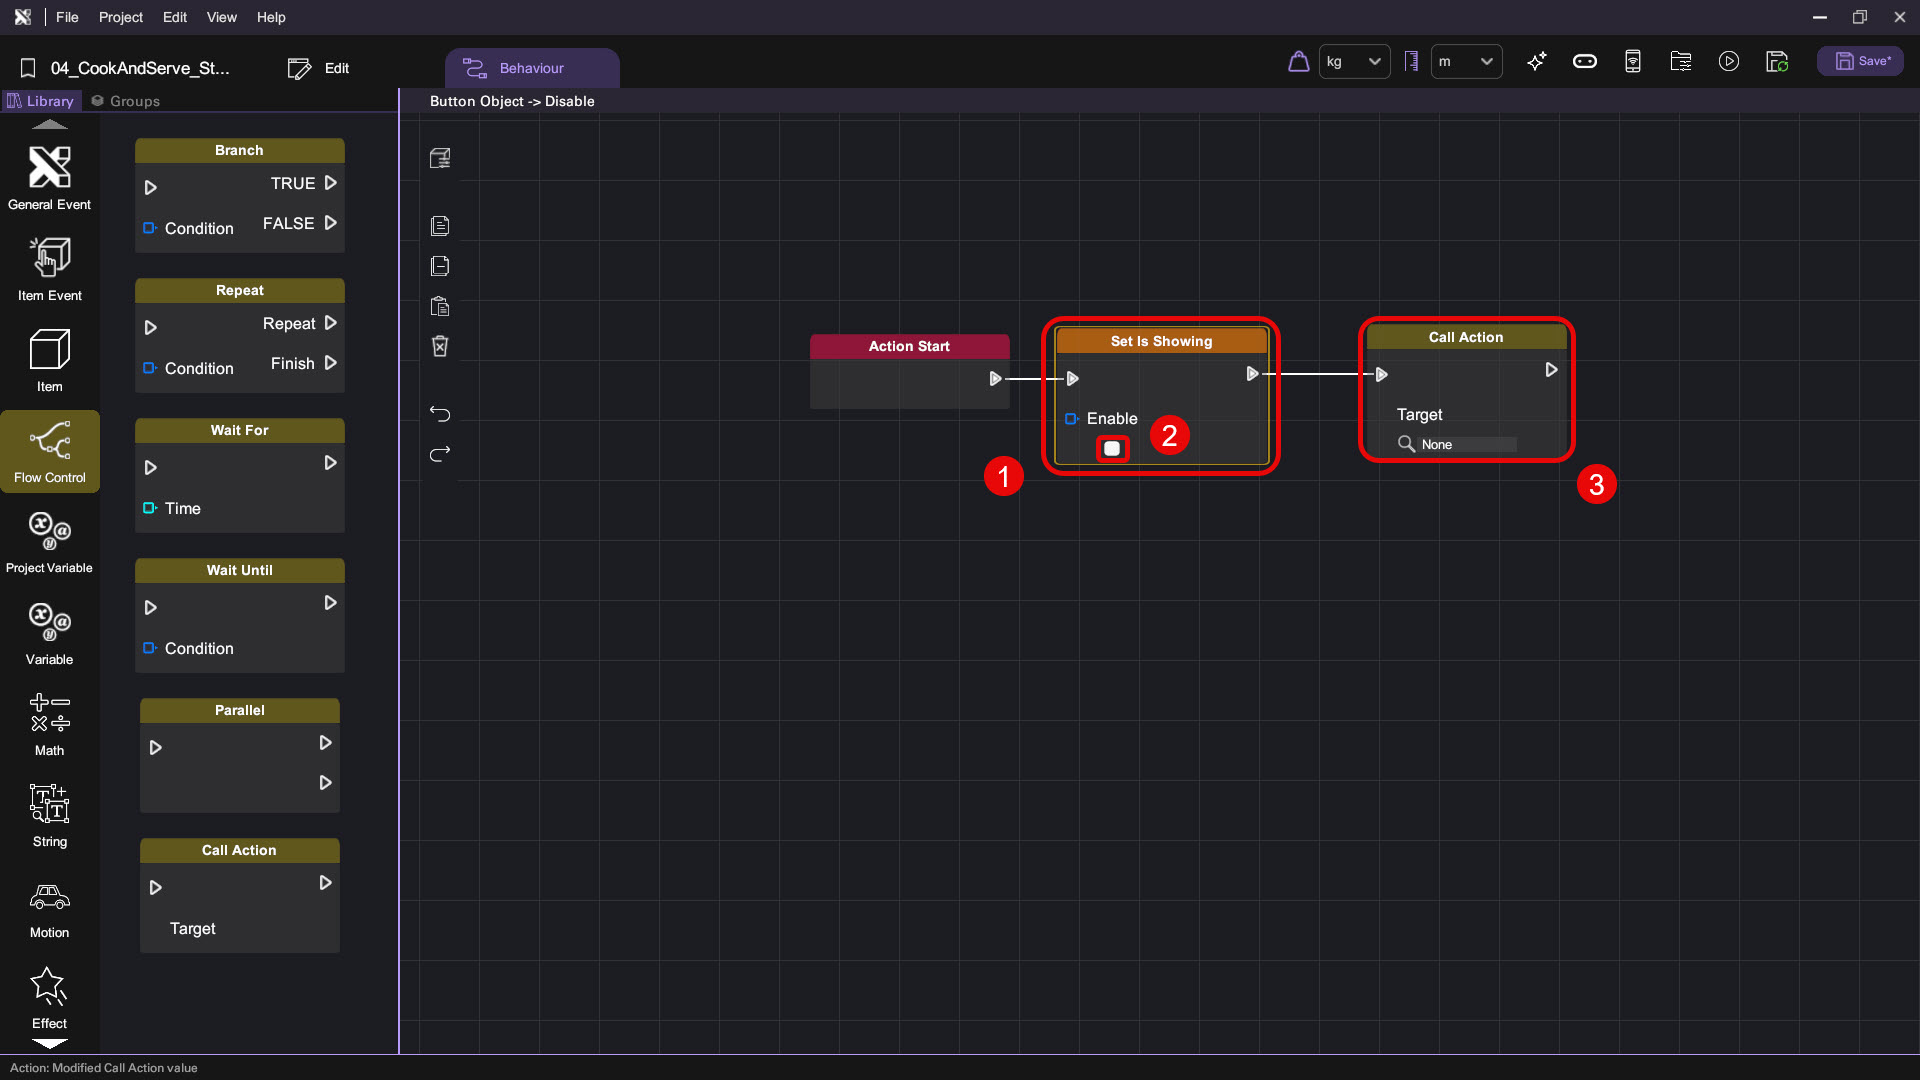
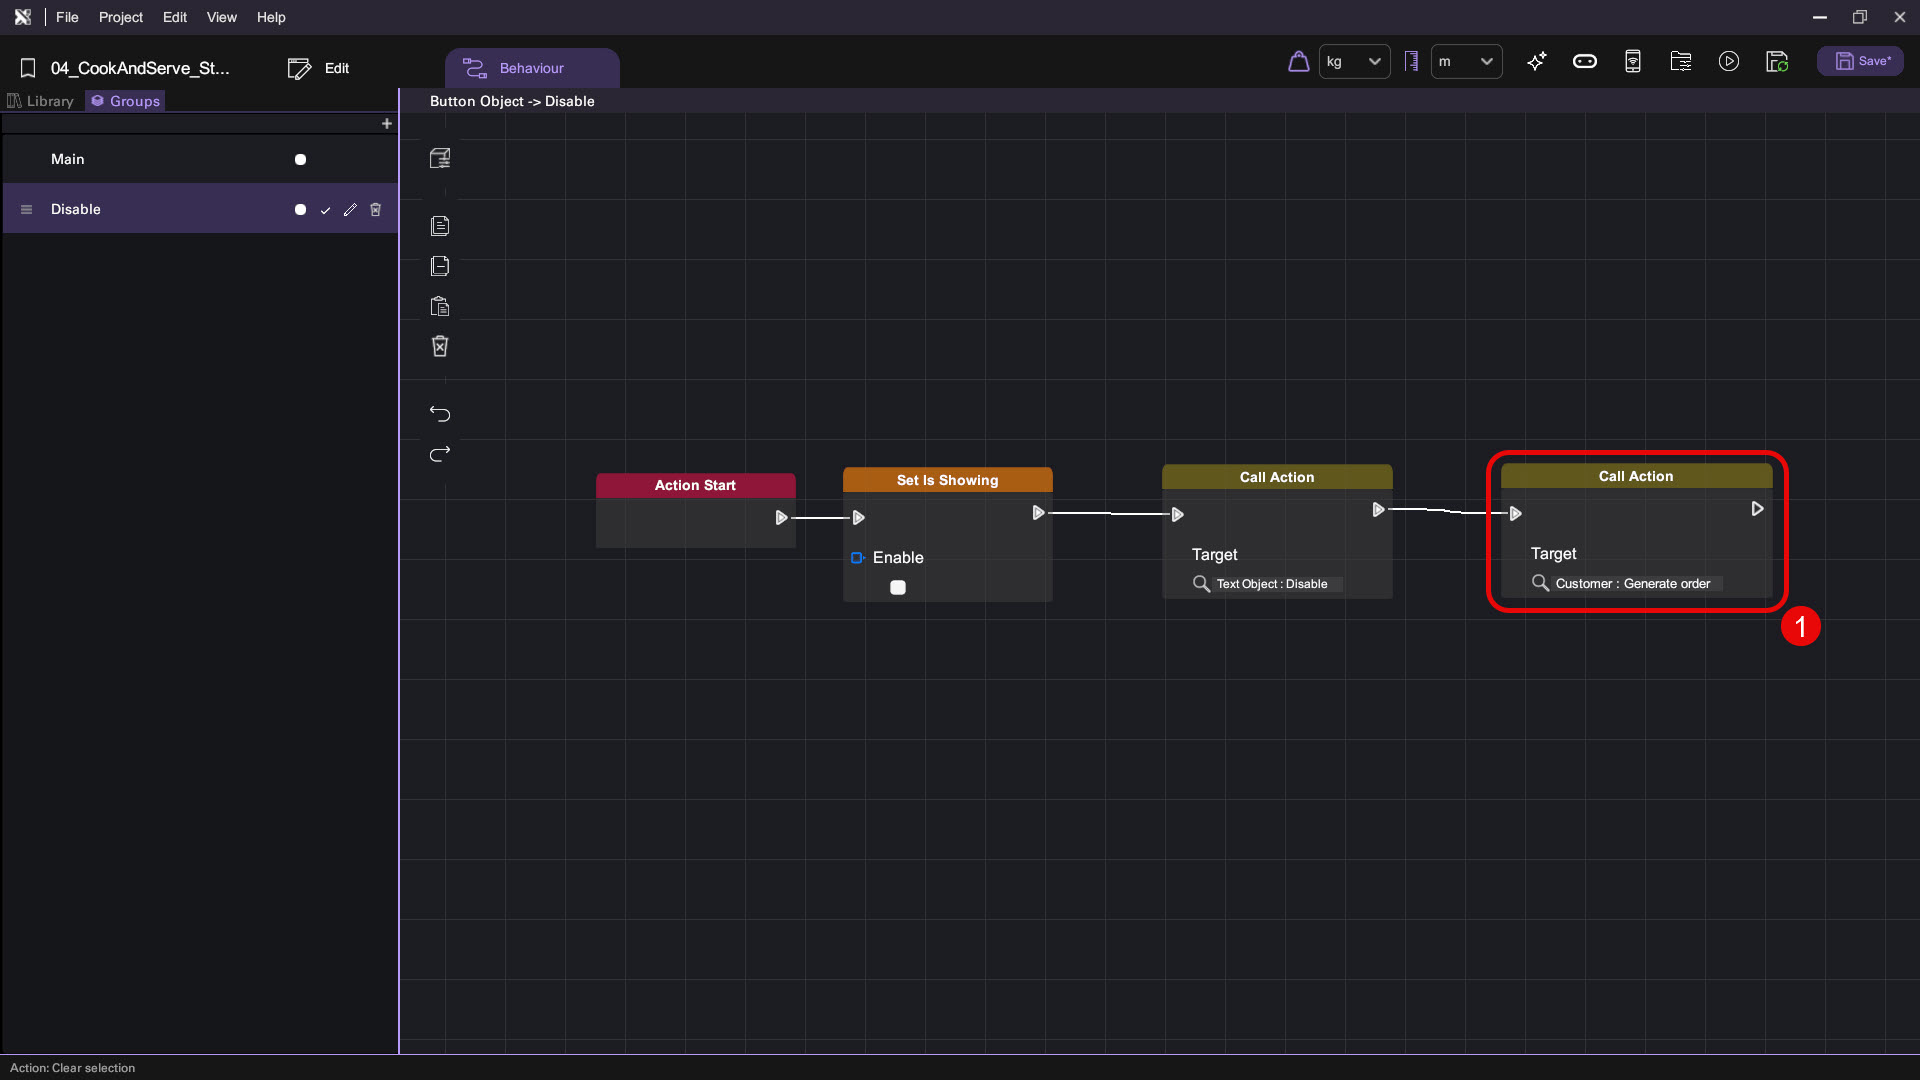
- Append a "Set Is Showing" Item Block to the "Action Start" block, then add a "Call Action" Flow Control block right after it. Set the "Set Is Showing" block's Enable to false. When the button object's "Disable" action is called, we want to hide the button object in the scene then call another action.
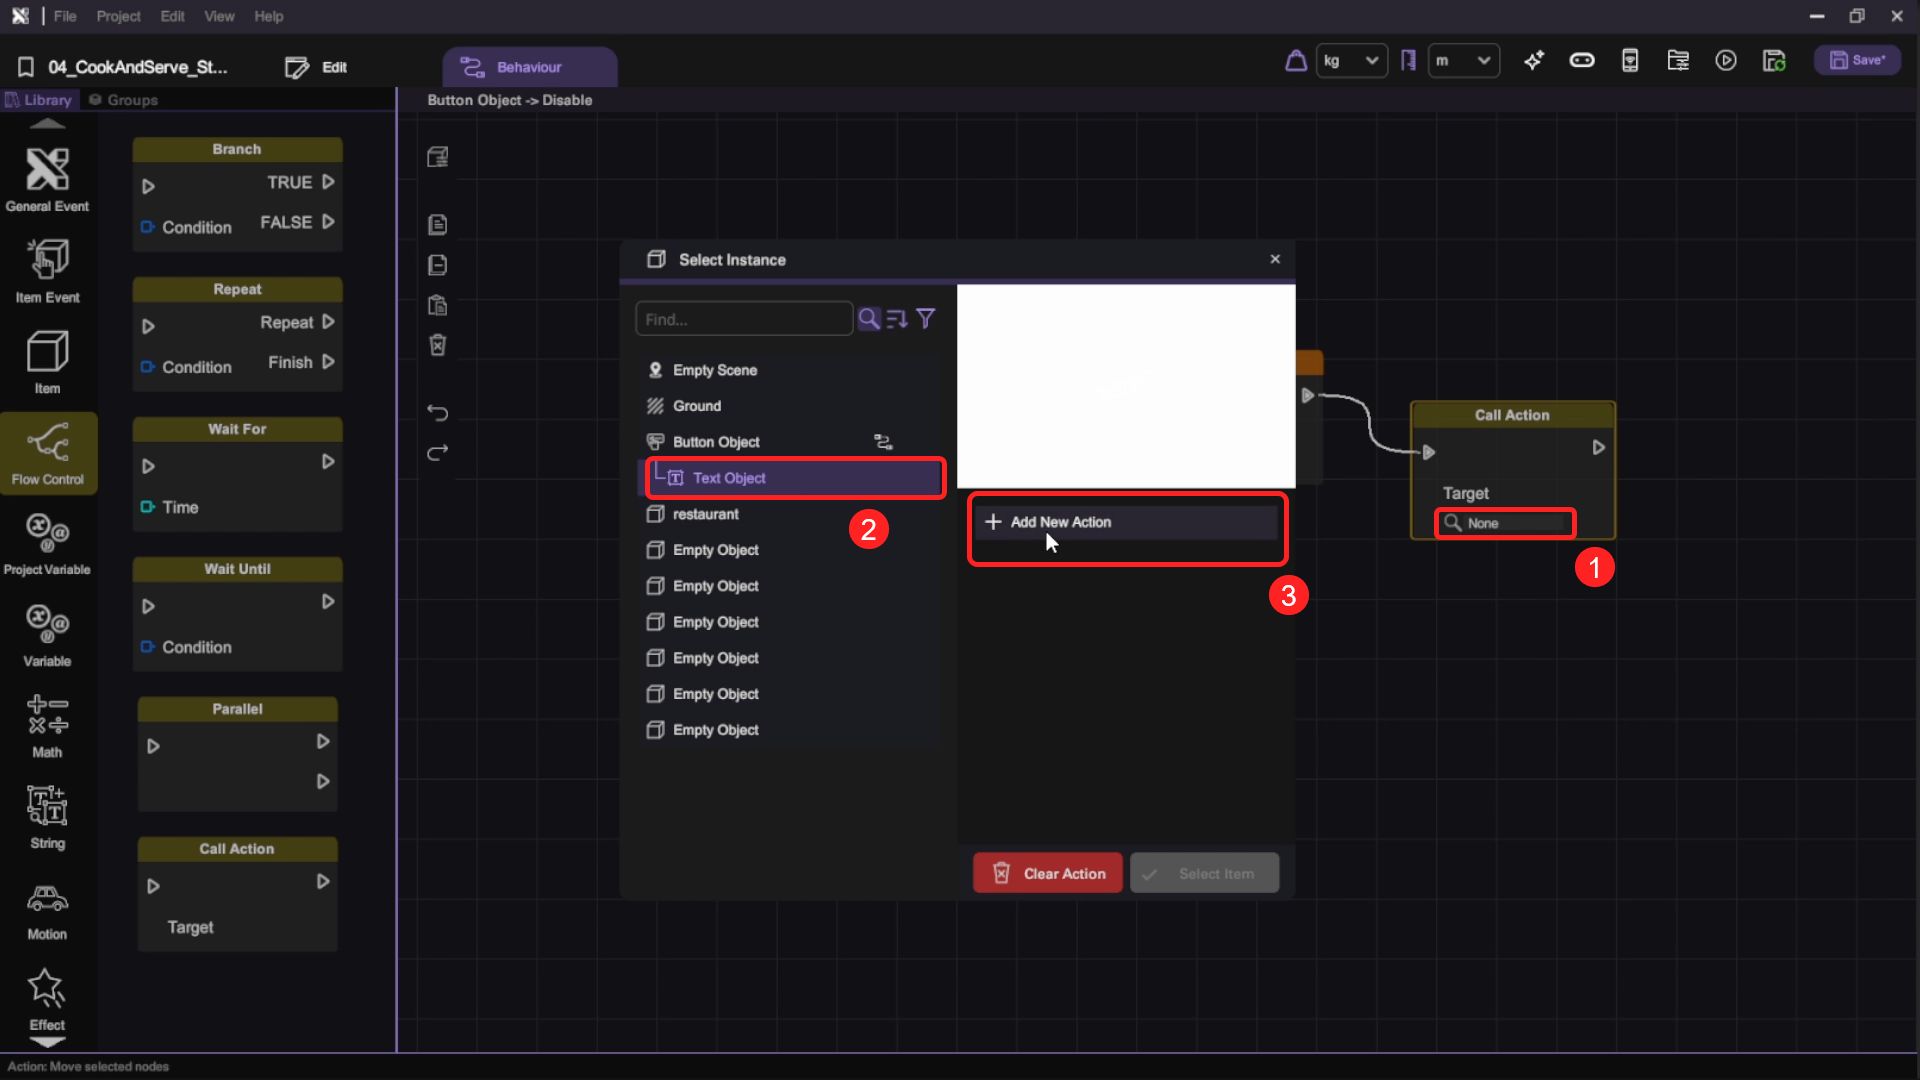
- In the "Call Action" block, launch the selection panel and create a "New Action" for Text Object in the same manner as you did for the button object's new action.
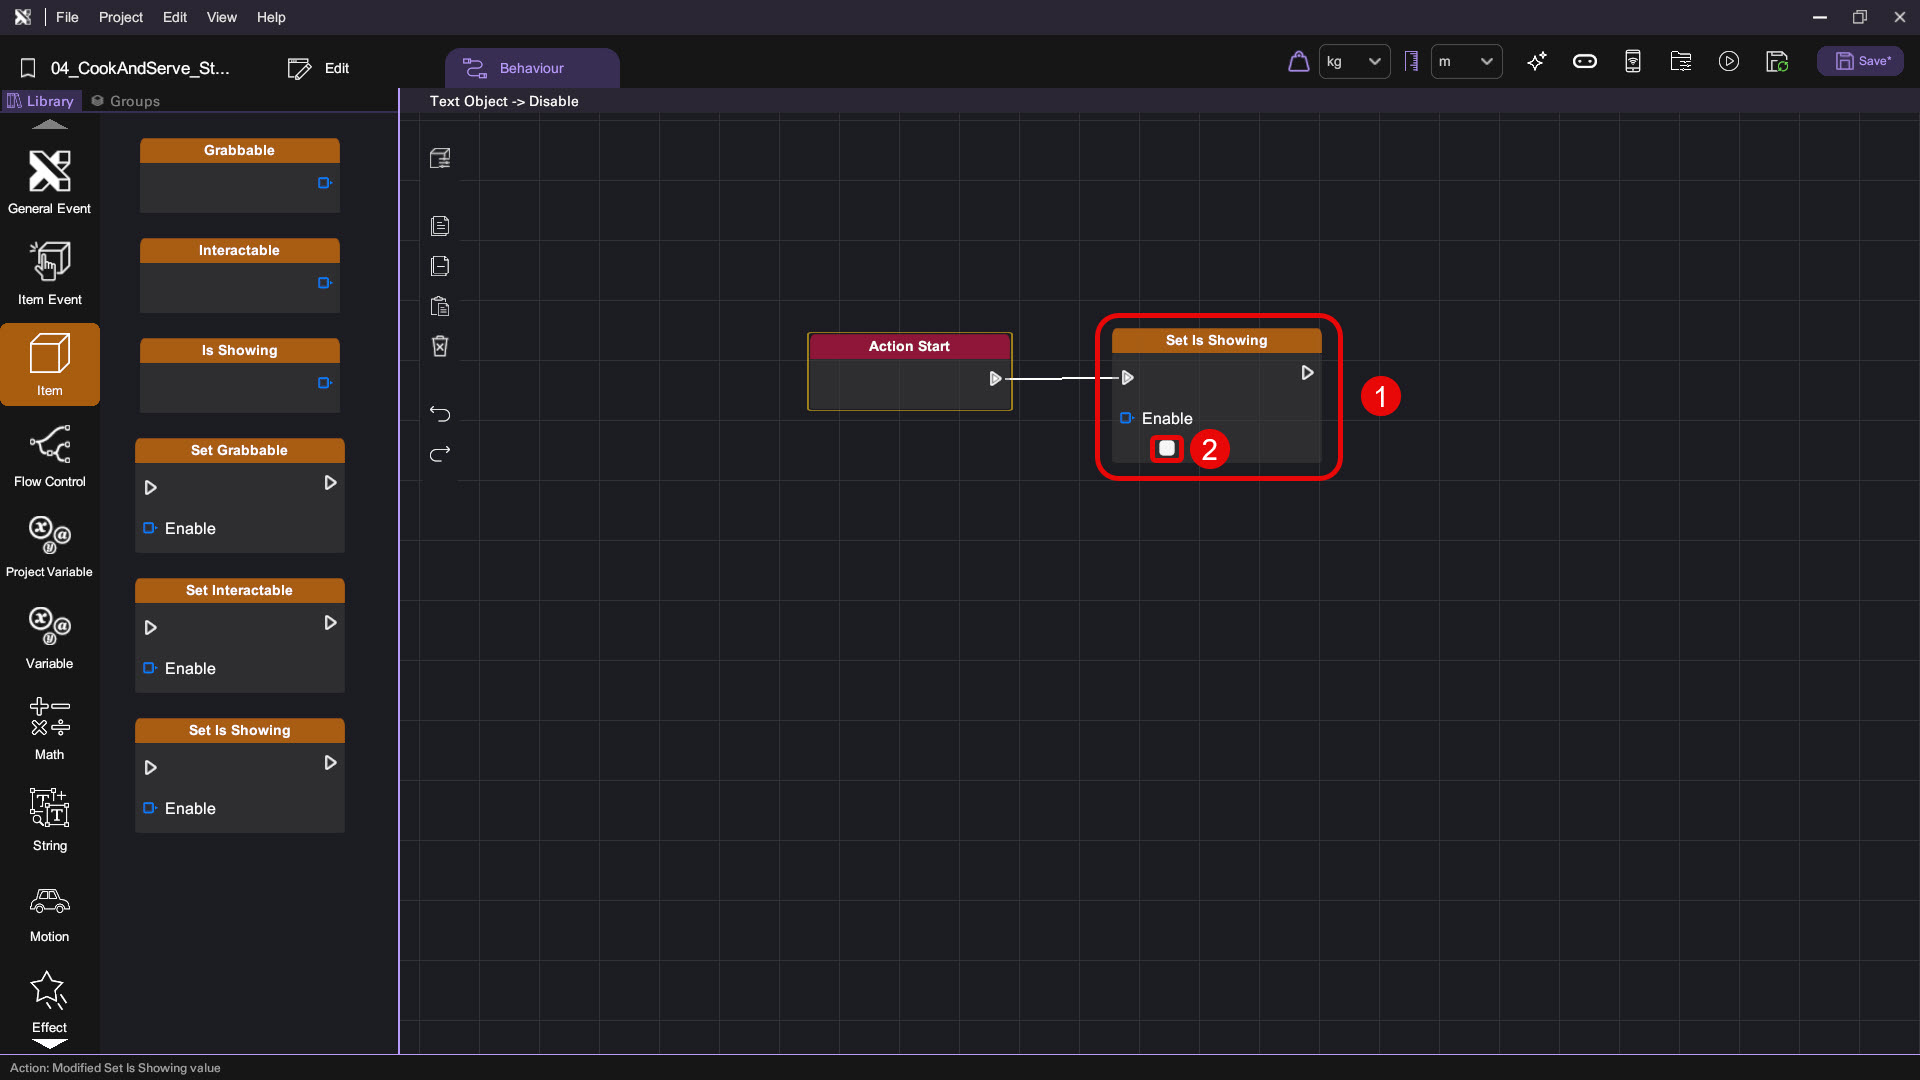
- In the Text Object's behaviour panel, select the "New Action" and rename it to "Disable". Append a "Set Is Showing" Item Block to the "Action Start" block, then set the "Set Is Showing" block's Enable to false.
This action plays out in the same manner as the button object's "Disable" action, which hides the introduction text when called.
- Press the "Play" button () and test clicking the button in the scene. The introduction message and button should both disappear after clicking the button.
-
Press "Esc" to exit play mode after you've done testing your scene.
-
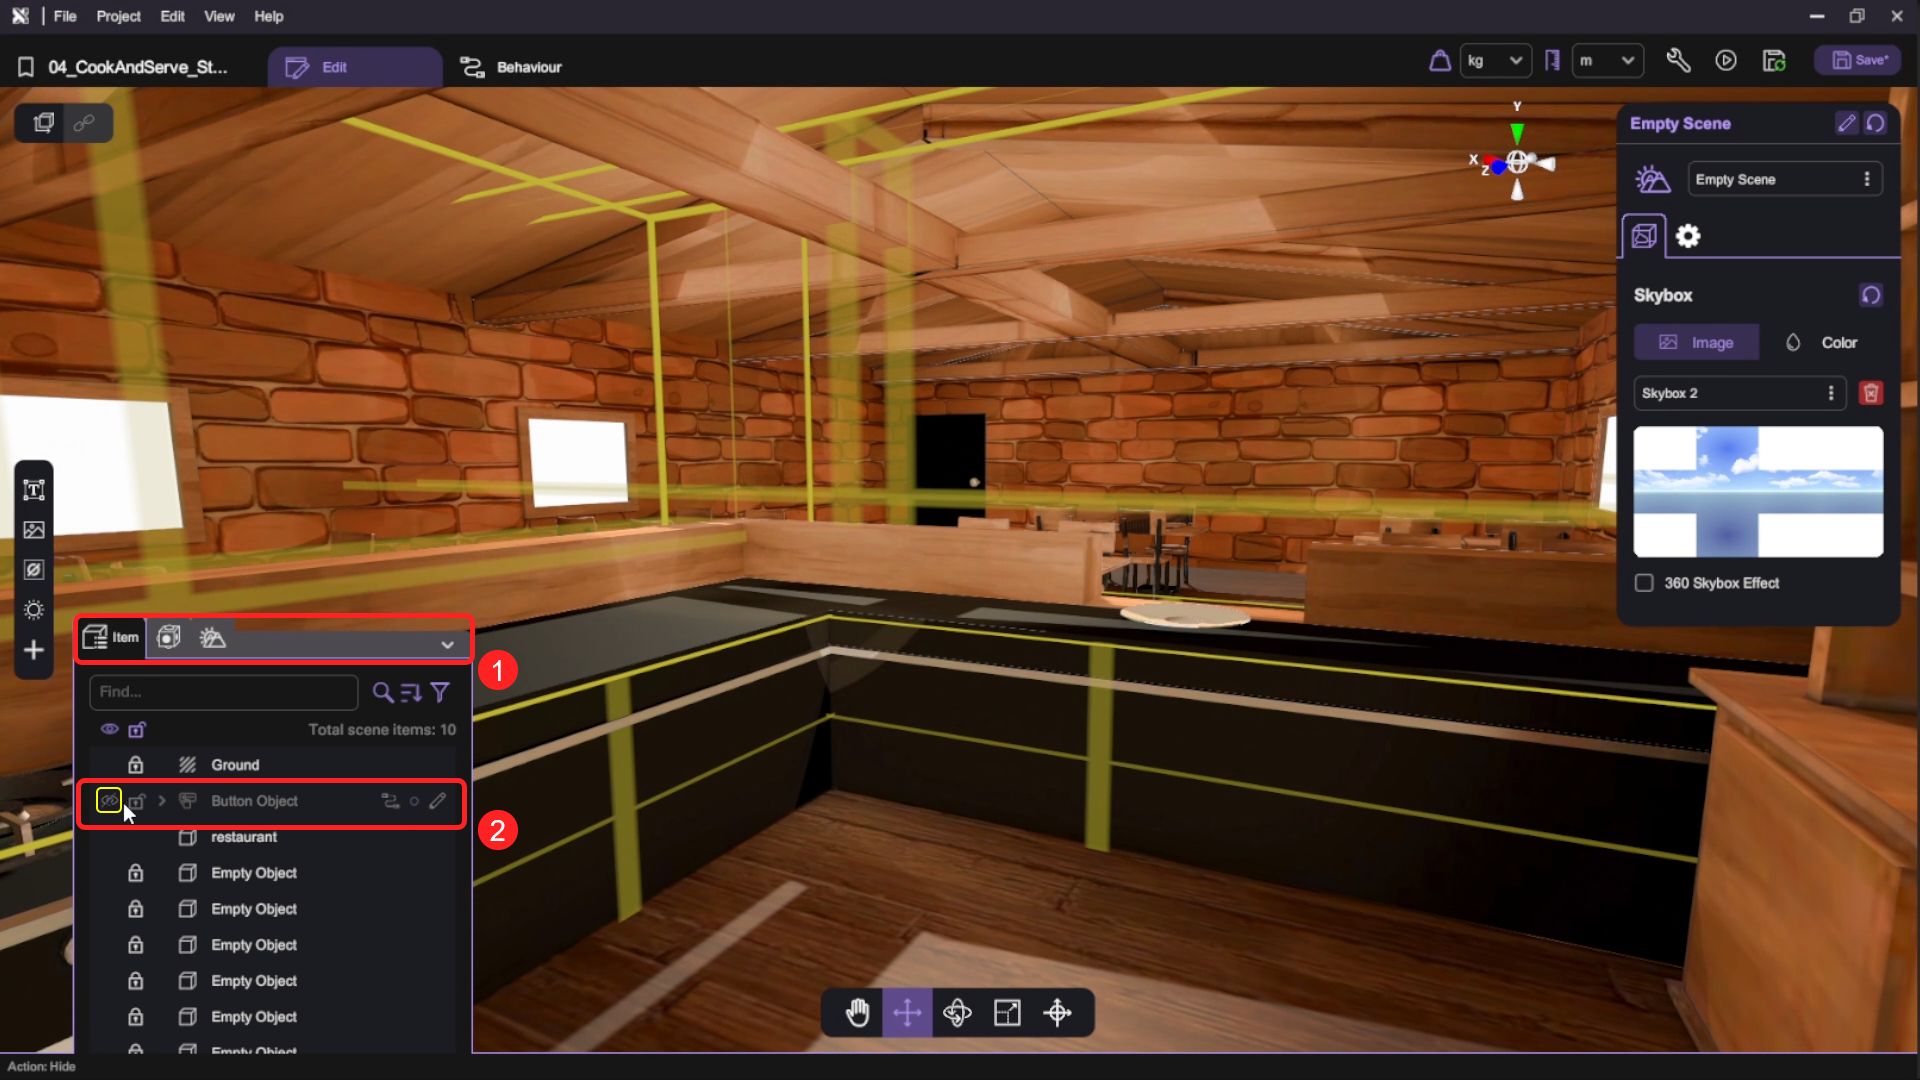
As the introduction message objects are already set up, we follow the same principle to hide the text object and the button object in the Editor as well.
Hiding the text object is optional, but it's a good practice to do so to avoid cluttering the scene with unnecessary objects.
Create the Interactable Objects in Scene
To enable interaction with certain objects in the game, such as the egg and chicken, you must set them as interactable and enable physics. This allows for a more immersive experience with these objects.
Add Interactable to the Plate
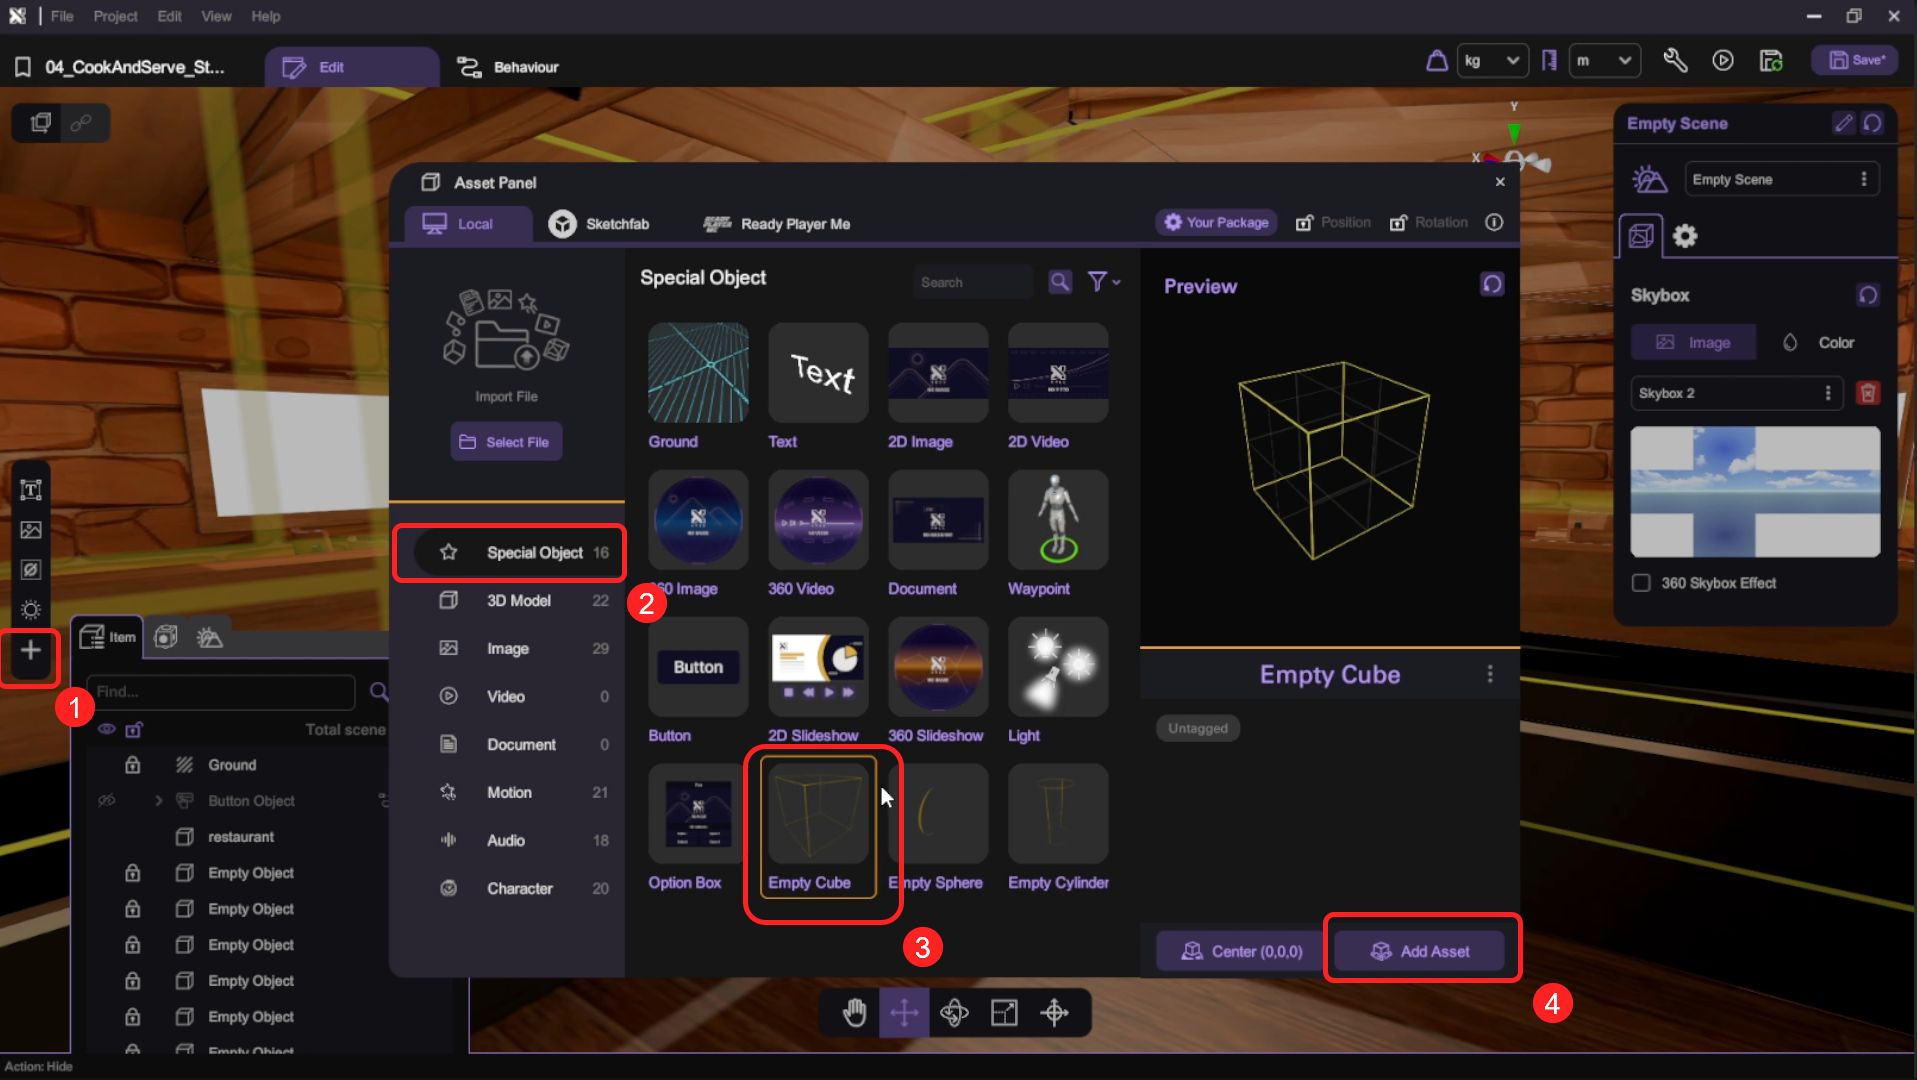
- Open the "Asset Panel" (G) and from the "Special Objects" tab, select and add an "Empty Object" to the scene.
Since the plate is inseparable from the restaurant 3D model, we will make use of an empty object to add interactivity to it to proxy the plate, so it acts as a virtual trigger point for food serving logic.
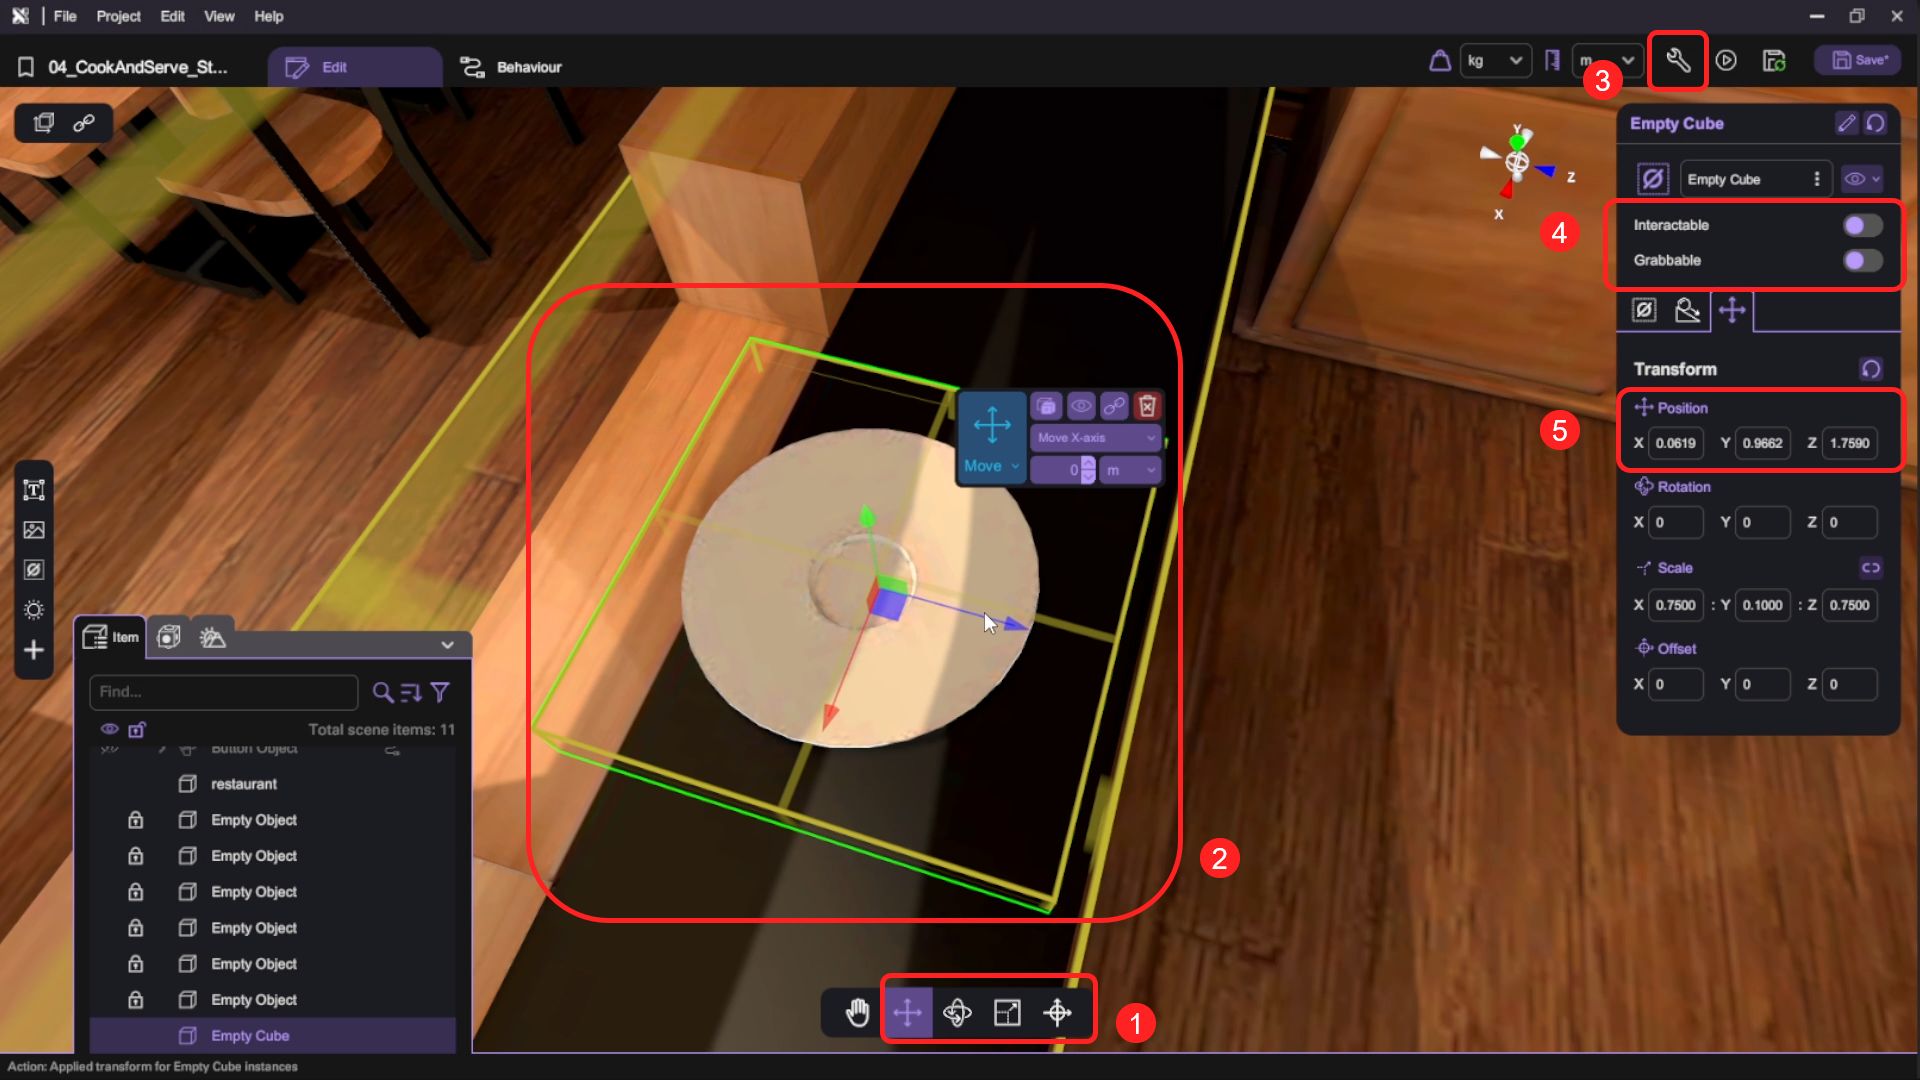
- Use the transform tools (move/ rotate/ scale) to reposition the empty object to the same position as the plate. Open the "Inspector" and deselect "Interactable" for the empty object. Name the object as "plate".
Deselecting Interactable prevents the VR wand from interacting with the object.
Add and Configure the Ingredient Objects
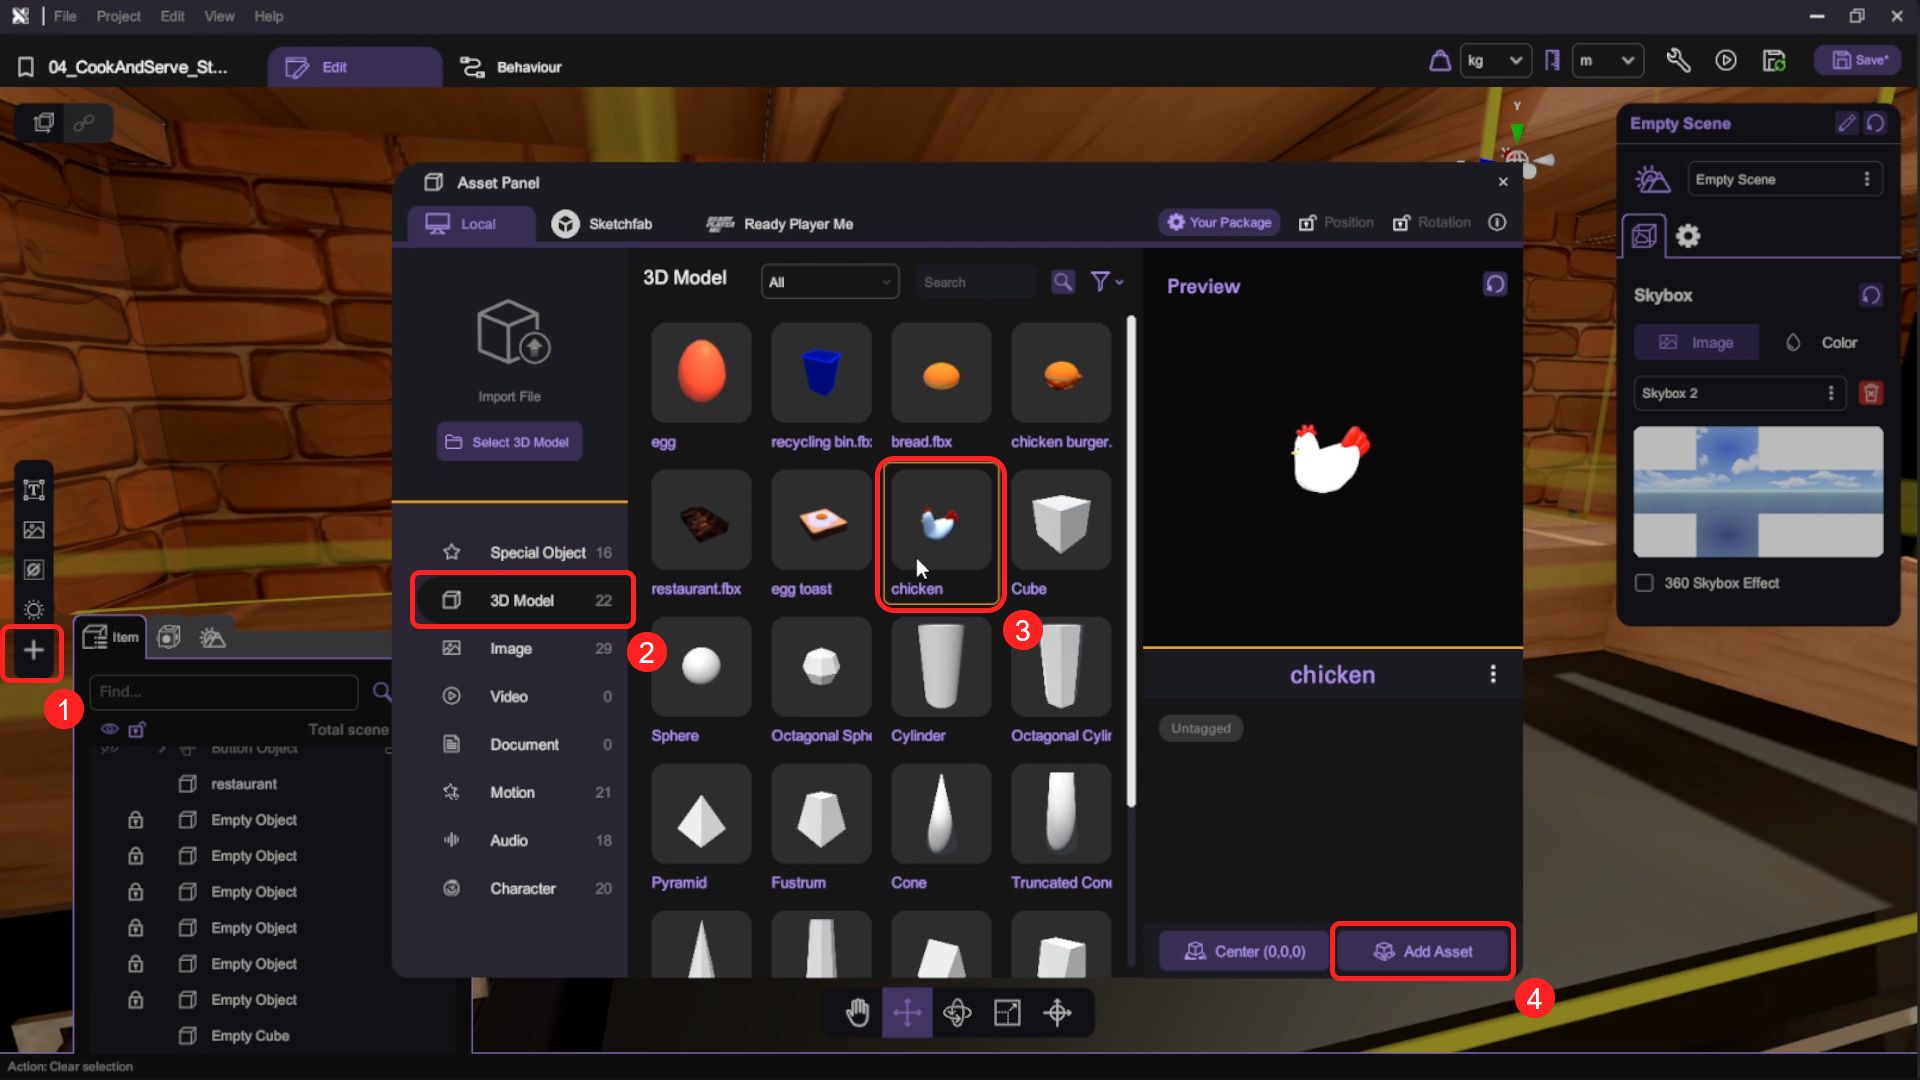
- Open the "Asset Panel" (G) and from the "3D Model" tab, select and add a "chicken.fbx" to the scene.
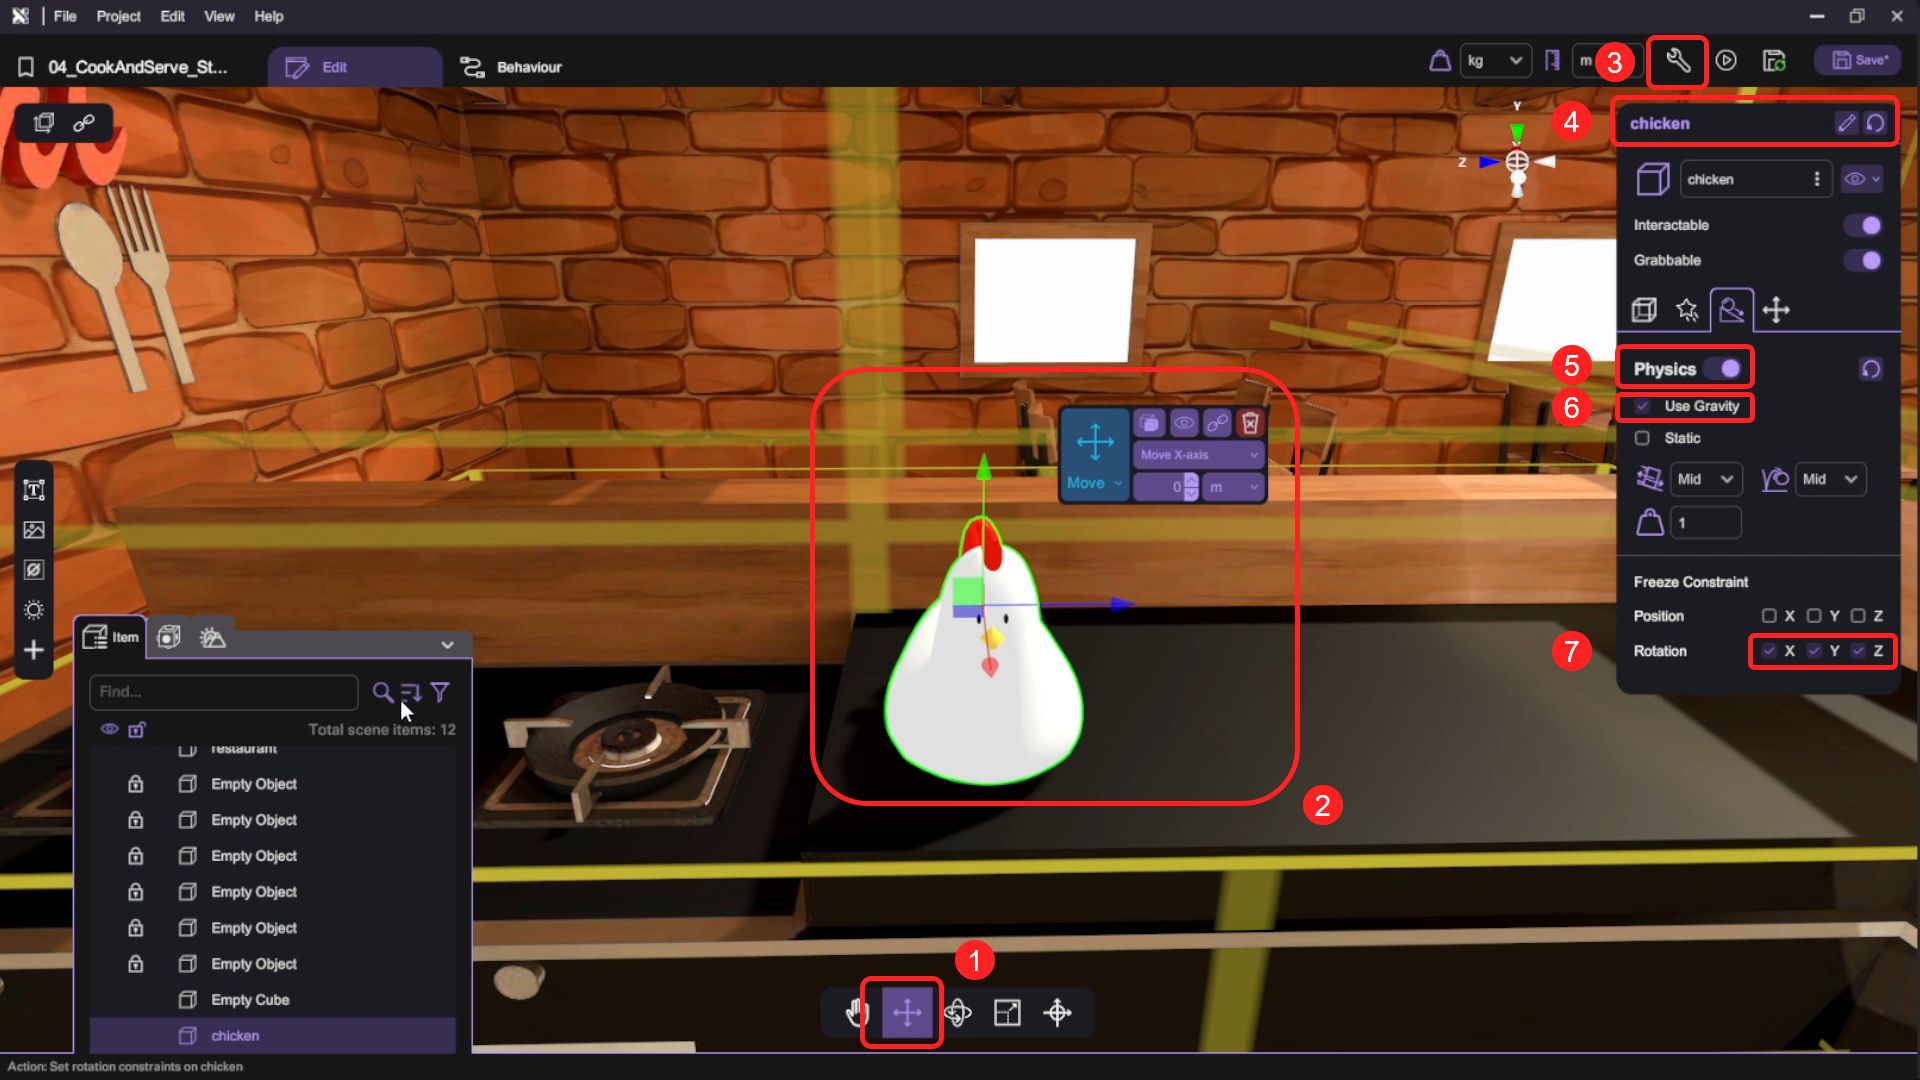
- Use the transform tools to reposition the chicken onto the counter. Then open its "Inspector". Rename it to "chicken" and set it to Grabbable. Enable Physics and select the "Use Gravity" option. We want to limit its physics calculation to just the chicken's position, so it's more controllable during gameplay. This can be achieved with the Freeze Rotation options.
Freezing the rotation can prevent an object from rotating in a specific axis, maintaining its orientation. In this case, we freeze the rotation for all 3 axis (X, Y, Z), then the chicken will not rotate when you interact with it.
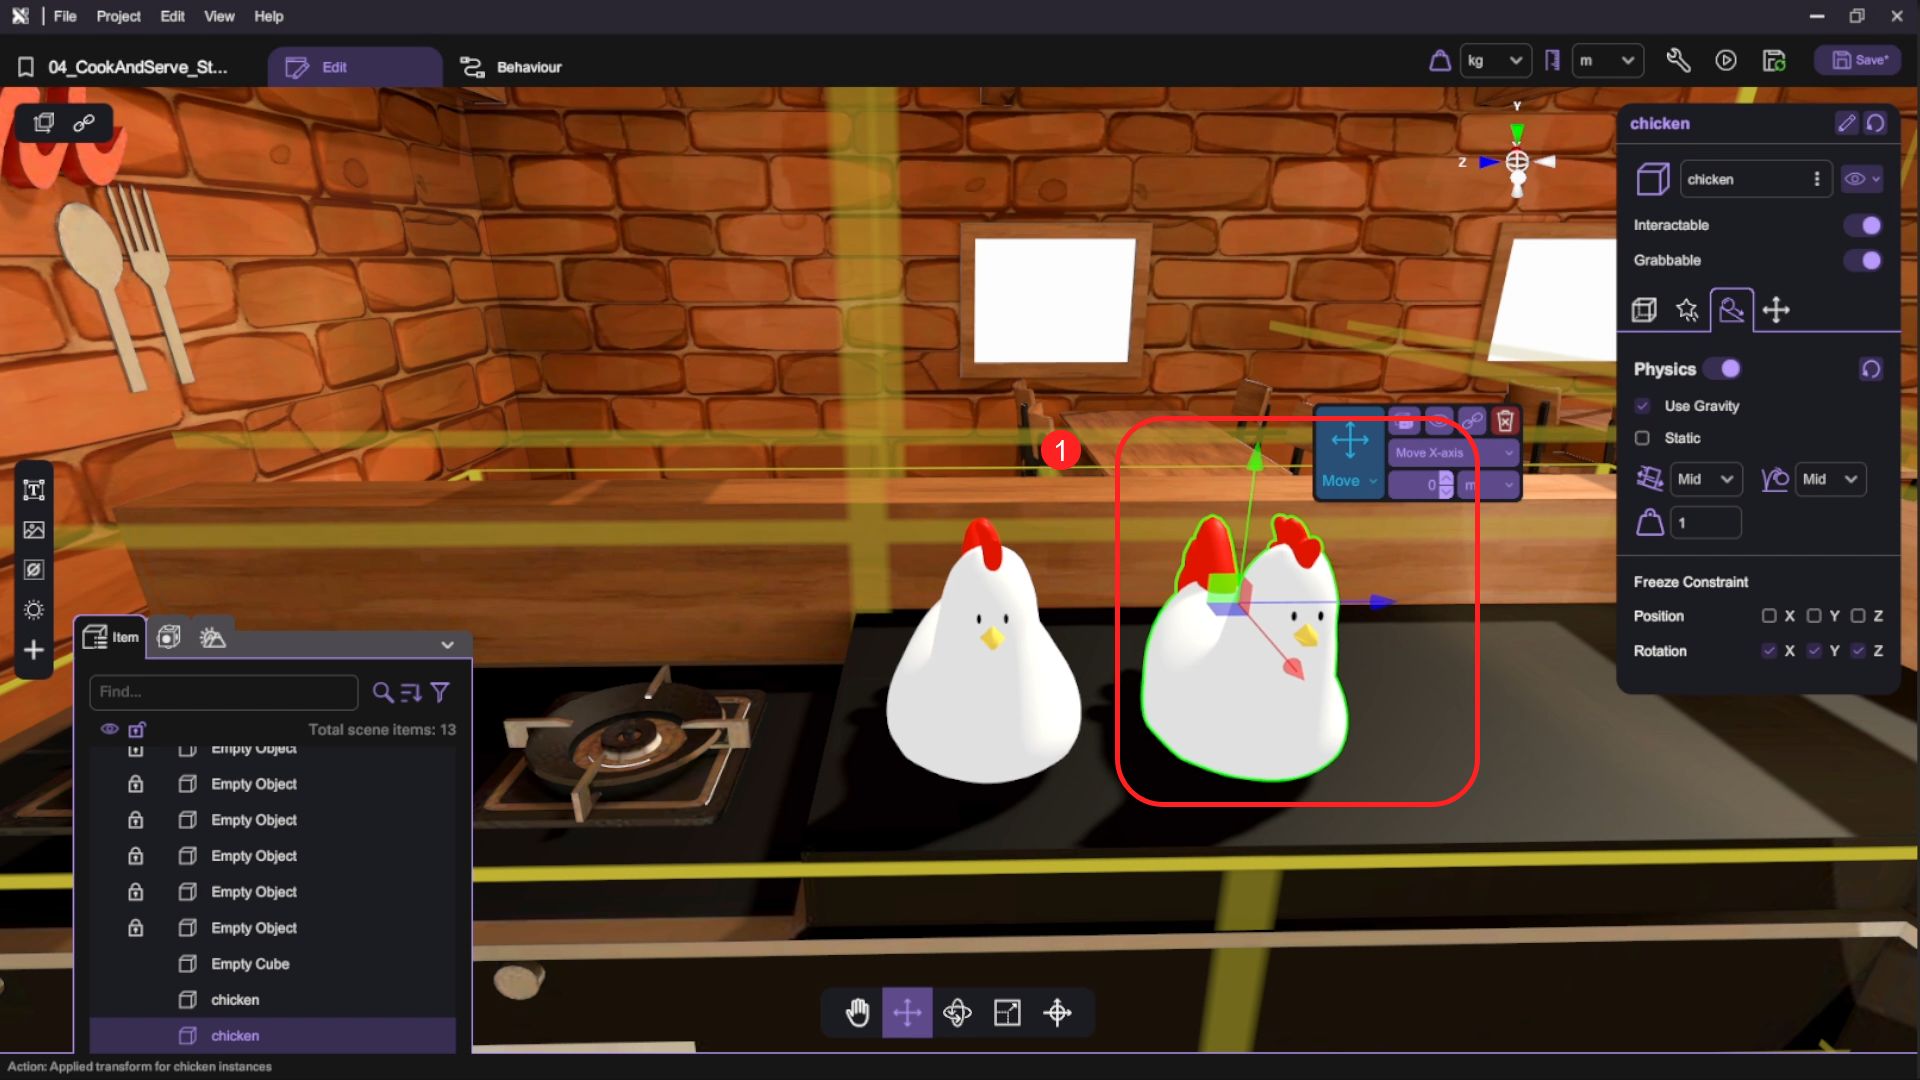
- Duplicate the "chicken" model and place it next to the original chicken model.
-
Change the "Model Asset" to "egg.fbx" and rename the object to egg.
-
Duplicate the "chicken" model one more time and place it next to the other models.
-
Change the "Model Asset" to "bread.fbx" and rename the object to bread.
-
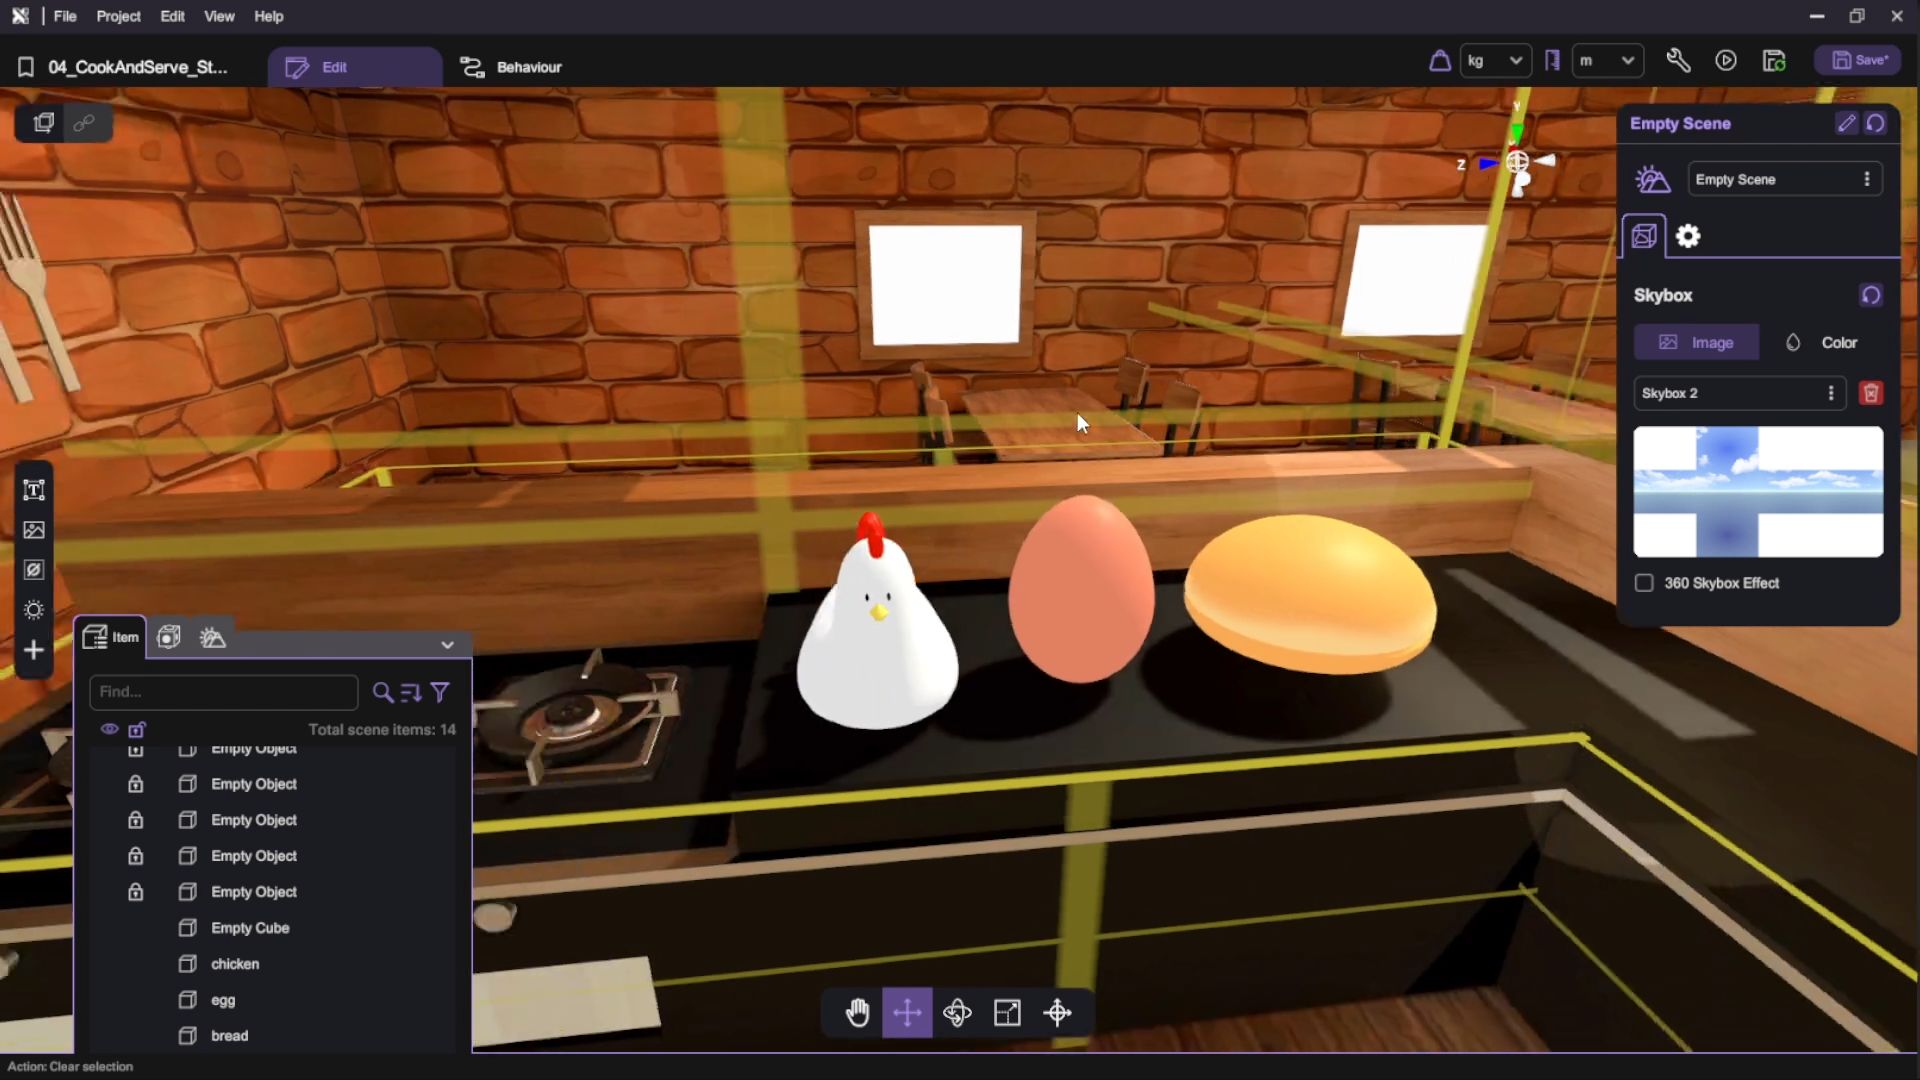
You now have a chicken, an egg and a bread on the counter.
- You have now finished adding the food ingredients to the scene. Press the "Play" button () and test grabbing food in the scene. All food should be grabbable and should drop back to the counter/ground when you release it.

- Press "Esc" to exit play mode after you've done testing your scene.
Create Behaviour to Cook Food
In this section, we will create the behaviour to cook food by combining two ingredients and setting the 3D model.
Cooking Food by Combining Two Ingredients and Setting the 3D Model
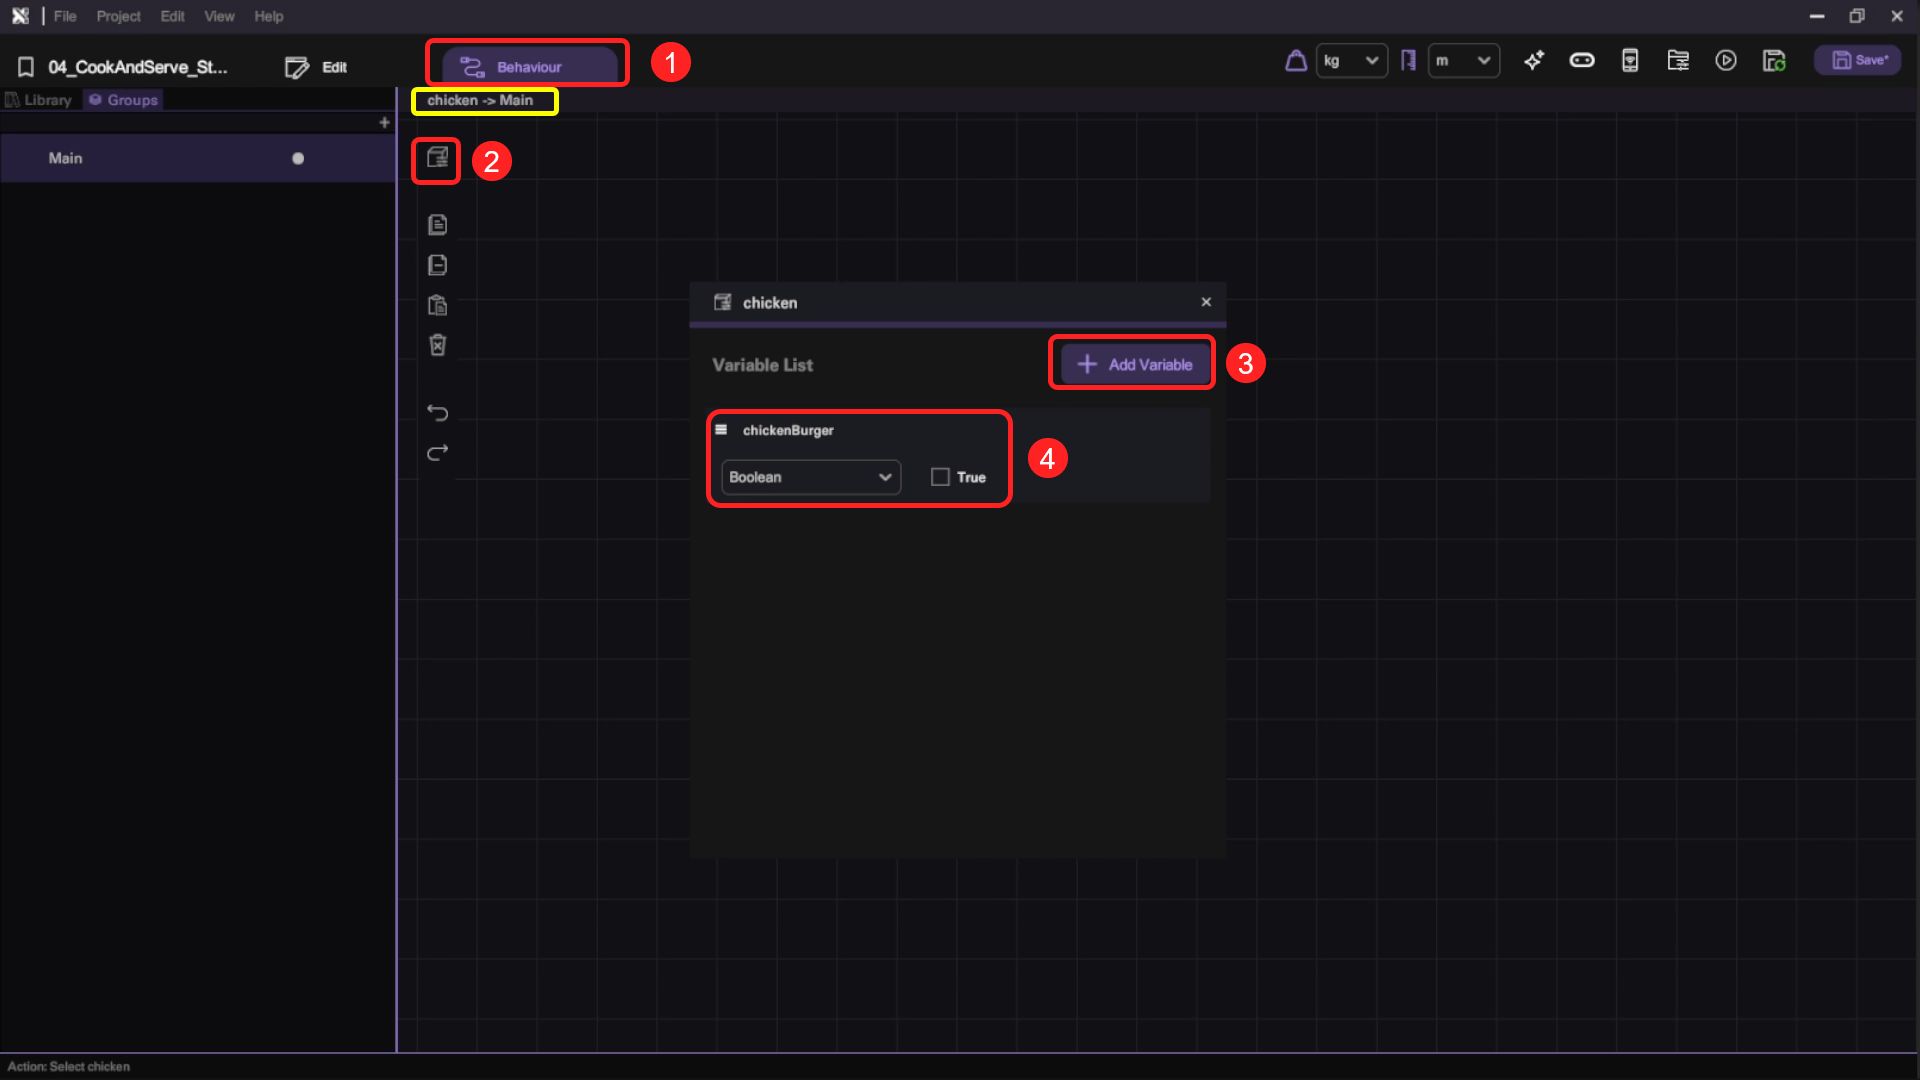
- Select the chicken object and open its behaviour panel. Add a new Boolean variable and name it "chickenBurger". Set its default value to false.
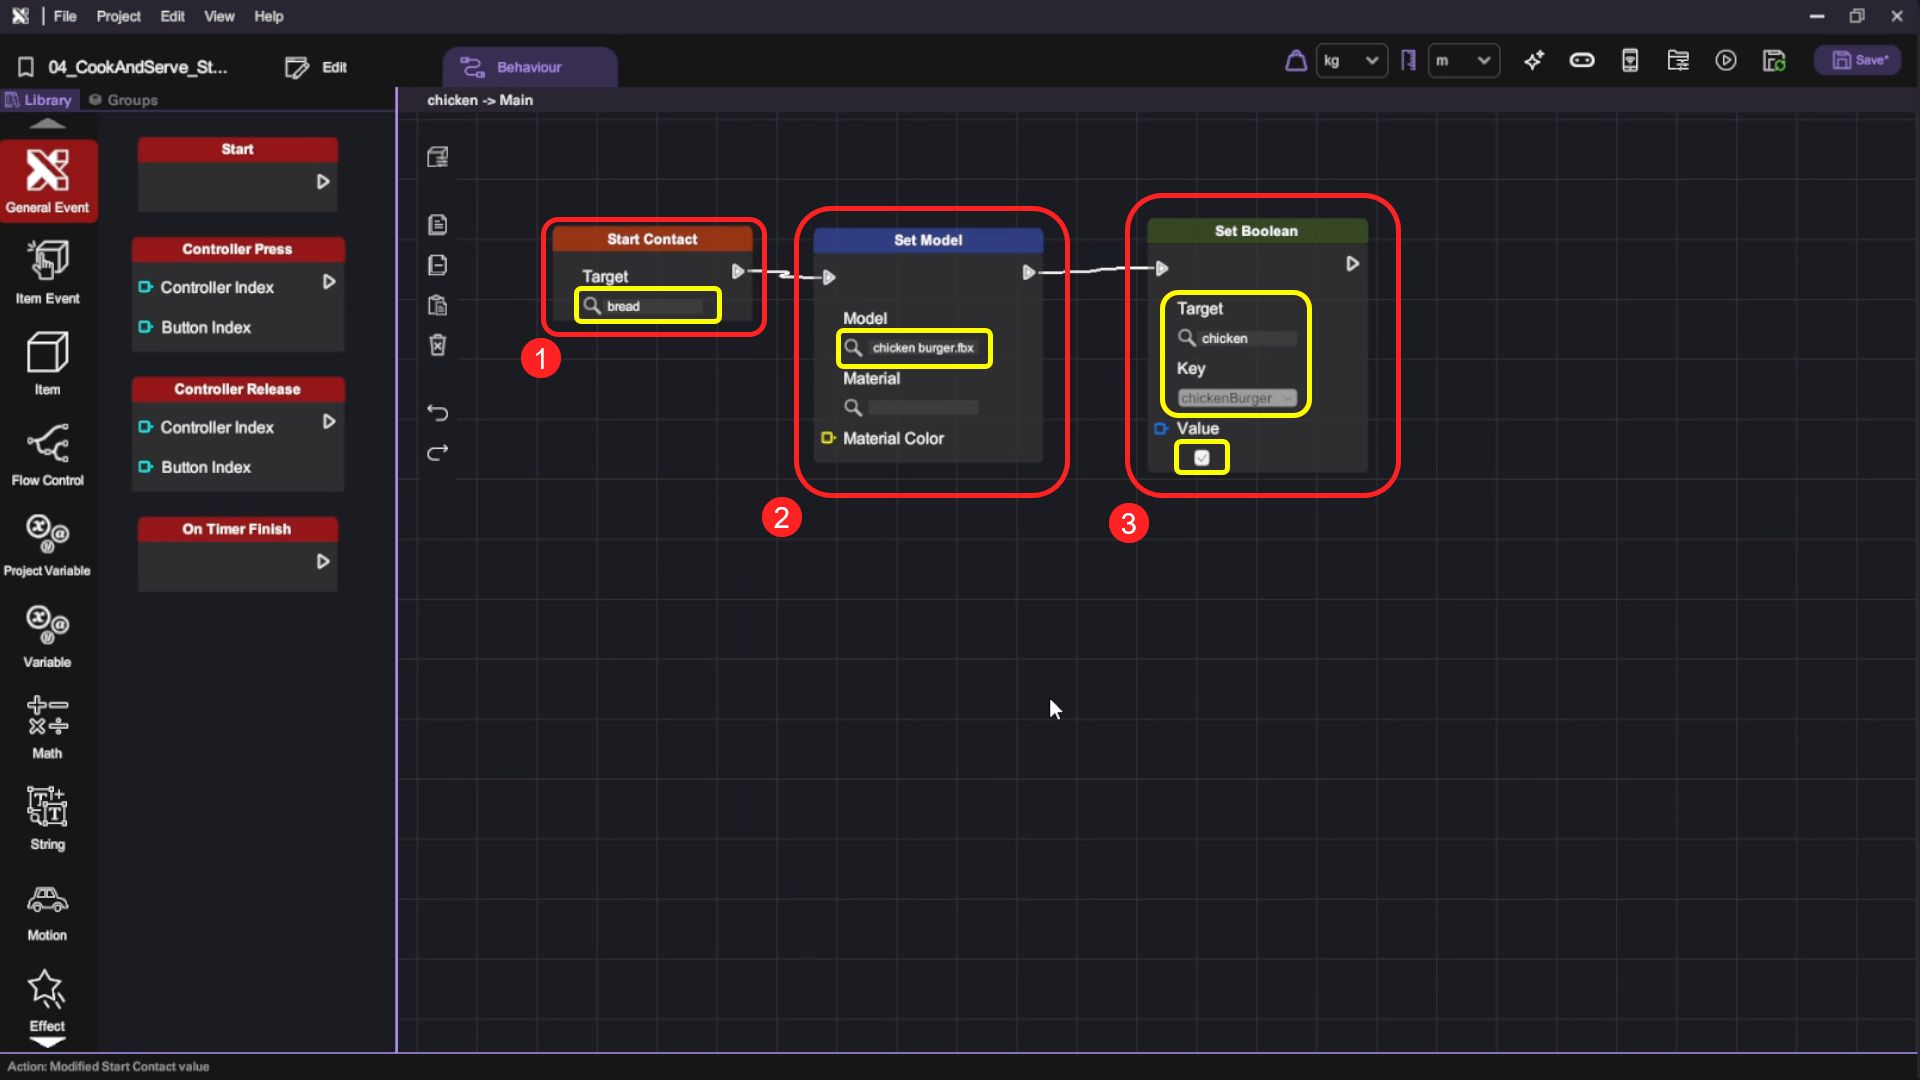
- On the chicken object's behaviour canvas, add a "Start Contact" Item Event Trigger block followed by a "Set Model" 3D Model block and a "Set Boolean" Variable block, connect the blocks together. On the "Start Contact" block, set the Target to the bread object, then click the selector on the "Set Model" block and select the "chicken burger.fbx" 3D model from your asset library. Lastly, set the "chicken" object's "chickenBurger" Boolean variable to true using the "Set Boolean" block.
| Category | Behaviour |
|---|---|
 |  |
 |  |
 |  |
- You have now finished editing the chicken. Press the "Play" button () and test grabbing the chicken and use it to touch the bread. The chicken should become a chicken burger.
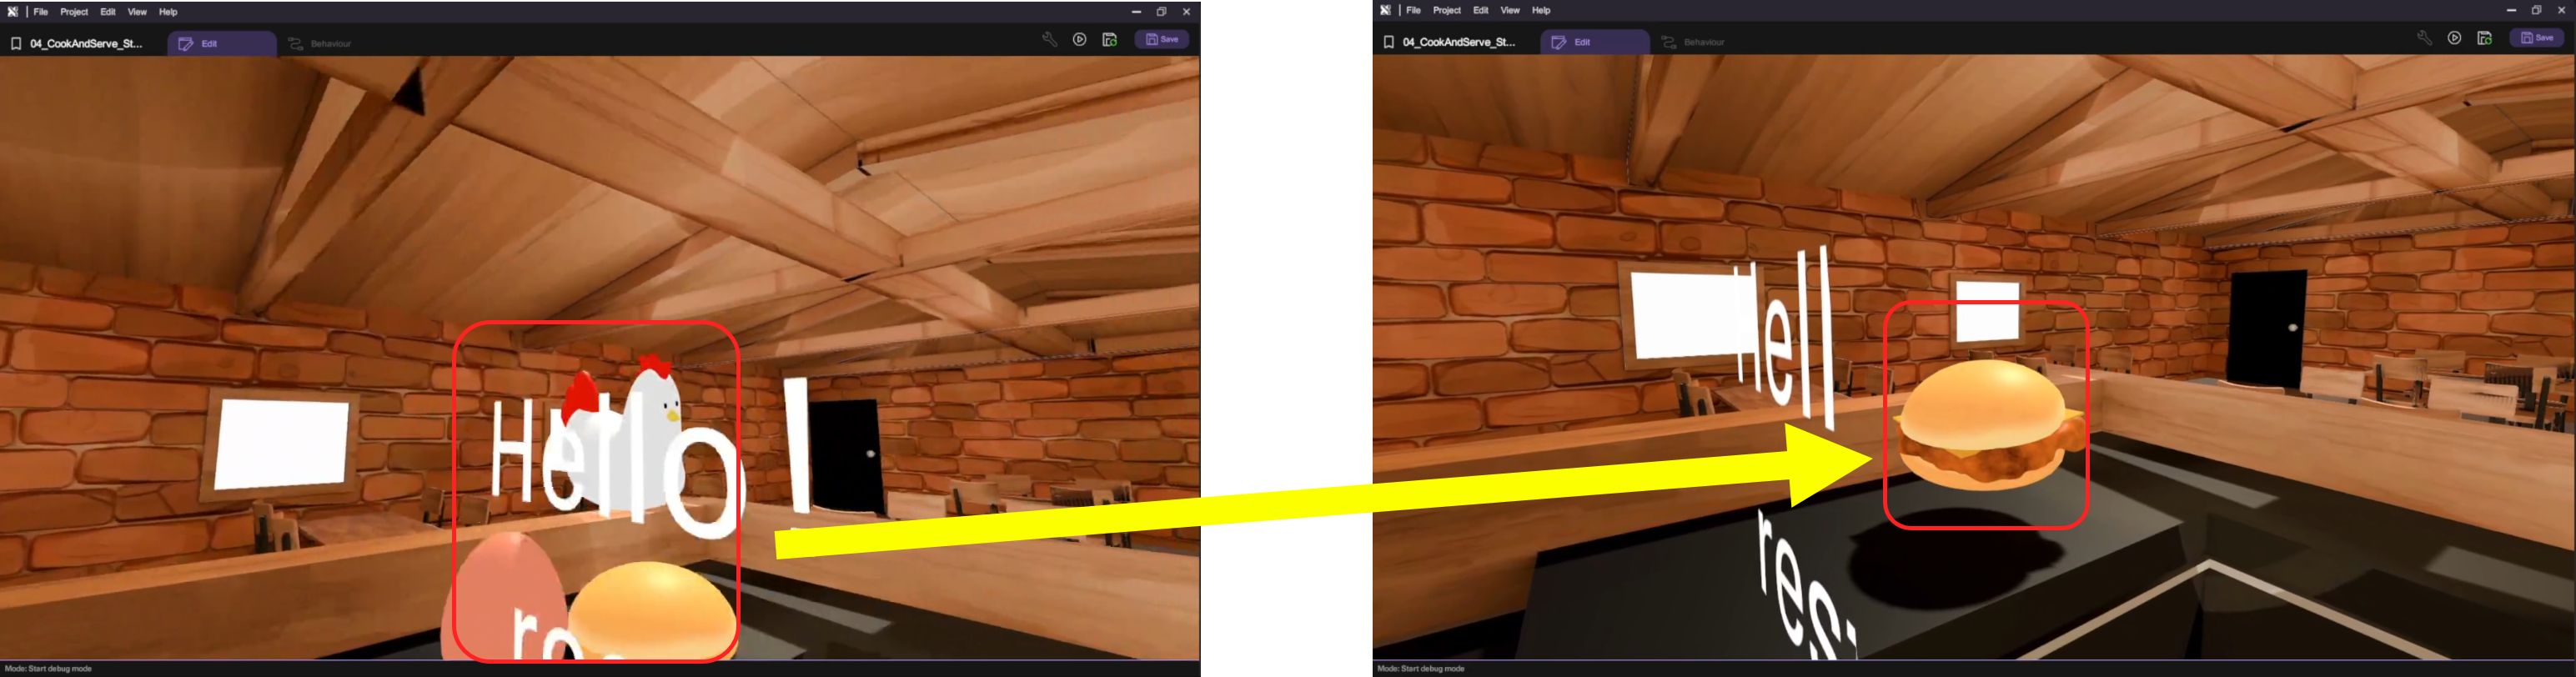
-
Press "Esc" to exit play mode after you've done testing your scene.
-
Follow the same logic to create a similar behaviour flow on the "egg" object, so that it turns into an "egg toast.fbx" model when it touches the "bread" object.
-
You have now finished creating the food cooking behaviour. Press the "Play" button () and test them by grabbing the ingredient objects and touching the relevant objects.
The chicken should become a burger when it touches the bread object. The egg will become egg toast when touching the bread.
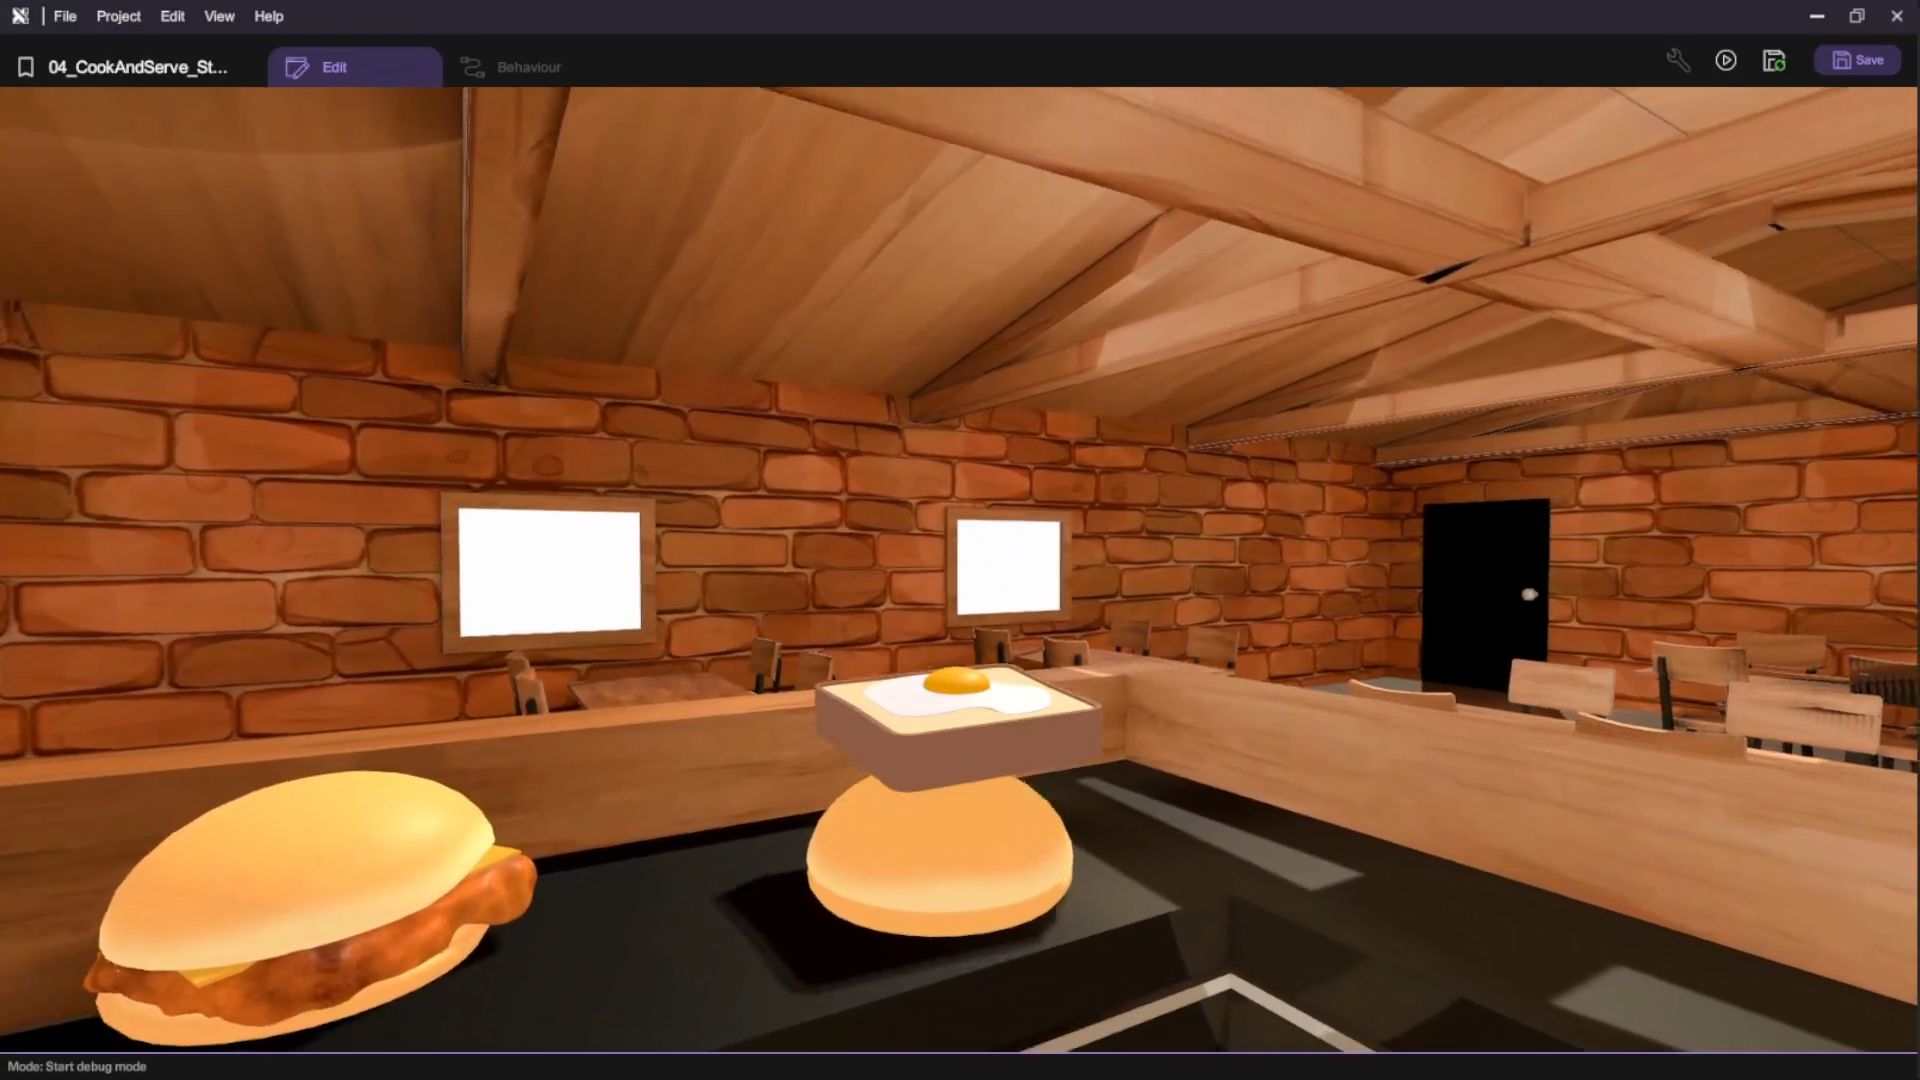
- Press "Esc" to exit play mode after you've done testing your scene.
Reset the Ingredients to Recycle Food
We will create a reset action for the ingredients to recycle the food. This will allow us to reuse the ingredients after they have been cooked into food.
Create Reset Action for Ingredients
- We will again use the chicken object as an illustrative example to walk you through the steps to set up its "Reset" action. To start, open the chicken object's behaviour panel and create a "Reset" action. An "Action Start" event trigger block will appear on the canvas.
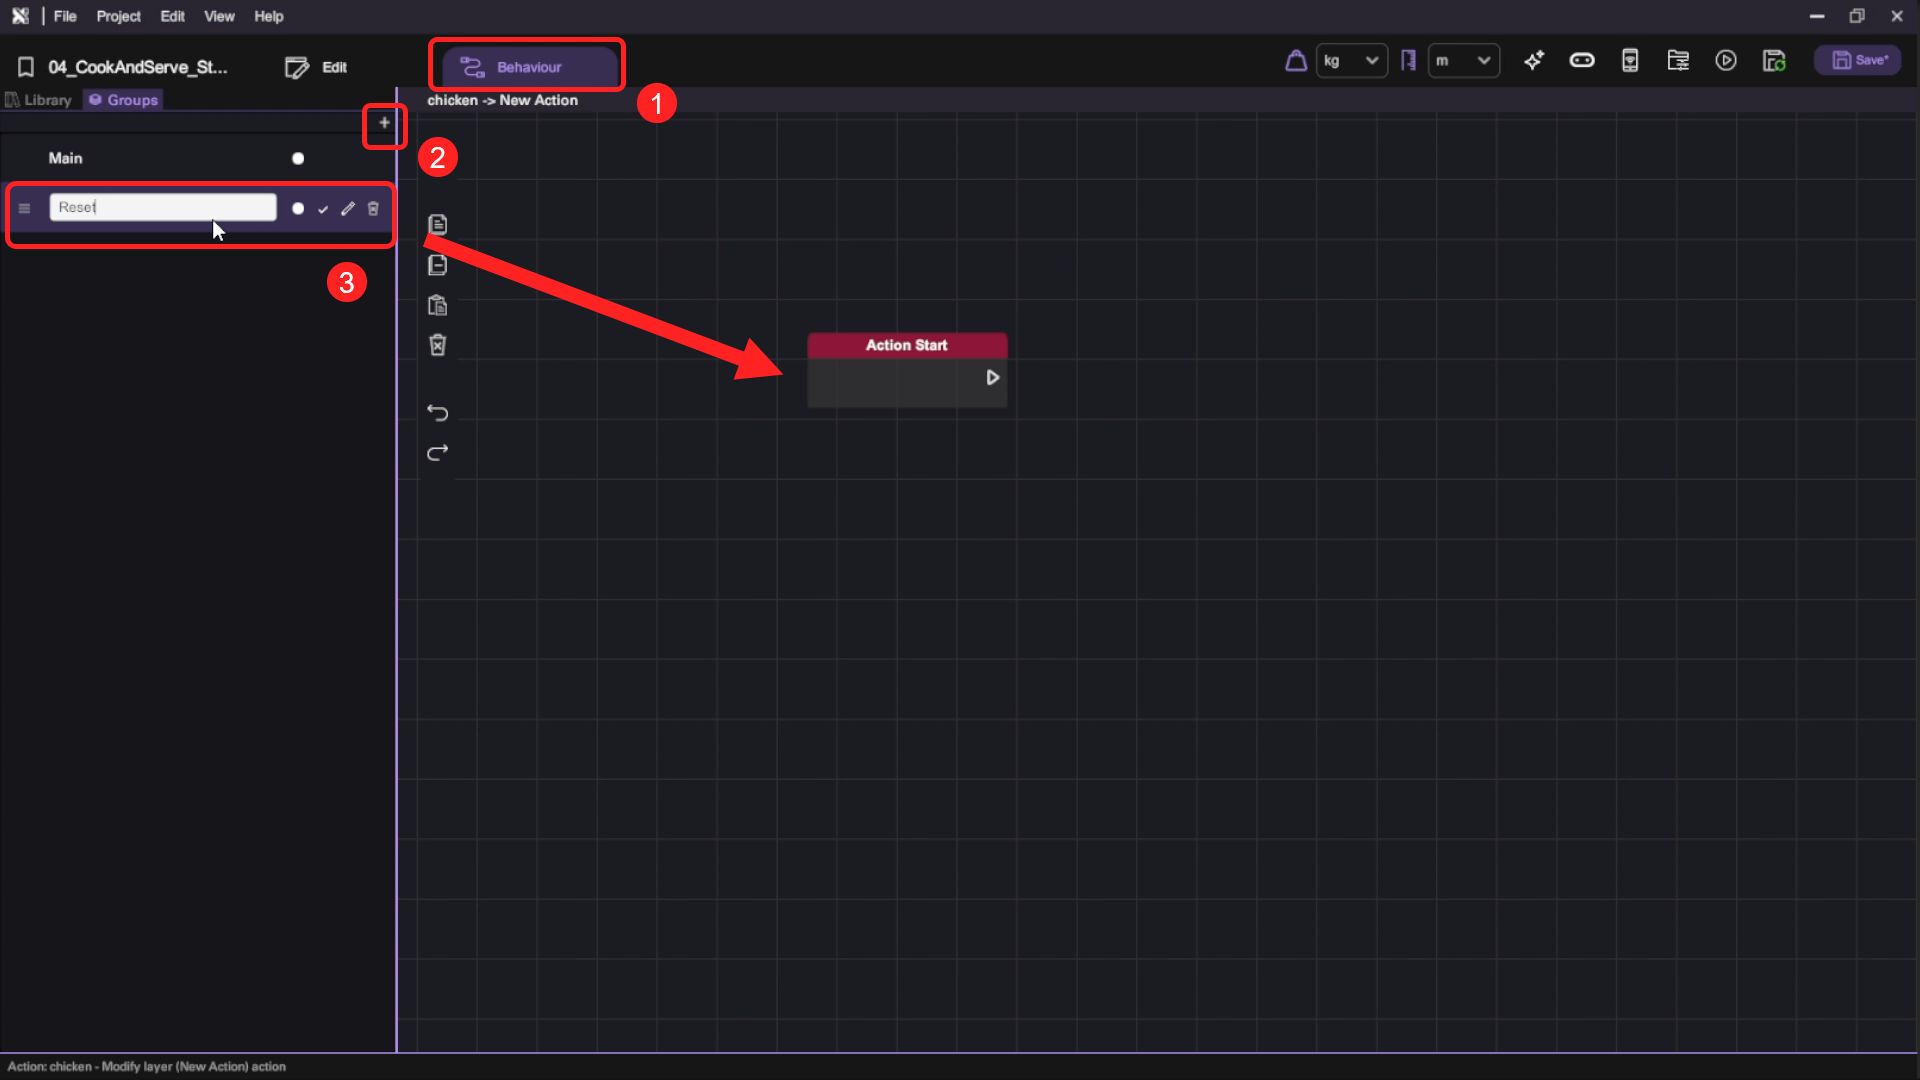
- Add both a "Set Rotation" and "Set Position" Motion block after the "Action Start" block. Then connect them to two "Vector3" blocks, respectively, to set their rotation and position values. For the "Set Rotation" block, copy and paste the chicken object's Y rotation value from the Inspector and set it to the "Set Rotation" block's "Vector3" Y value. Then copy and paste the chicken object's X, Y, Z position values to the "Set Position" block's "Vector3" values.
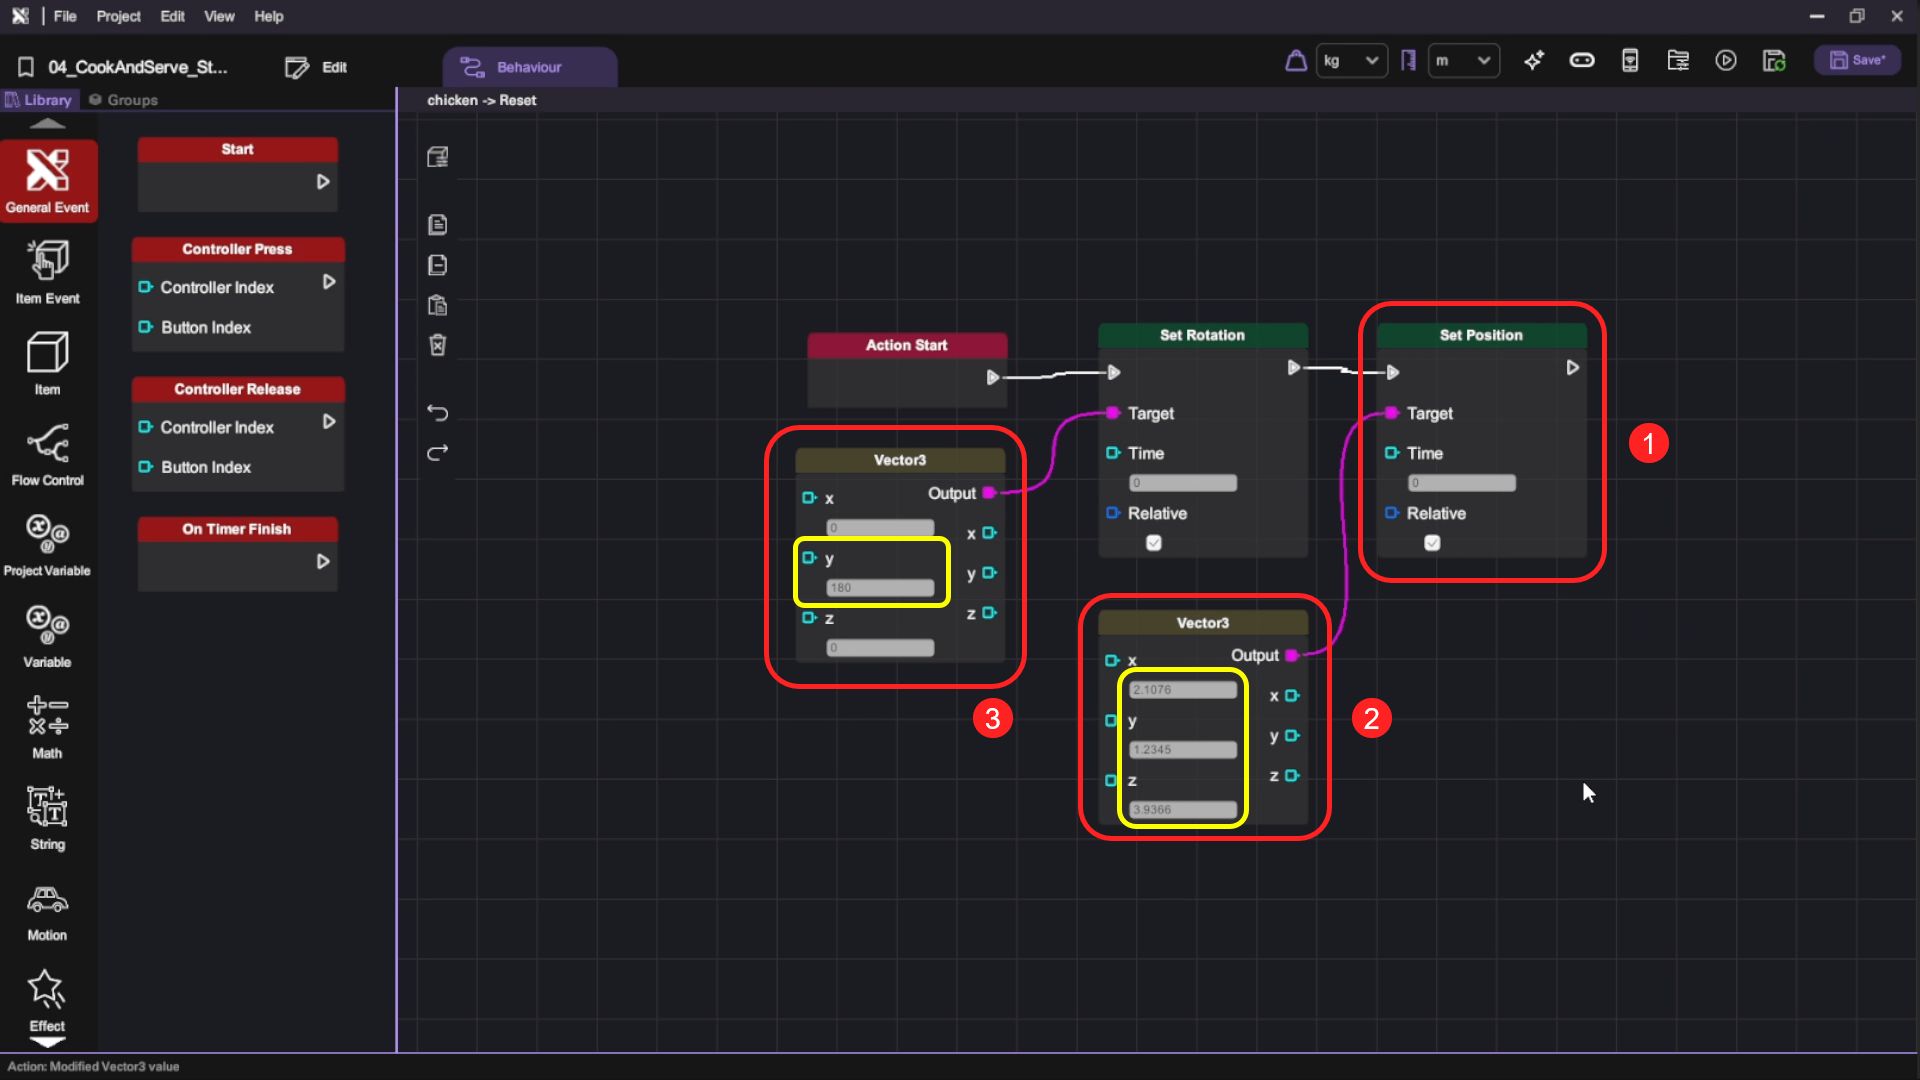
| Category | Behaviour |
|---|---|
 |   |
 |  |
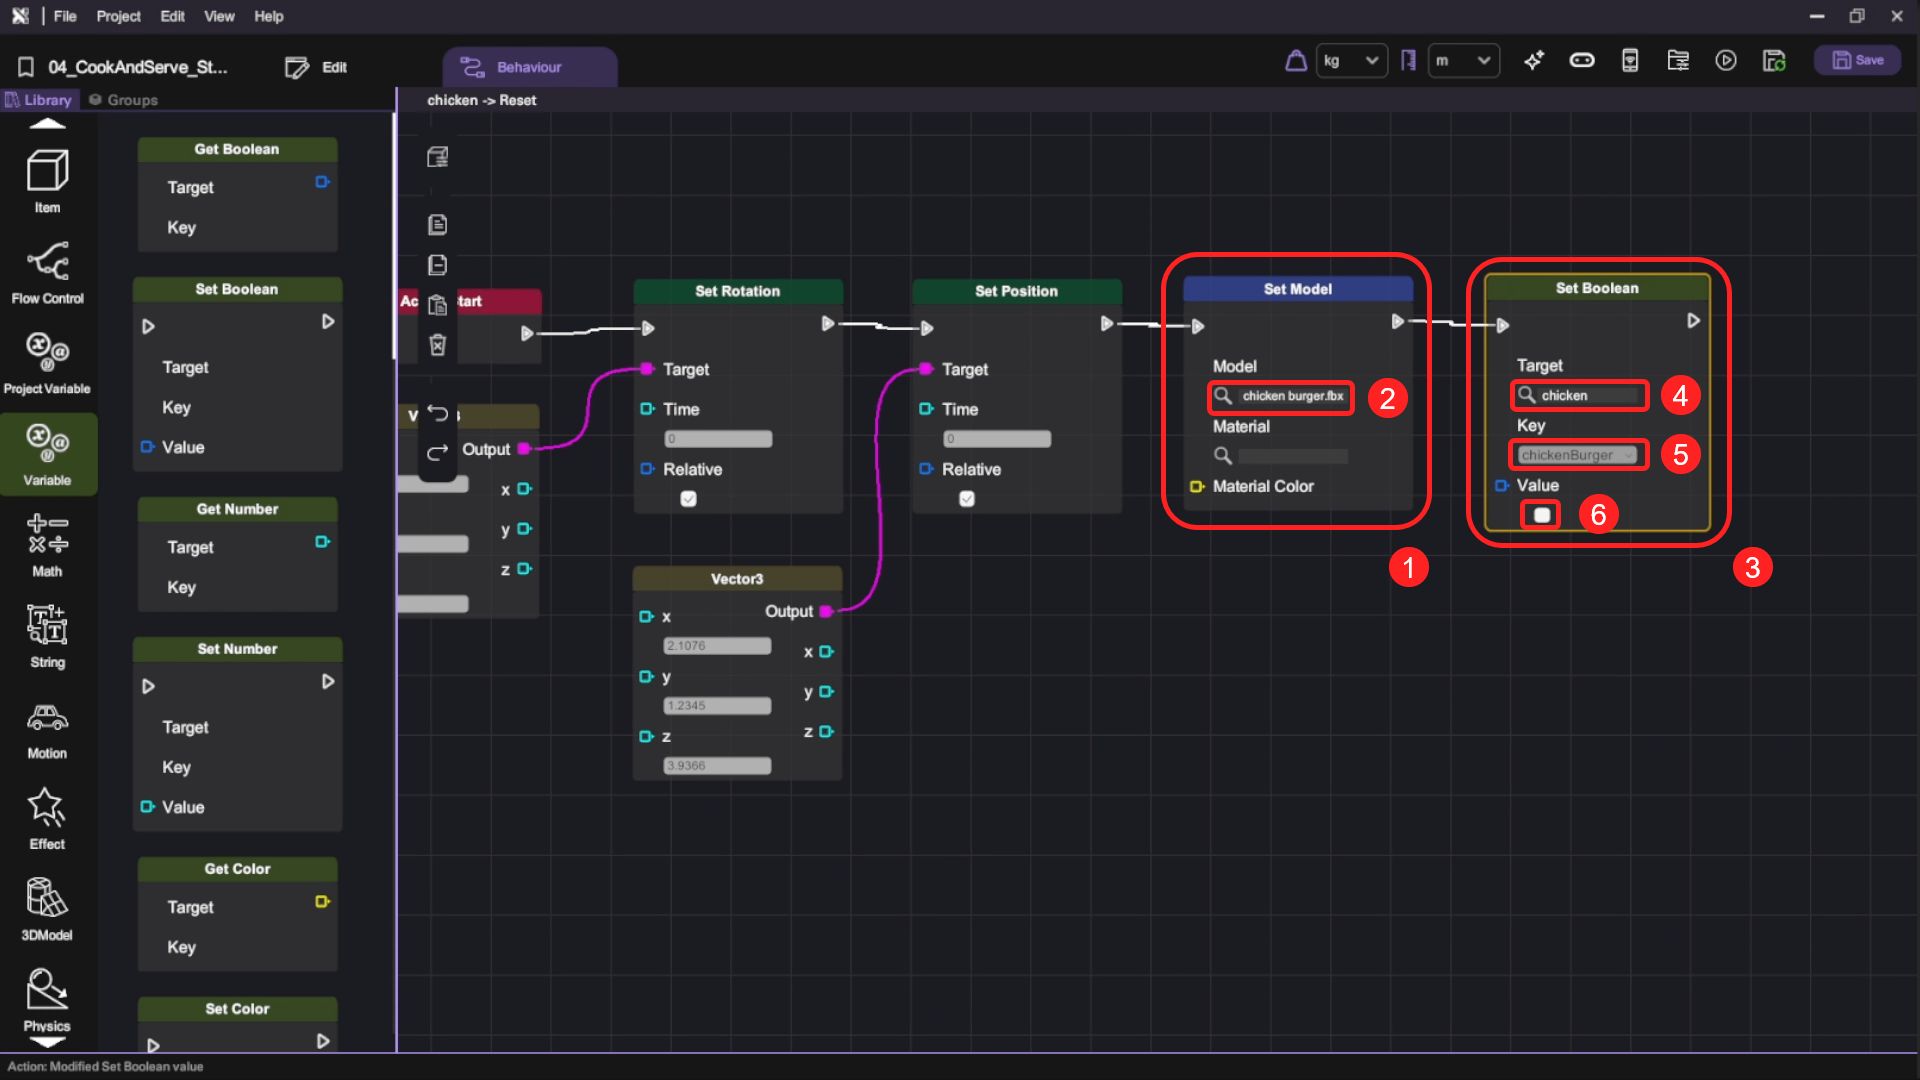
- Add a "Set Model" 3D Model block followed by a "Set Boolean" variable block after the "Set Position" block in the "Reset" action. On the "Set Model" block, set "chicken.fbx" as the Model, then set the chicken object's "chickenBurger" variable to false using the "Set Boolean" block.
- Repeat the same procedure to set up the "Reset" actions for the "egg" object.
Create Recycle Bin
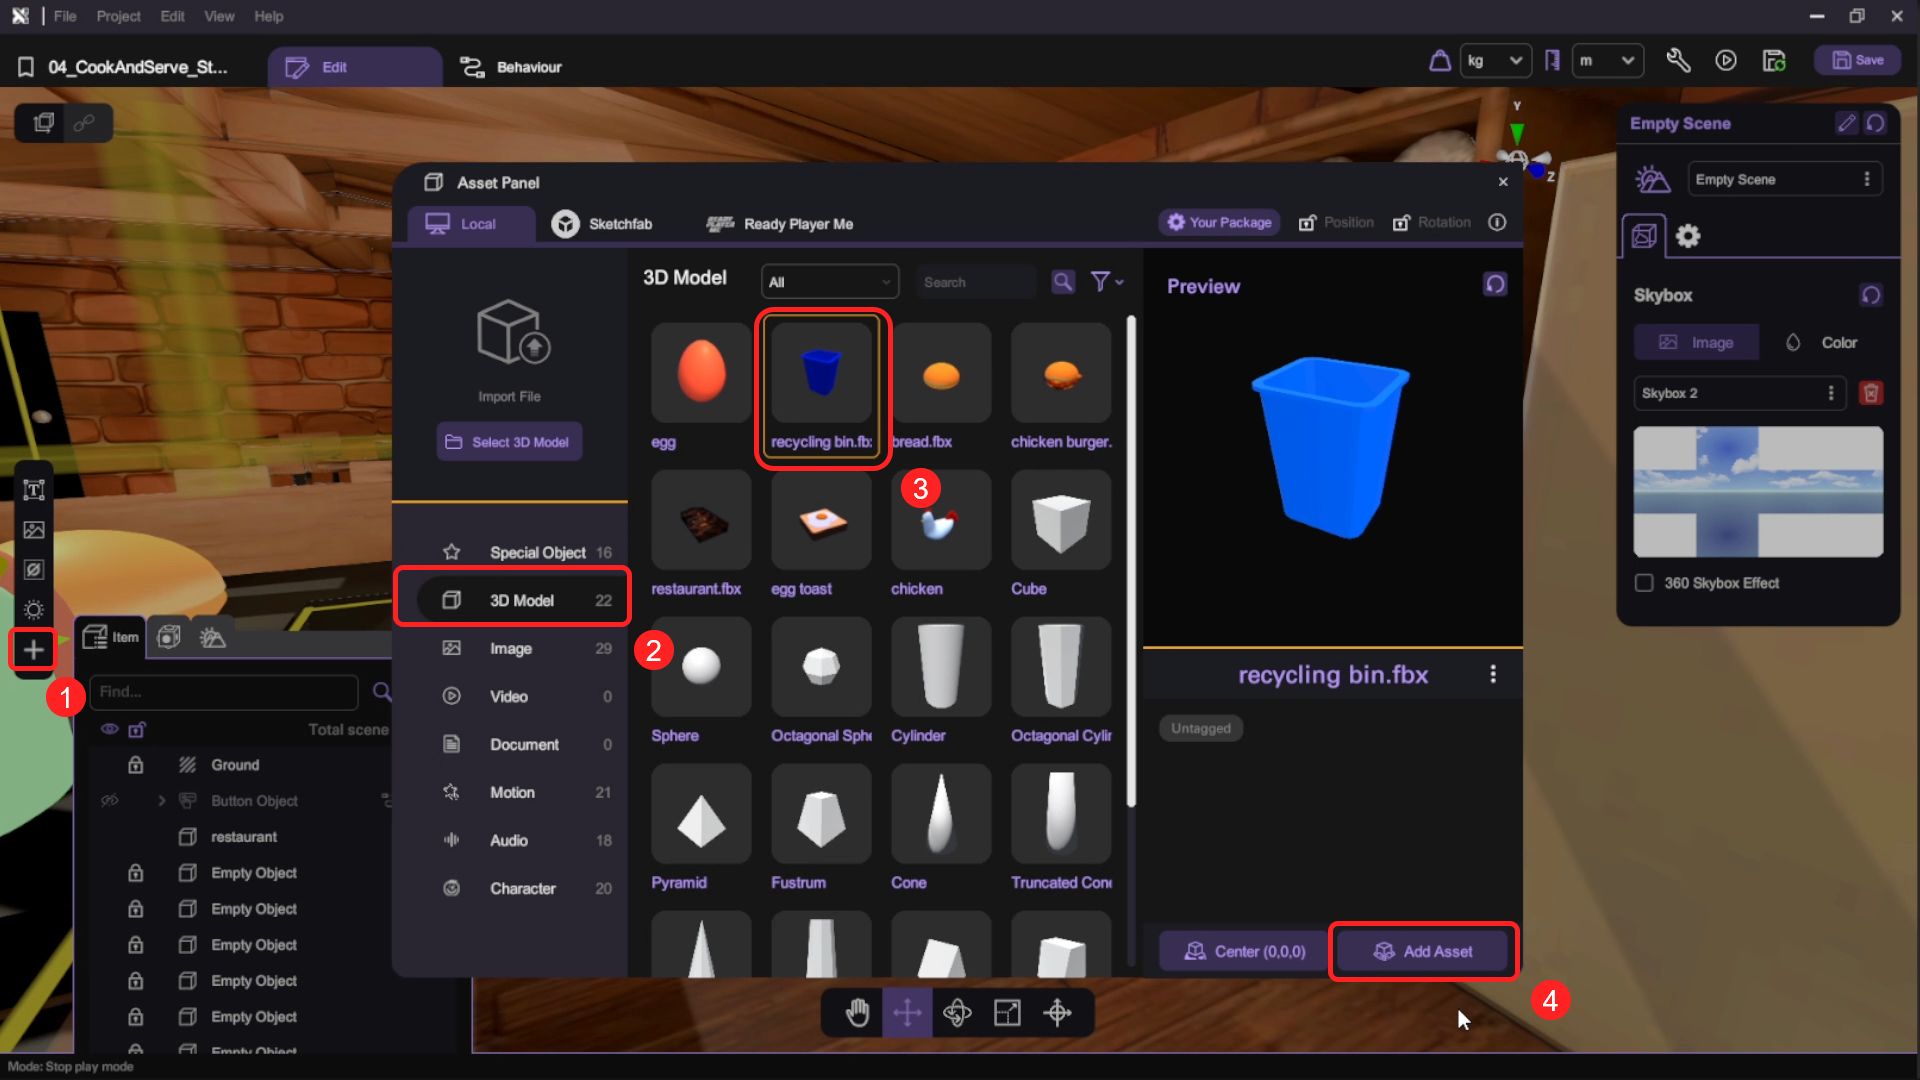
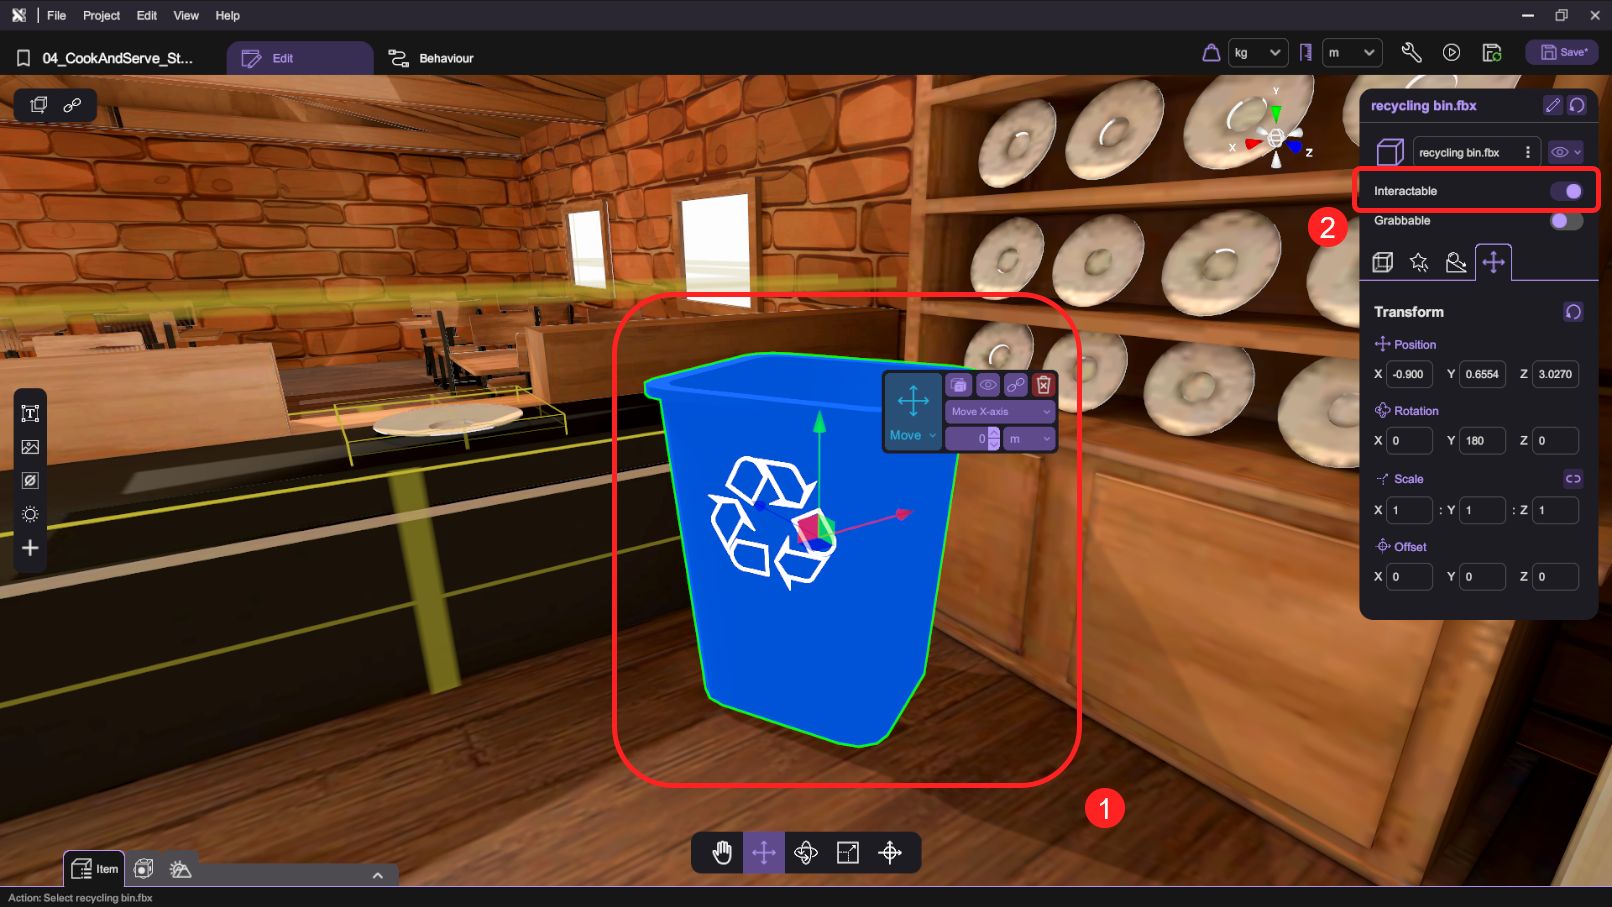
- We will use a recycle bin to trigger the "Reset" actions, but only reset the ingredients if they have been cooked into food. Open the "Asset Panel" (G) and from the "Imported Assets" tab, select and add the "recycling bin.fbx" to the scene.
- Use the transform tools (move/rotate/scale) to reposition the bin. Open the "Inspector" and deselect "Interactable" for the rubbish bin object to make sure it can't be interacted with using the VR wand.
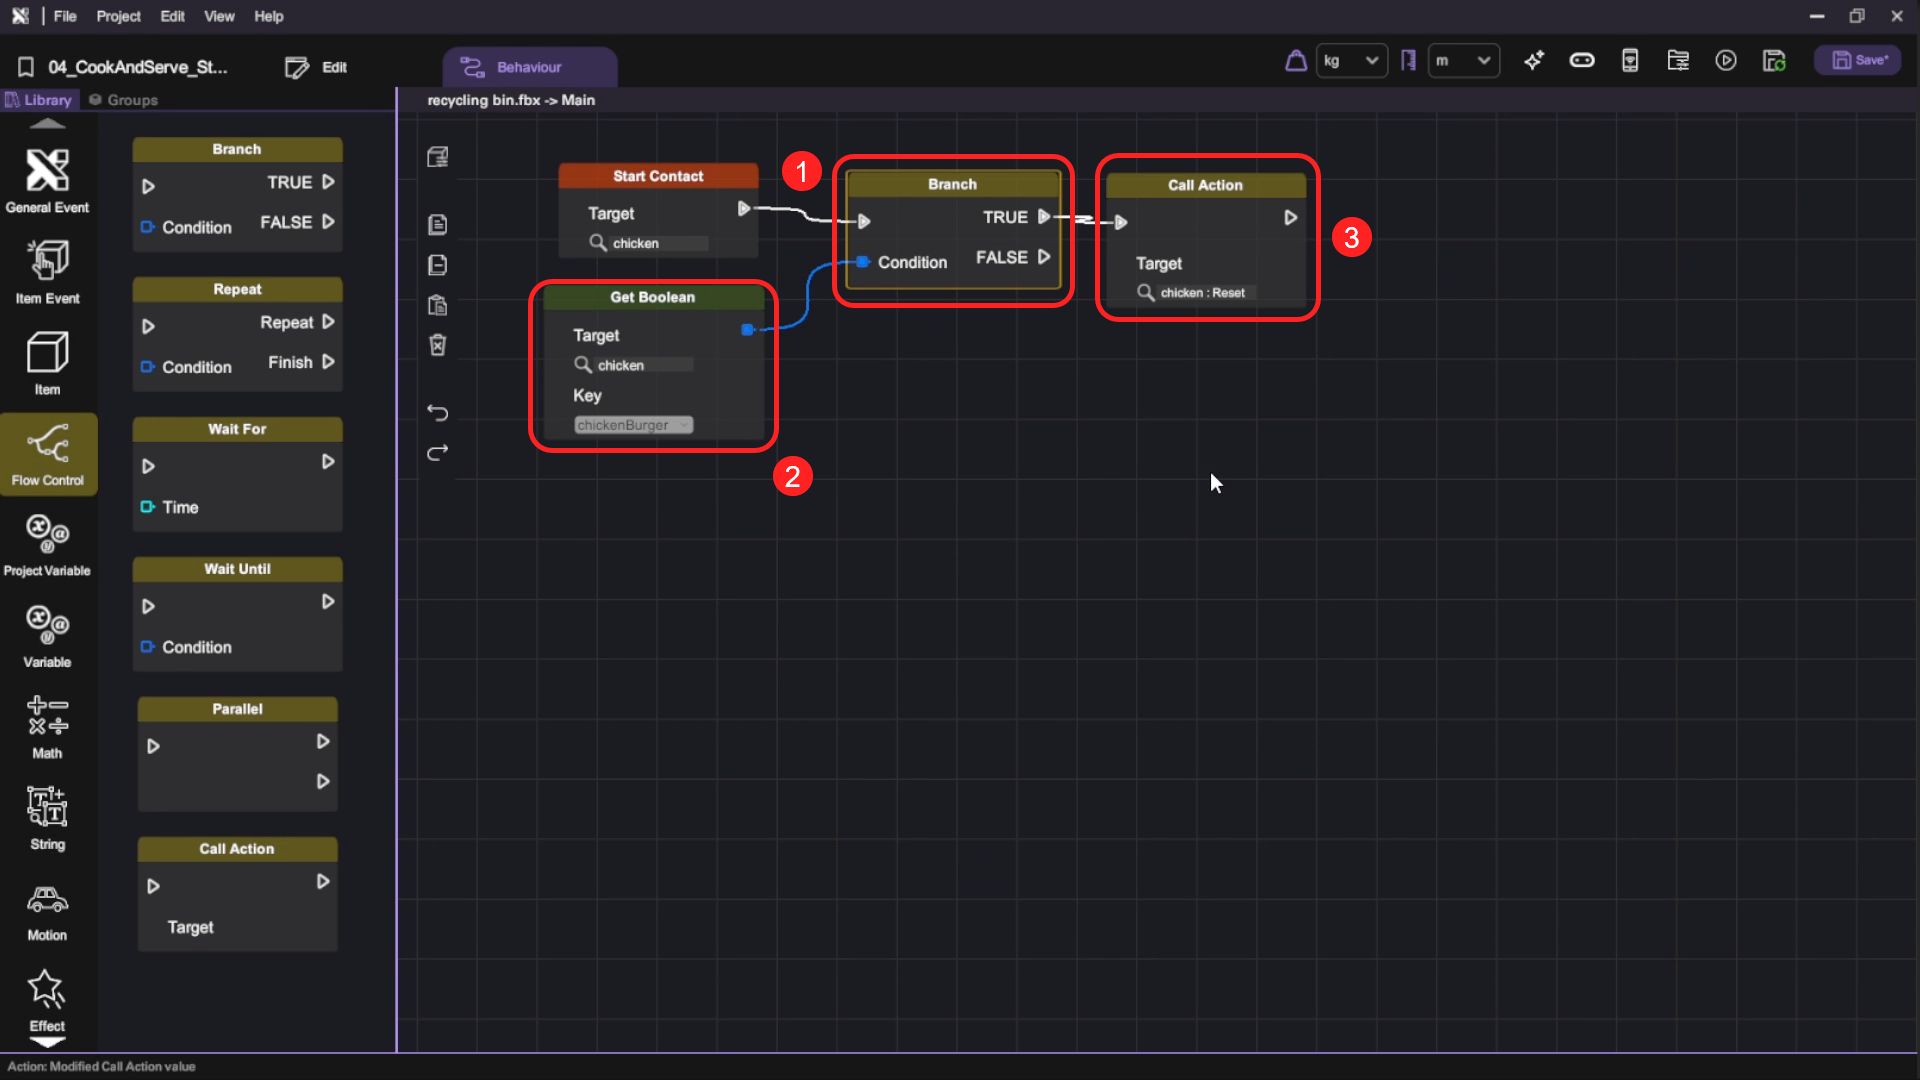
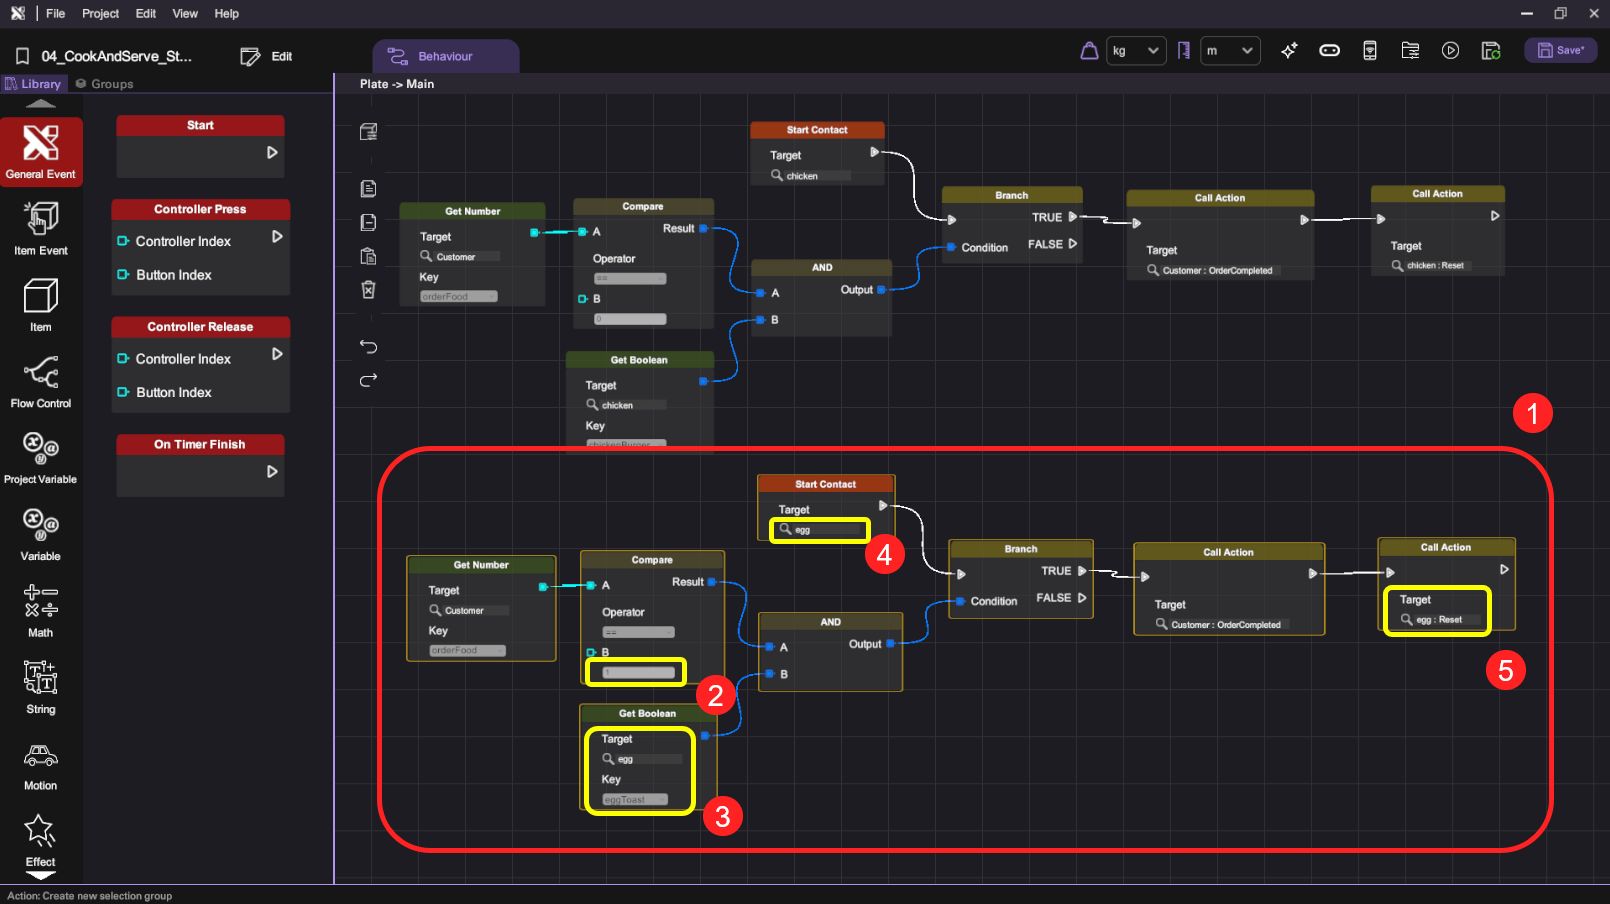
- Switch to the behaviour panel. Add a "Start Contact" Item Event Trigger block and set the target to "chicken". Then append a "Branch" block to the "Start Contact" block and use a "Get Boolean" block to check the "chicken" object's "chickenBurger" variable as the "Branch" block's Condition. Add a "Call Action" block and connect it to the True node of the "Branch" block. The chicken object's "Reset" action will only be called if the "chickenBurger" variable is True.
So the chicken burger will be reset to the chicken object and placed to its original position when the chicken burger comes into contact with the recycle bin object.
| Category | Behaviour |
|---|---|
 |   |
|  |
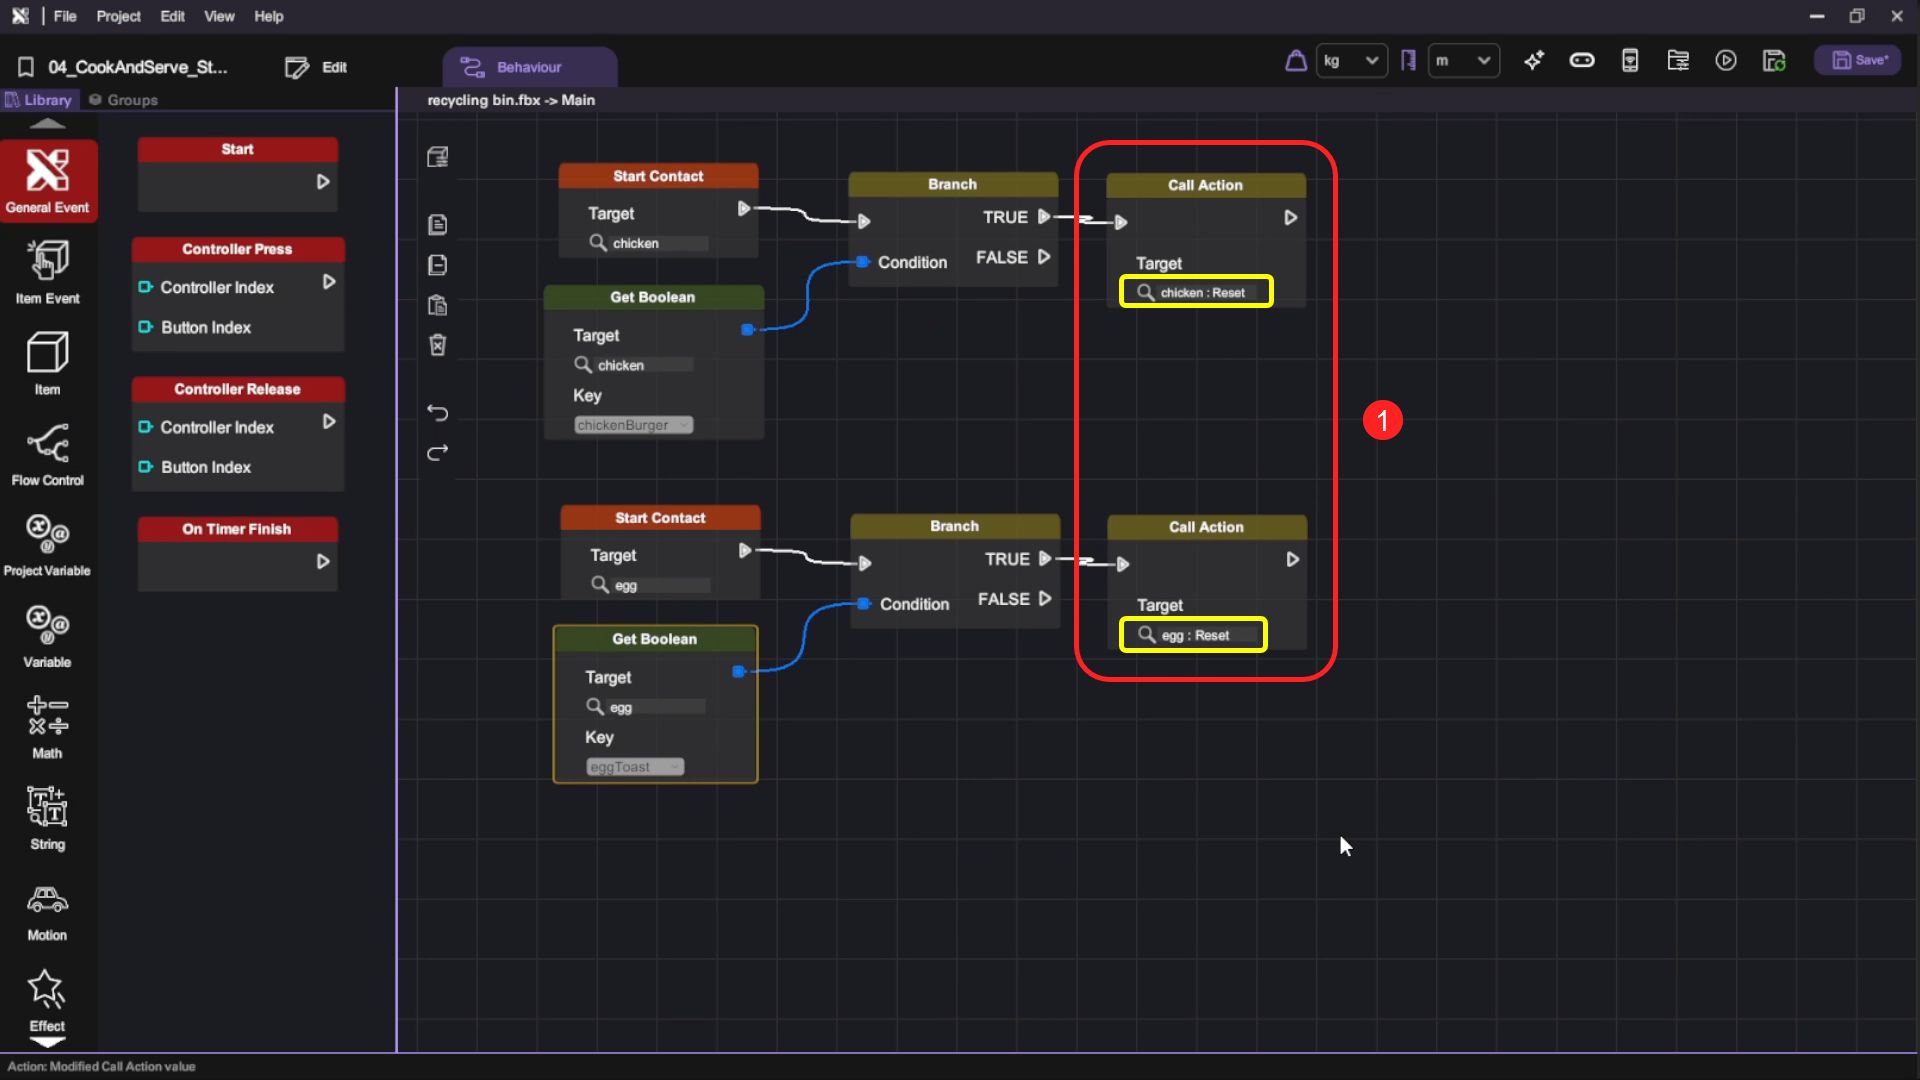
- Duplicate the above behaviour flow one more time and modify it to set up the action call to the "egg" object's "Reset" action.
- You have now finished setting up the recycle bin. Press the "Play" button () and test grabbing the chicken and touching it to the bread.
After it becomes a chicken burger, grab it to the rubbish bin. It should turn back to a chicken. When you grab other cooked foods, they should turn back to the original ingredient.

- Press "Esc" to exit play mode after you've done testing your scene.
Create the Customer Order Process
We will create the customer order process for our game. This process will involve generating a random order for the customer, displaying the order, and handling the completion of the order.
Add a Customer
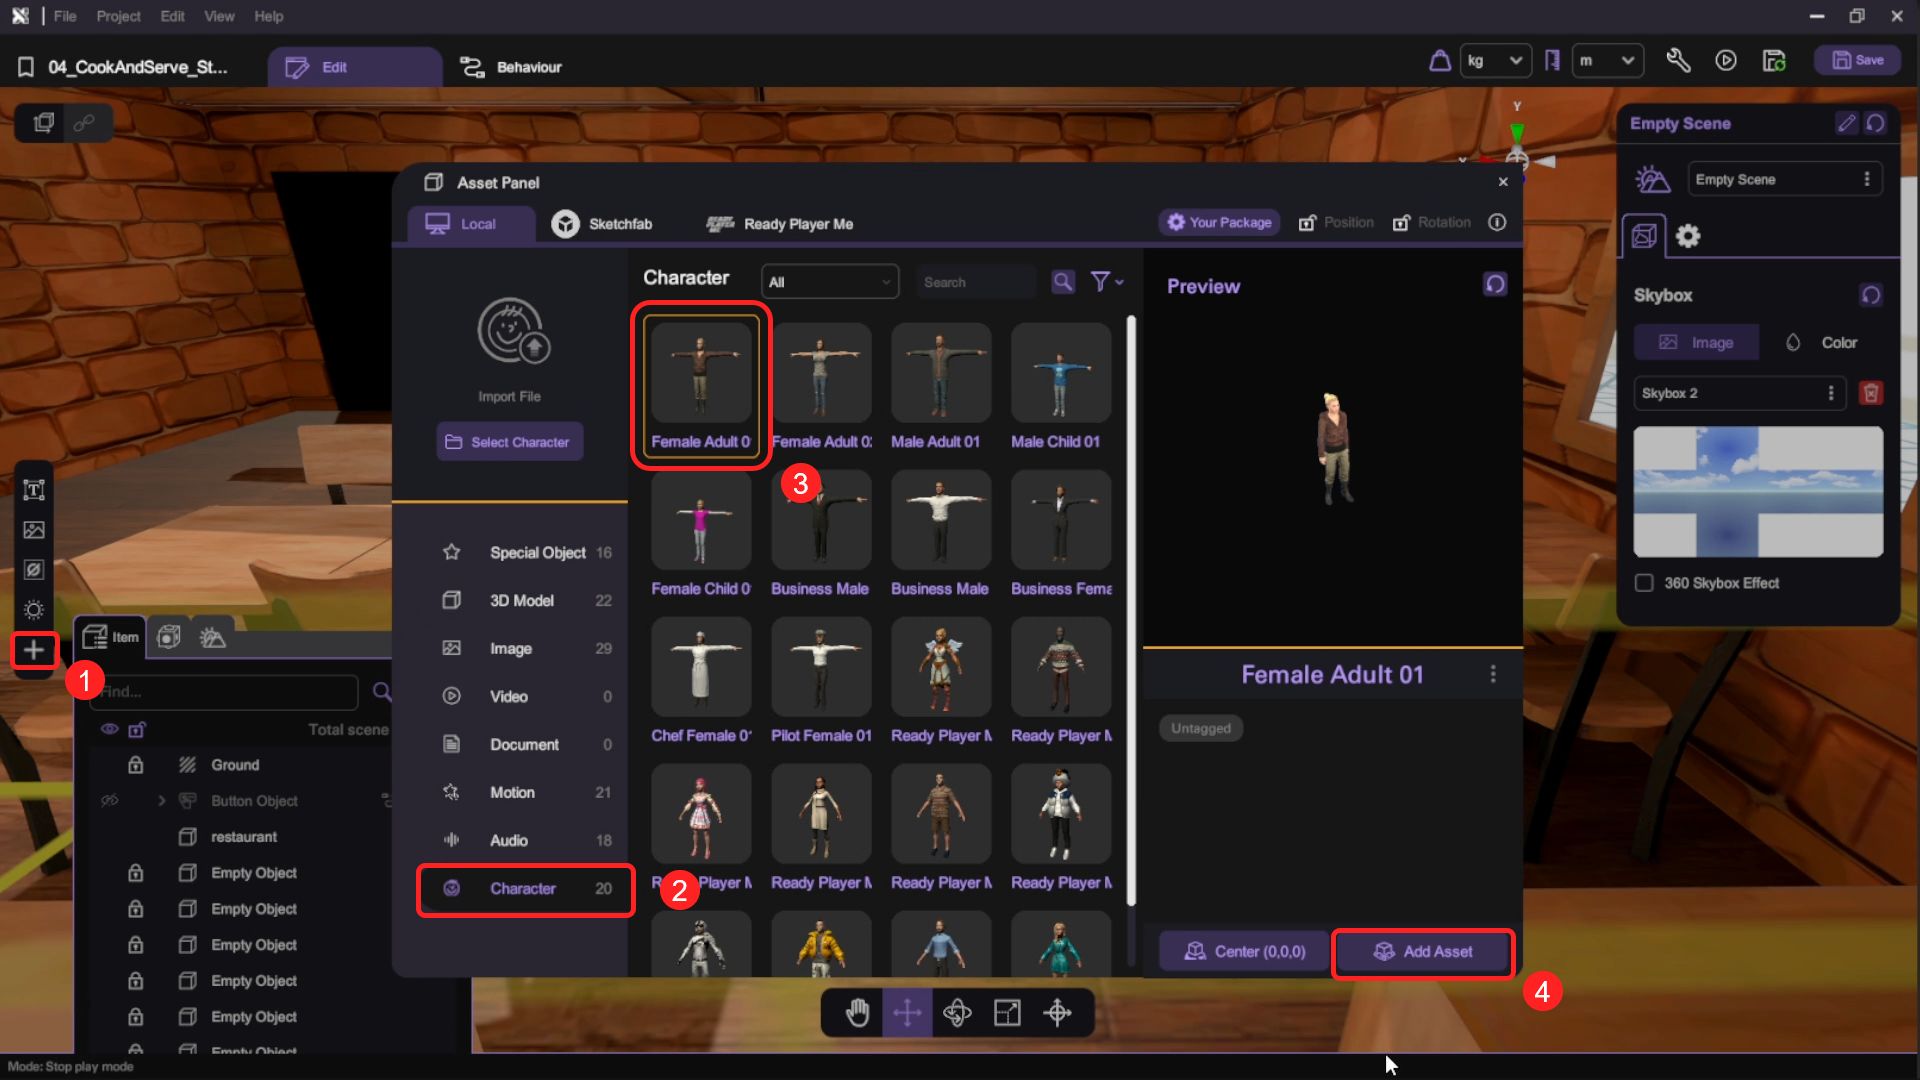
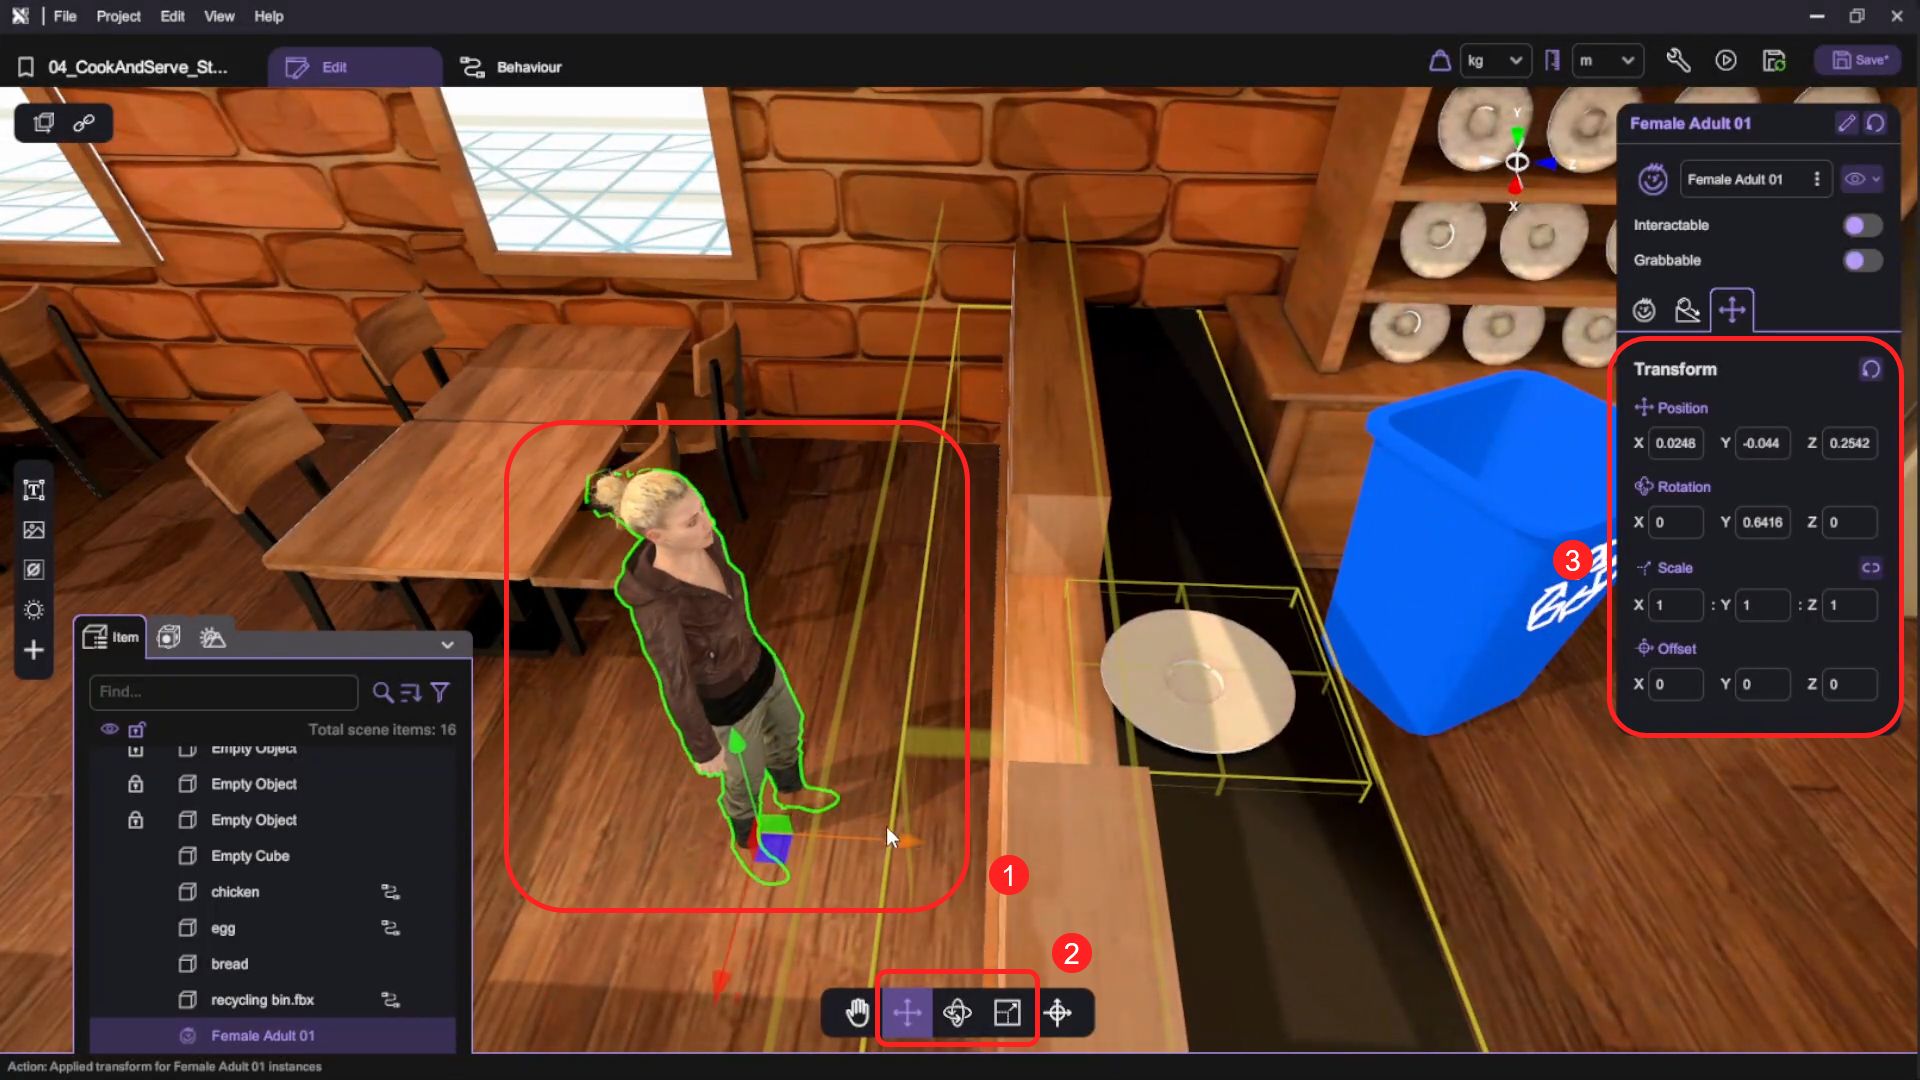
- Open the "Asset Panel" (G) and from the "Default Assets" tab, select and add a "Female Adult 01" to the scene.
- Use the transform tools (move/rotate/scale) to reposition the character behind the counter. Then open the "Inspector" and rename the character to customer.
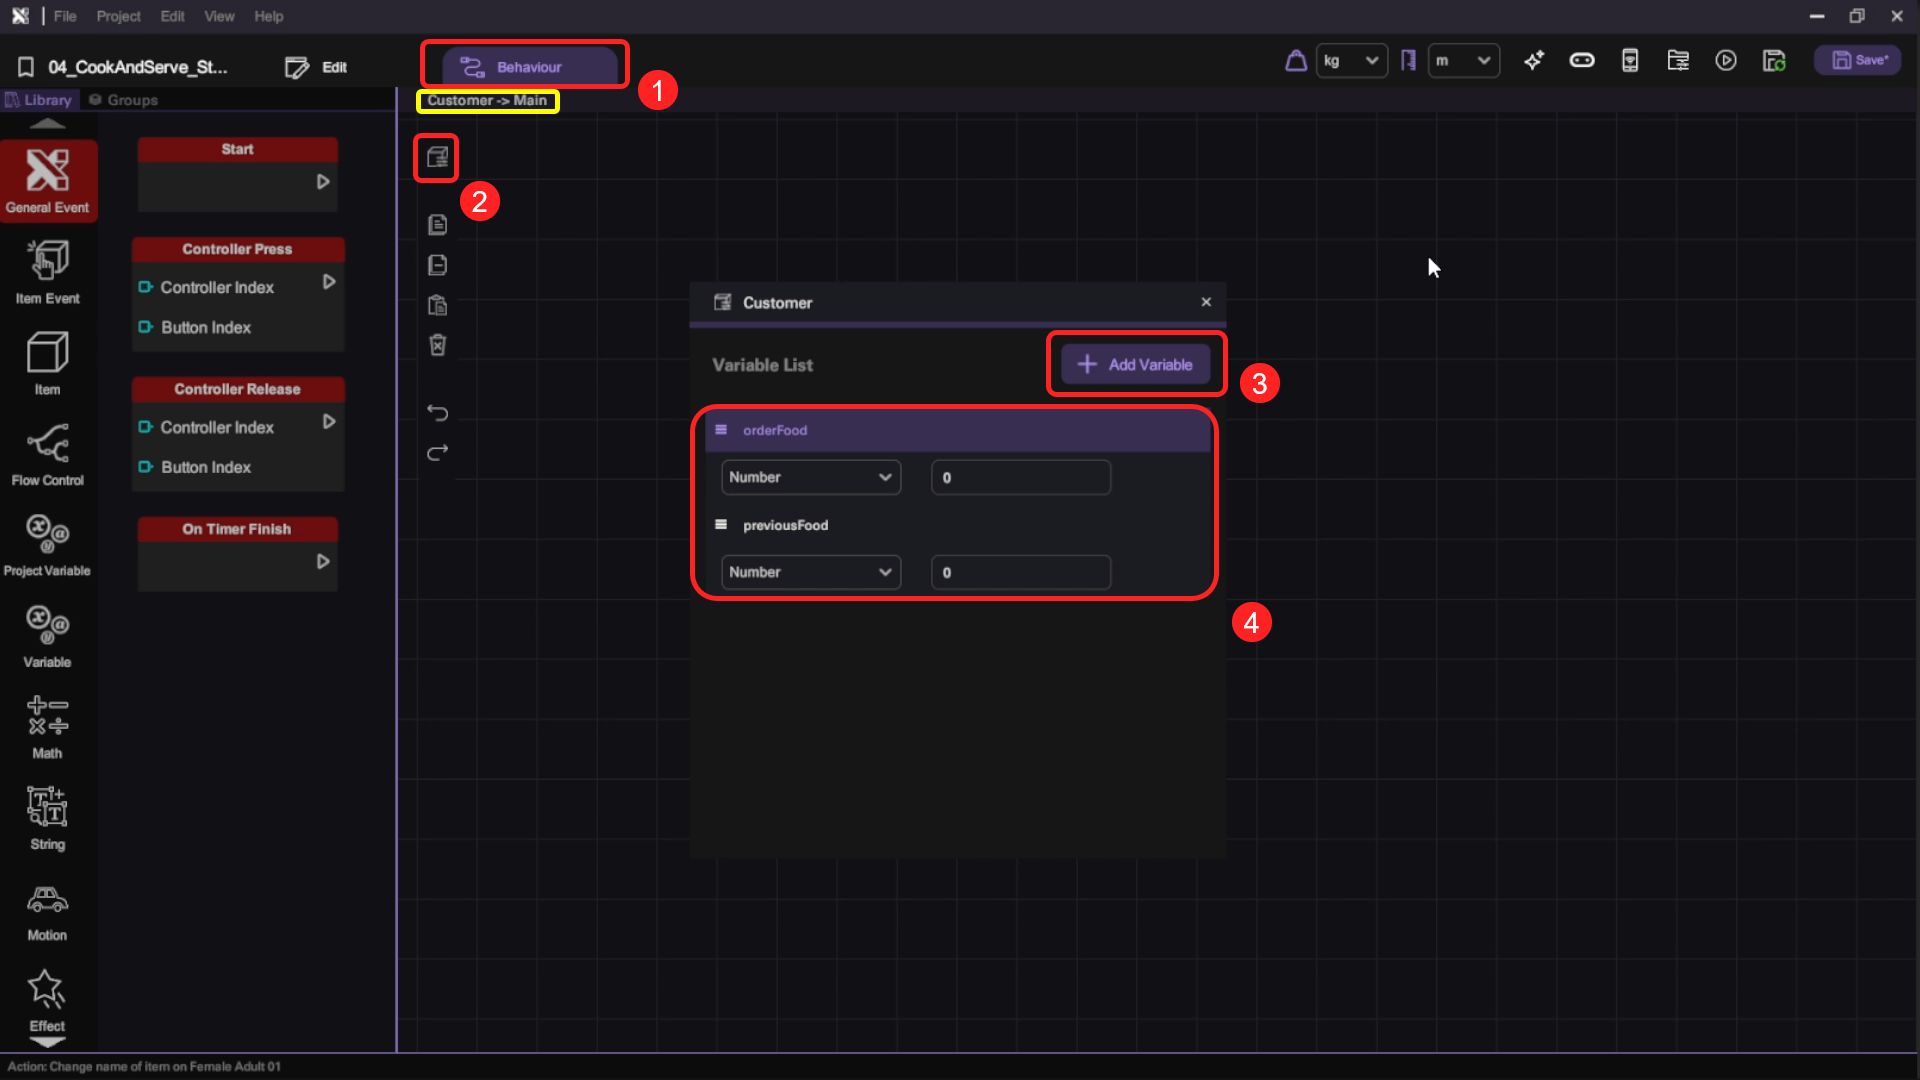
- Select the customer and open its behaviour panel. Add two Number type variables named "orderFood" and "previousFood".
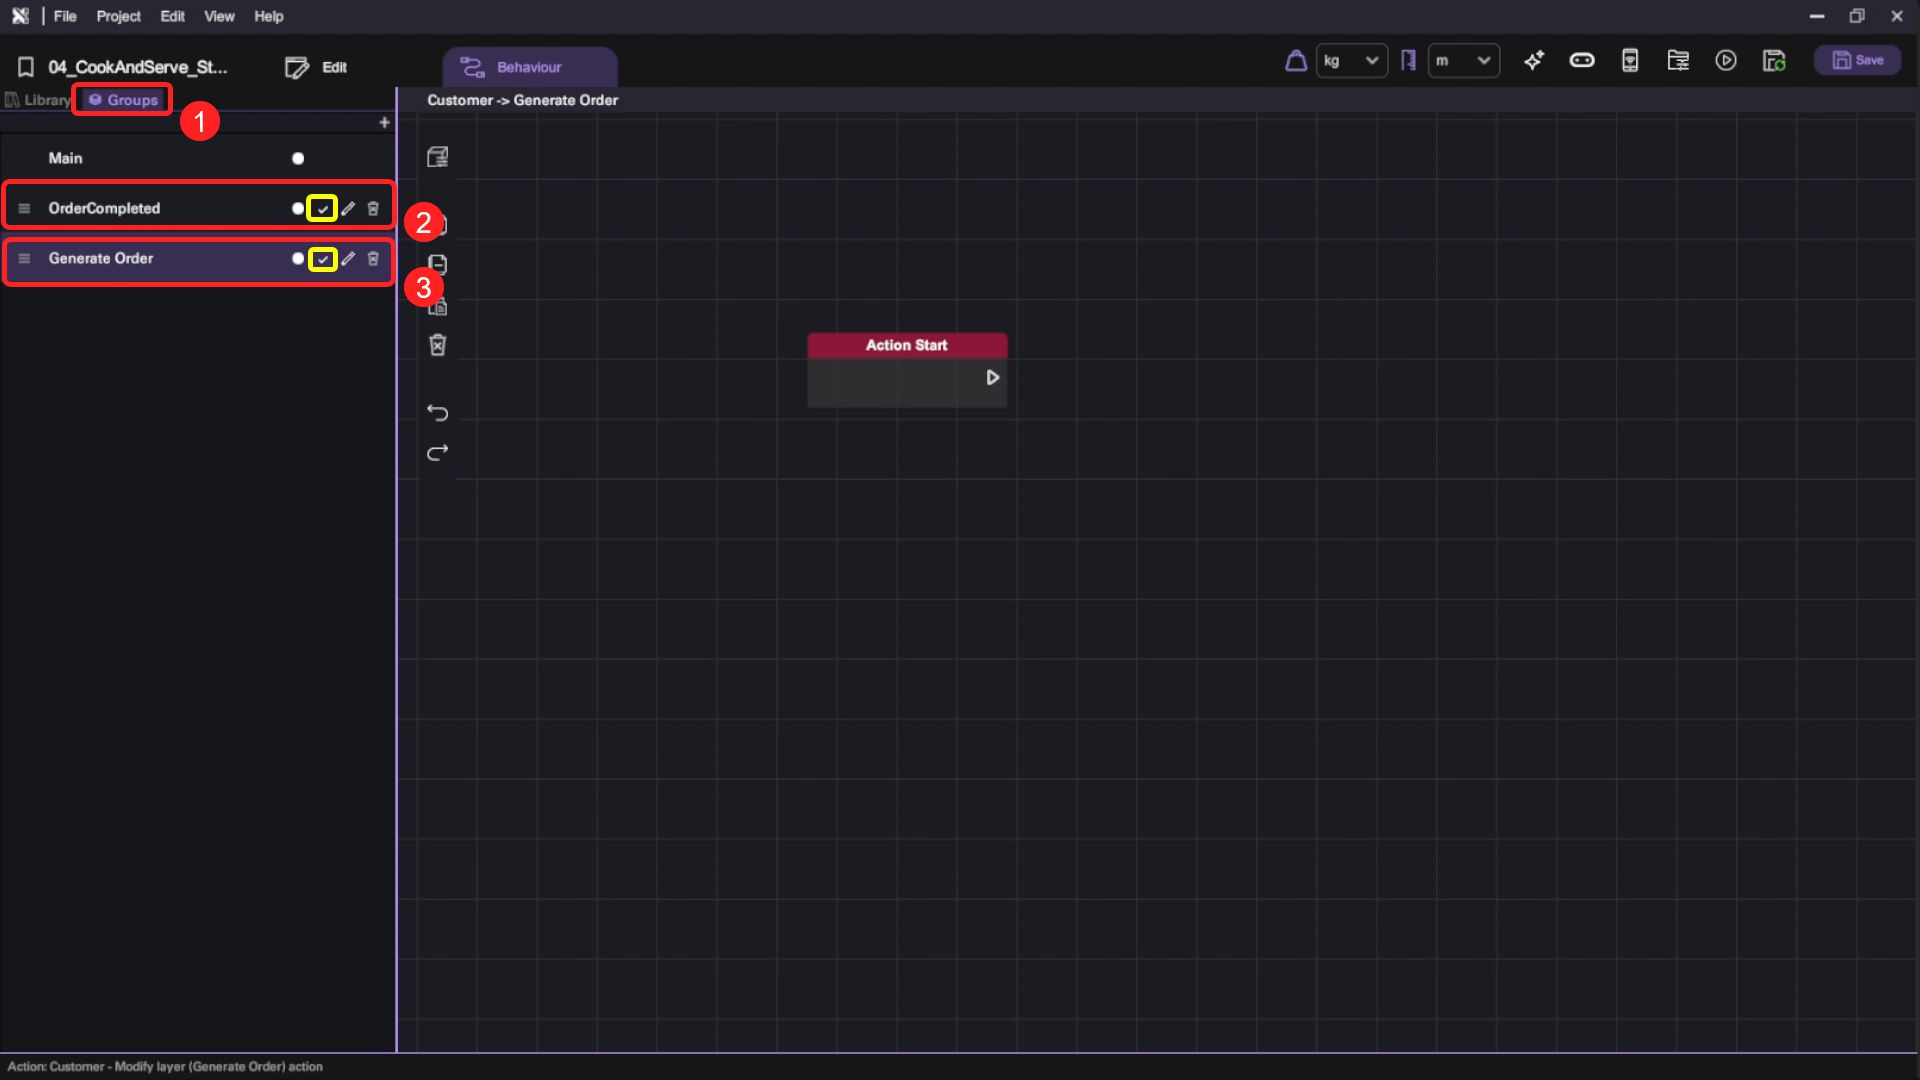
- Create 2 new actions for the customer object, namely "Generate Order" and "OrderCompleted".
Create the Order Food Logic
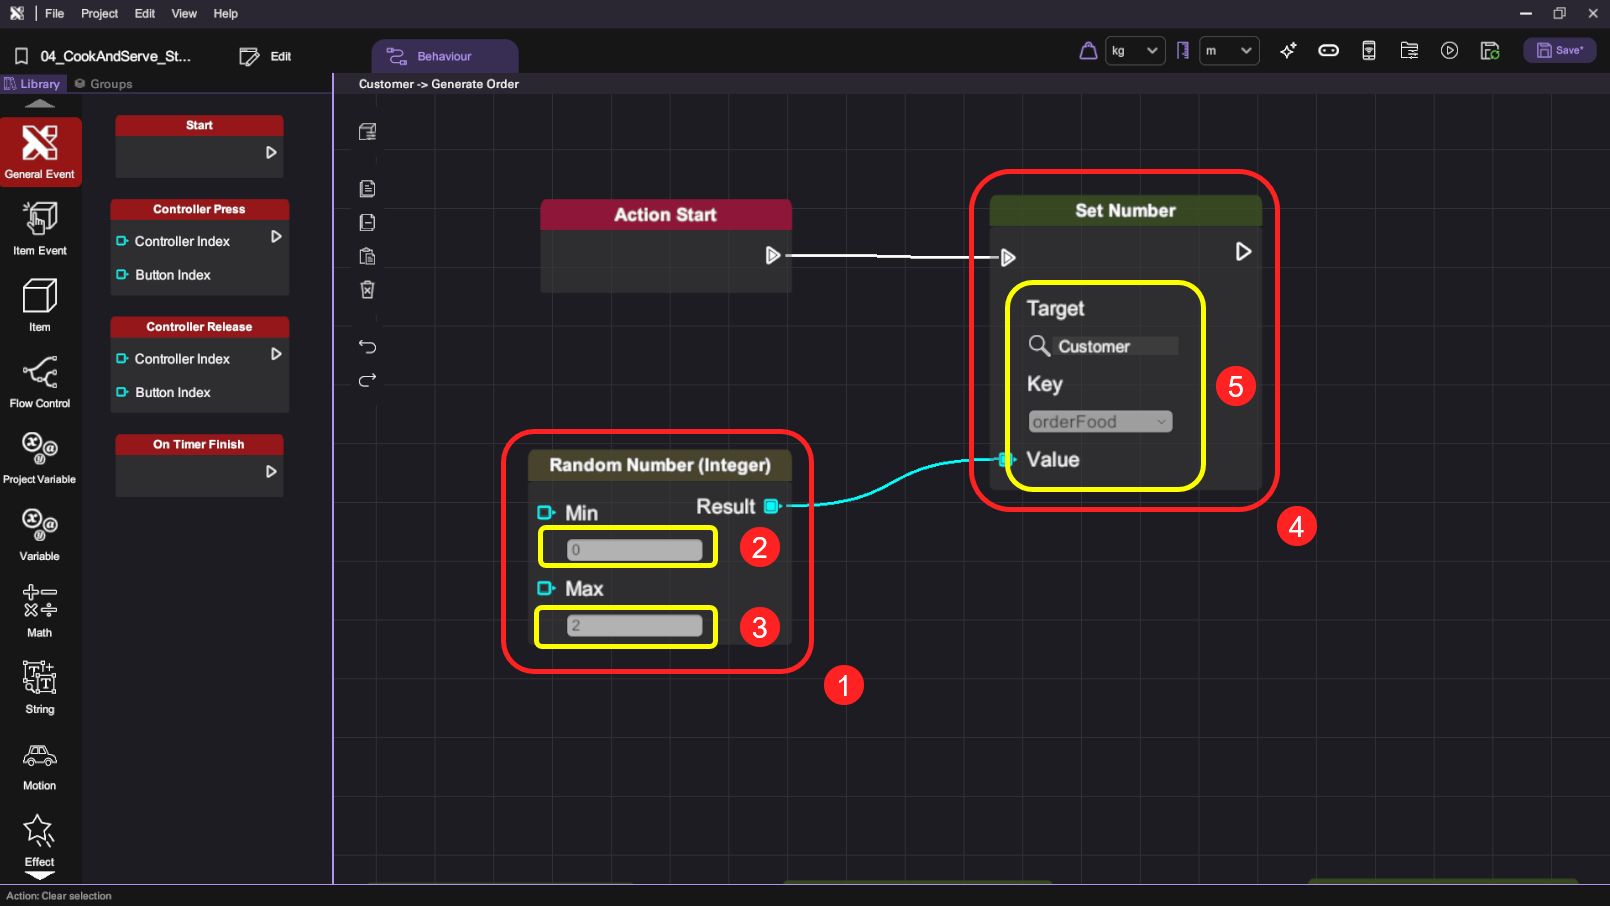
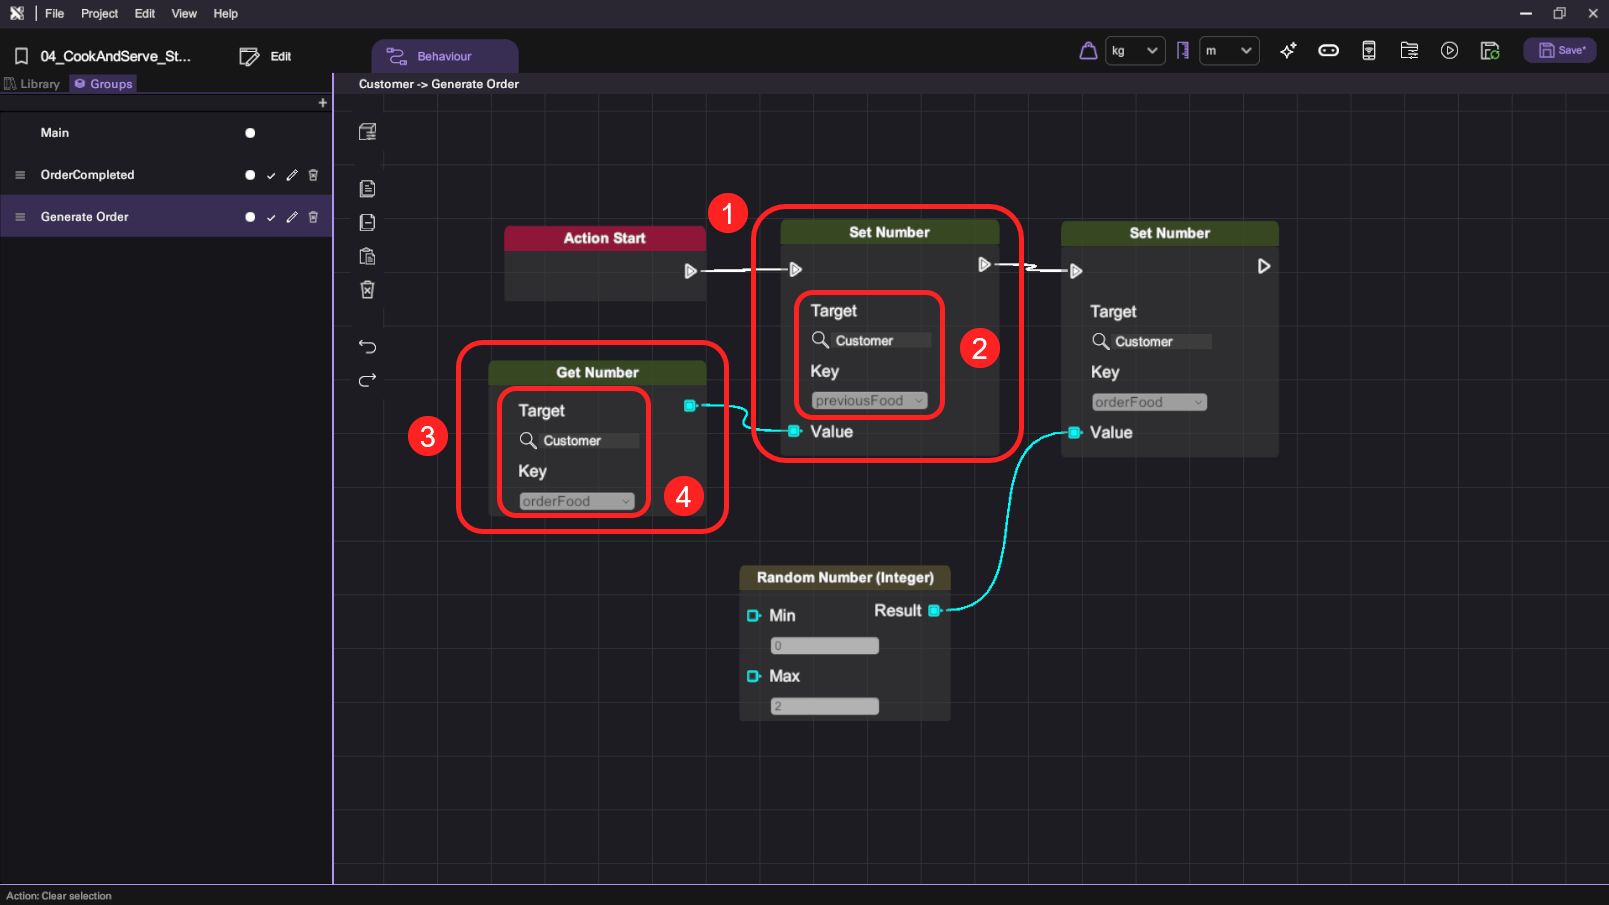
- Select the customer object's "Generate Order" action, then append a "Set Number" block to the "Action Start" block. Select the customer object's "orderFood" variable and use a "Random Number (Integer)" block to randomly set its value to an integer number between 0 and 1.
Each number will represent one type of food to serve. For instance, integer number 0 means the customer wants a burger, or integer number 1 means the customer wants egg toast.
| Category | Behaviour |
|---|---|
|  |
|  |
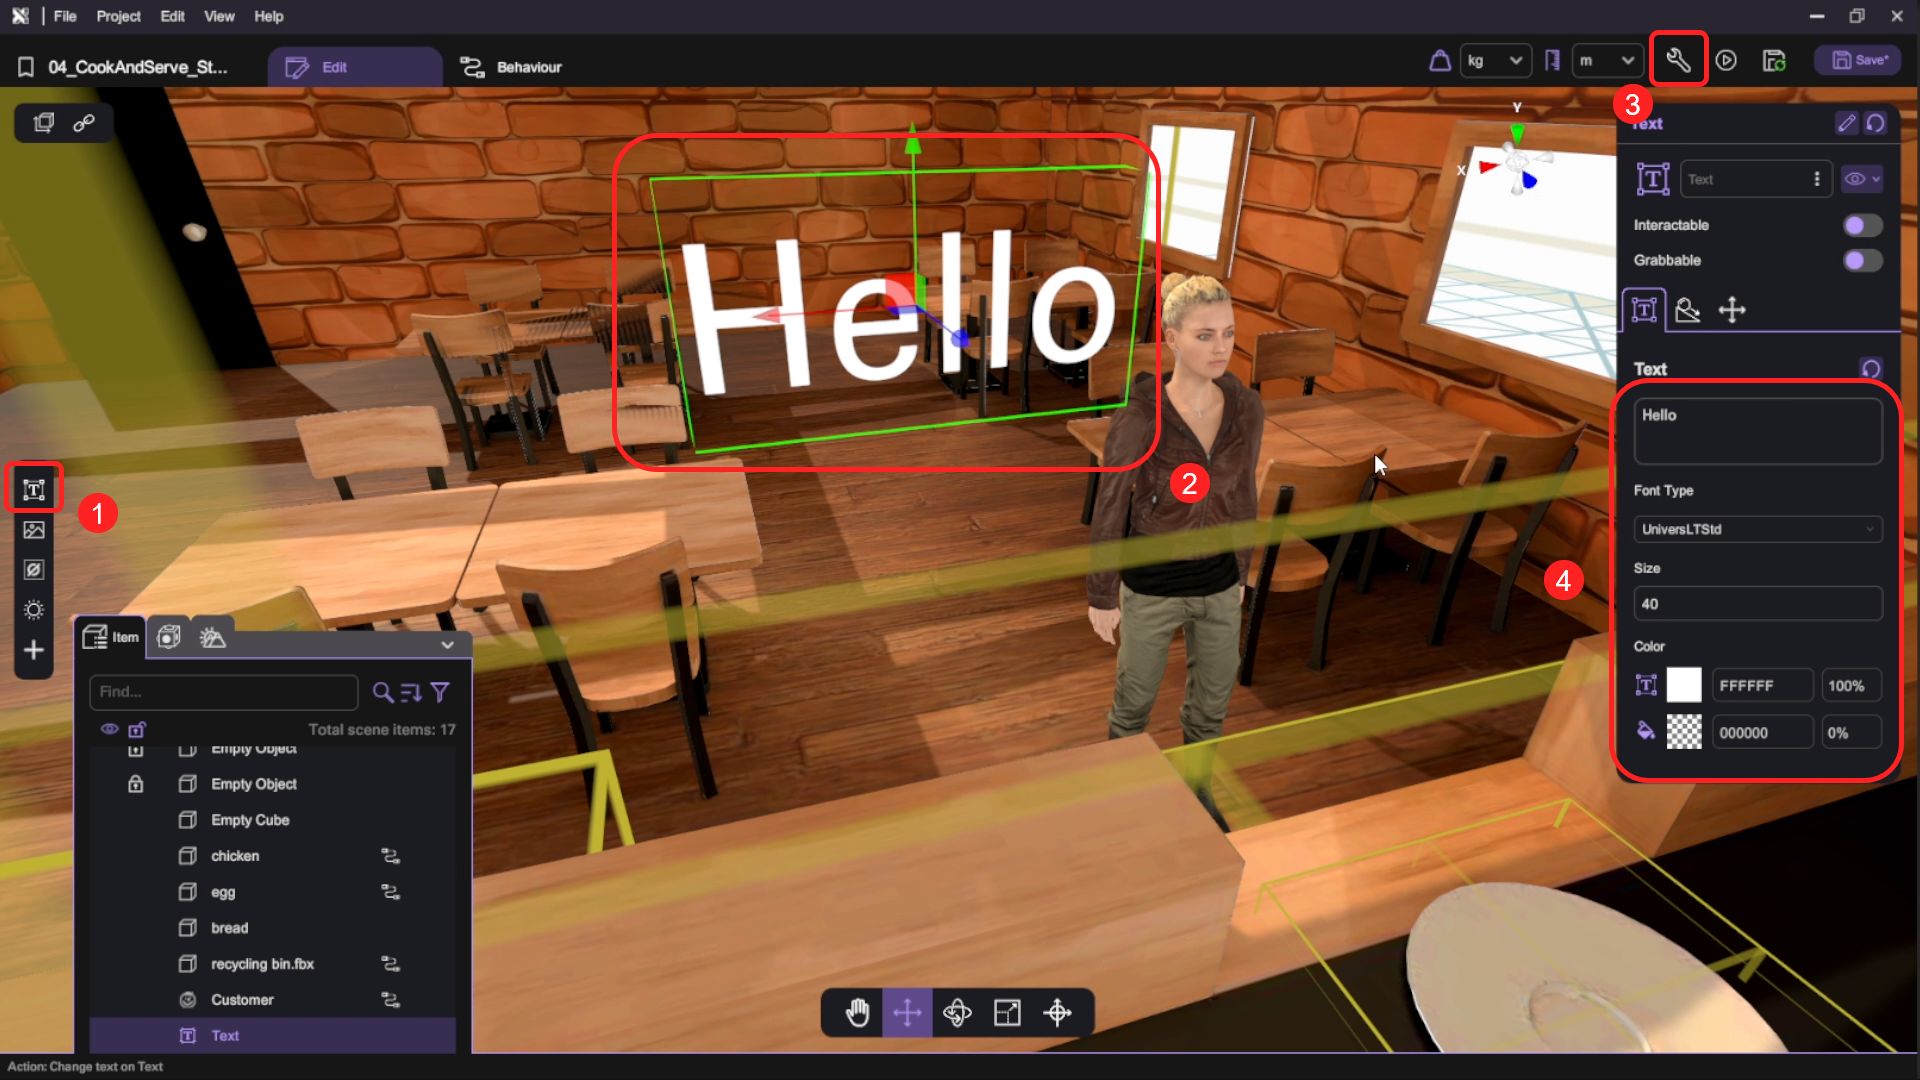
- Back to the scene, add a new Text object and rename it to "orderDisplay". Use the "Inspector" to set up the text content, font size, and color of the text object.
We will use it to display the name of the food the customer orders.
- Create a new action named "changeText" for the orderDisplay object. Append a "Branch" Flow Control block to the "Action Start" block and use a "Compare" Math block as the Condition.
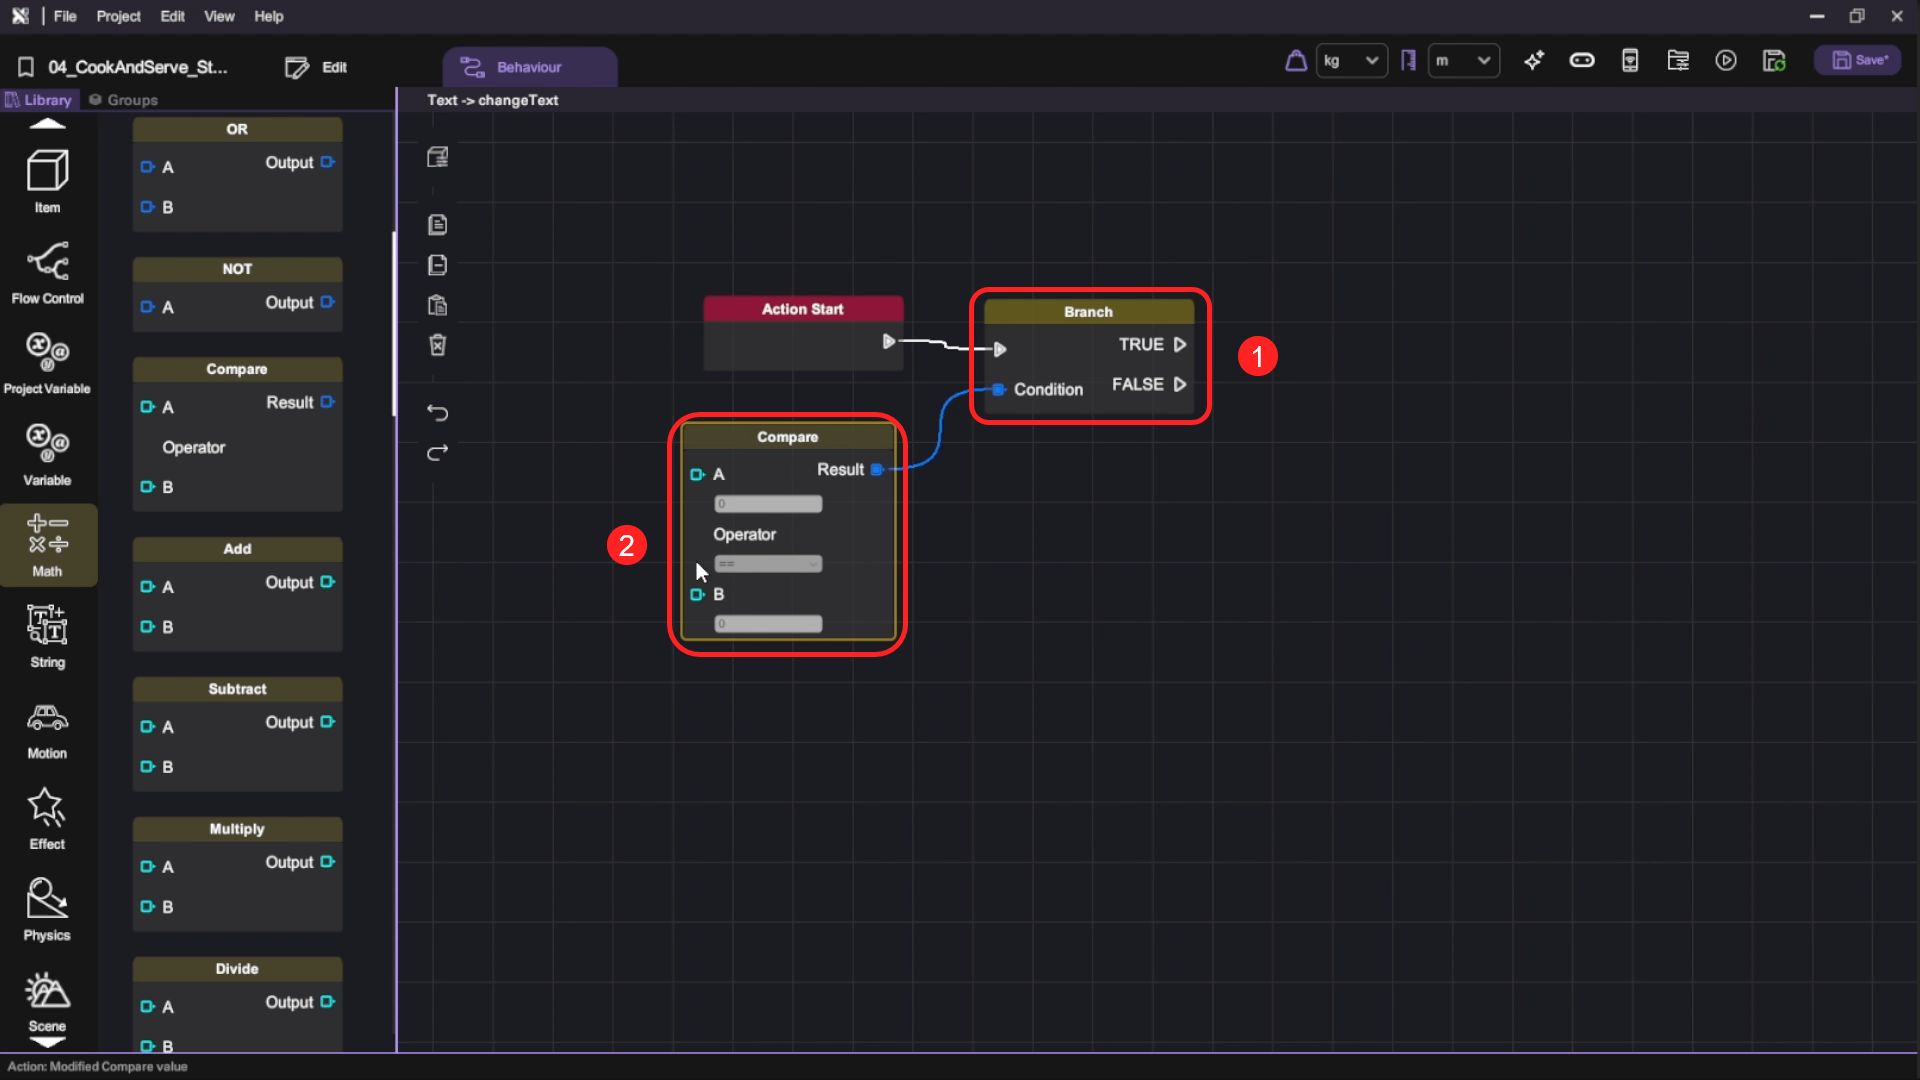
| Category | Behaviour |
|---|---|
| |
|  |
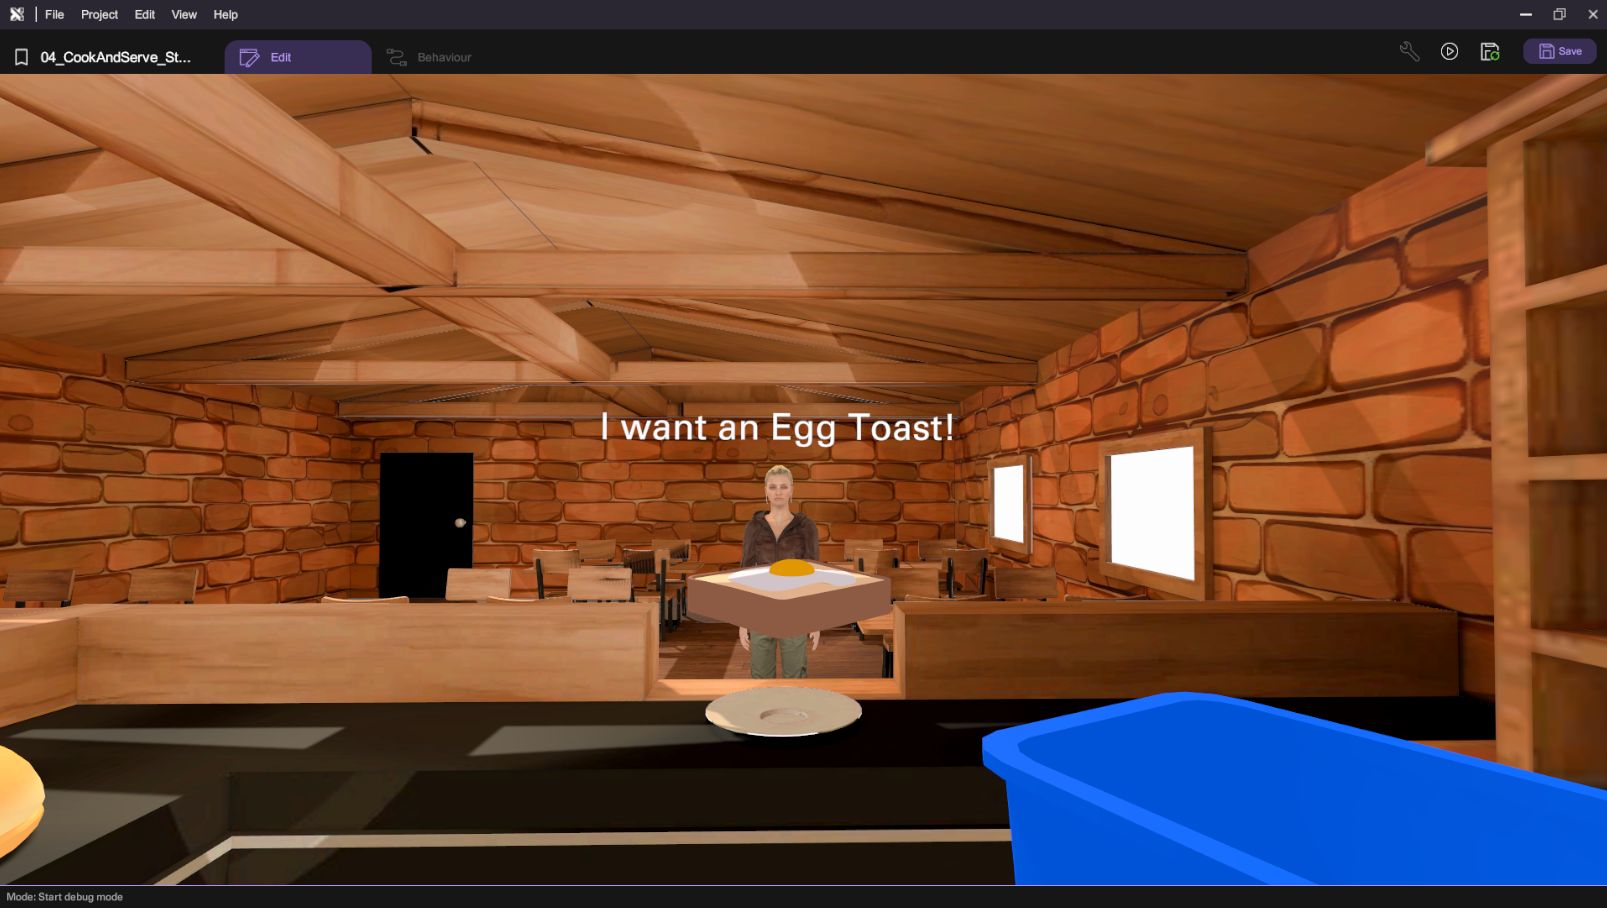
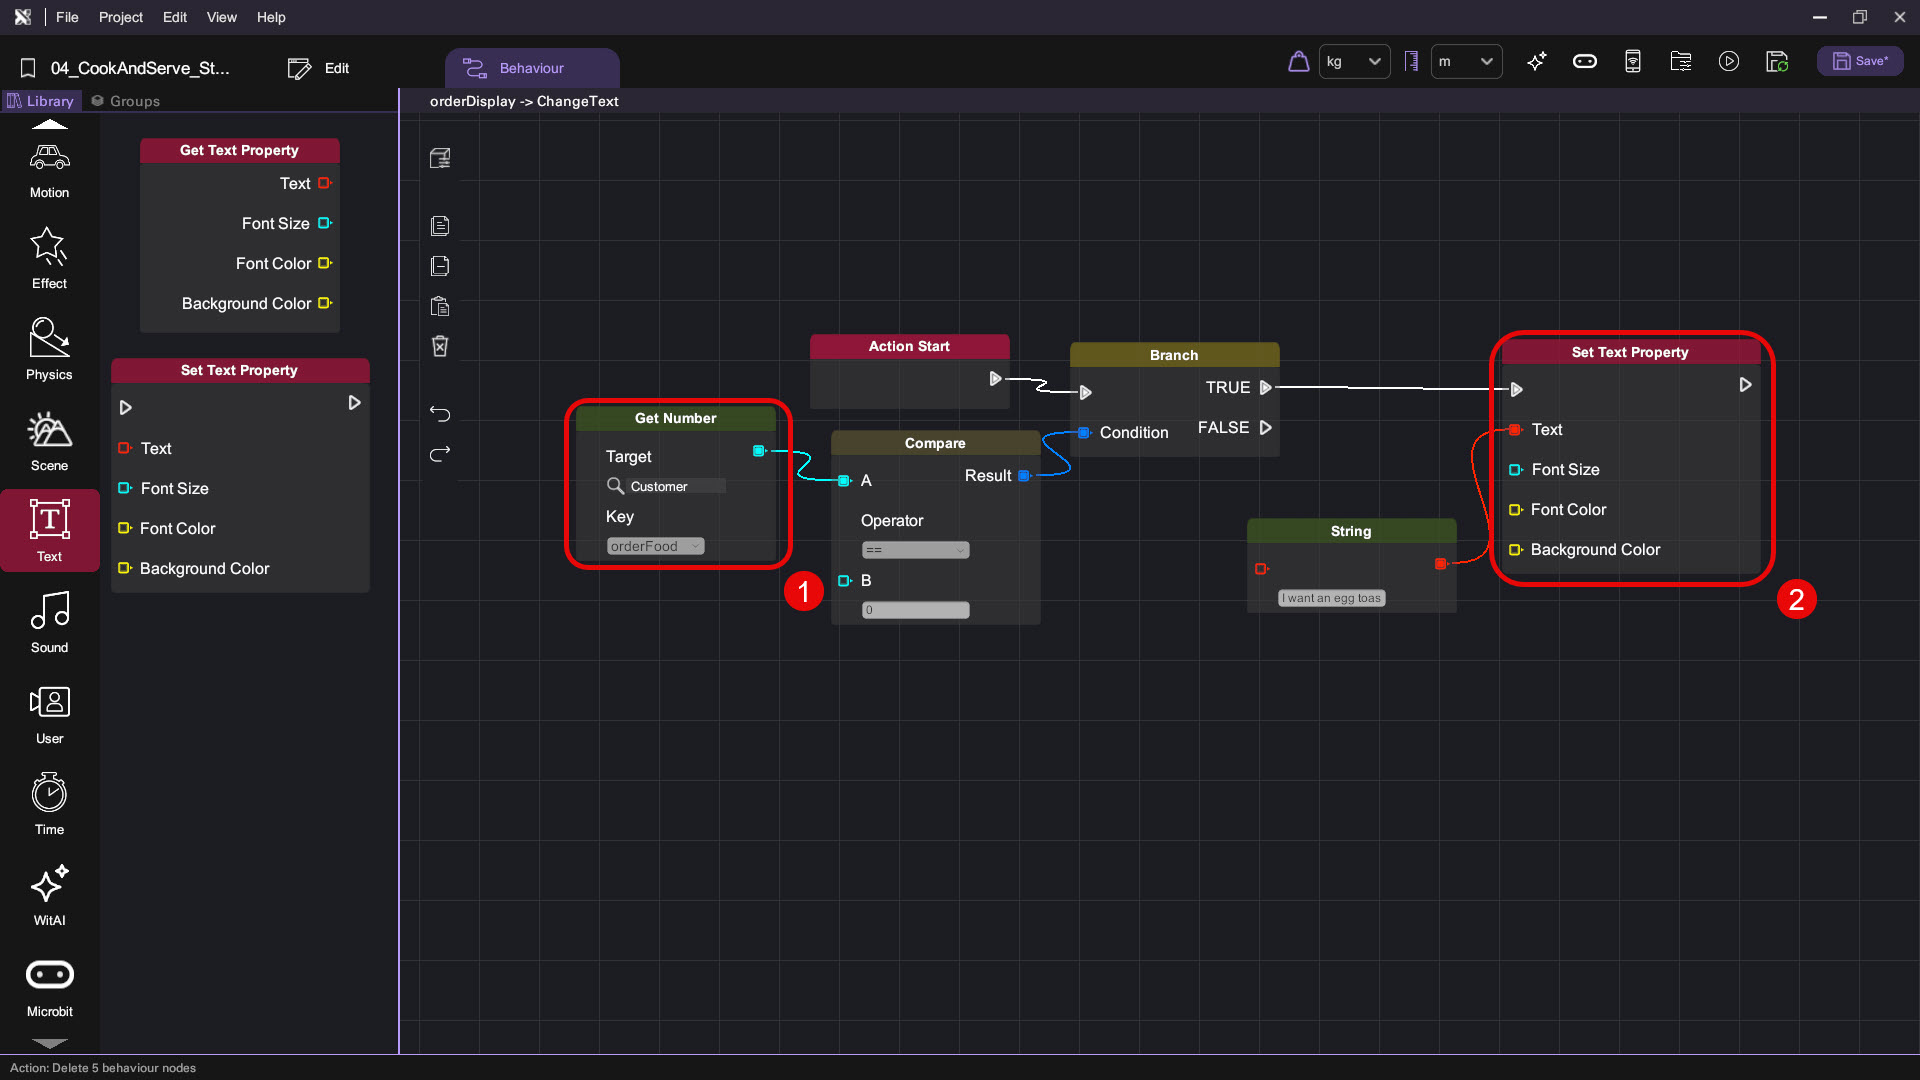
- Use a "Get Number" Variable block to retrieve the customer object's "orderFood" variable and connect it to the A node of the "Compare" block, then set the B node to 0 and the Operator to "==". This will return True if the value in the A node equals the value in the B node, and False otherwise. Lastly, add a "Set Text Property" Text block and connect it to the "Branch" block's True node, and set the text to "I want a chicken burger!".
At this point, the behaviour flow checks the "orderFood" value and shows a text to order a chicken burger if the value is 0.
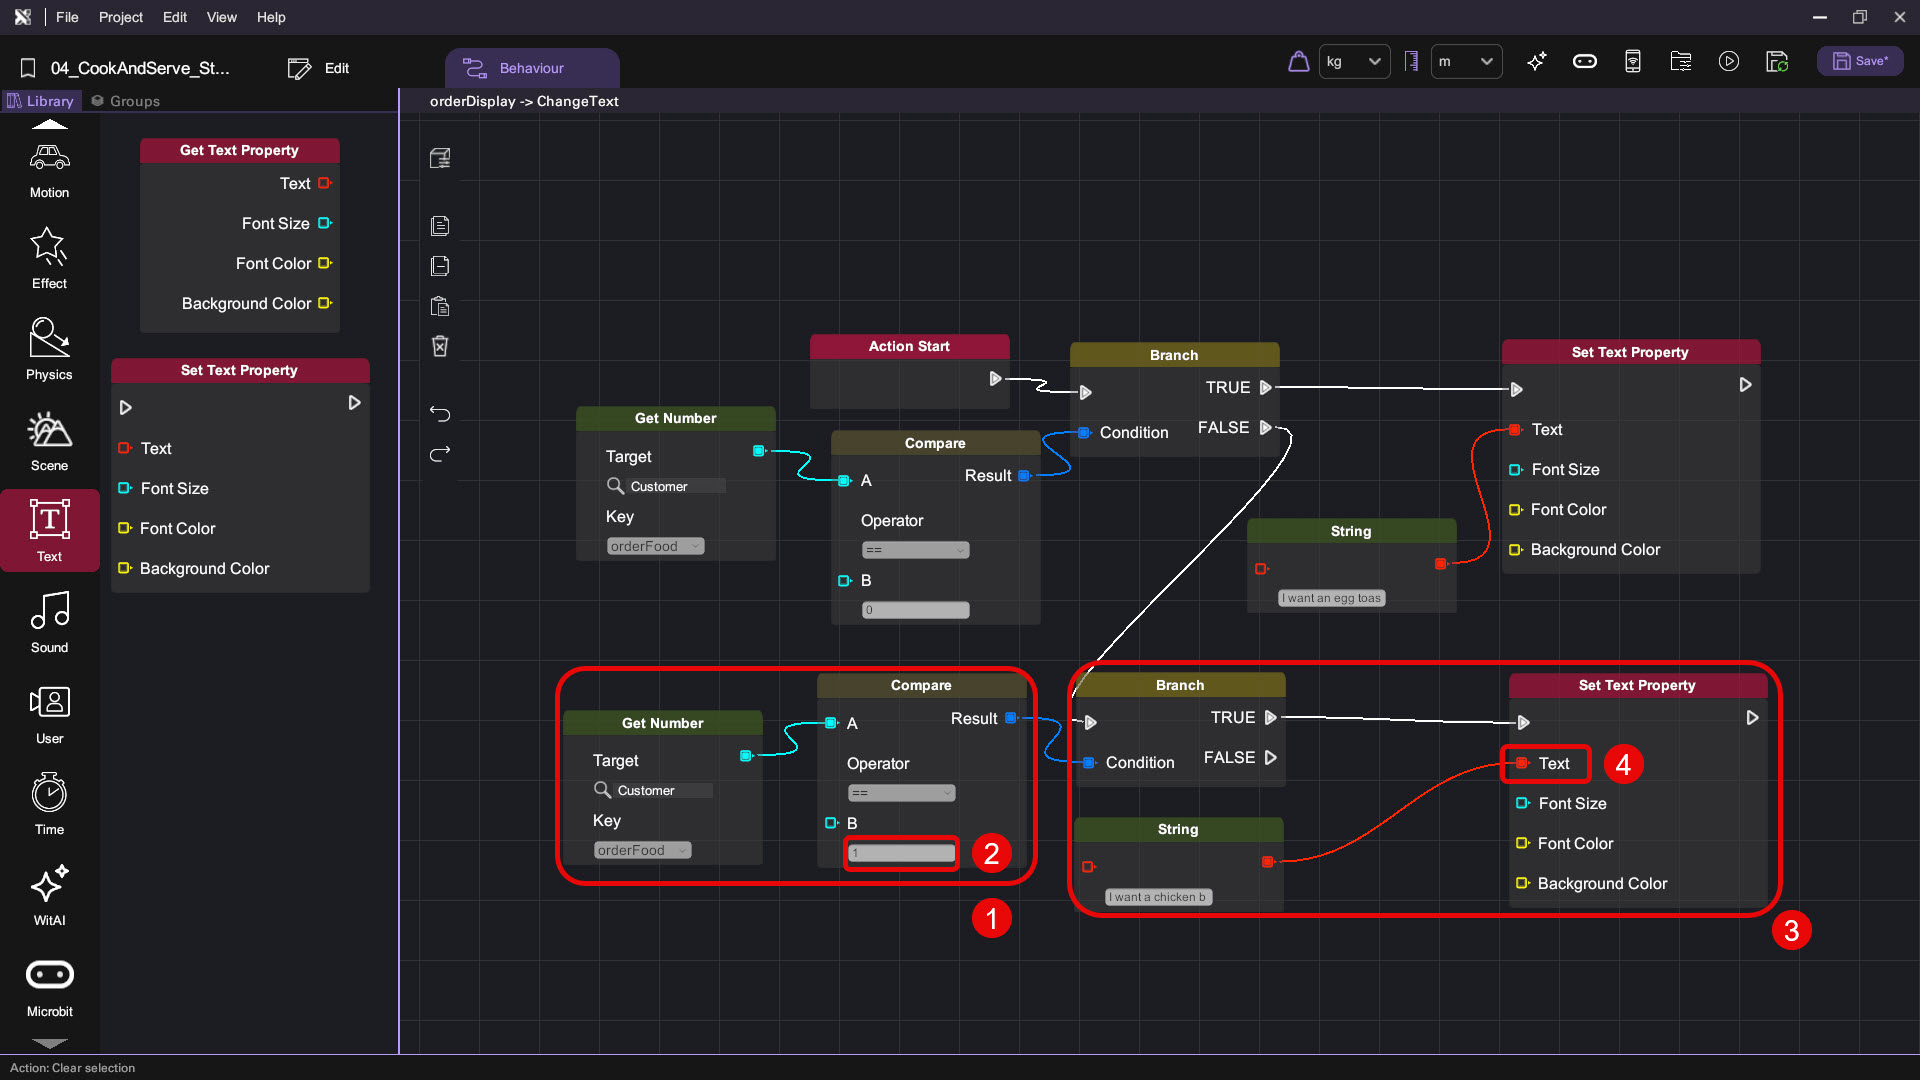
- Copy and paste these 4 behaviour blocks and place them under the original behaviour flow, then connect the original "Branch" block's False node to the copied "Branch" block's in flow node. Change the new "Compare" block's B value to 1 and change the new "Set Text Property" block's Text to "I want an egg toast!"
Index number 0 represents the order for Chicken Burger, Index number 1 represents the order for Egg Toast.
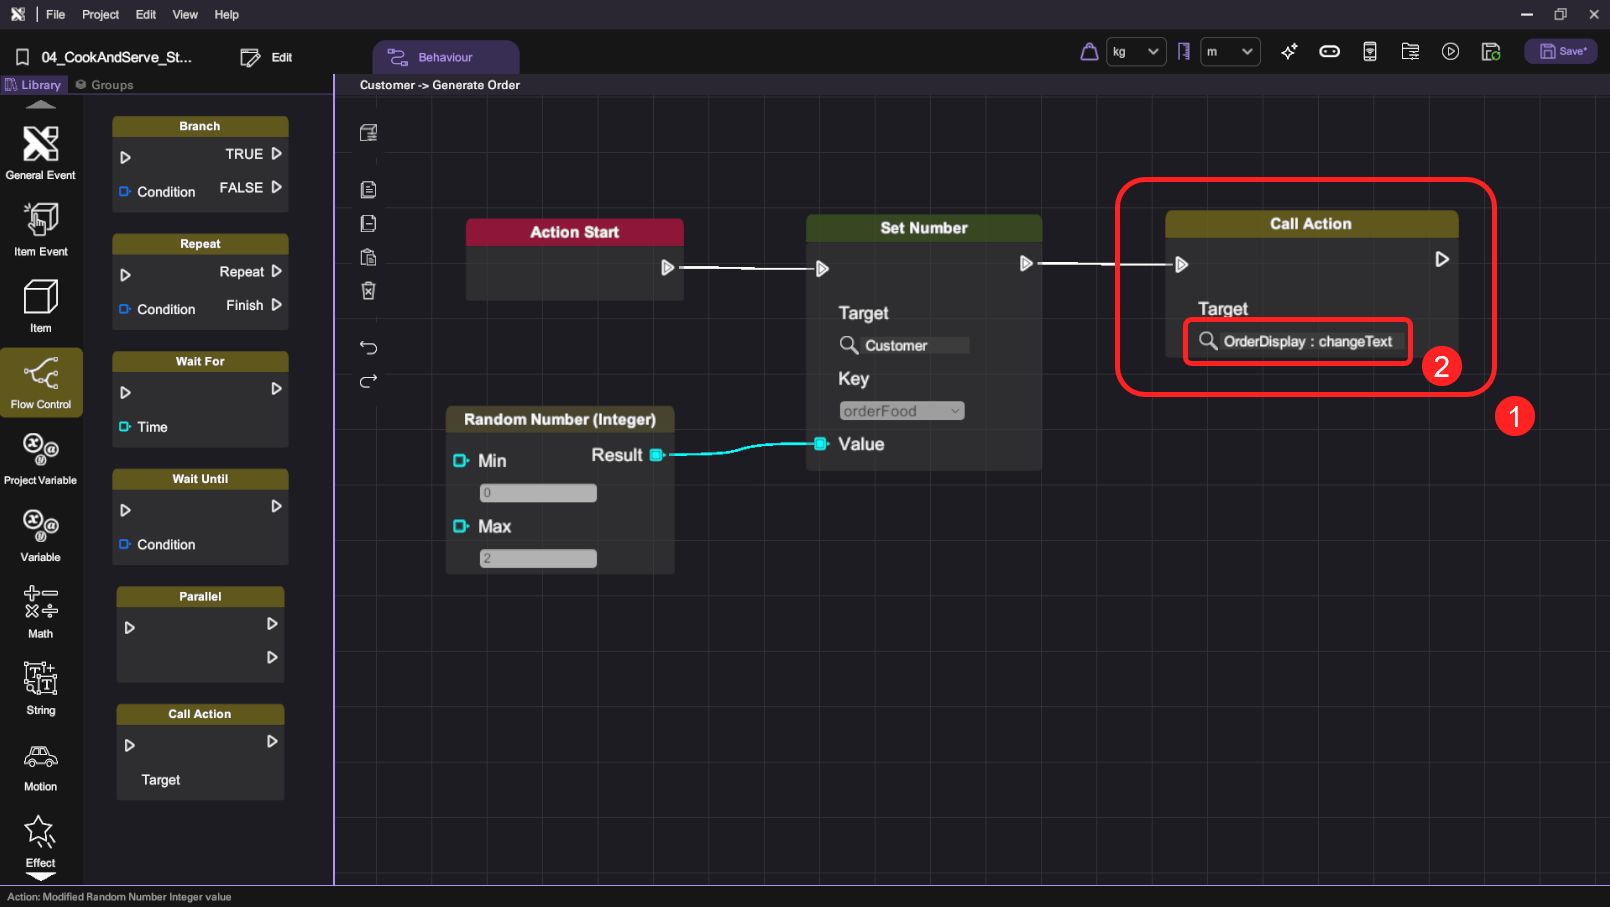
- Switch back to the customer object's behaviour panel, choose the "Generate Order" action. Add a "Call Action" block to the end of the behaviour flow. Set the Target to the "orderDisplay" object's "changeText" action.
- You have now finished creating the food order logic. Press the "Play" button () and click start to see the food order text, repeat the play test a few times and you should see different food orders.
Create the Order Fulfillment Process
In this section, we will establish the logic for fulfilling customer orders by checking if the correct food items are placed on the plate and managing the completion of those orders.
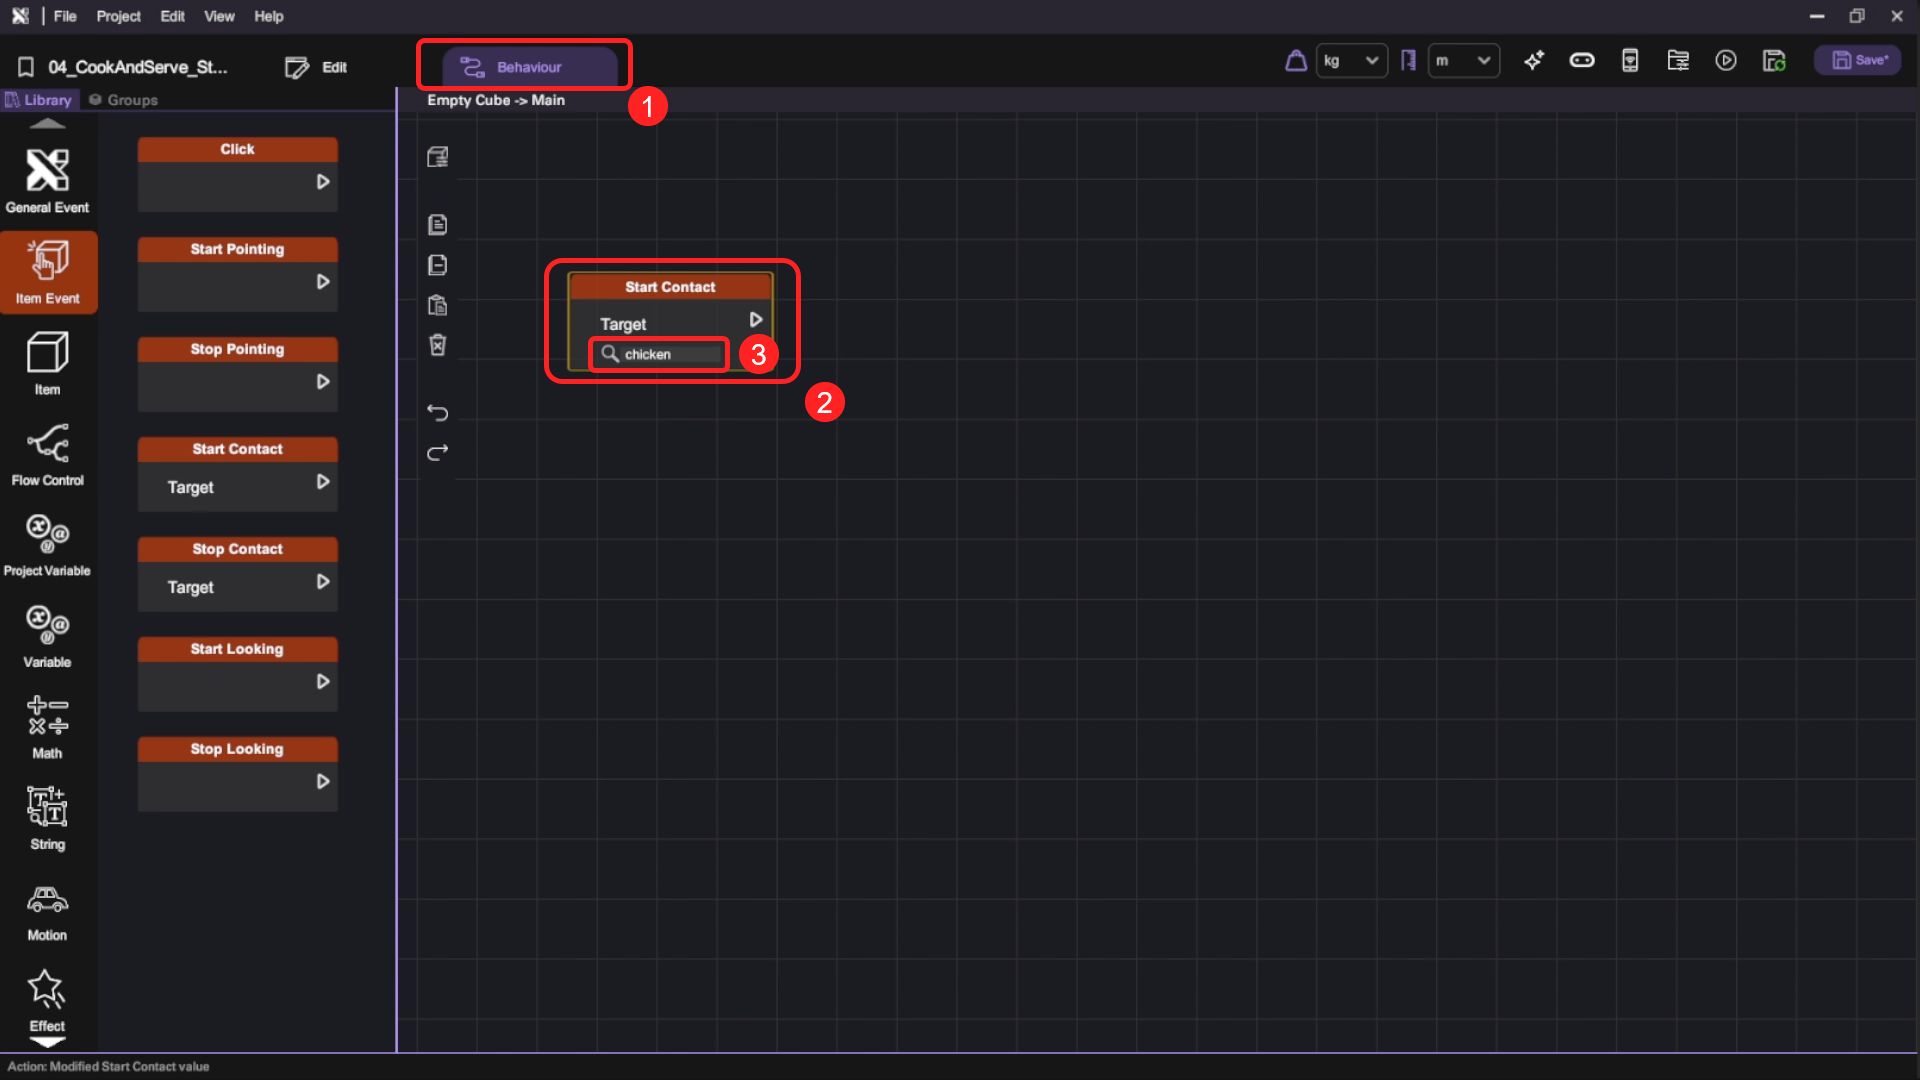
- The player will complete the customer order when they place a cooked food matching the customer order onto the plate. To create this behaviour flow, we begin by adding a "Start Contact" block to the "plate" empty object's behaviour canvas. Set the Target to chicken.
The behaviour flow that follows will only be triggered when the "plate" comes into contact with the "chicken" object.
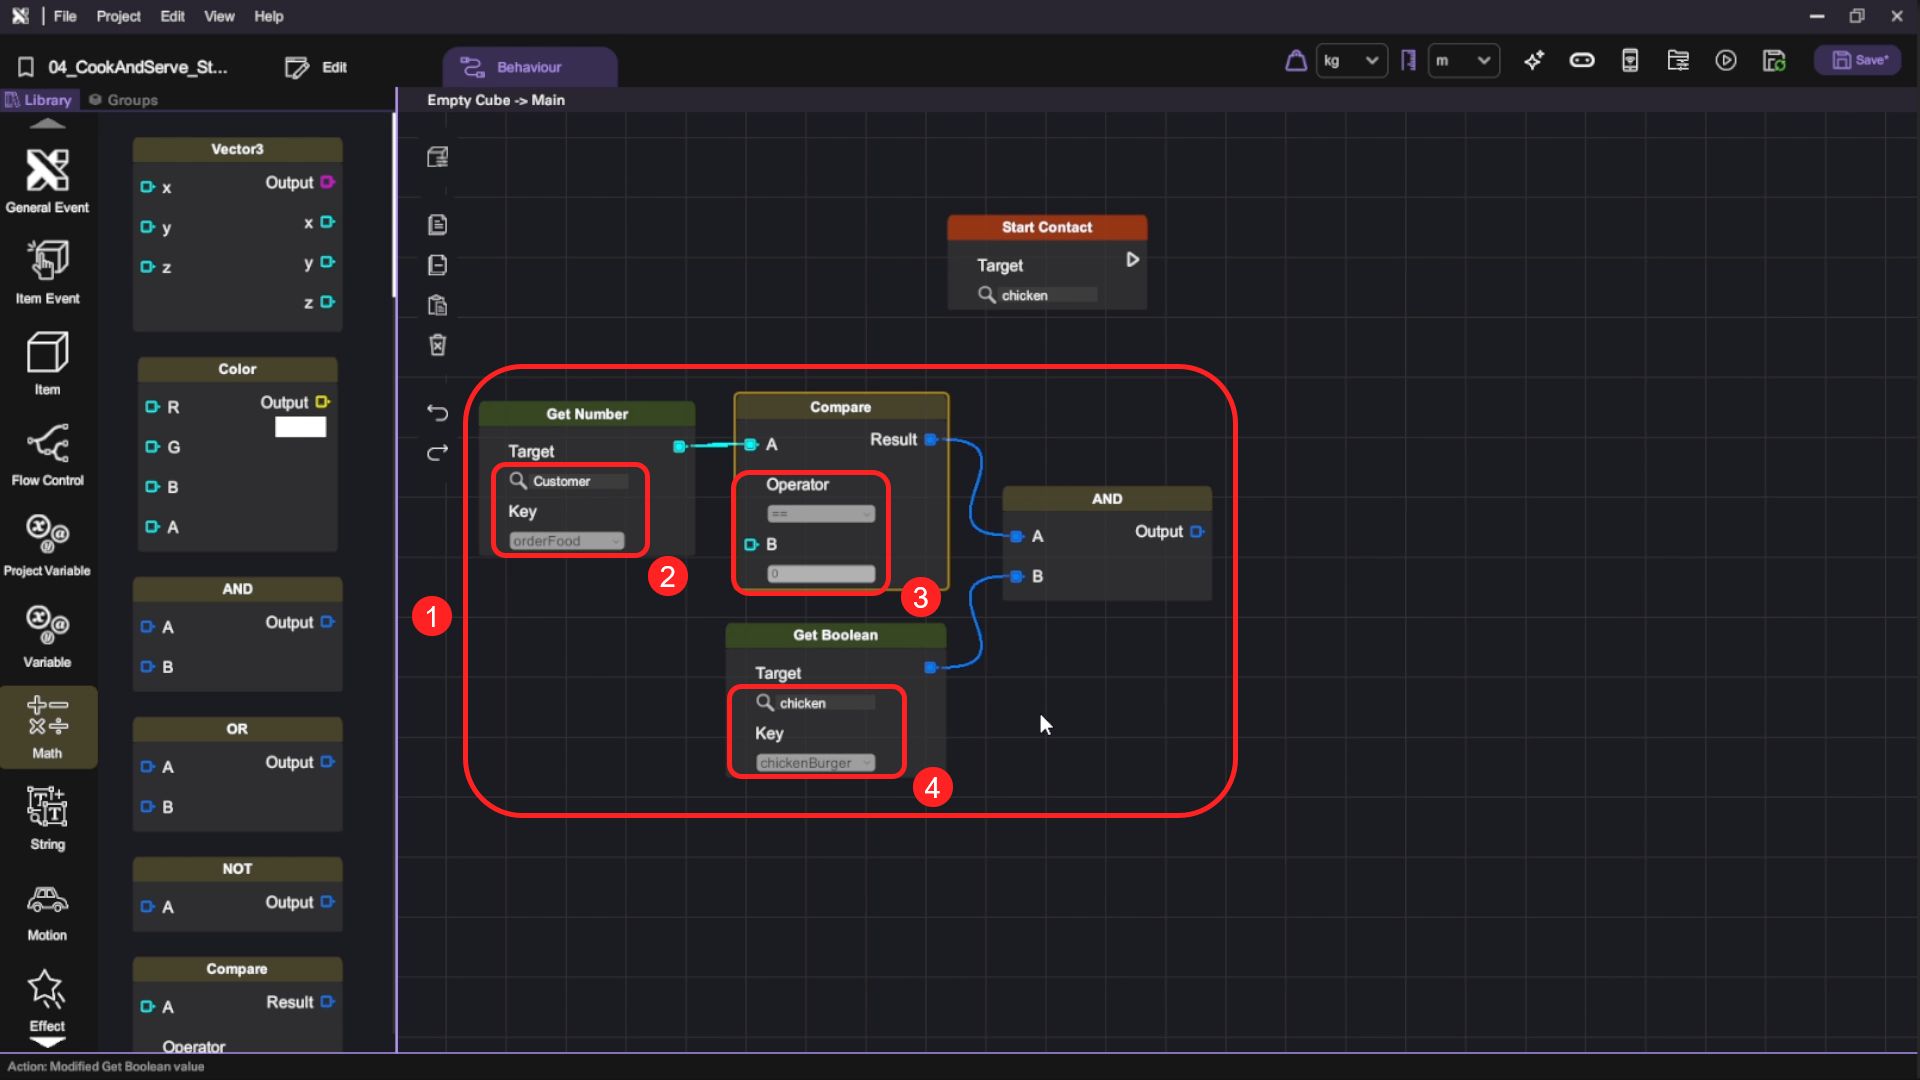
- Append a "Branch" block to the "Start Contact" block. For the Branch Condition, we check if A: the customer has ordered a chicken burger and B: the chicken is processed into chicken burger. The Condition is only True if both states are met. This checking can be done using an "And" Flow Control block. For its A node, we add a "Compare" block to check if the customer's "orderFood" variable retrieved using the "Get Number" Variable block is equal to 0. For the B node, we use a "Get Boolean" block to get the chicken object's "chickenBurger" variable value.
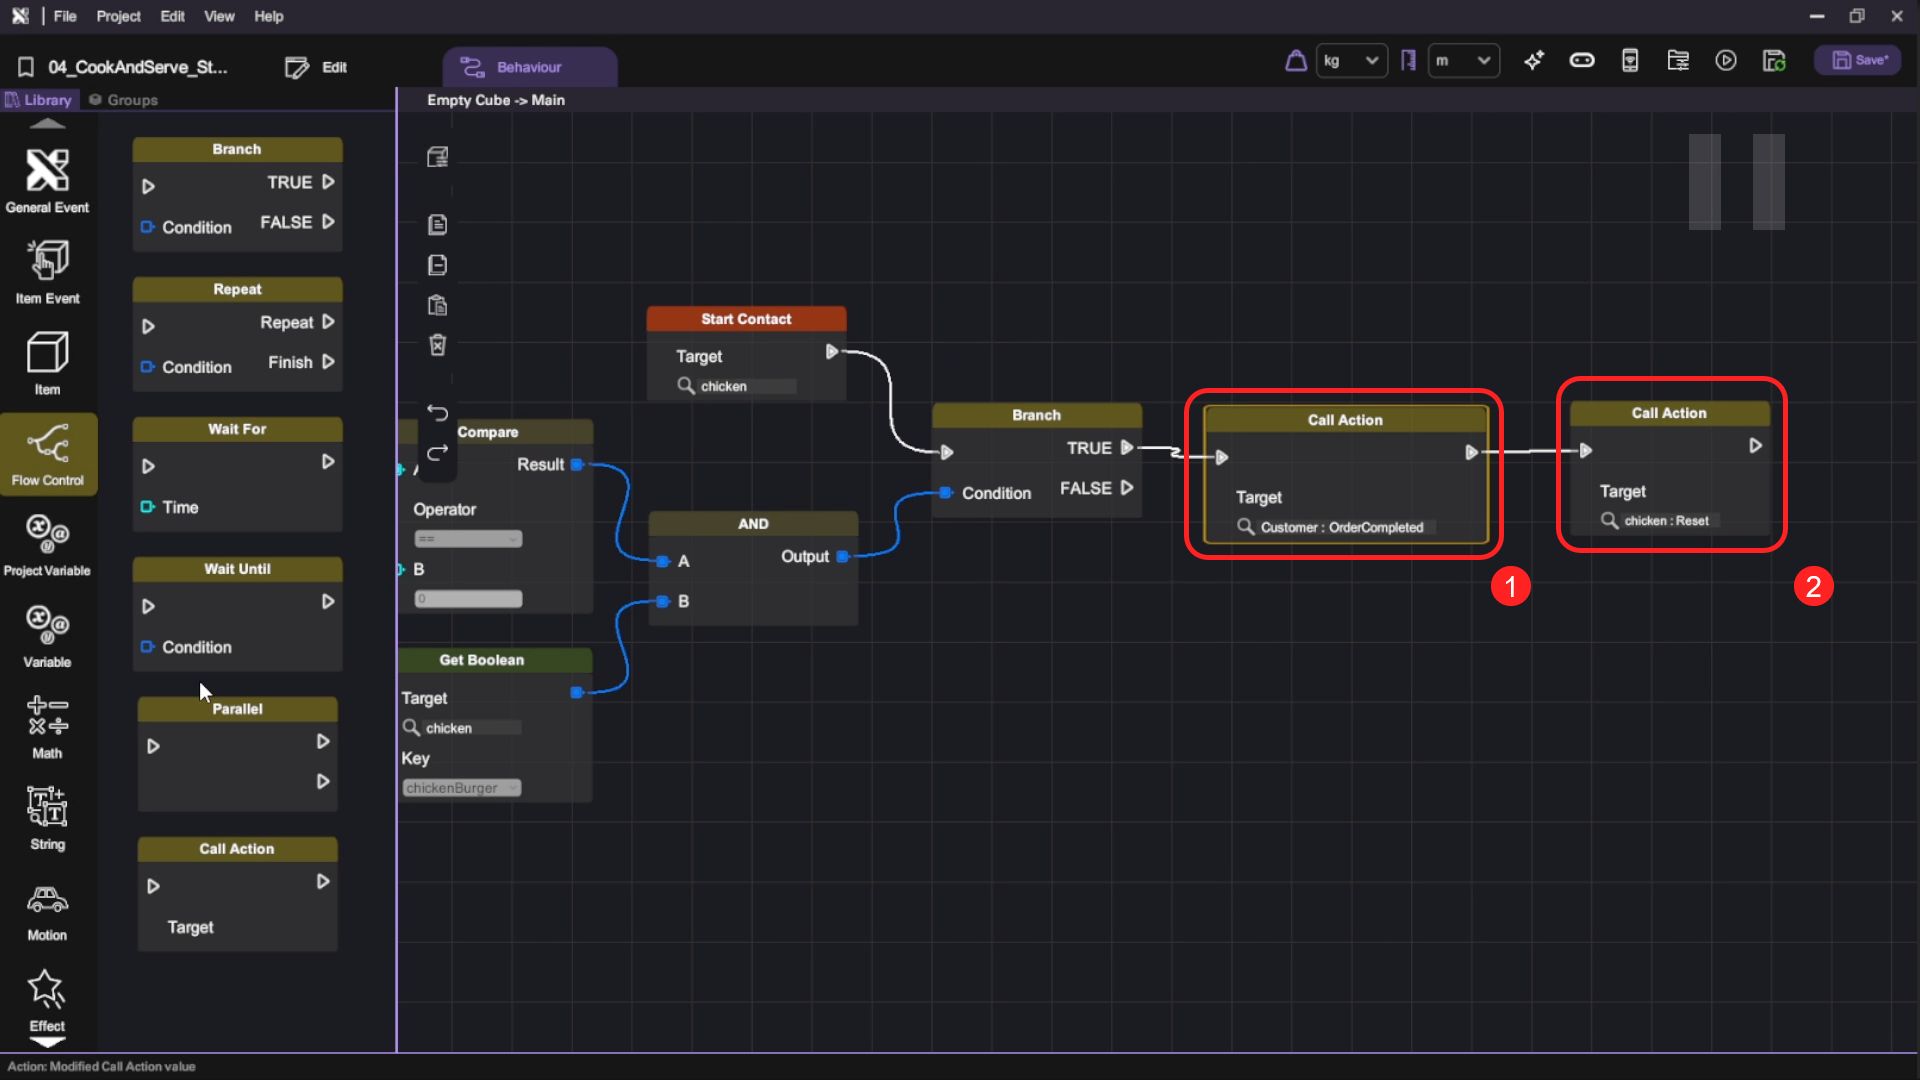
- Connect a "Call Action" block to the "Branch" block's True node, set the Target to the customer's "OrderCompleted" action. Then add one more "Call Action" block after it and set the Target to the chicken's "Reset" action.
The whole behaviour flow checks if the customer has ordered the chicken burger and if the player has delivered the chicken burger on the plate. If so, the customer's order is complete and the chicken will reset from chicken burger back to chicken and re-appear at its original position.
- You've completed creating the "chicken burger" order fulfilment behaviour flow, now repeat step 1 to step 3 and do the same for the egg toast. For egg toast, copy and paste all 8 behaviour blocks on the canvas, then change all chicken-related values to those of egg's and change the "Compare" block's B value to 1.
- Now switch to the "Button Object" (start message button) and add a "Call Action" block to its end, set the Target to the customer object's "orderFood" action.
So the food ordering process will start when the player clicks the button.
- Now press the "Play" button () and test the behaviour flow you've just created. Experiment with throwing different food onto the plate and confirm if the order only completes when a matching food is placed.
Set More Complex Behaviour for Customer
In this section, we will add more complex behaviour to the customer when she makes an order. This will involve playing different motions and voices based on the type of food ordered, as well as ensuring that the customer does not order the same food consecutively.
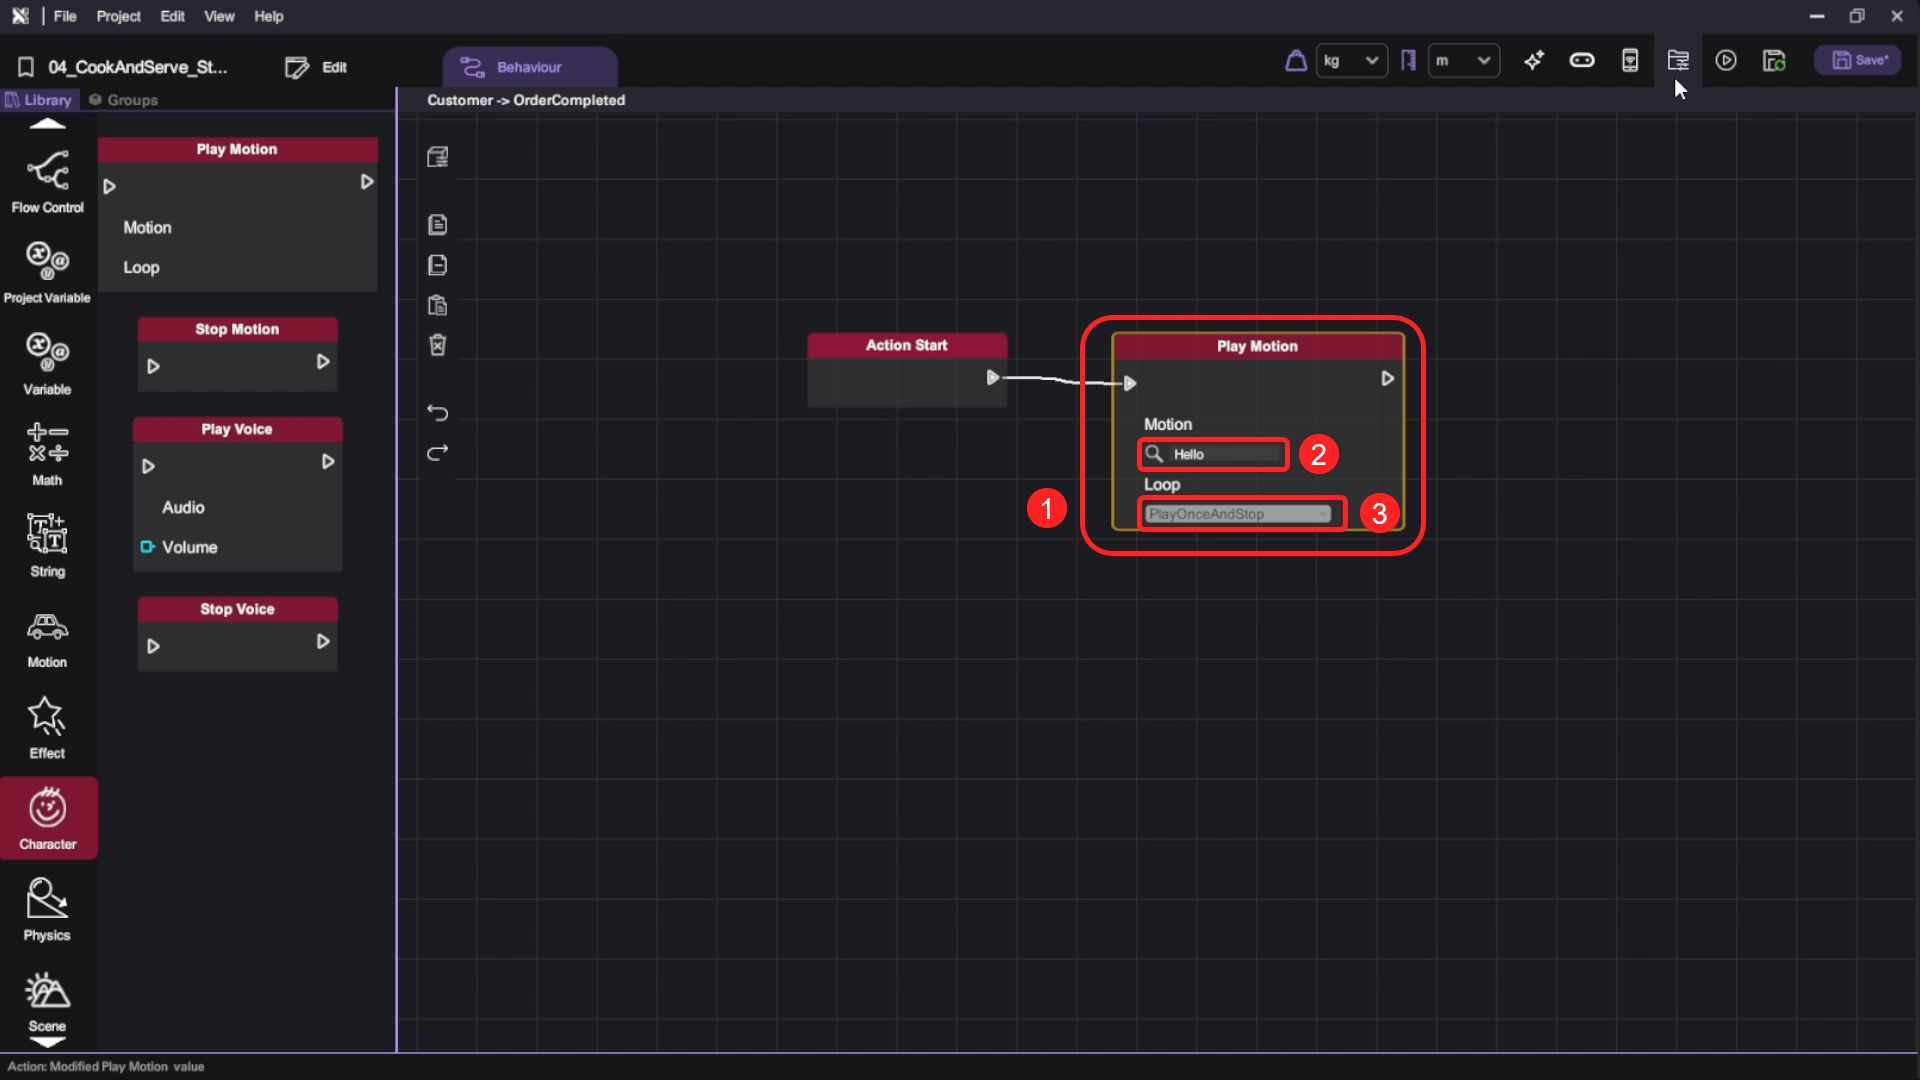
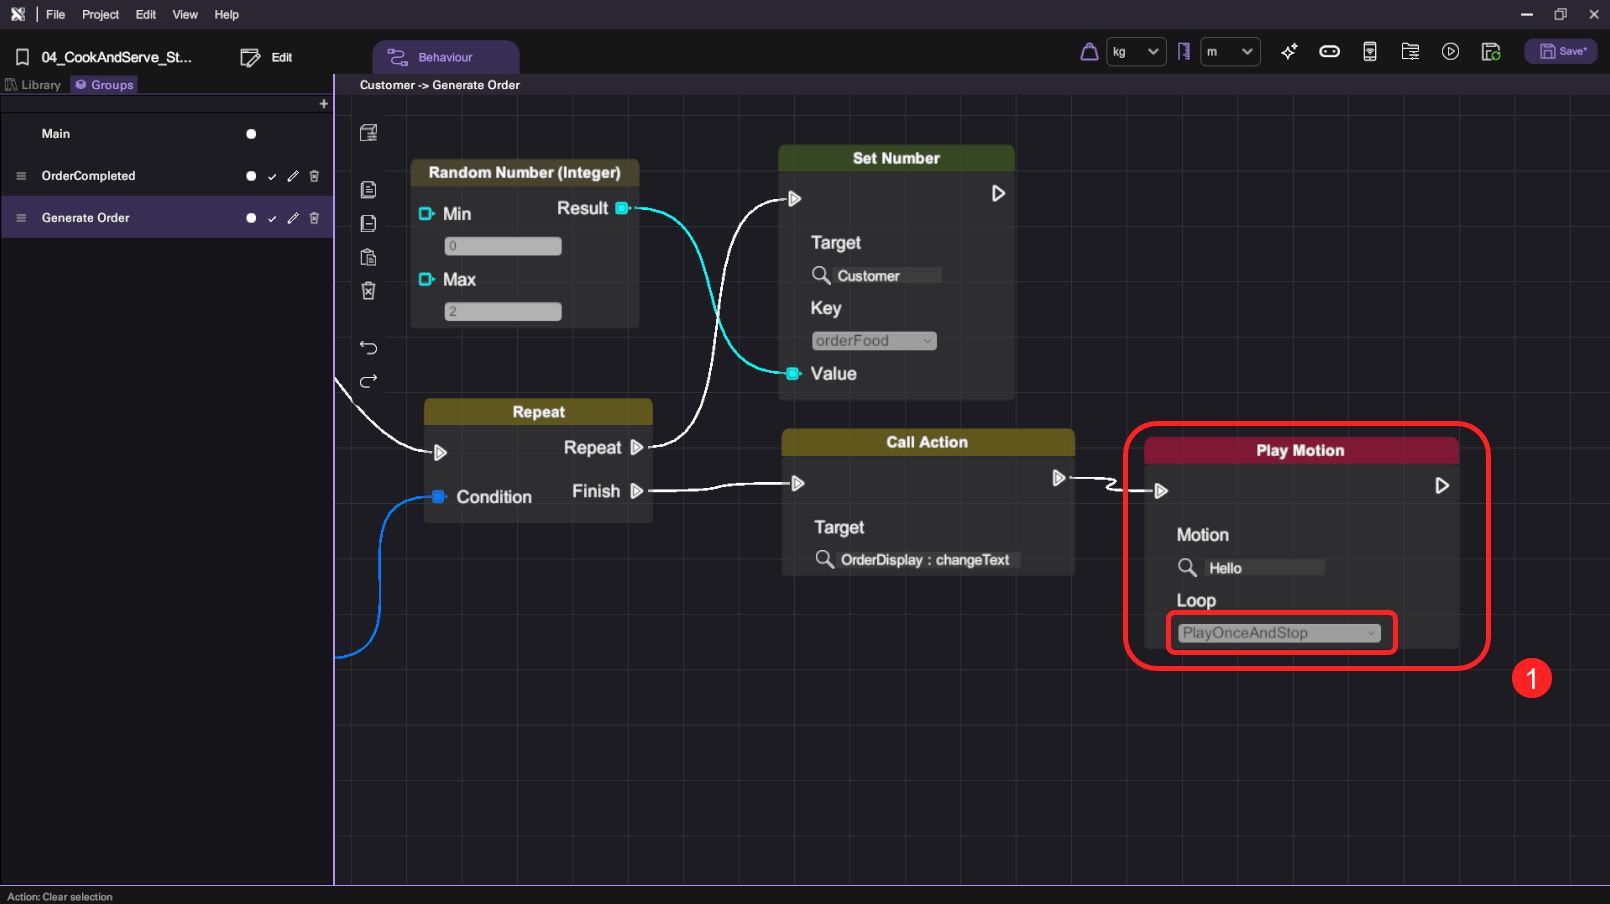
- We will add more complex behaviour to the customer when she makes an order. As a starting point, open the customer's "OrderCompleted" action, add a "Play Motion" block and append it to the "Action Start" block. Set the motion to "Hello". Then, set the loop to "PlayOnceAndStop" to make the motion play once and stop the motion immediately.
- Now switch to the customer's "Generate Order" action, we will modify it so that the customer will not order the same food consecutively. First, insert a "Set Number" block between the "Action Start" block and the existing "Set Number" block. For this new "Set Number" block, we select the customer's "previousFood" variable as the Key, and set its Value using a "Get Number" block to retrieve the current "orderFood" variable.
As the "orderFood" will be set to a new value in the next "Set Number" block, we can make use of the "previousFood" variable to compare it with the new value.
- Add a "Repeat" block between the last "Set Number" and the existing "Call Action" block. For the Condition, we set it to "Compare" the value of "previousFood" and the newly generated "orderFood" variable.
If the two variable numbers are the same, it will trigger the Repeat block.
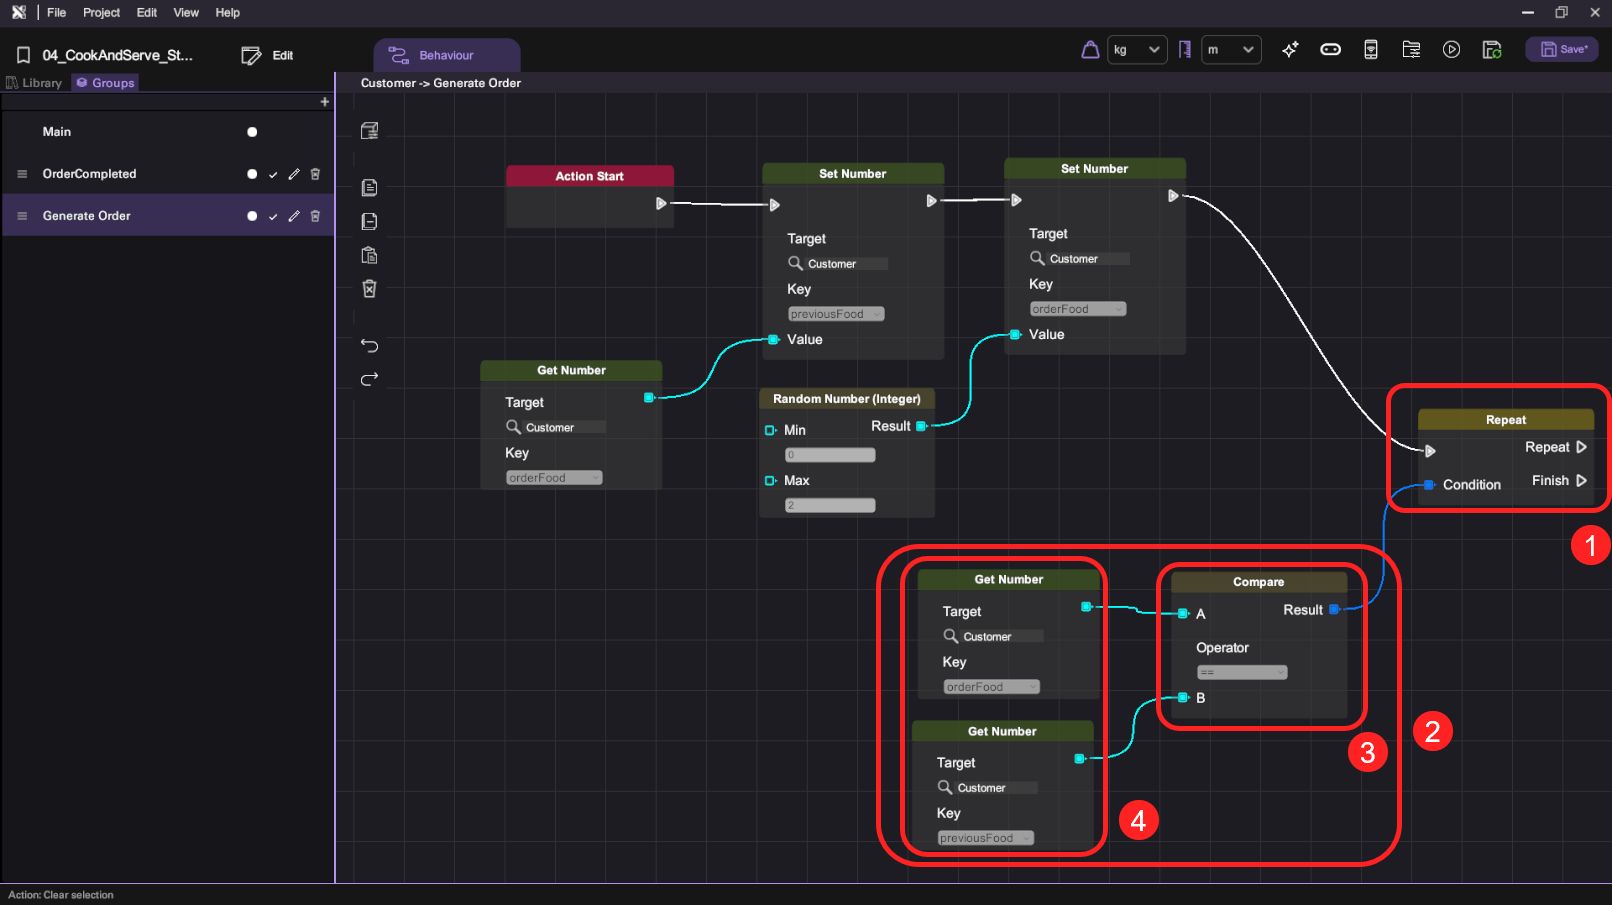
- For the "Repeat" block, we copy and paste the "Set Number" and "Random Number" blocks from the previous step to re-generate the "orderFood" variable. Connect the "Repeat" block's Finish node to the "Call Action" block to change the food order text.
This step will be repeated until we get an "orderFood" number that's different from the "previousFood" value.

- Next, copy and paste the "Play Motion" blocks from the "OrderCompleted" action and append them to the "Call Action" block.
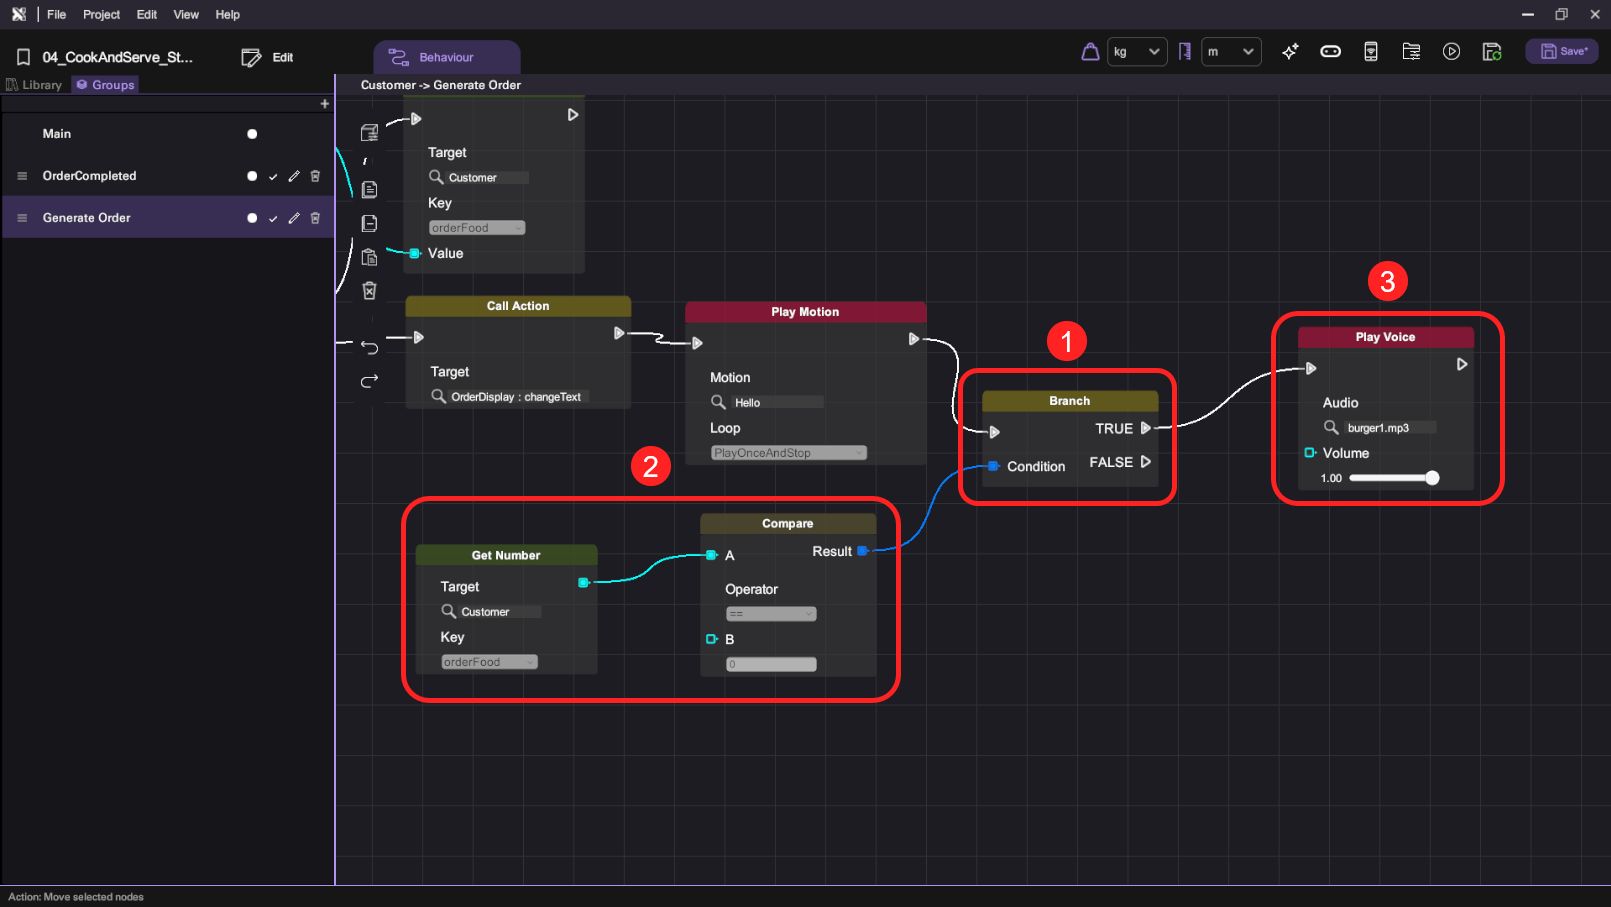
- We will then make the customer speak out the order using the "Play Voice" block. Add a "Branch" block to follow the "Play Motion" block, and set its Condition to "Compare" the "orderFood" value to the value set in B, which is 0 in this case (chicken burger). When this condition is met, add a "Play Voice" block to the "Branch" block's True node, set the Audio to "burger1.mp3" in your asset library.
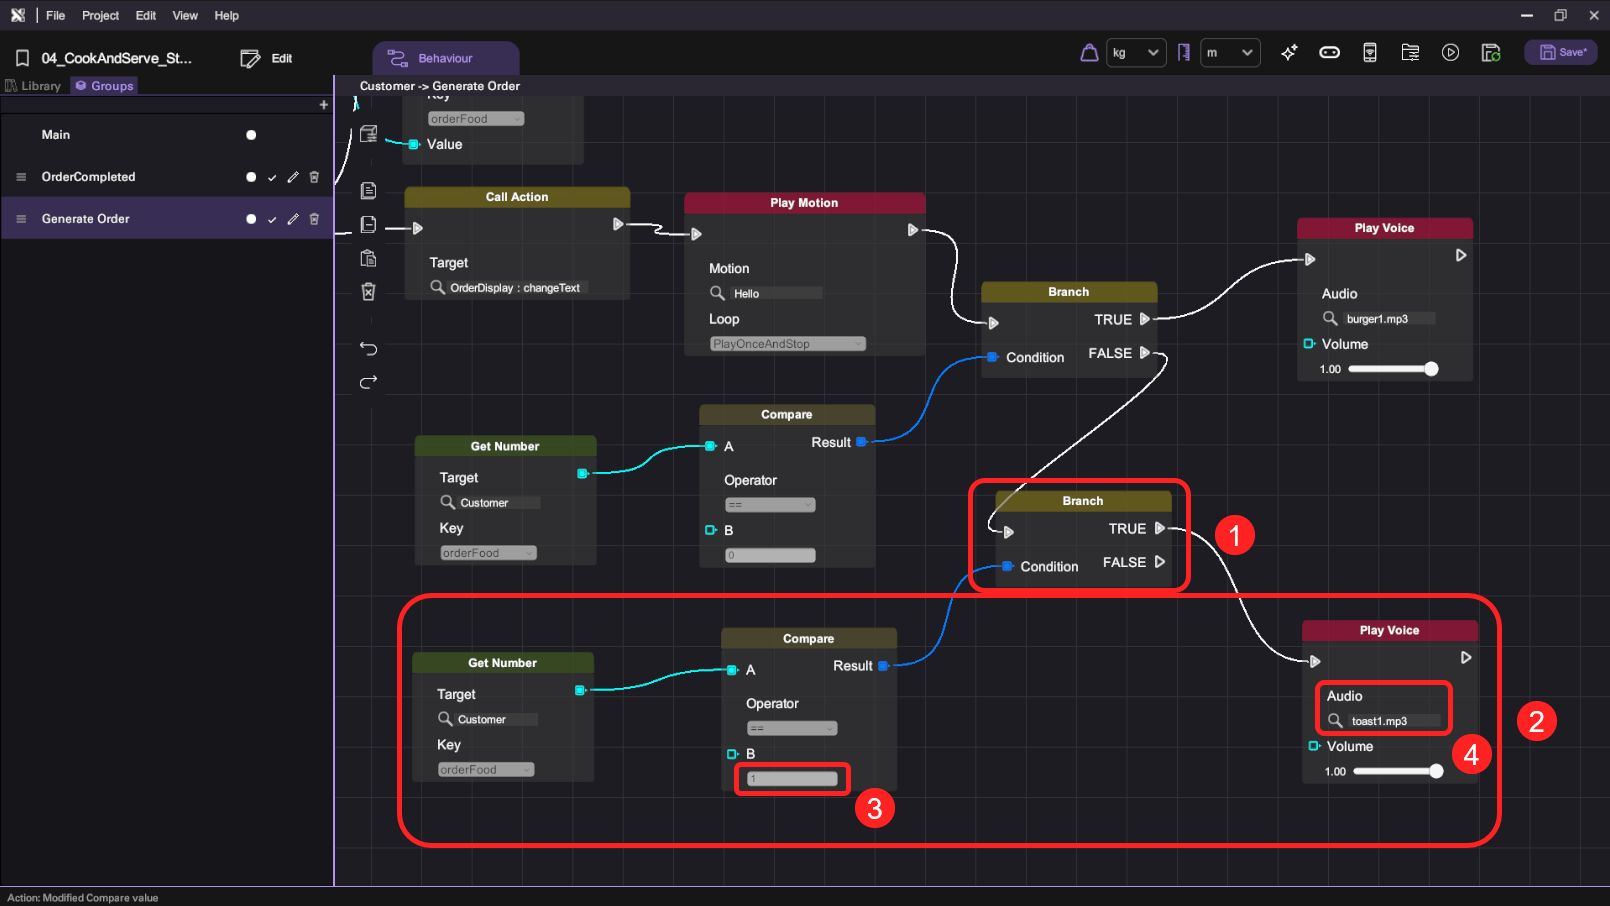
- In case the condition (chicken burger order) is not met, we check if the order is for egg toast, then apply the same logic to play out "toast1.mp3" when "orderFood" is 1.
- You have now completed the whole game. Enter play mode to play test it.