XRCC Tutorial - Pinball
Overview
You will build an interactive Pinball Machine using XRCC in this tutorial. This tutorial will focus on using the XRCC's physics features to create the pinball game. You will learn how to use physics settings and physics-type behaviour blocks to create a physics-based game. This is an advanced-level XRCC tutorial. If it's your first time using XRCC, we recommend that you finish tutorials 1 and 2 first.
Techniques Covered
You will learn the following techniques in this tutorial:
| Technique | Specific Techniques Covered |
|---|---|
| Using Physics Setting & Behaviour | |
| Advanced Behaviour Setting |
Tutorial Project
The project used for this tutorial comes in two formats: a starter project for use in this step-by-step tutorial, and a completed project for your reference after you've completed the tutorial.
Project files for the pinball tutorial can be found at:
For this tutorial, the starter project will be used to guide you in building the Pinball Machine in a step-by-step manner. All the necessary assets required for the tutorial are already included in the project, so just open the starter project in XRCC and you are ready to go with the tutorial.
A complimentary video for this tutorial is available from the below link to assist your learning process:
If the wall or flipper is not exactly the same as the model position, you may need to manually modify the offset or move it to the model position
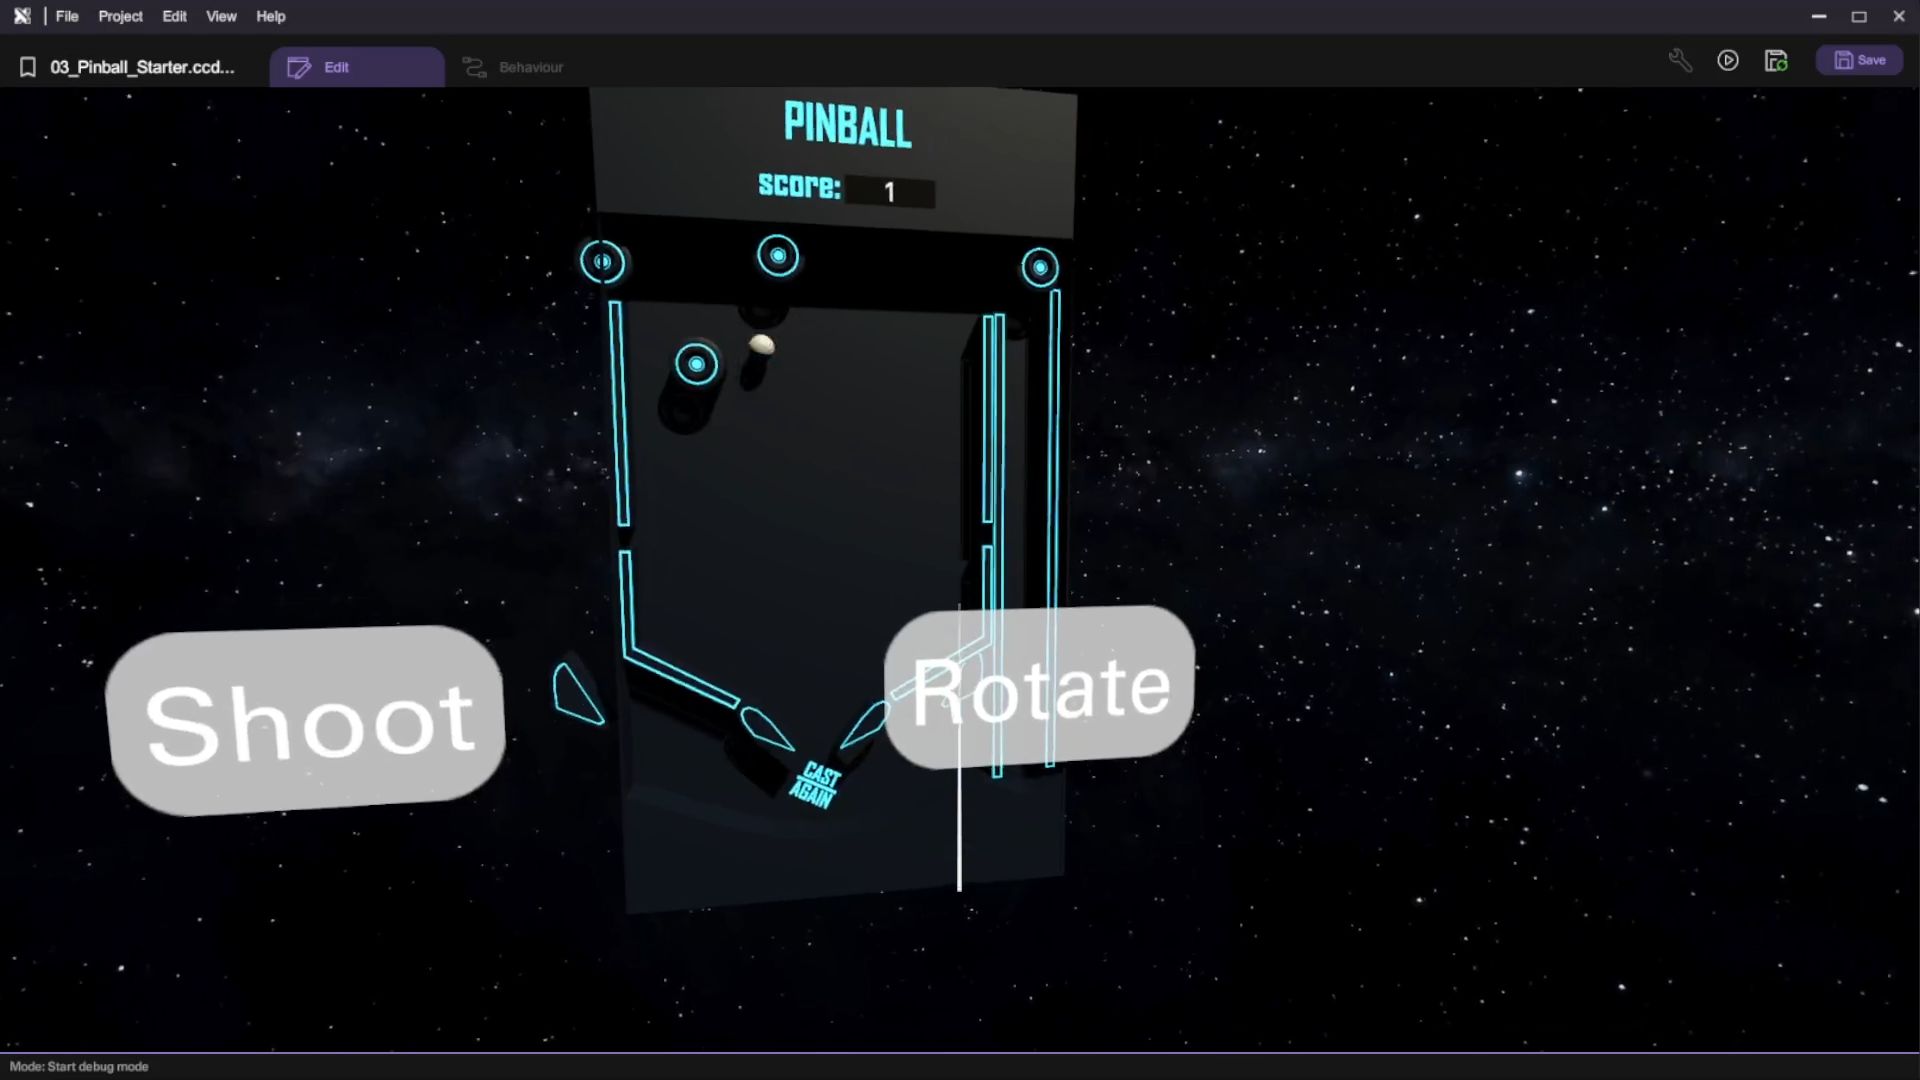
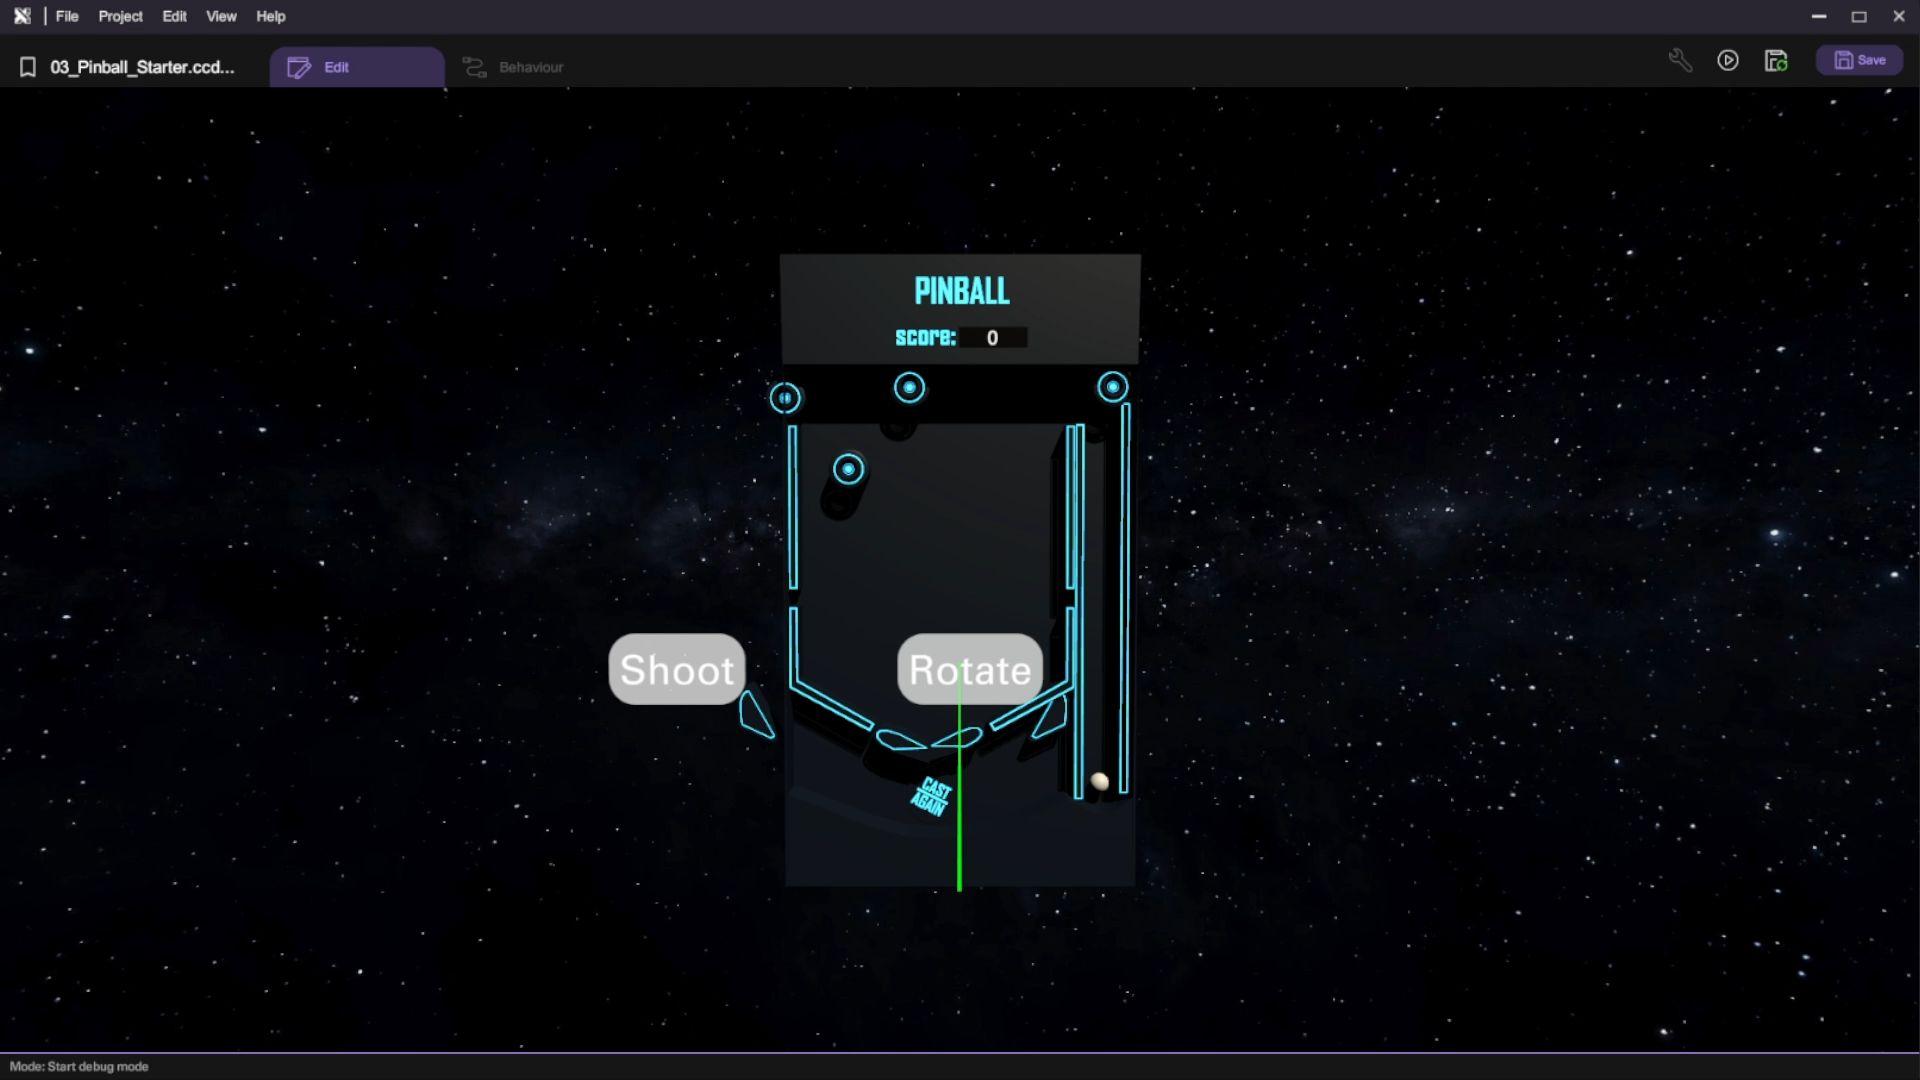
Gameplay Flow
-
The player presses the "Shoot" button to launch the ball into play.
-
As the ball moves inside the machine, the player's score can be increased by 1 for each contact with bumpers and slingshots.
-
The player needs to deflect the ball to prevent it from falling out of play by pressing the "Rotate" button to control the flippers.
-
If the ball falls through the bottom, the round ends.
Assets Provided in the Starter Project
The starter project for the Pinball tutorial provides a comprehensive set of assets and functionalities to get you started. This includes 3D models of different components of a pinball machine including the playfield, flippers, slingshots, and bumpers.
Enable Physics and Interactable
In this section, you will set up the physics and interactivity settings for the key components of the pinball machine. This includes configuring the ball's physics behaviour, setting up static colliders for walls, and making buttons interactive.
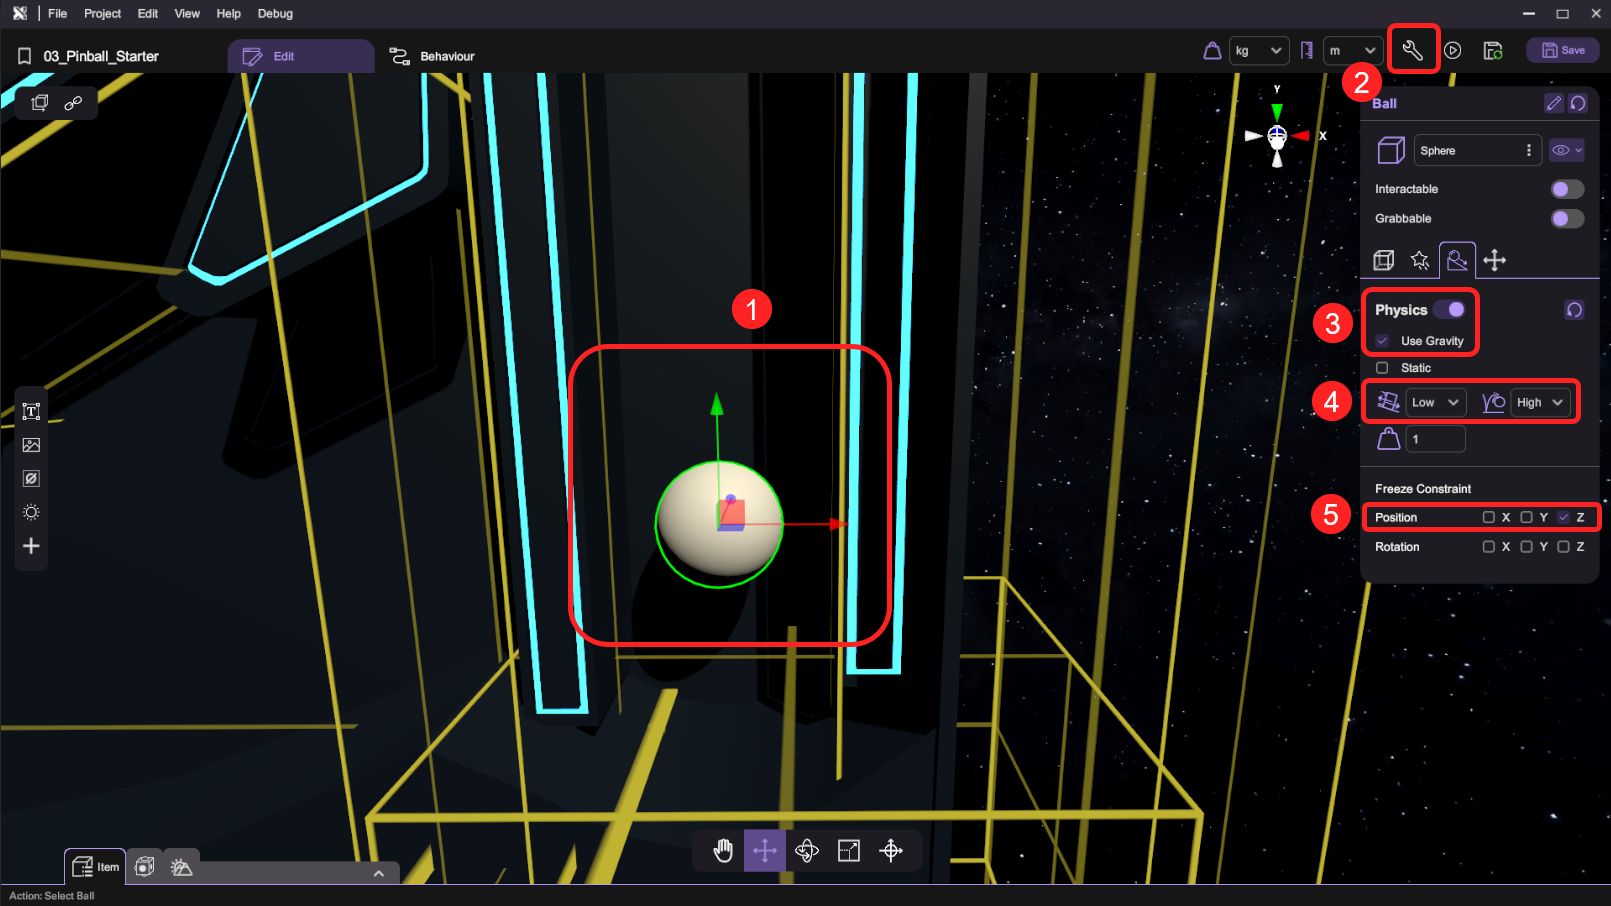
Enable Ball Physics
- First, we select the ball and open the "Inspector". Deselect "Interactable" for it then set its physics setting to "Enable Physics" and "Use Gravity". Finally, freeze the Z position under Constraint.
The Z position physics constraint limits the ball's physics movement to only the X and Y direction, so that it won't bounce off the playfield.
Enable Wall Physics
-
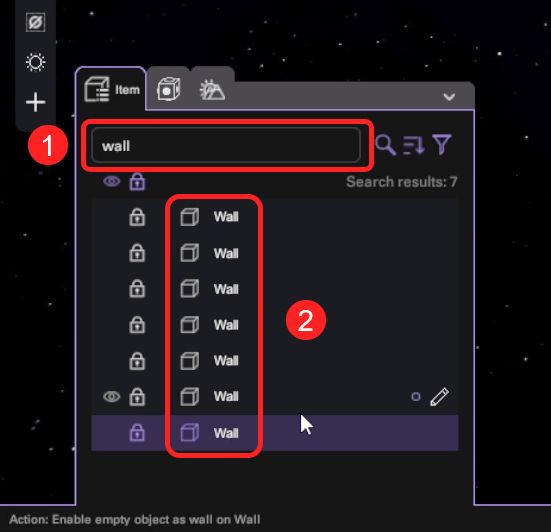
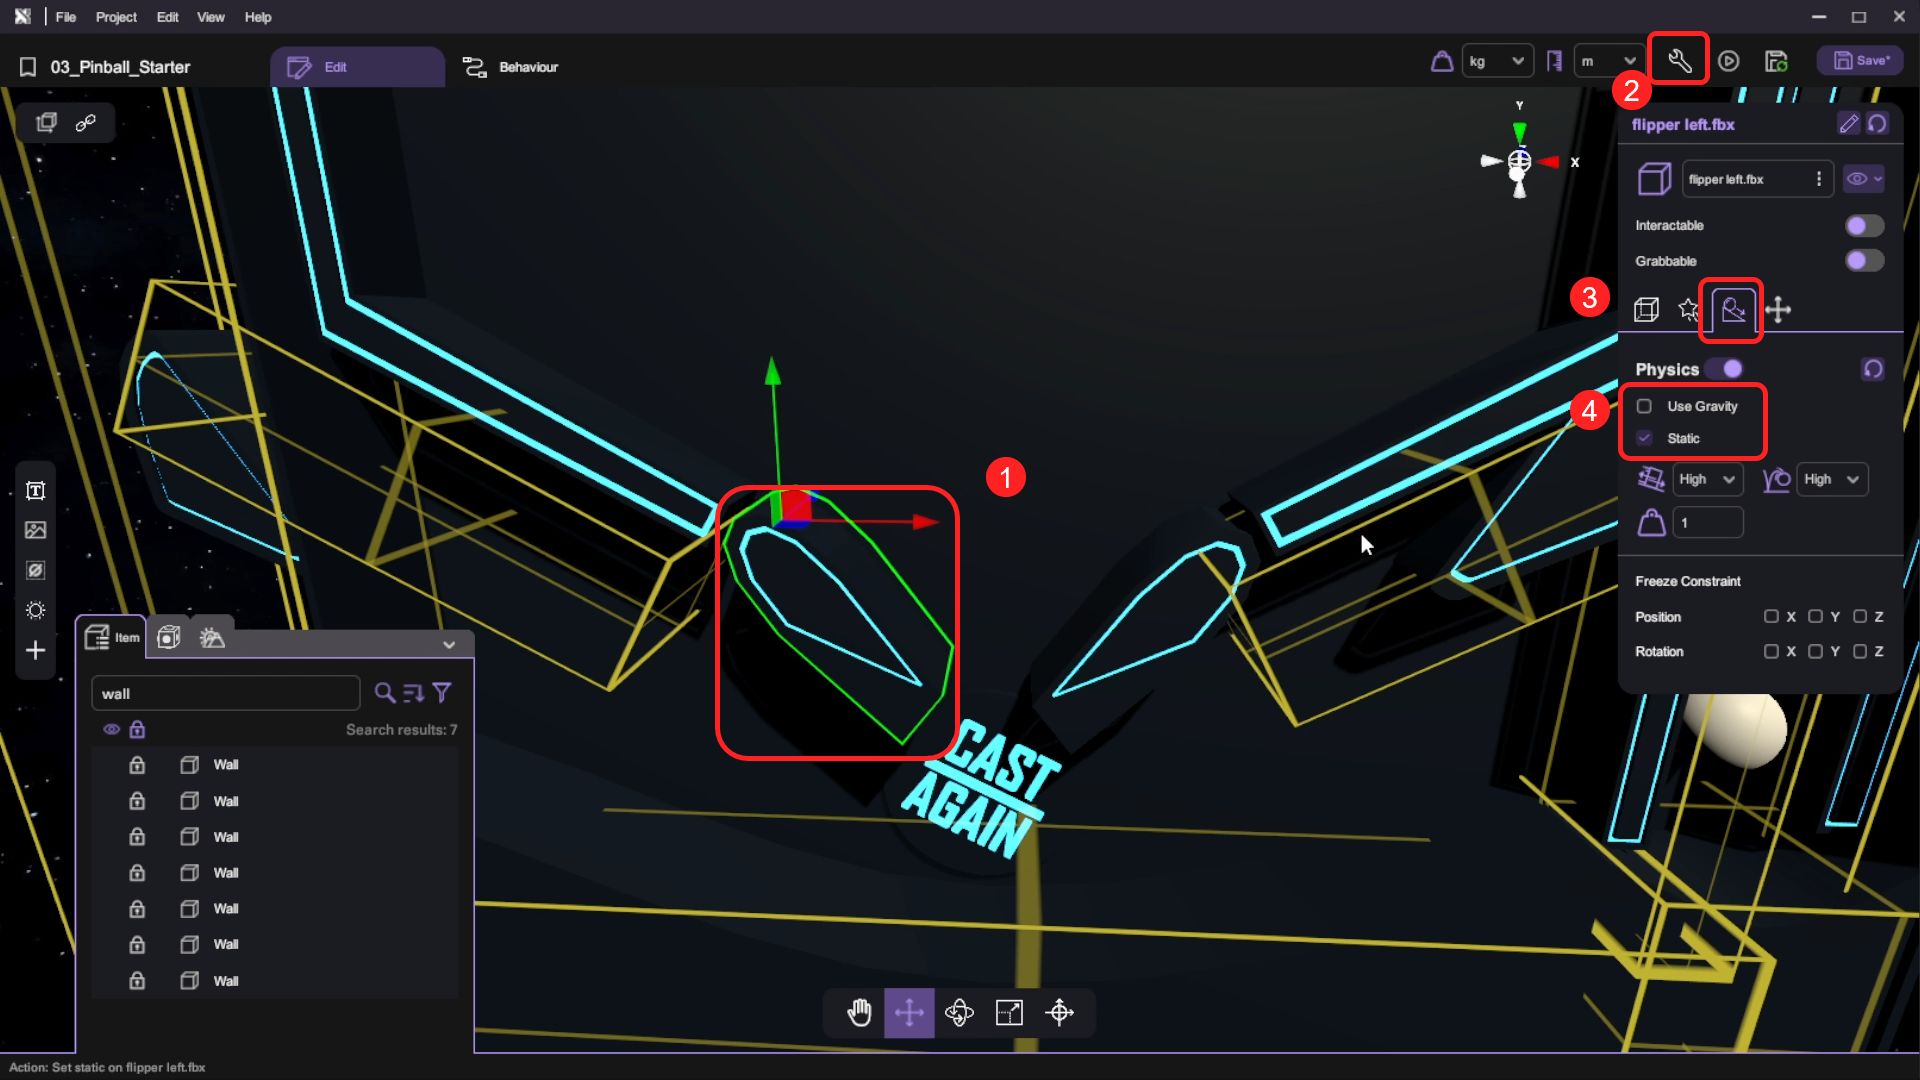
We will use the Empty Object as the walls. Select the Empty Objects and open the "Inspector". Then select "Enable Physics" and "Static" under physics setting in the Inspector.

-
Remember to set the Empty Object to be a wall.
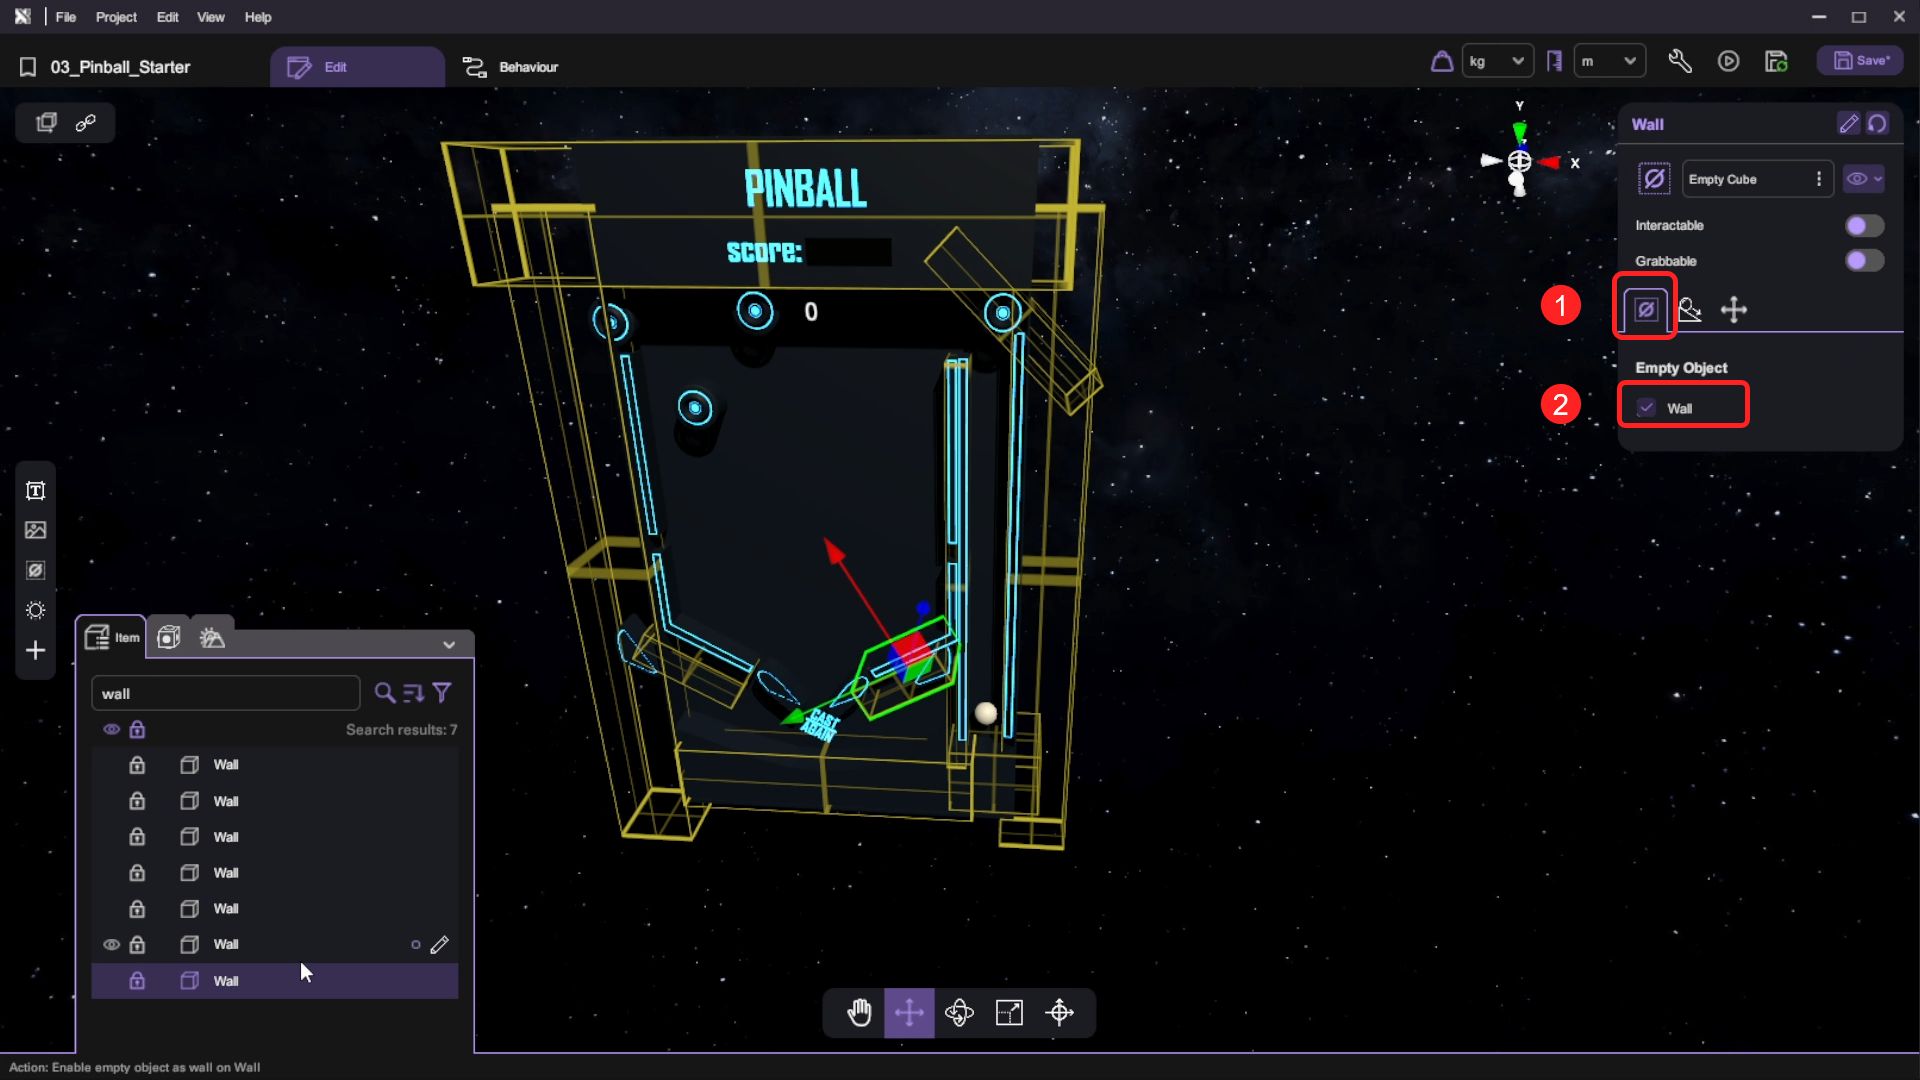
You can search "wall" to quickly filter the wall object
Enable Bumpers and Slingshots Physics
- For the bumpers and the slingshots in the pinball machine's middle section, we want them to contact the ball and have fixed positions. Select the machine's bumpers and slingshots then open the "Inspector". Select "Enable Physics" and "Static" under the physics tab.
Enable Buttons Interactable
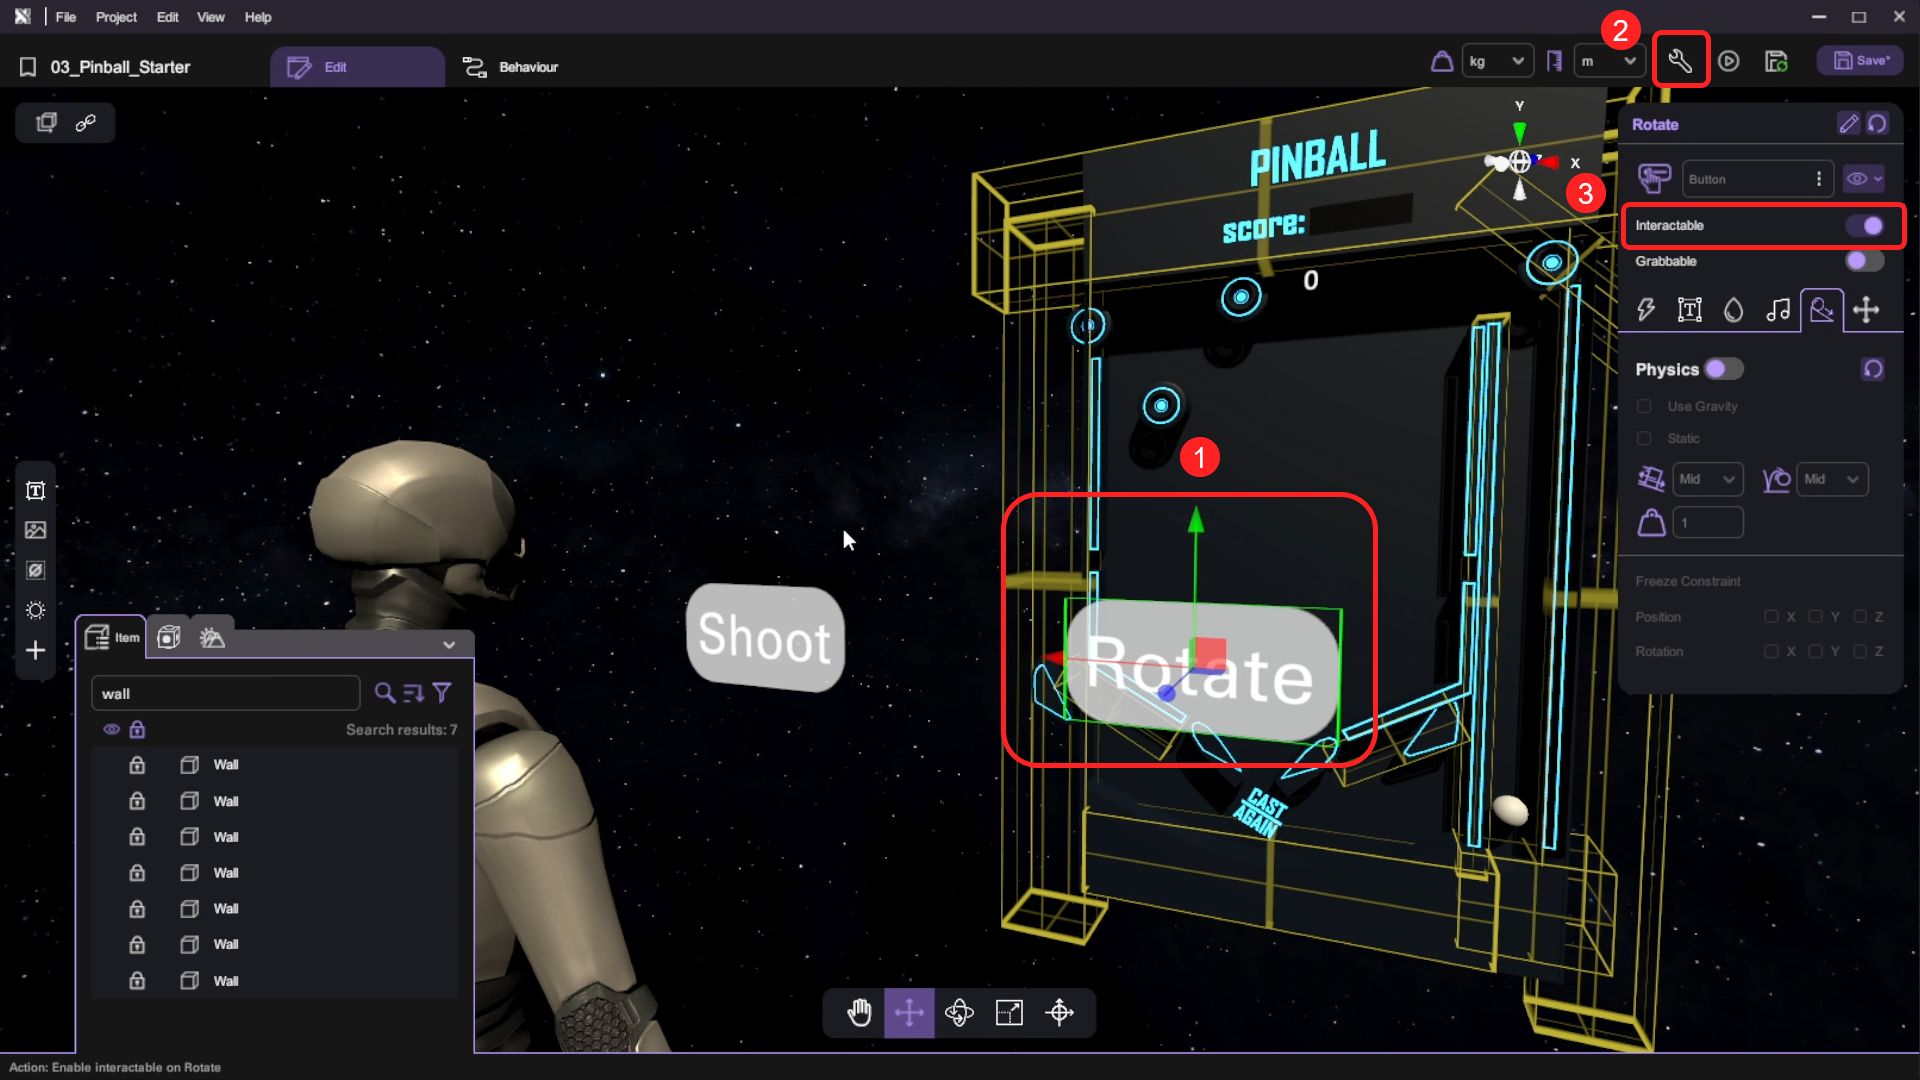
- For each of the buttons, open the "Inspector" and enable Interactable.
Create the Behaviour Flow for Pinball
In this section, you will learn how to create the core gameplay mechanics for a pinball machine. You will implement ball shooting mechanics, flipper controls with proper cooldown timing, and collision behaviours between the ball and various pinball machine elements.
Shooting and Resetting the Ball
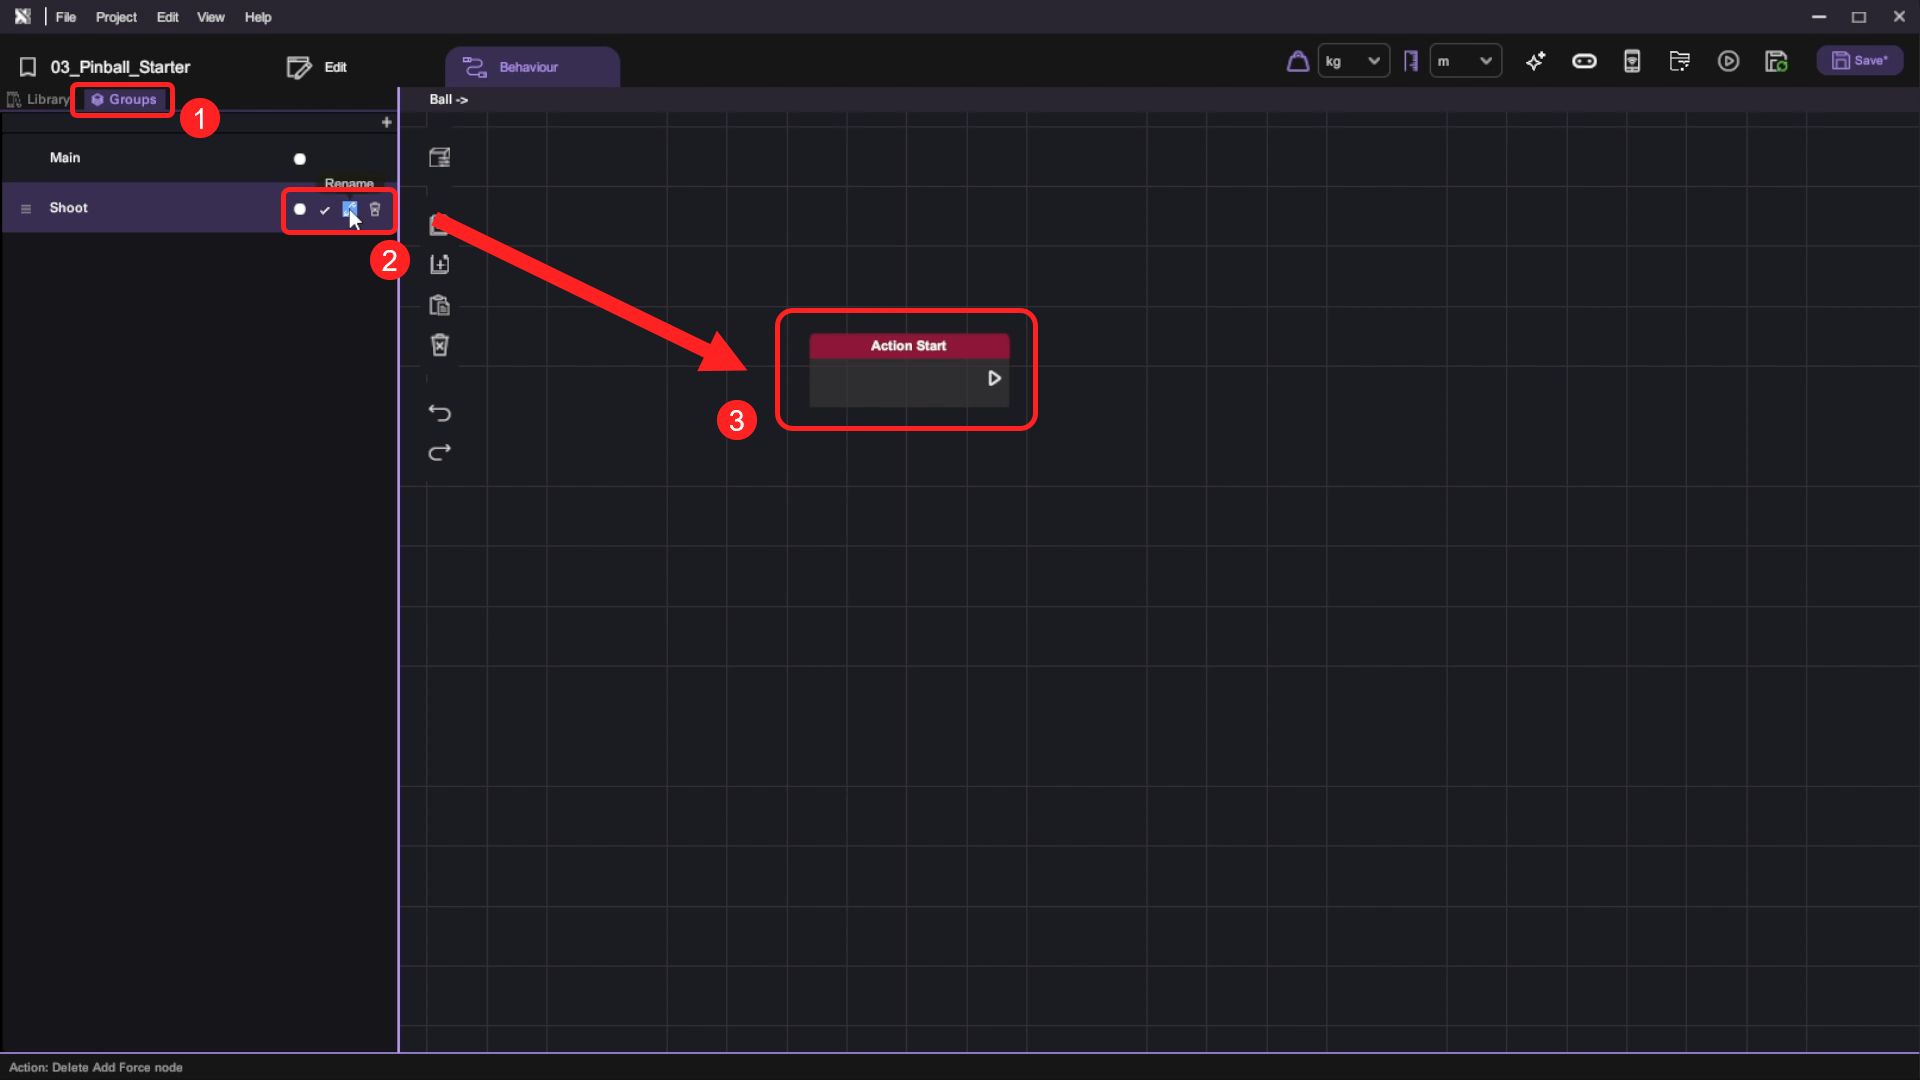
- Open the Ball object's behaviour panel. Under "Group", create an action and rename it to "Shoot". Then toggle the "Action" button to make it an action that can be called by other objects.
- Then switch to the Behaviour Library. We will use the following behaviour:
| Category | Behaviour |
|---|---|
 |  |
 |  |
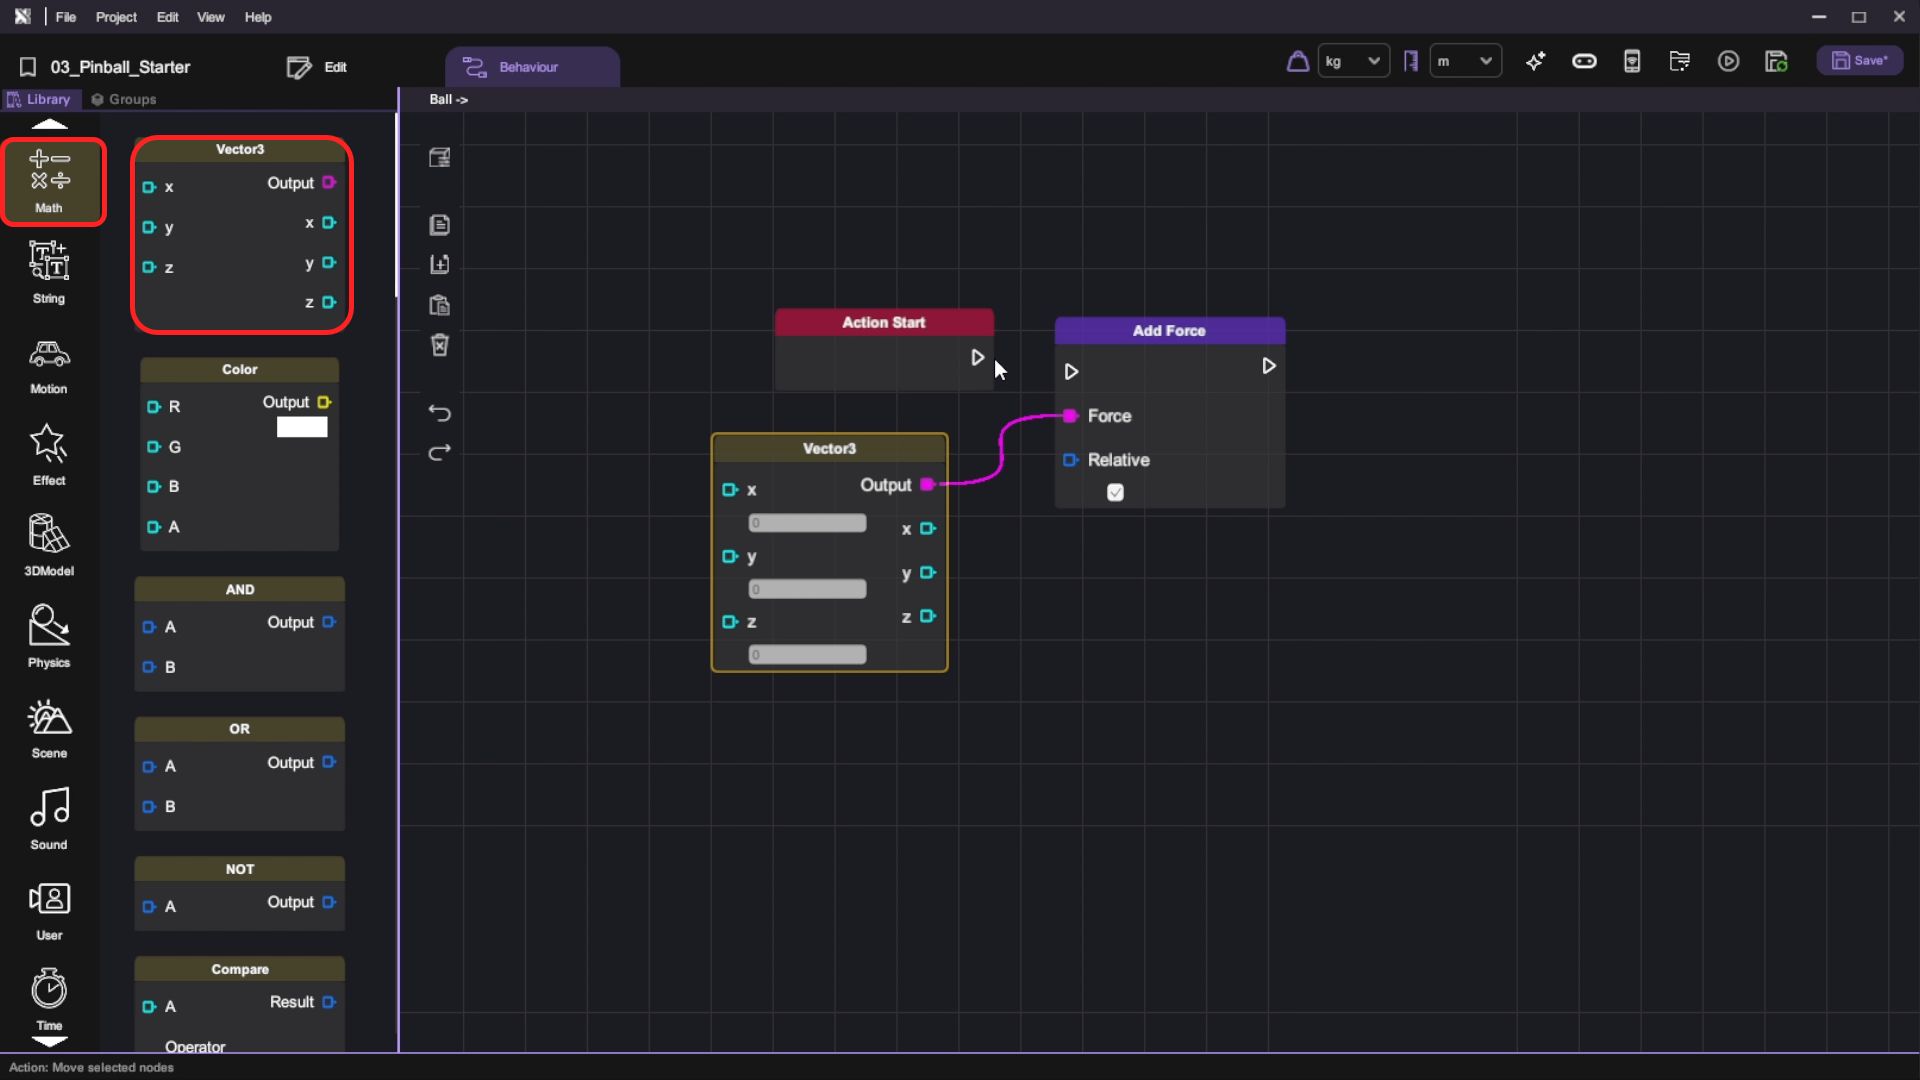
Connect the "Add Force" block and append it behind the "Action Start" block and deselect the "Relative" option. It will add force using the scene's X, Y, Z direction
As opposed to using the Ball object's, which is changing constantly. Add a "Vector3" block to the "Add Force" block's Force node, then set its Y value to 12. When the "Shoot" button is clicked, we add an upward force to the ball. Then, we will get the following design:
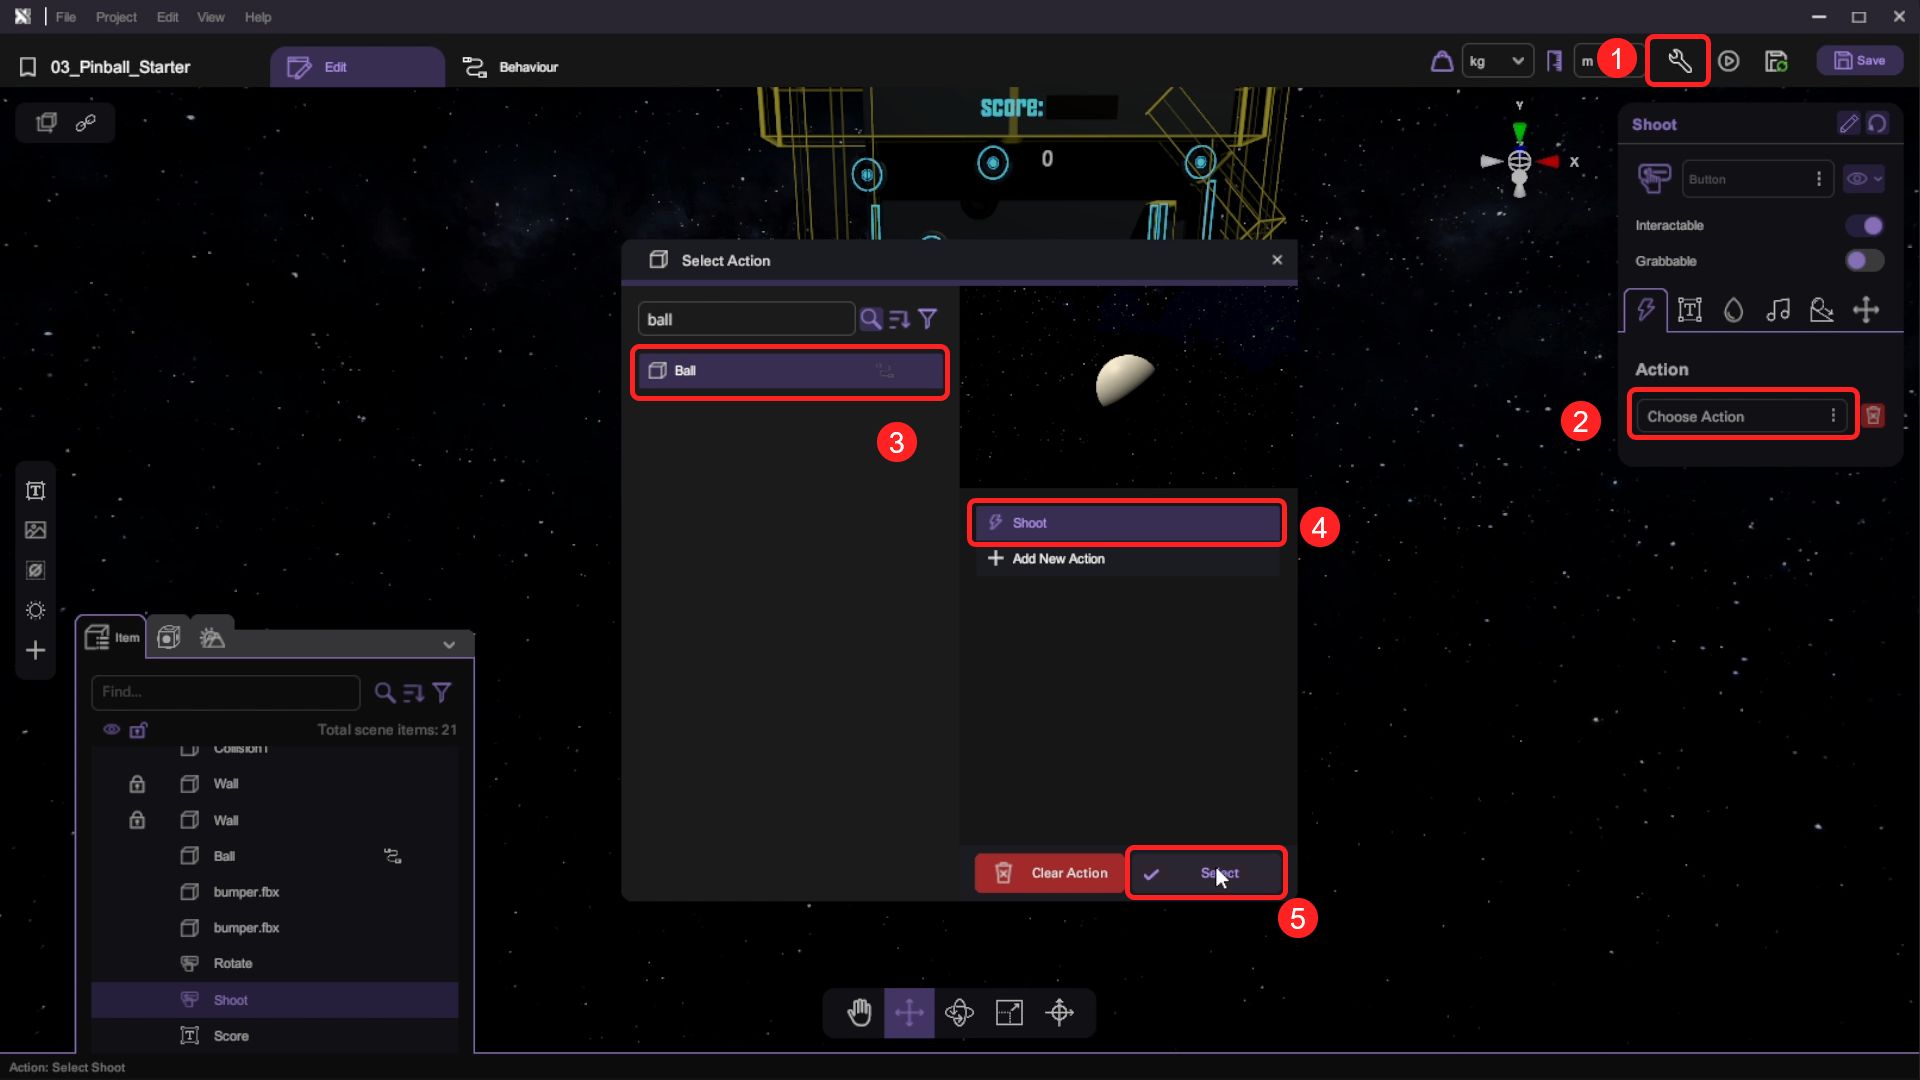
- Go back to the scene and select the "Shoot" button. Open the "Inspector" and select the "Action" option. On the "Select Instance Panel", select the Ball object and choose the "Shoot" action we have just created. Click the "Select" button.
- We want to add force to the ball when it makes contact with "Collision1". We will use the following behaviour:
| Category | Behaviour |
|---|---|
 |  |
|  |
| |
Then, we will set and connect them below:
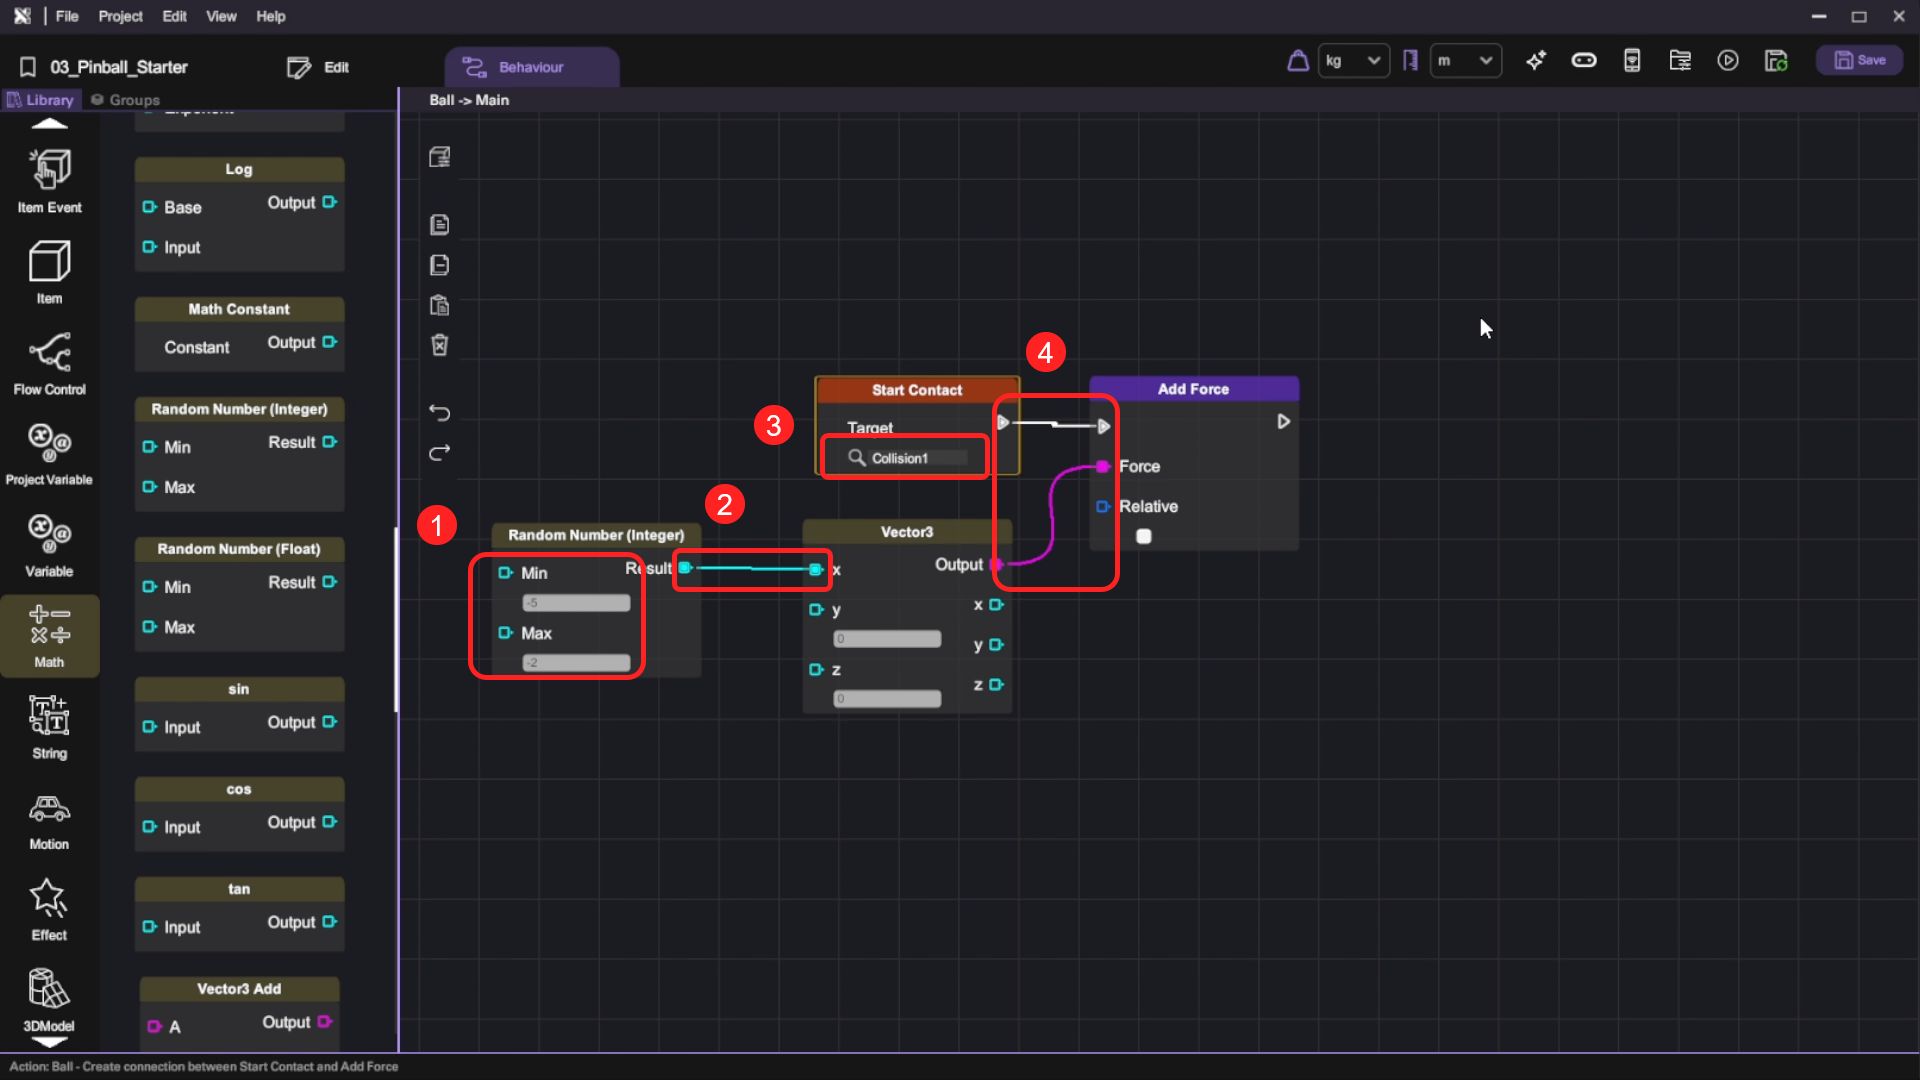
- Step 1: We will use the "Random Number" to generate the upward force acting on the ball. Set the Min as -5 and Max as -2
This adds a varied force to the X direction every time the ball touches the deflector, so the ball will drop to different positions in every gameplay.
- Step 2: Connect the "Random Number" Output to the "Vector3 'X'"
- Step 3: Select the "Start Contact" Target as "Collision1". Every time the ball contacts the Collision, the action will be triggered
- Step 4: Connect them to "Add Force"
When the contact happens, we will add a force on top of the ball's physics calculation to amplify the bouncing effect.
There is no restriction for using Integer or Float as the random output, you can feel free to use any of them.
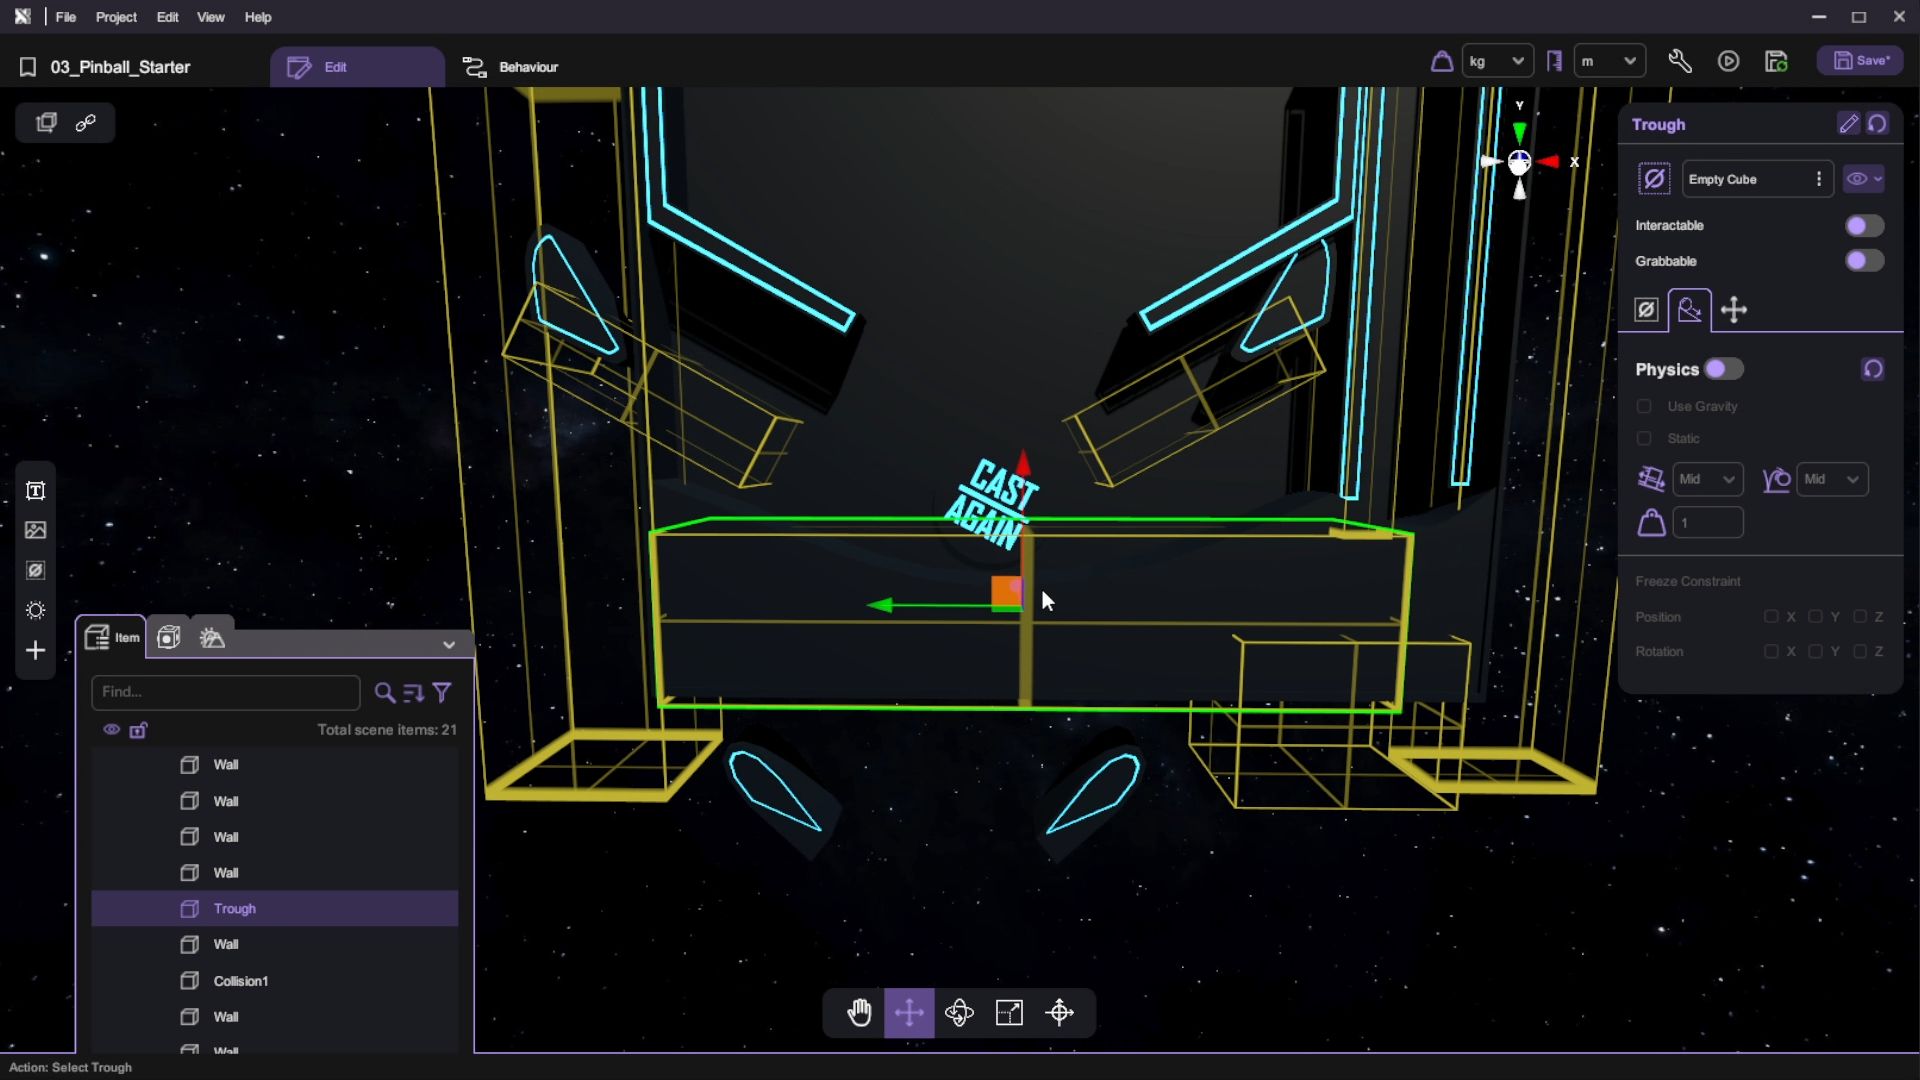
- We want to reset the ball when it makes contact with "Trough". On the Ball object's Main behaviour layer, we will use the following behaviour:
| Category | Behaviour |
|---|---|
| |
| |
 |  |
Then, we will set and connect them below:
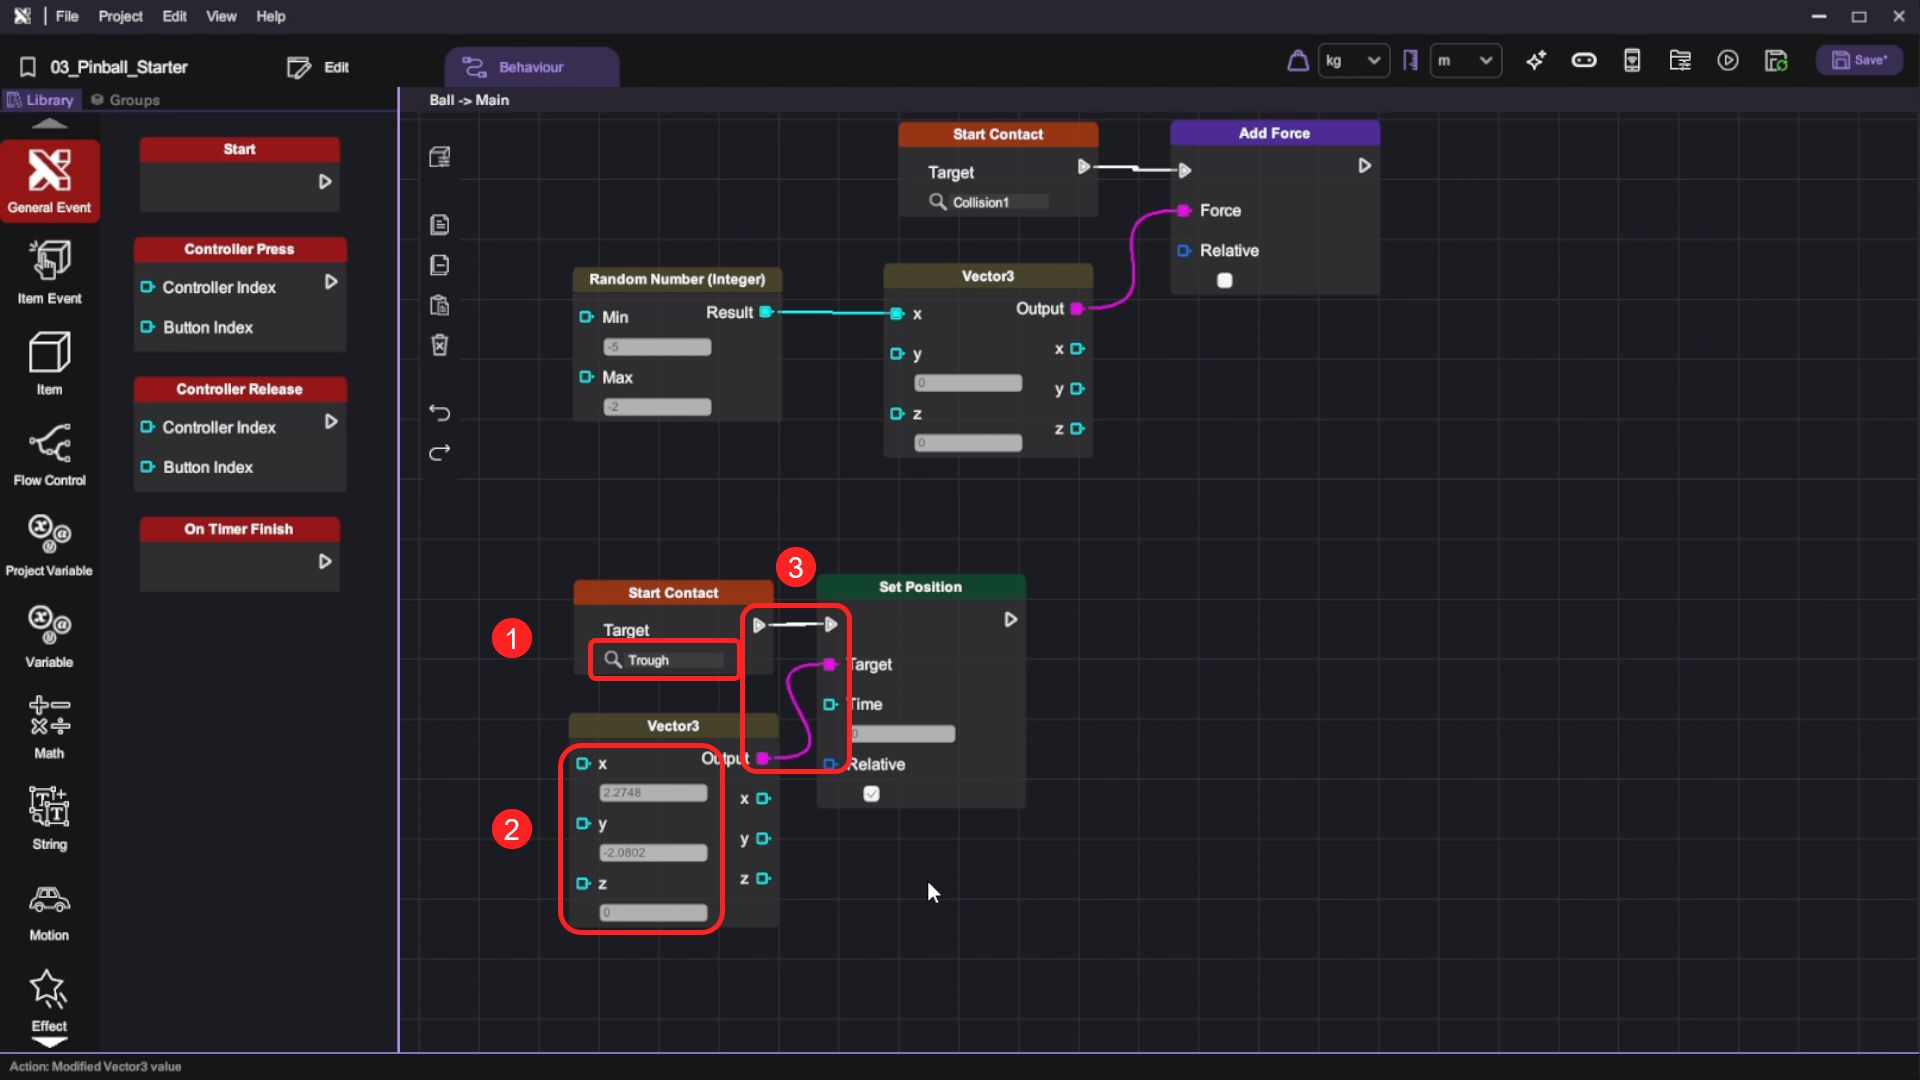
- Step 1: Select "Trough" as the "Target" in "Start Contact" block
- Step 2: Copy the X, Y, Z position of the Ball from the "Inspector" and paste them into the respective fields of the "Vector3" block.
- Step 3: Then append a "Set Position" block to it and use a "Vector3" block to set its Target position.
This behaviour flow will reset the position of the Ball when it contacts the Trough.
- Press the "Play" button and test the shooting function by clicking the "Shoot" button. When the ball makes contact with object "Collision1" it will bounce away. Finally, when it touches the object "Trough", the position will be reset.
Hitting the Ball with Flippers
- Open the left flipper object's behaviour panel.
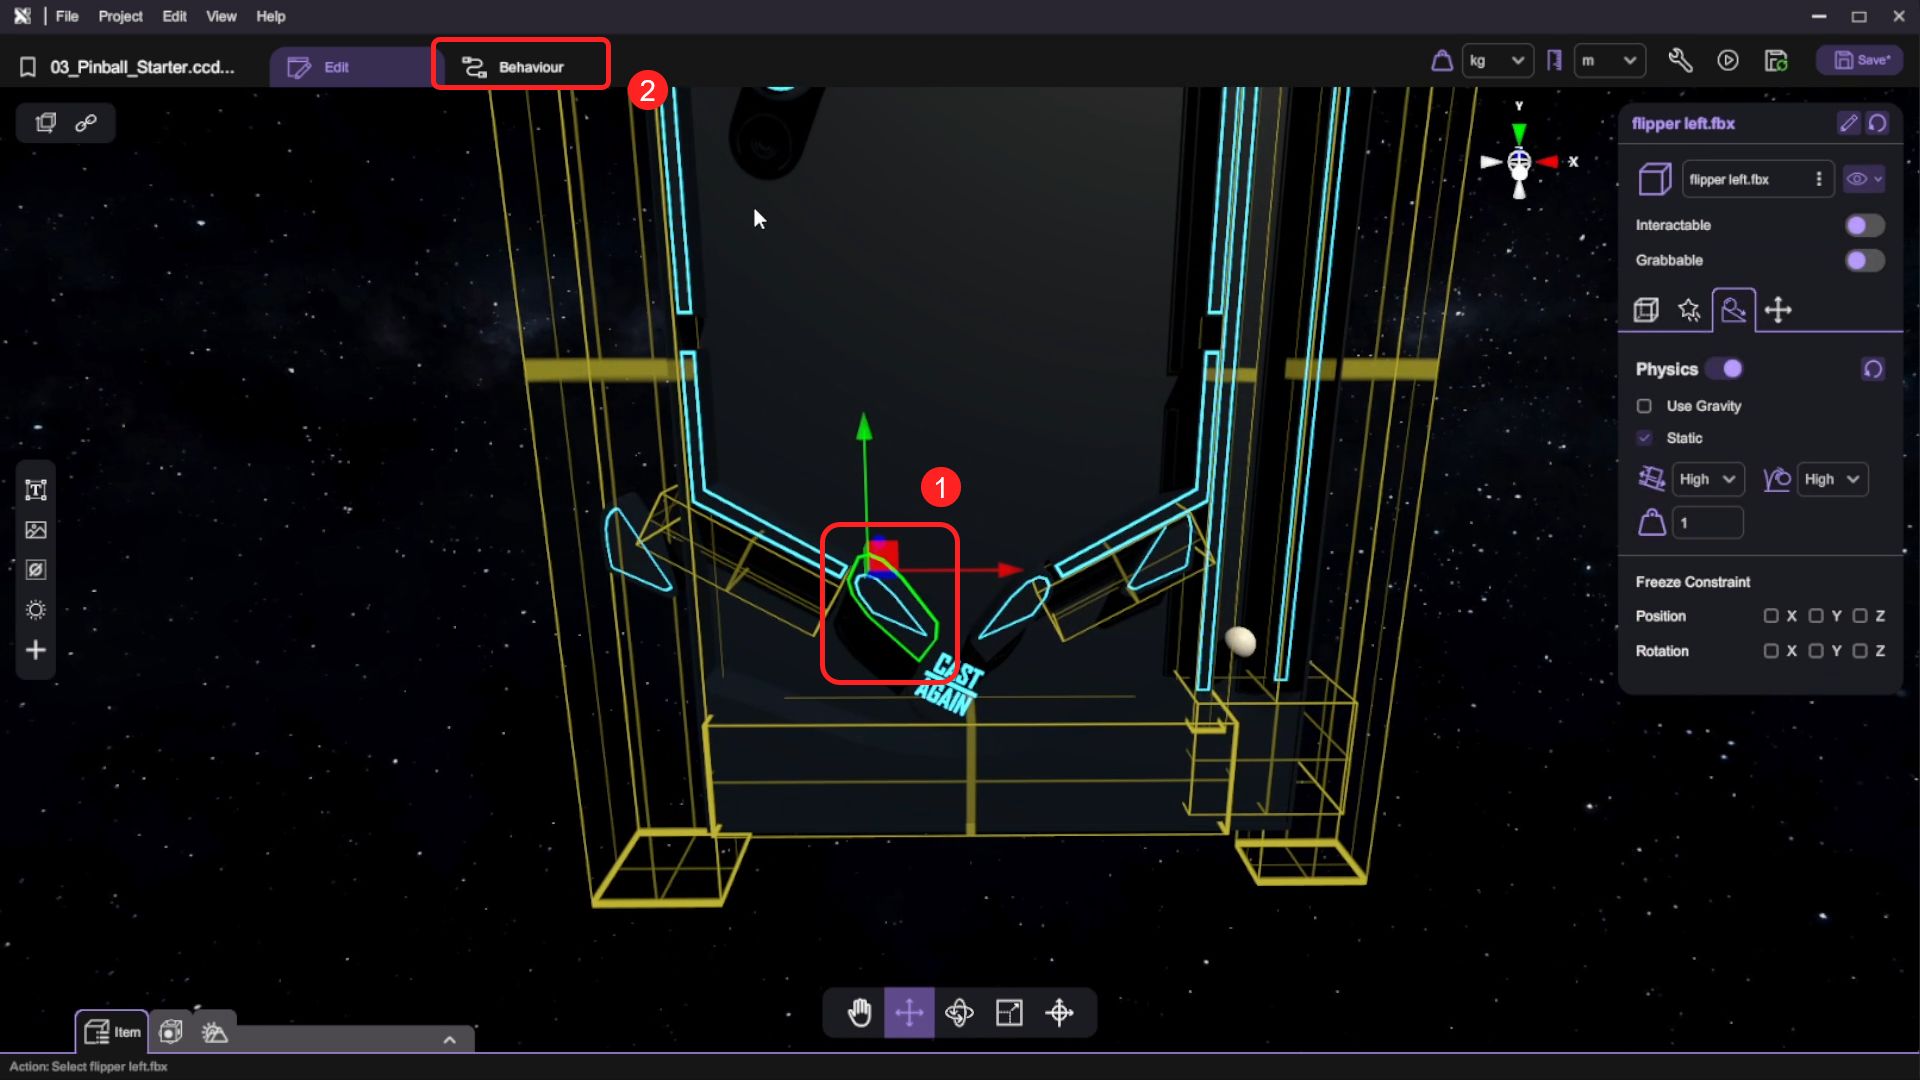
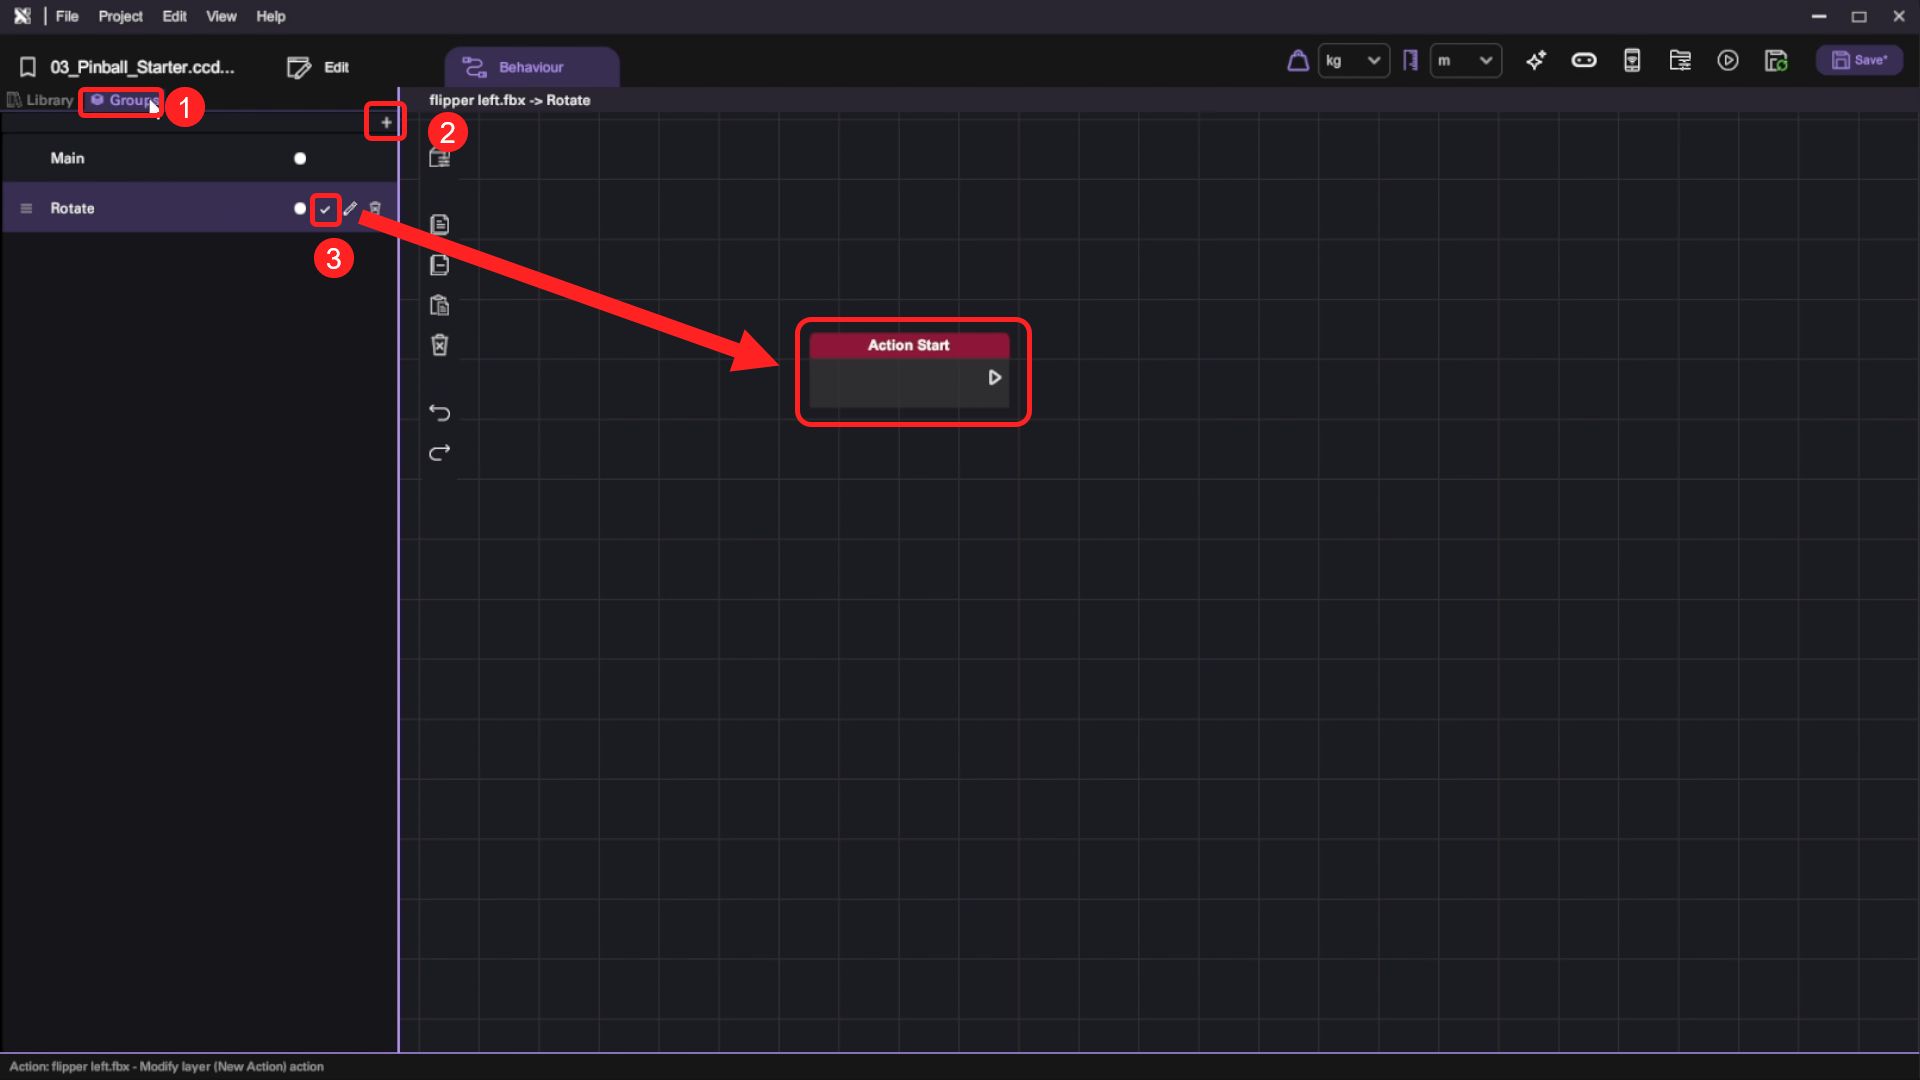
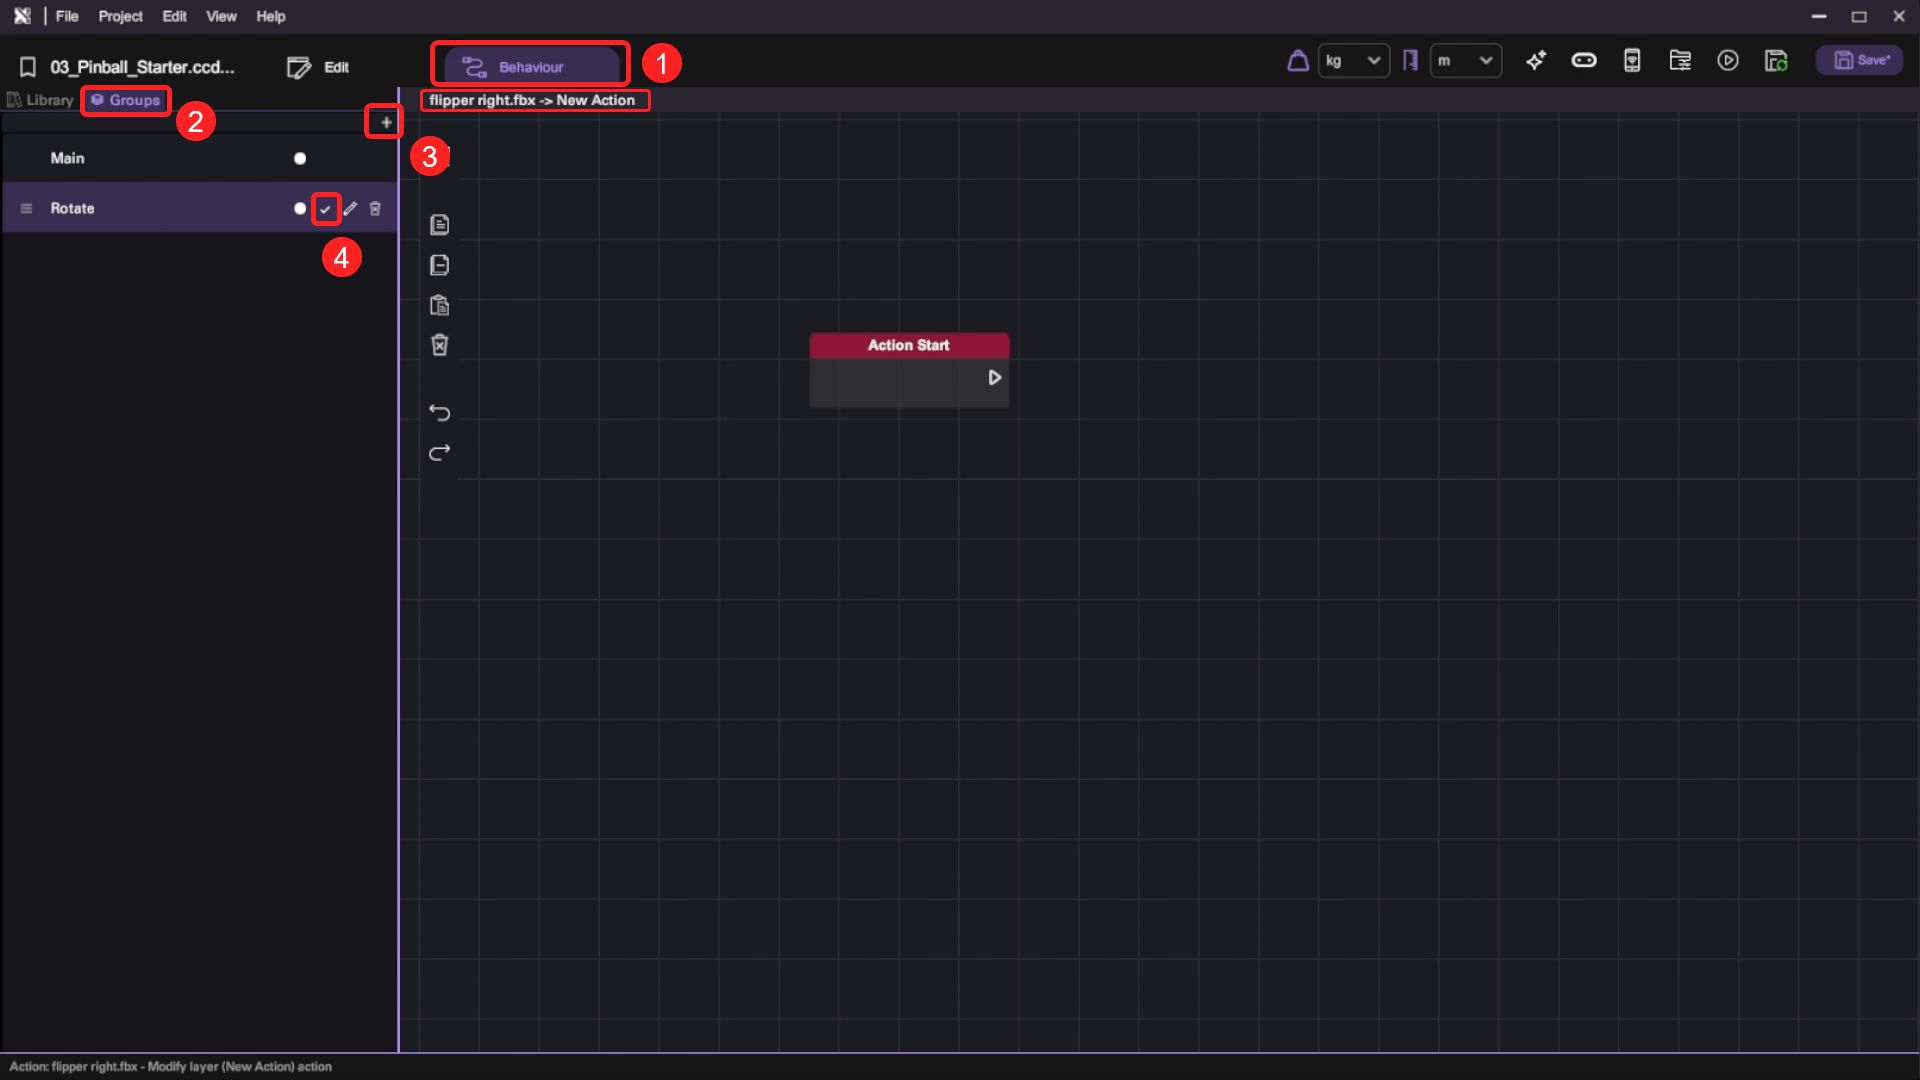
- Under "Groups", add a new behaviour group and rename it to "Rotate". Toggle the "Action" button to make it an action that can be called by other objects. An "Action Start" event trigger block will appear on the canvas.
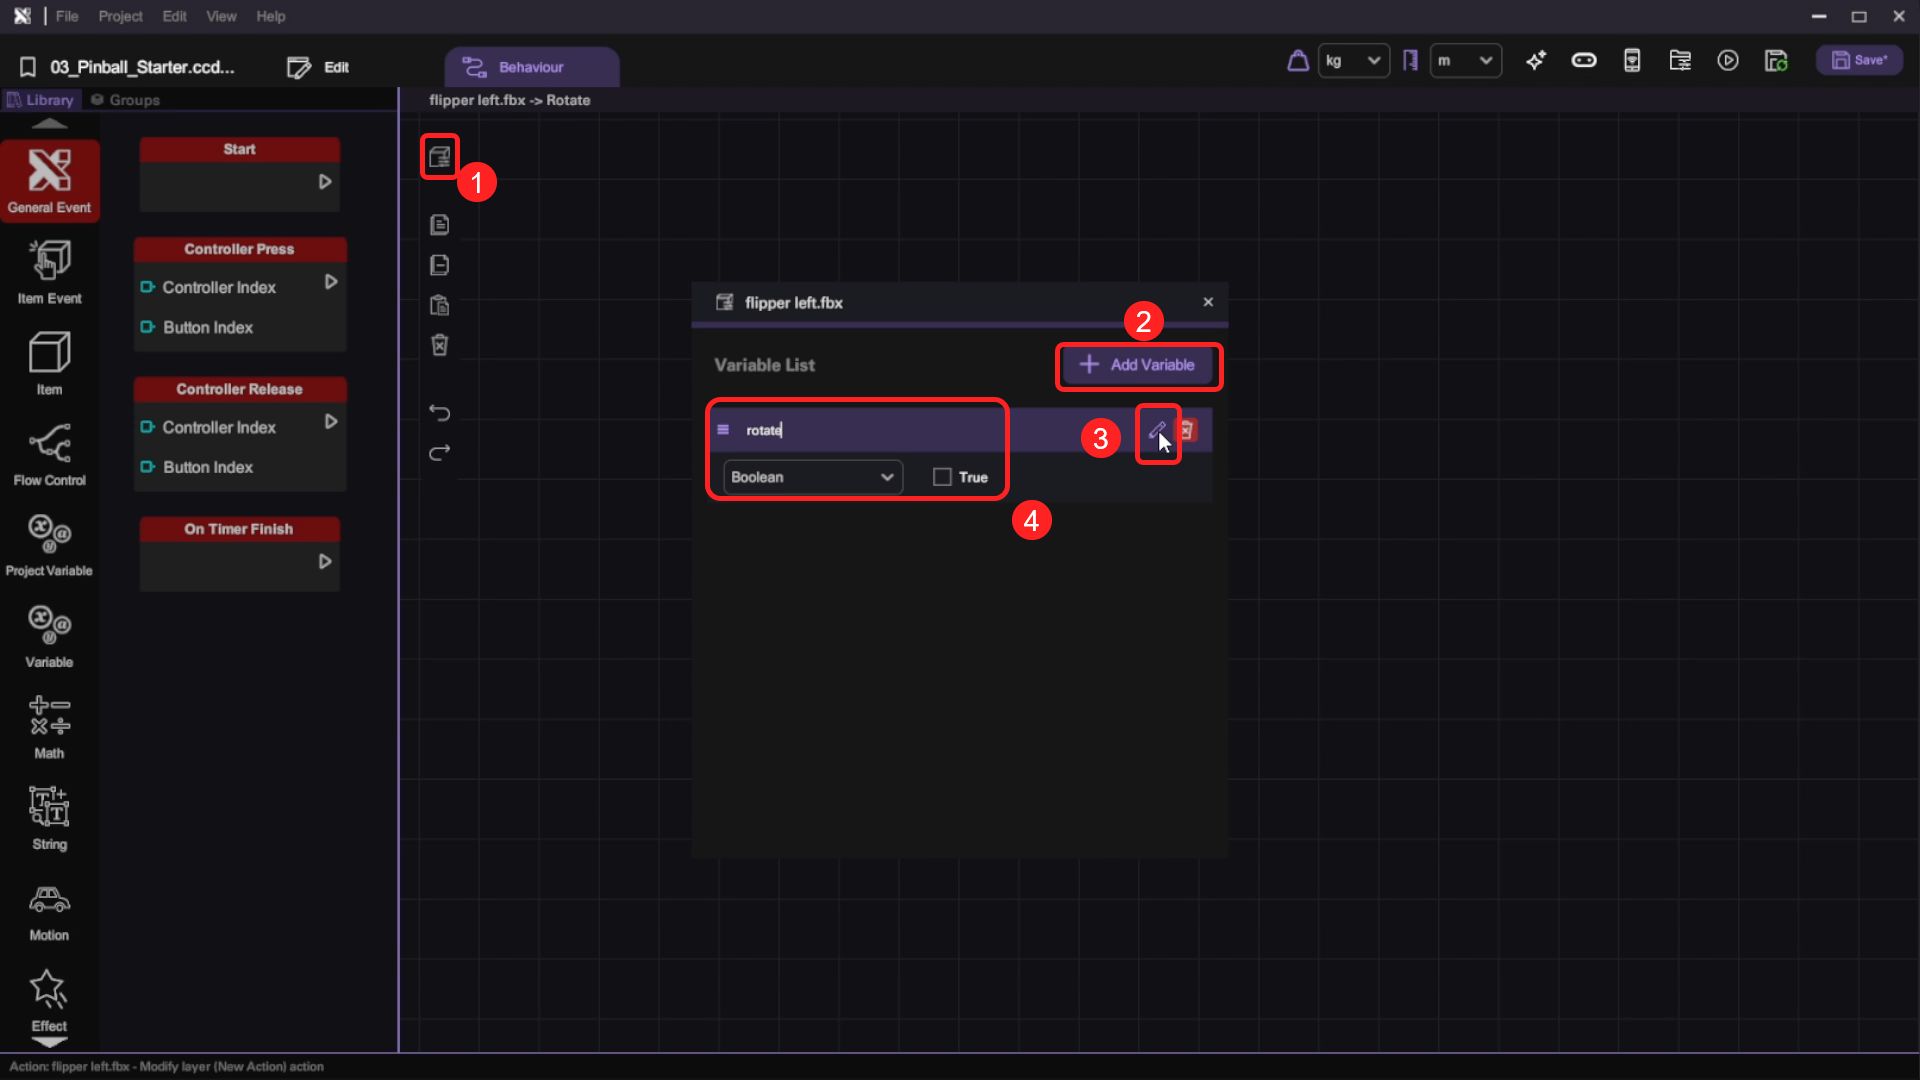
- Select the "Show Item Variables" button to open the item variables panel. Add a new variable named "rotate", set the variable type to "Boolean" and set its default value to False.
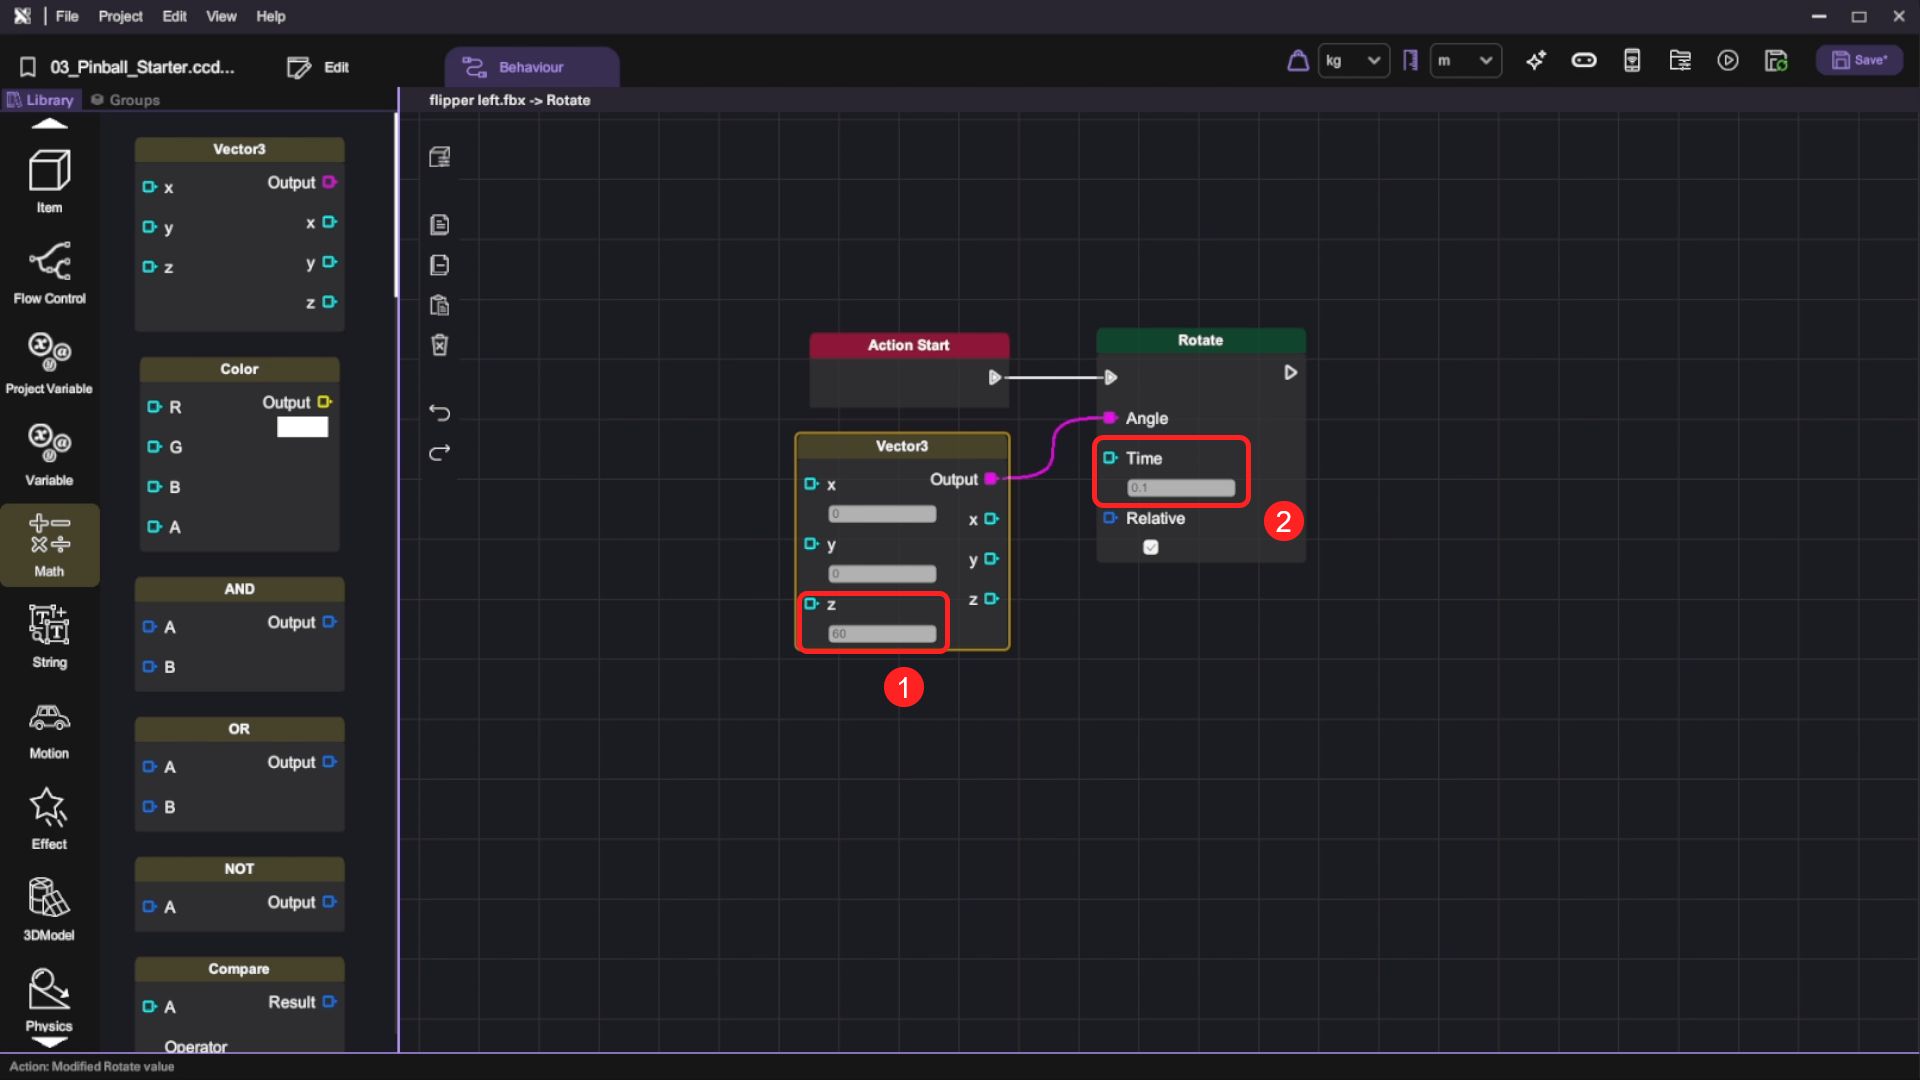
- For the "Rotate" action, add a "Rotate" block behind the "Action Start", set the "Rotate" Time to 0.1, then use a "Vector3" block to set the rotation Angle. Finally, set the "Vector3" block's Z value to 60.
| Category | Behaviour |
|---|---|
| |
|  |
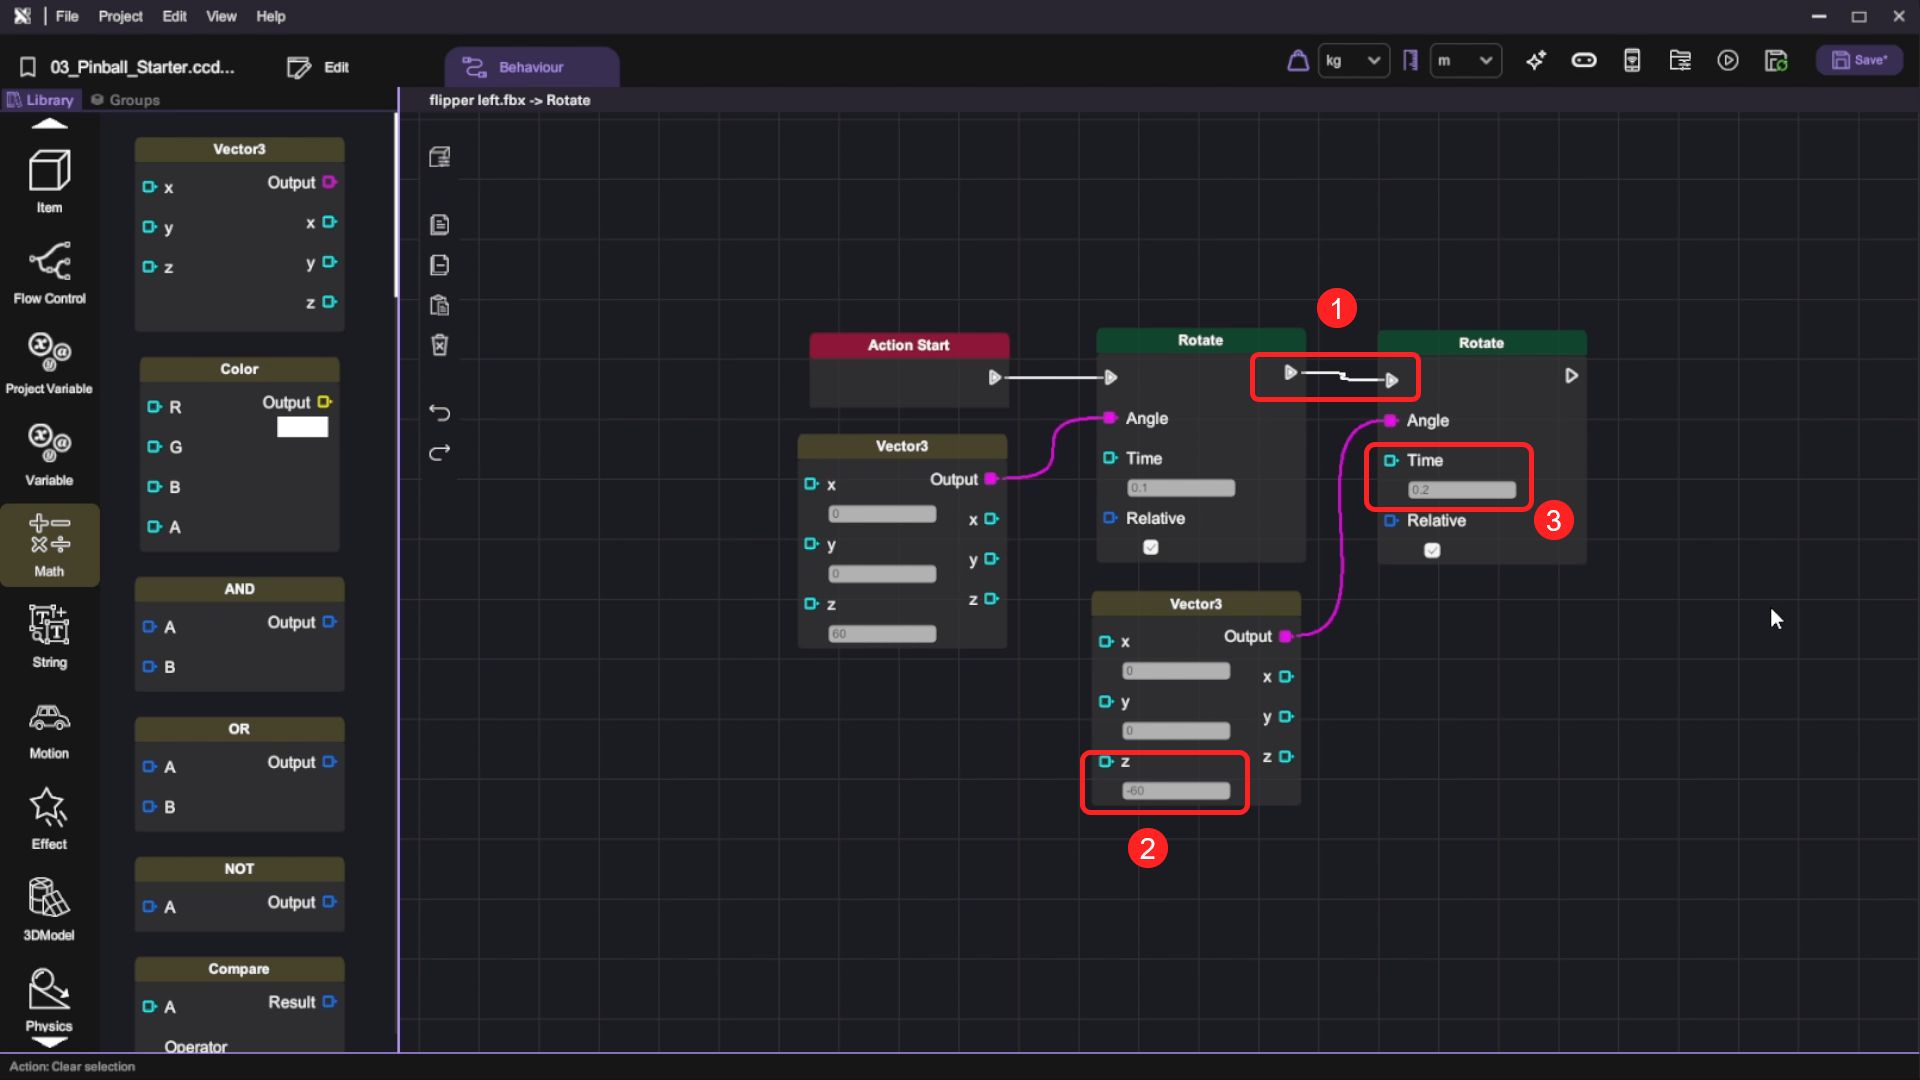
- Select both the "Vector3" and "Rotate" blocks, Copy "" (Ctrl + C) and Paste "" (Ctrl + V) or Duplicate (Ctrl + D) them on the canvas.

-
Connect the previous "Rotate" block's out flow node with the copied "Rotate" block's in flow node. Then set the Time on the other "Rotate" block to 0.2 and the Z value of the "Vector3" to -60.
noteWhen this action is called, the left flipper will rotate 60 degrees clockwise for 0.1 seconds and then counterclockwise for 0.2 seconds to its original rotation.
-
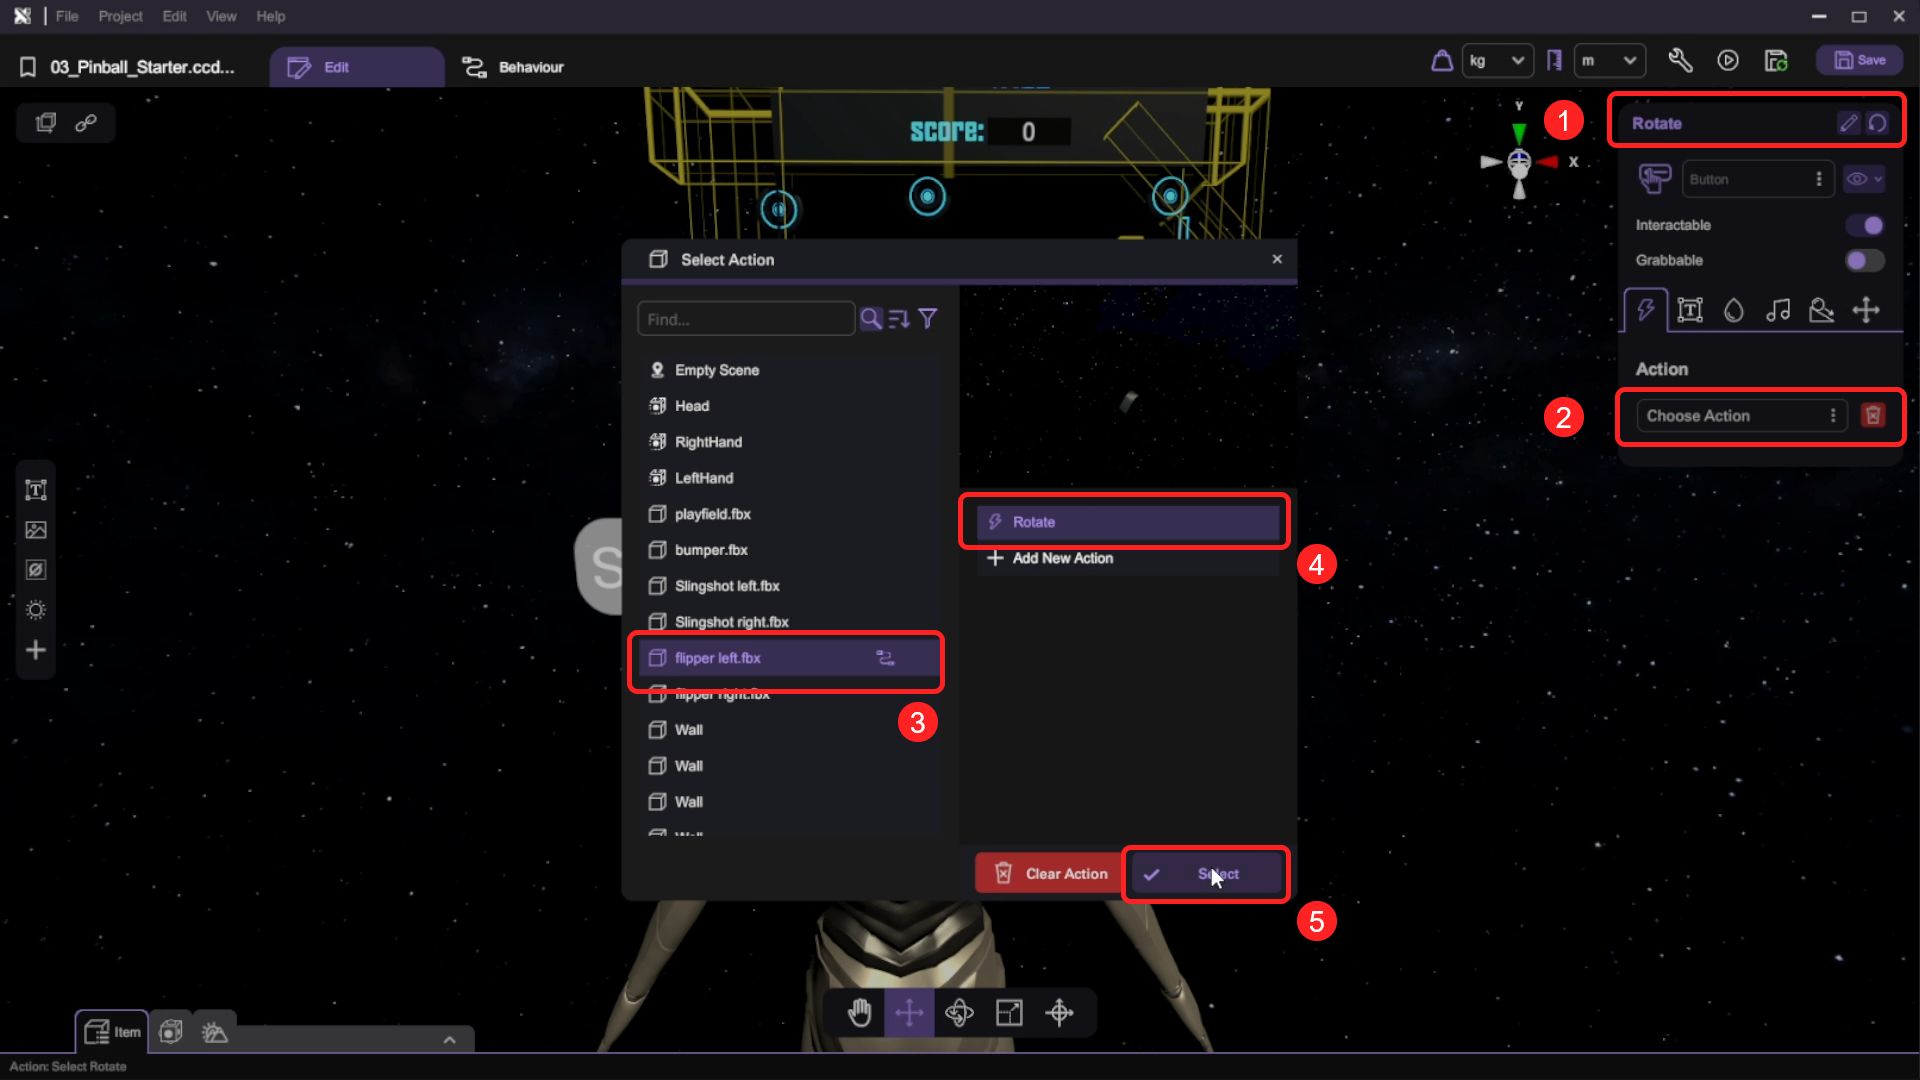
Select the "Rotate" button and click the selector next to the Rotate button's "Action" in the "Inspector" and select the Flipper Left object's "Rotate" action to assign the action to the Rotate button.
noteThis will set up the "Rotate" button to call the "Rotate" action when the button is clicked.
- Press the "Play" button and test the flippers by clicking the "Rotate" button. The left flipper will rotate and return to its original state, but its rotation may look off if you click the button too quickly or too often. Now return to behaviour editing to fix this issue.
Set a Cooldown Time for Flipper
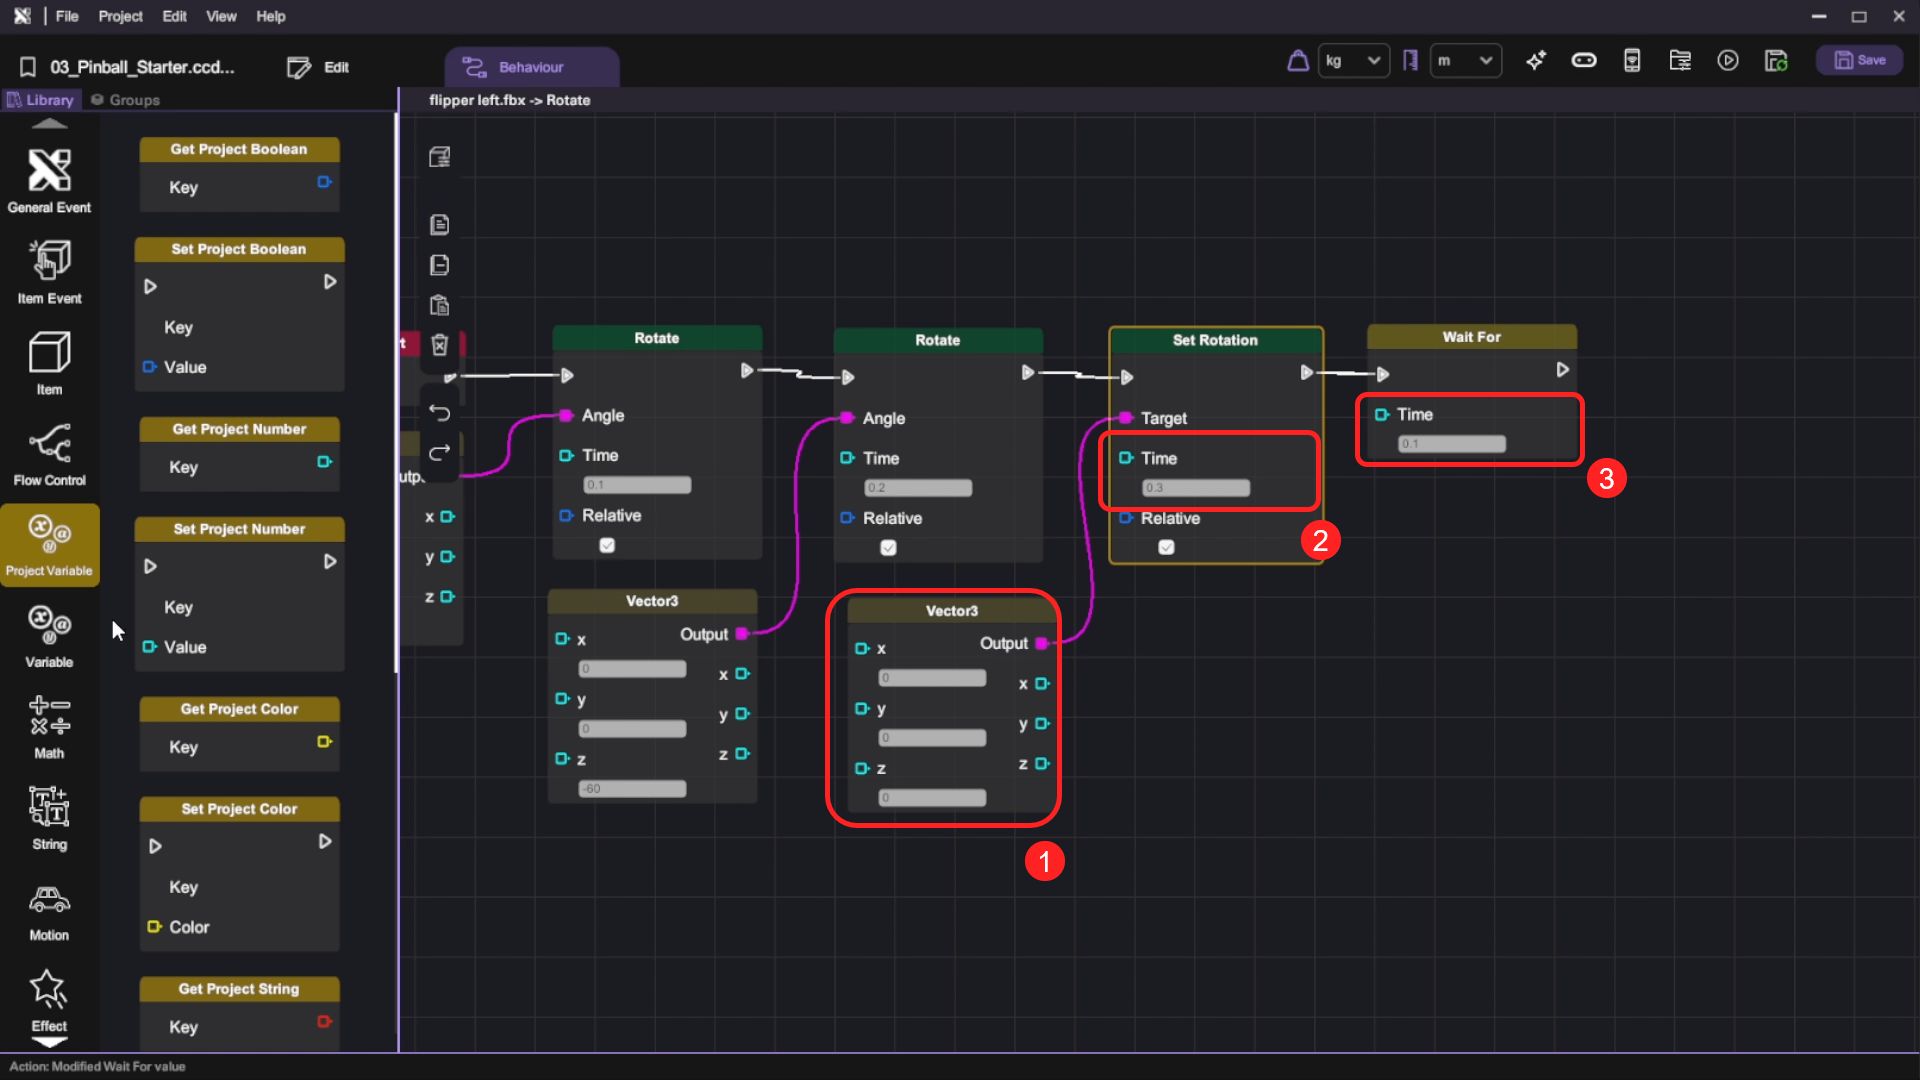
- Return to the "flipper left" object's "Rotate" action. First, add a "Set Rotation" block after the last "Rotate" block and set Time to 0, then add a "Vector3" to set its Target. This will instantly set the flipper back to its original rotation. Then add a "Wait For" block after the "Set Rotation" block, and set the Time to 0.1. When this action is called, the rotation of the left flipper will reset to 0 after it rotates back and wait for 0.1s to cool down.
| Category | Behaviour |
|---|---|
 |  |
|  |
- We are going to build a condition block to stop the user control when the flipper is acting. We will use the following blocks:
| Category | Behaviour |
|---|---|
|  |
 |   |
Then, we will set and connect them below:
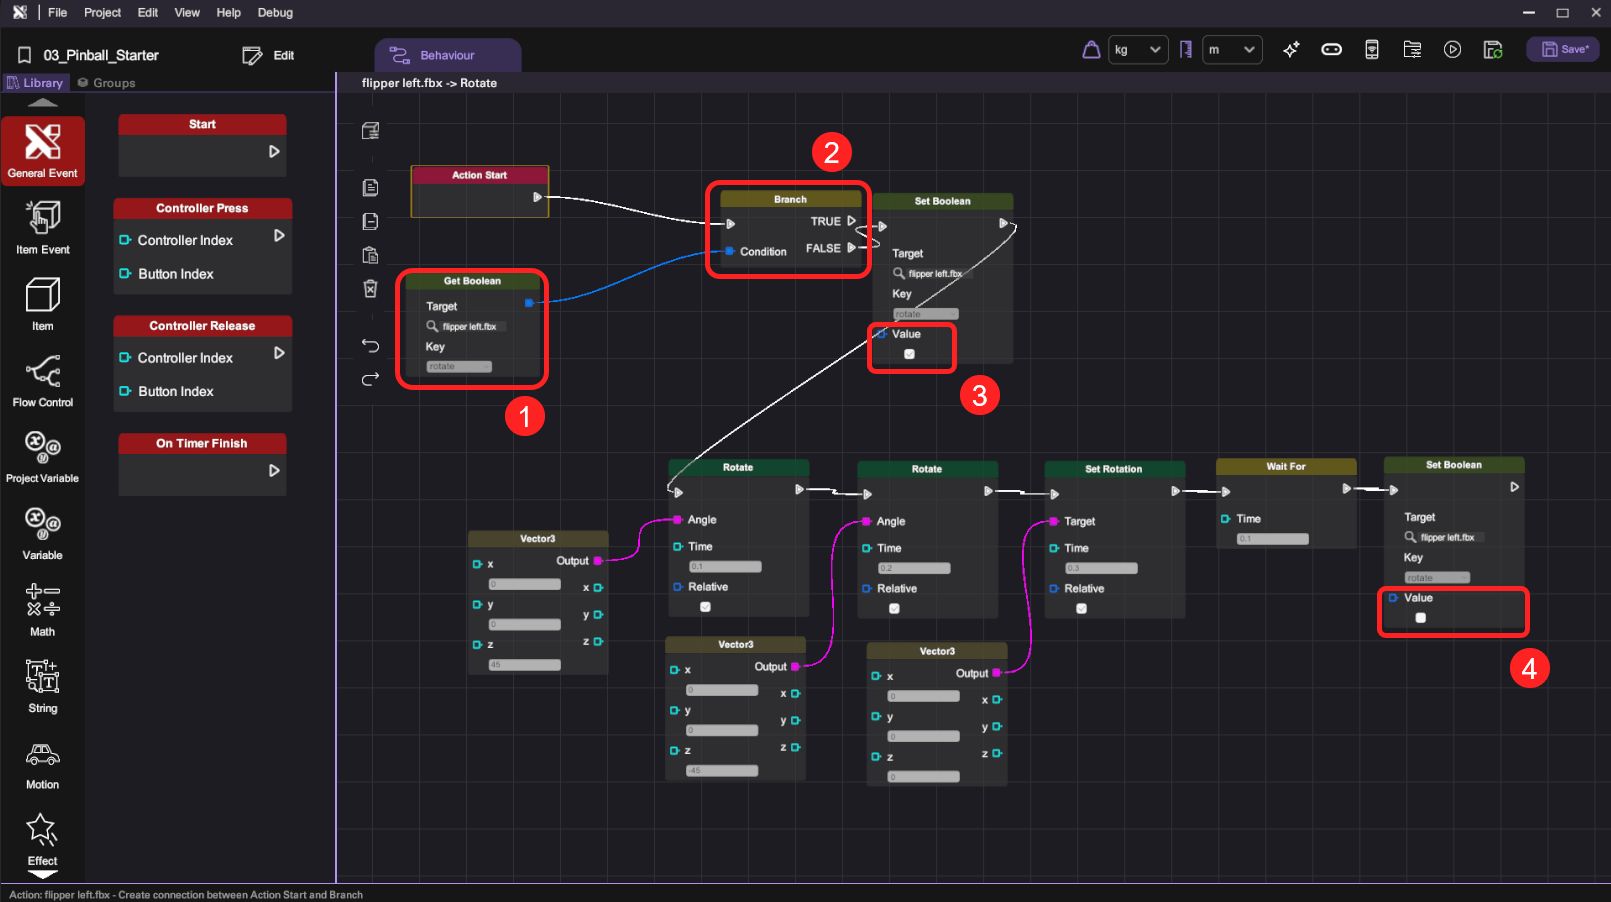
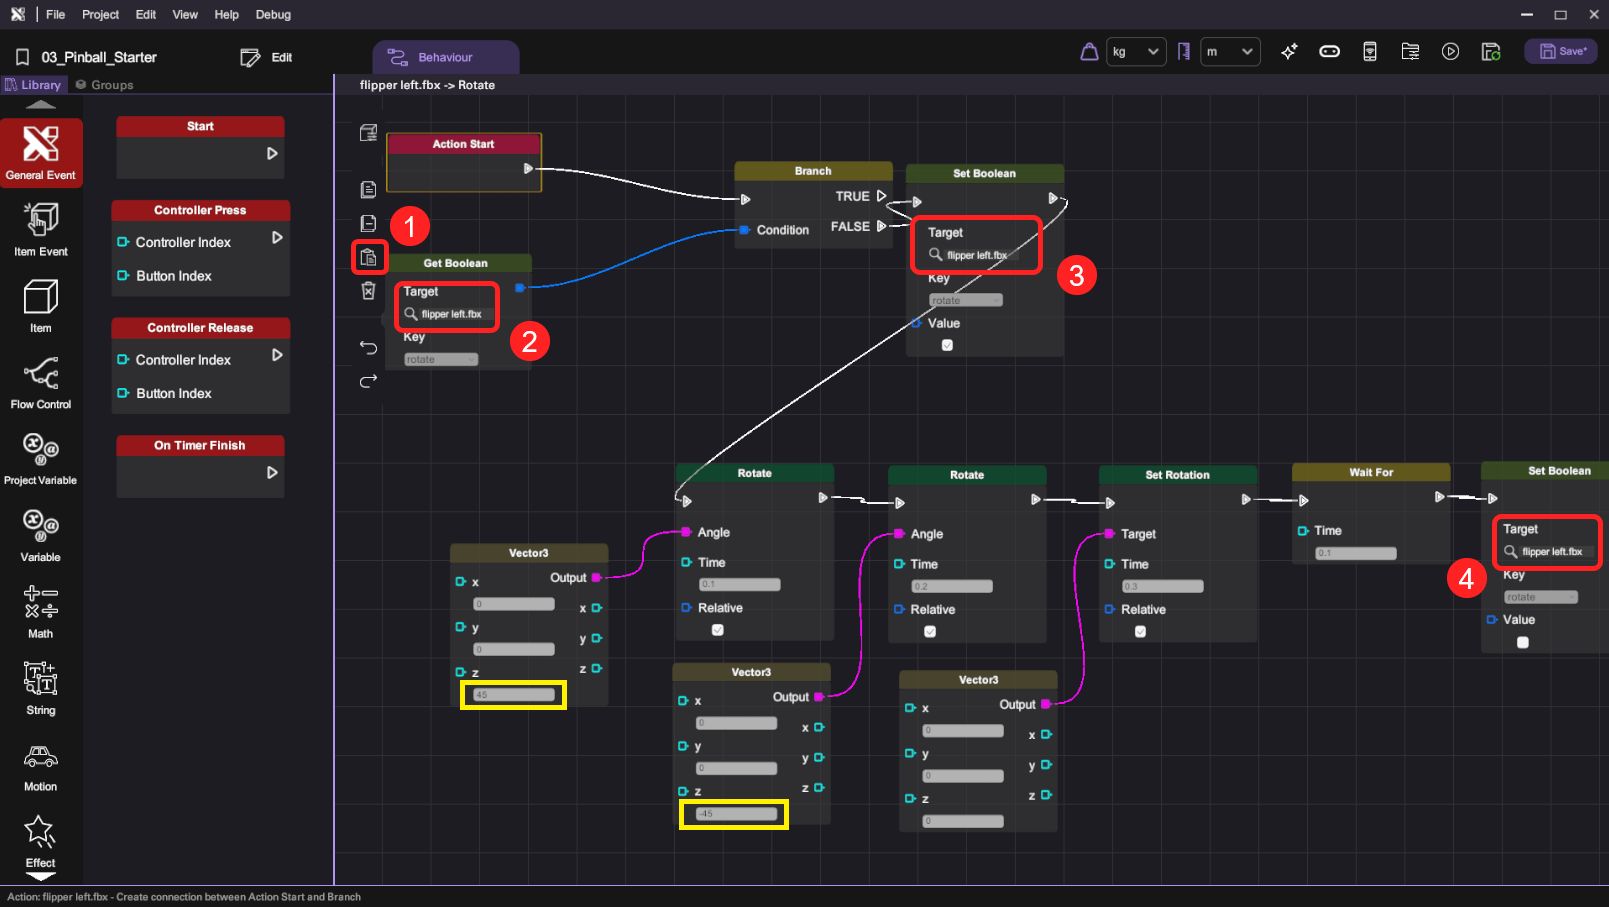
- Step 1: Select "flipper left.fbx" as the "Target" and "rotate" as the "Key" in the "Get Boolean" block. This means get the boolean variable "rotate" from the object.
- Step 2: Connect it to the "Branch" and we will use the FALSE output.
- Step 3: Connect "Branch" - FALSE output to the "Set Boolean", and set the "rotate" value as True. This means "When flipper is not rotating, then set it as rotating".
- Step 4: At the end of the block ("Set Boolean"), set the "rotate" value as False, marking it as false to indicate that all the rotation motion is finished.
-
Enter play mode and test the newly modified rotate behaviour and observe the subtle difference.
-
Now you can repeat the whole procedure on the right flipper object. First create the "Rotate" action on the right flipper.
-
Go back to the left flipper and select the whole behaviour flow, copy them and paste them to the right flipper object's "Rotate" action.
-
On the right flipper's behaviour panel, open the "Show Item Variables" and add a new variable named "rotate", set the variable type to "Boolean" and set its default value to False.

- After pasting the behaviour flow, change all Targets to "flipper right" and reverse the Z values in the "Vector3" blocks.
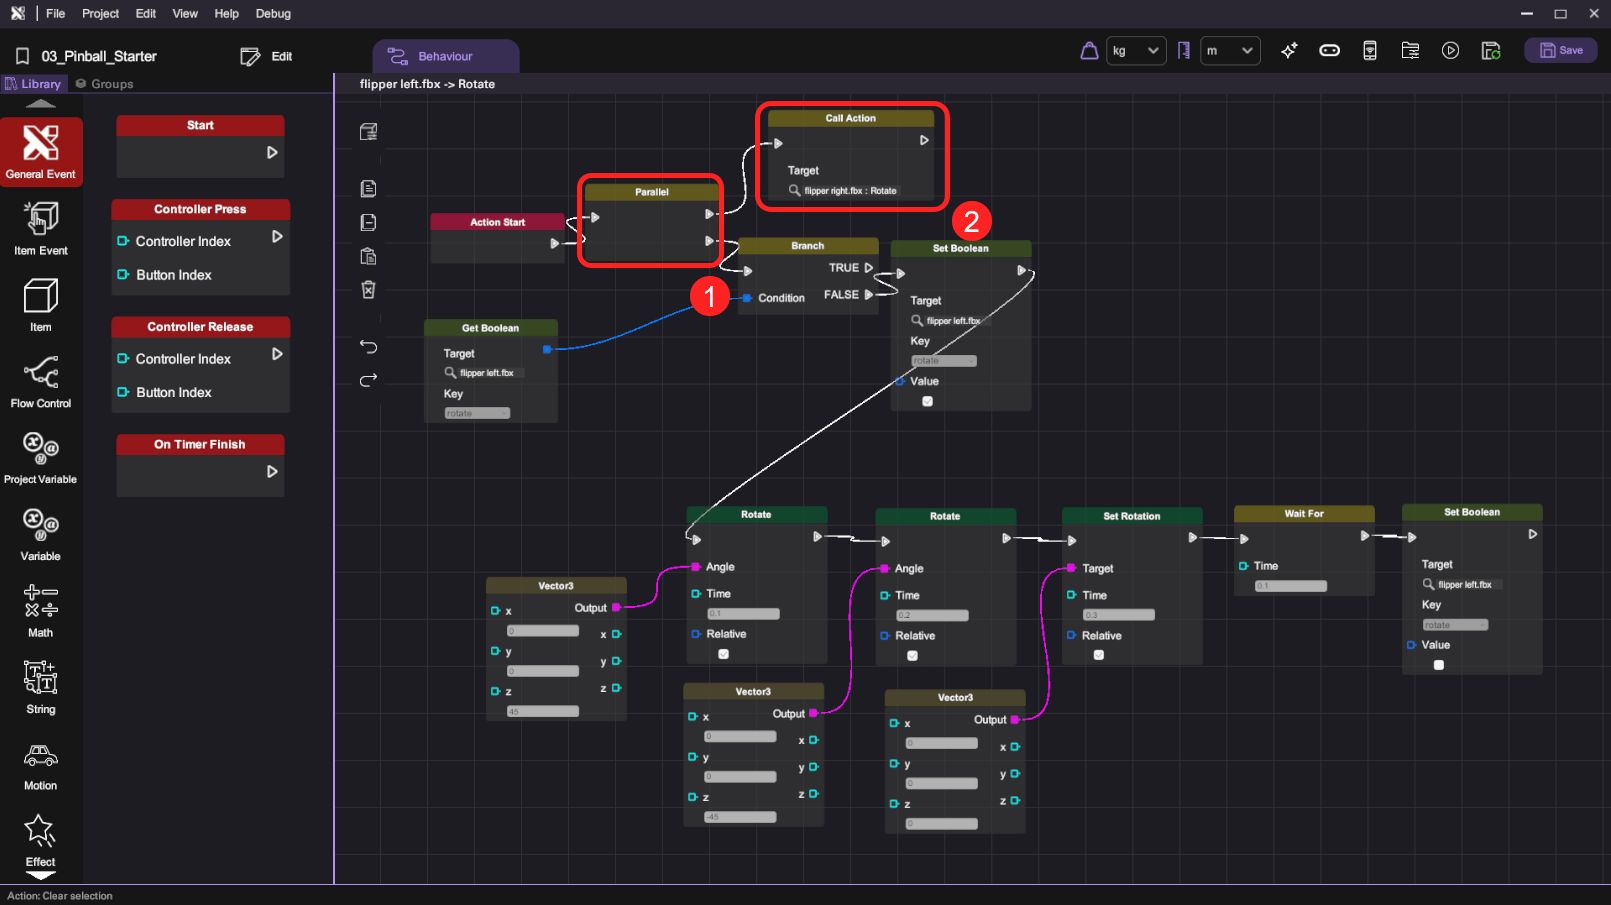
- Open the Flipper Left object's behaviour panel. Break the connection between the "Action Start" and "Branch" blocks and add a "Parallel" block between them. Connect one of the "Parallel" block's out flow nodes with the "Branch" block and add a new "Call Action" block behind the other node. Finally, set the "Target Action" of the "Call Action" block to "flipper right.fbx : Rotate". When this action is called, both sides of the flippers will rotate simultaneously.
| Category | Behaviour |
|---|---|
|   |
Create Behaviour for the Ball when it Touches the Flippers
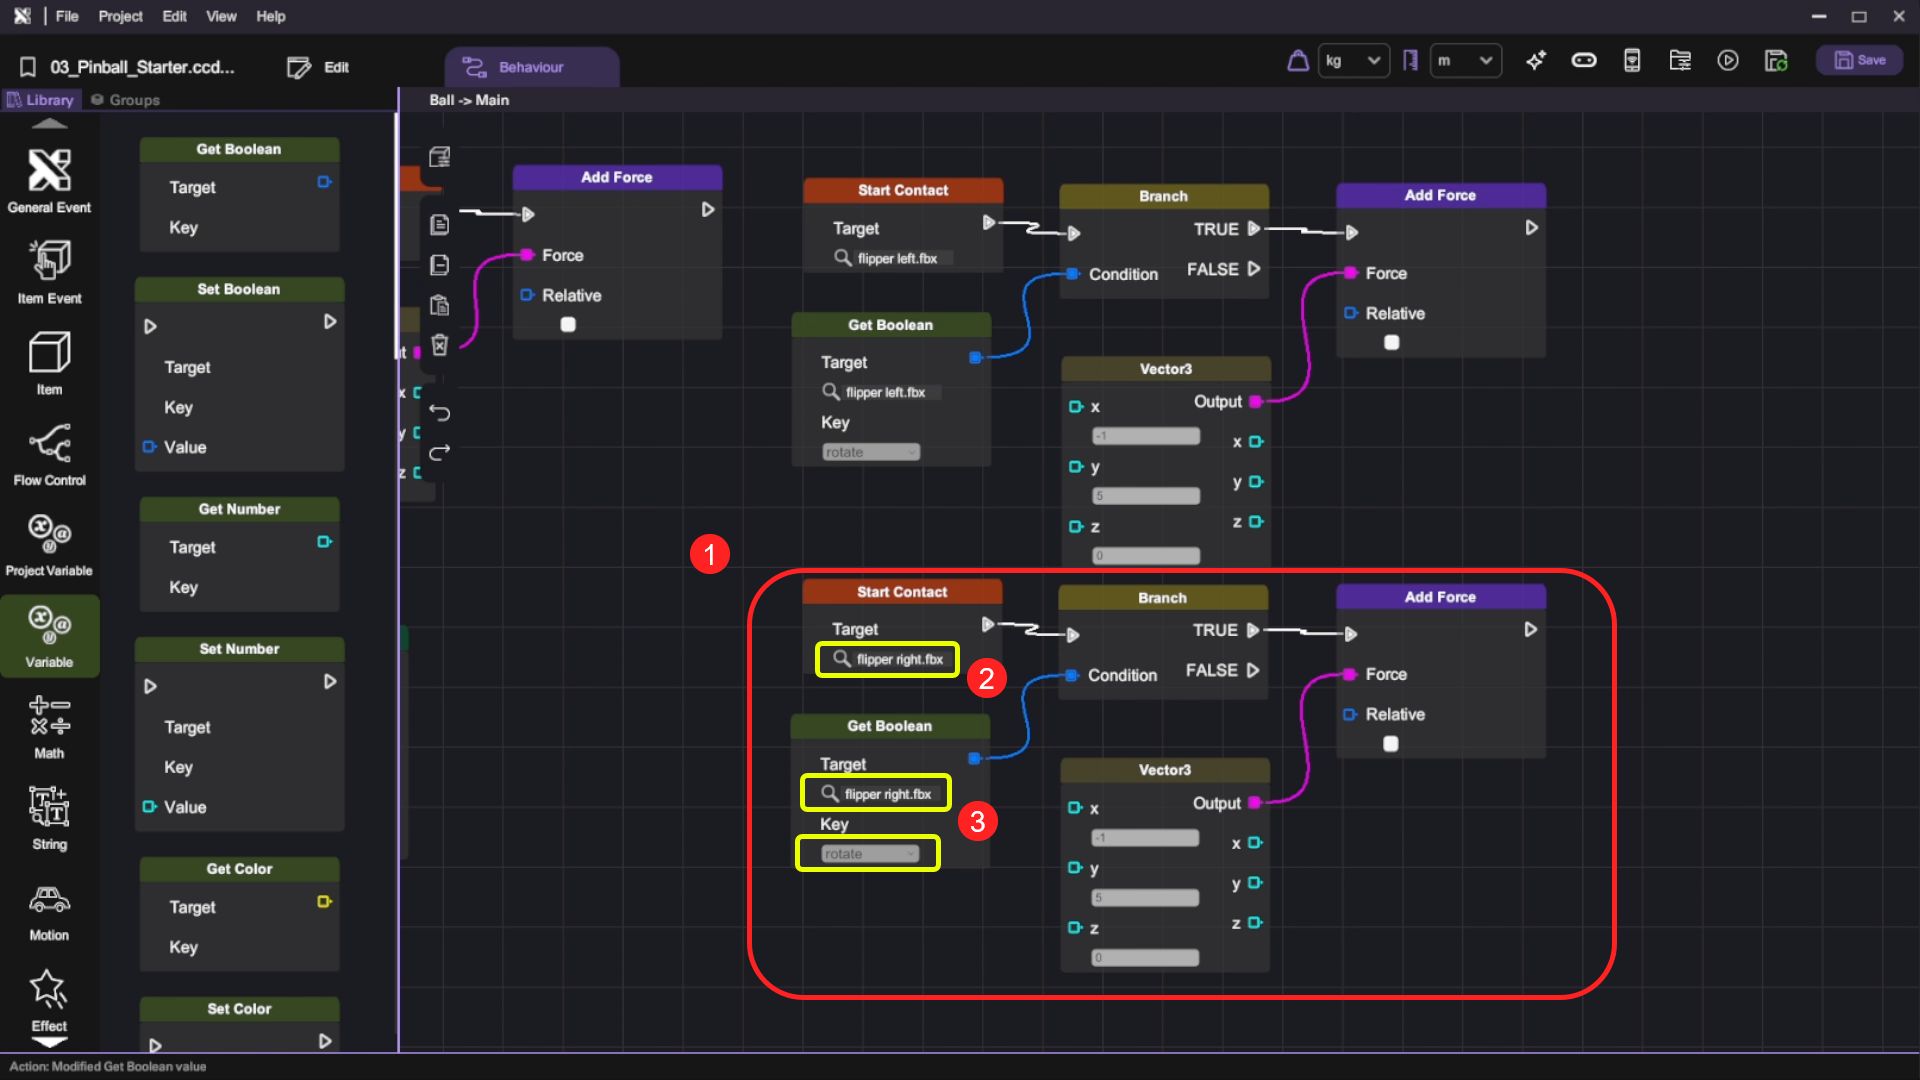
- We are going to build a condition block for when the Ball touches the Flippers. We will use the following blocks:
| Category | Behaviour |
|---|---|
| |
| |
| |
| |
| |
Then, we will set and connect them below:
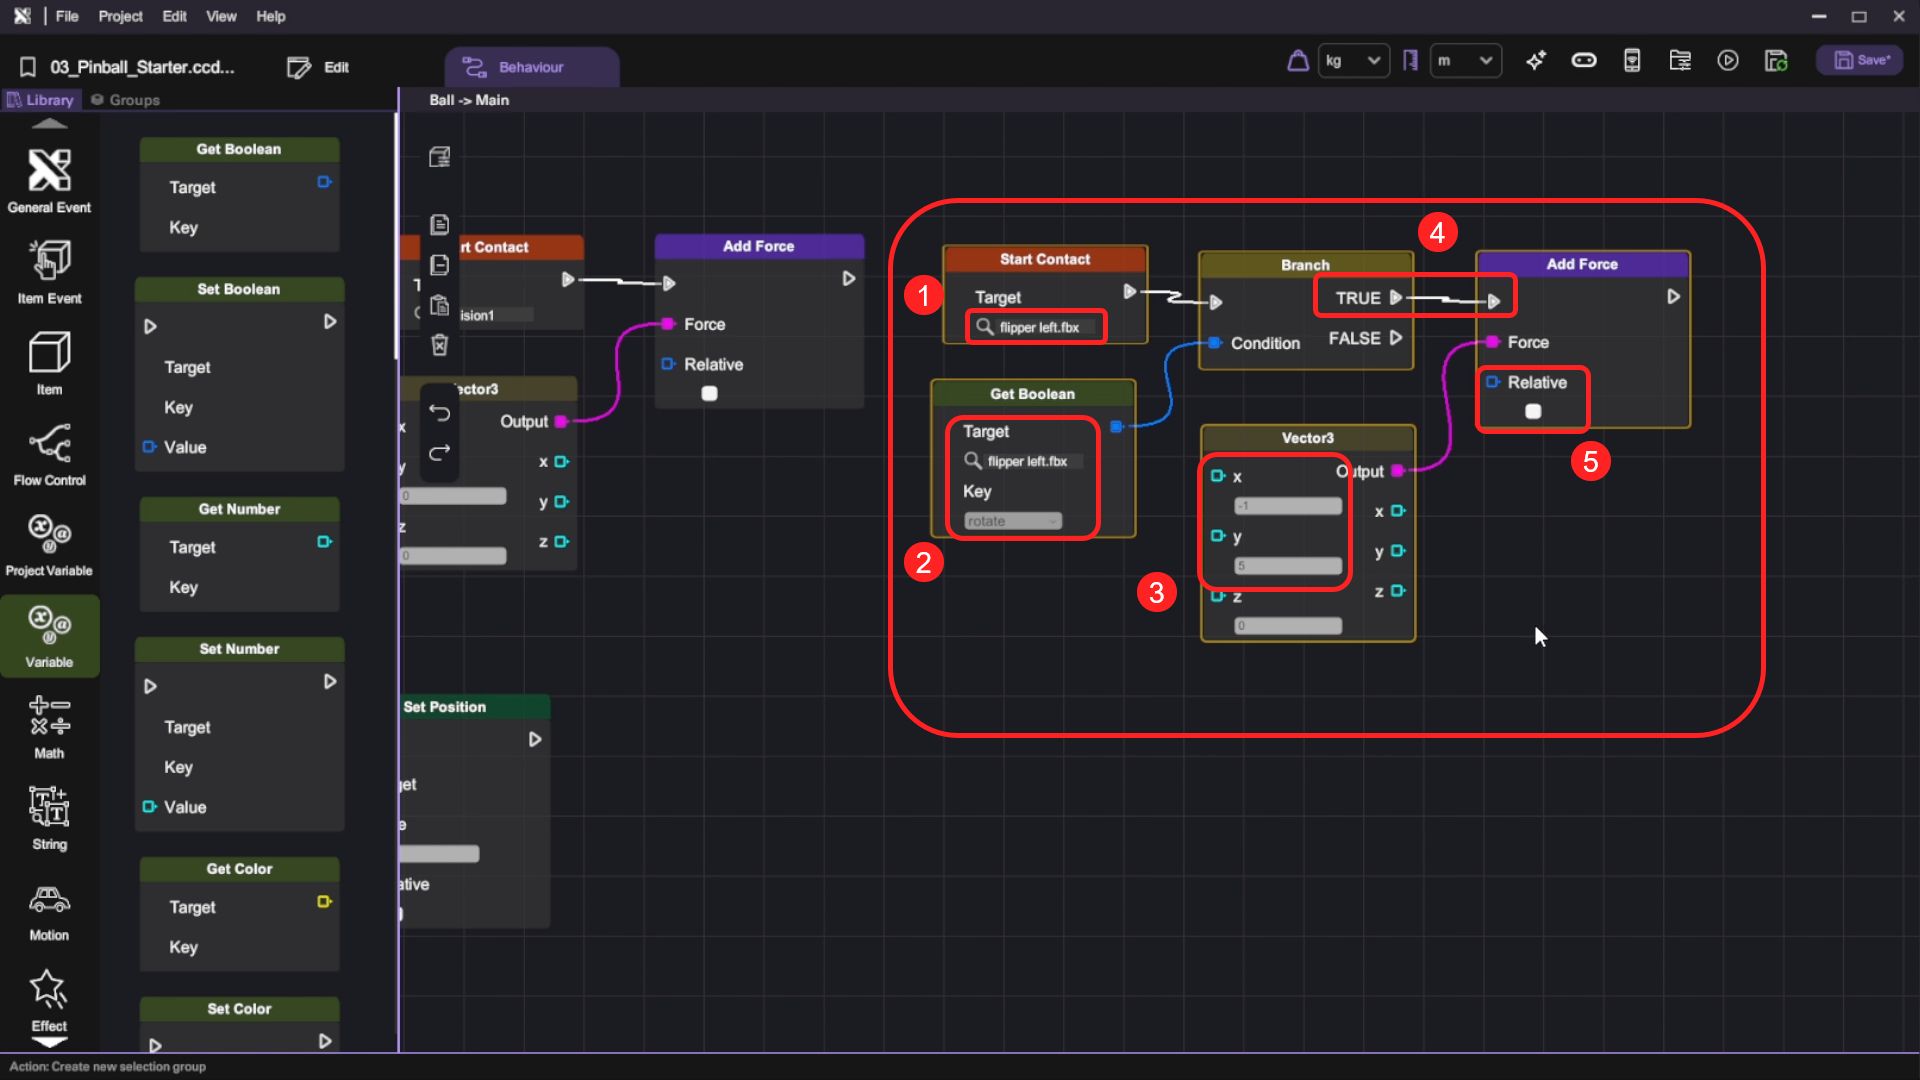
- Step 1: Select "flipper left.fbx" as the "Target" in "Start Contact" block.
- Step 2: Select "flipper left.fbx" as the "Target" and "rotate" as the "Key" in "Get Boolean" block.
- Step 3: Set X and Y as -5 and 5 in the "Vector3" block. This is the upward force acting on the ball; you can set any number you like.
- Step 4: Connect the "Start Contact" block and "Get Boolean" block, and we will use the TRUE output node.
- Step 5: In the "Add Force" block, connect the "Branch" block TRUE and "Vector3" to it, and set Relative as false
When this action is called, force will ONLY be added when the flippers are rotating.
- Repeat the same procedure for the right flipper. Remember to change the target in both the "Start Contact" block and "Get Boolean" block.
- Now, enter the play mode and test the behaviour. The flippers should rotate together when you click the "Rotate" button. When the ball hits the rotating flippers, it should bounce off with an added force.
Create the Counting System
In this section, you will learn how to implement a score system for your pinball game. You will set up score tracking using variables, create score display functionality, and implement score incrementing when the ball hits various game elements like bumpers and slingshots. You will also add score reset functionality when the ball falls through the bottom.
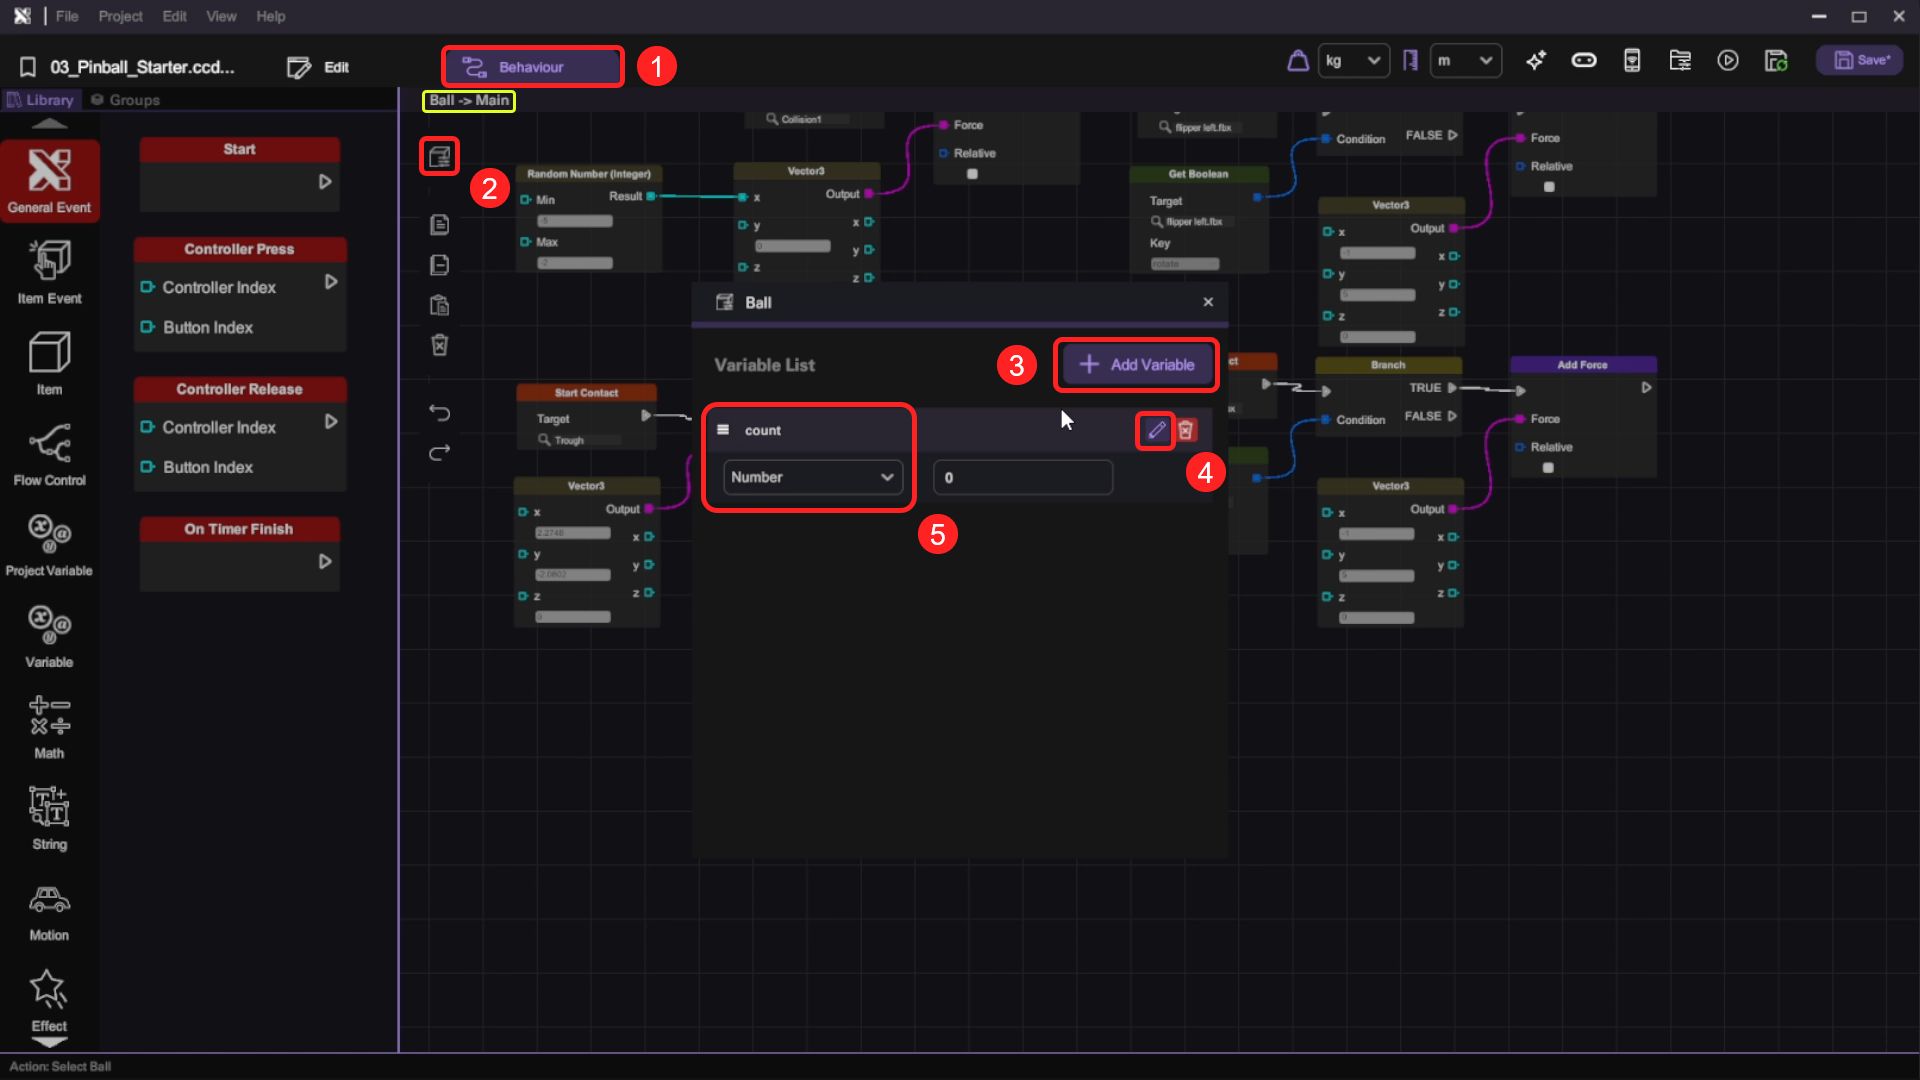
- Open the Ball object's behaviour panel and add a new variable named "Count", set the variable type to "Number" and default value to 0.
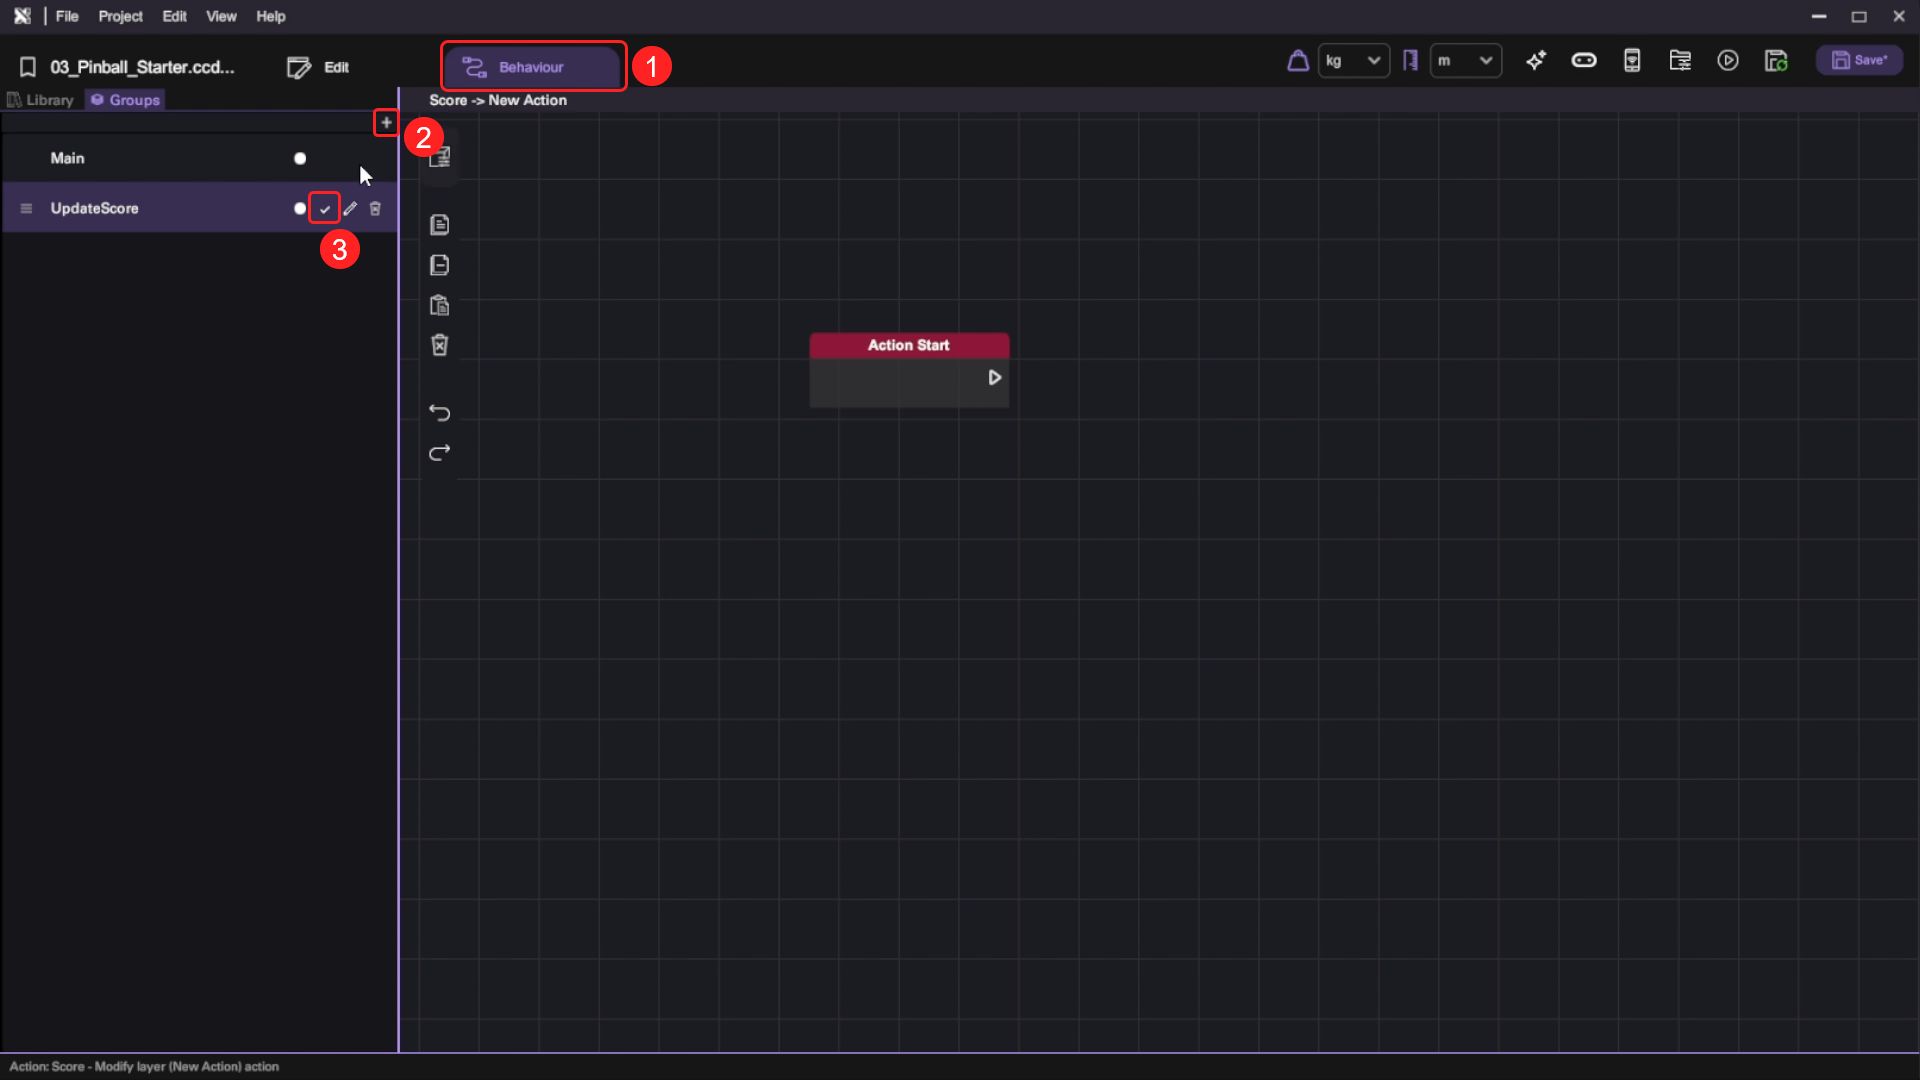
- Select the Score object and open its behaviour panel. Under "Groups", create a new action named "UpdateScore". An "Action Start" event trigger block will appear on the canvas.
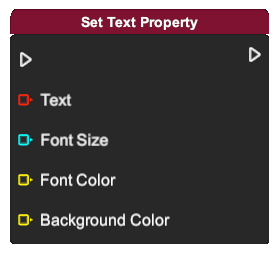
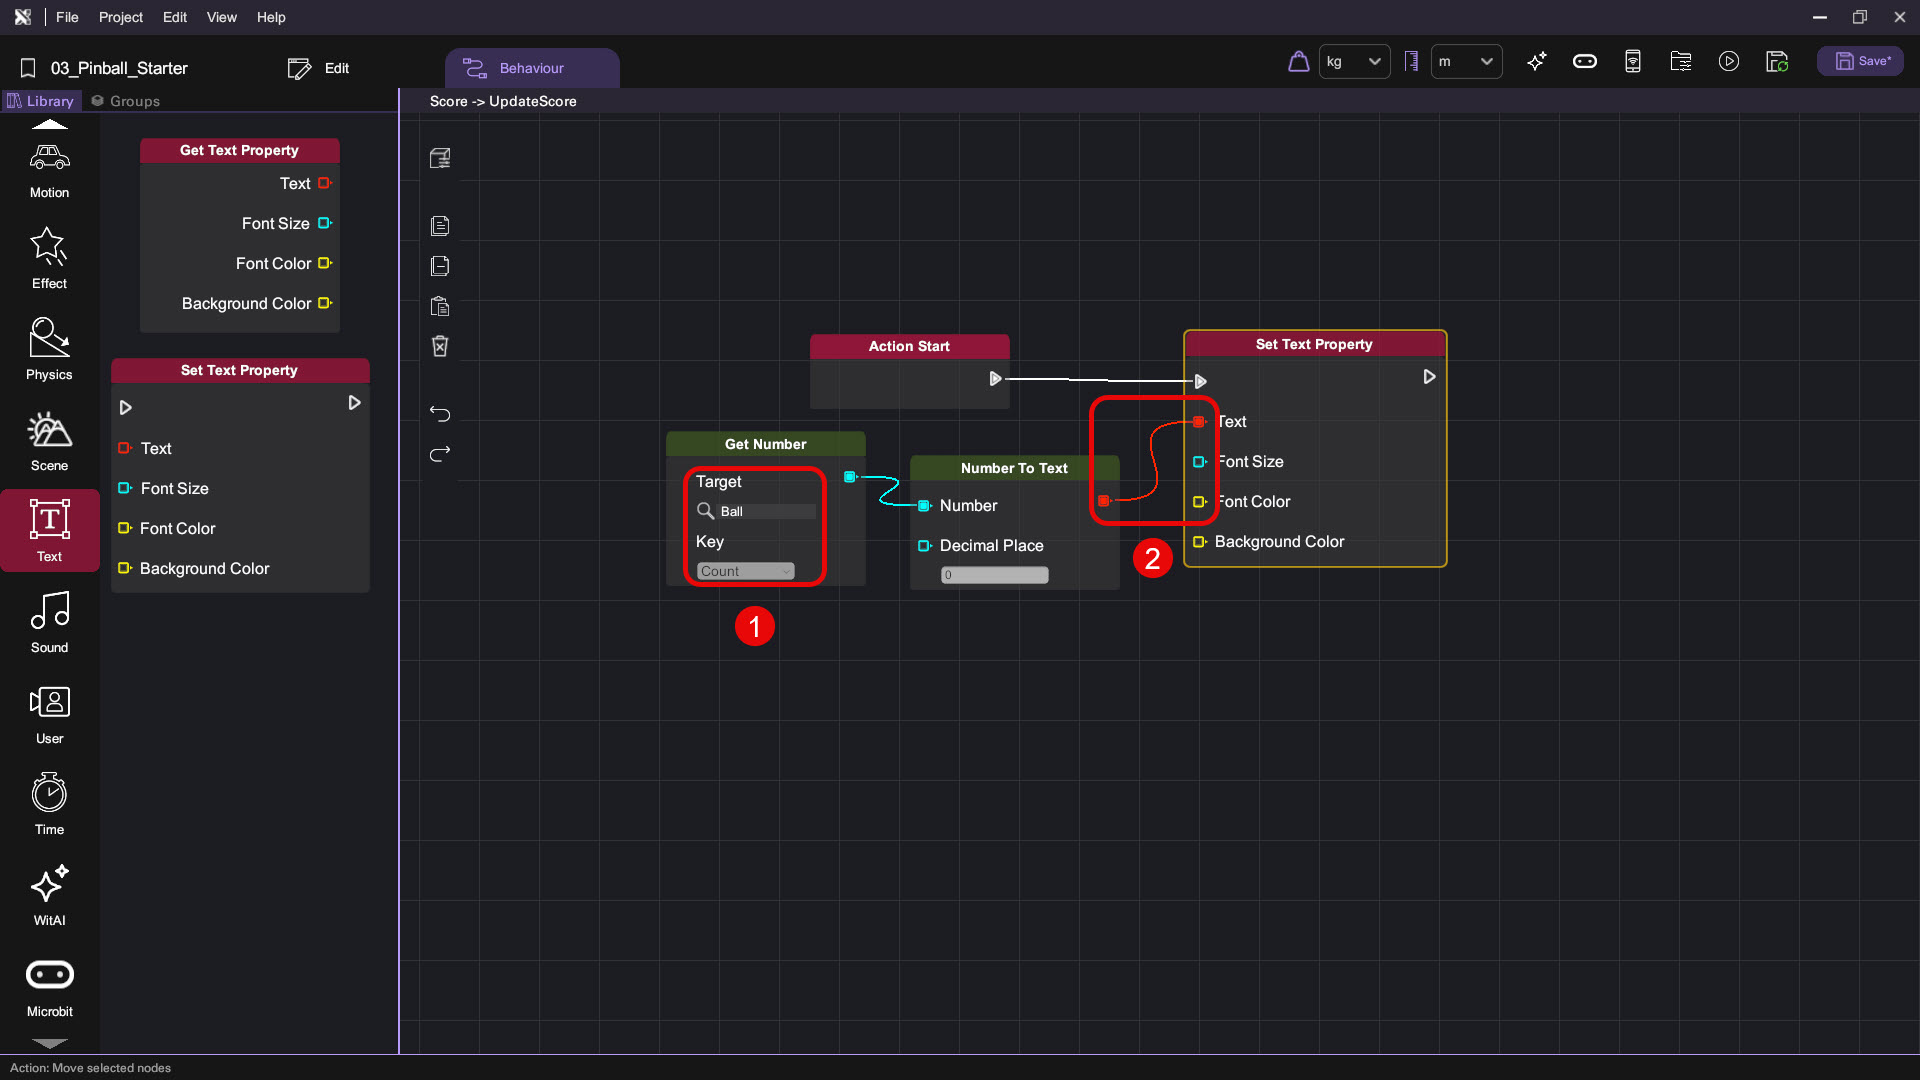
- Switch to the behaviour Library and append a "Set Text Property" block to the "Action Start" block. Use a "Get Number" block to retrieve the "ball" object's "Count" variable value, then use a "Number To Text" block to convert the number to Text format for display by the "Set Text" block. When this action is called, the score will be updated.
| Category | Behaviour |
|---|---|
|   |
 |  ! ! |
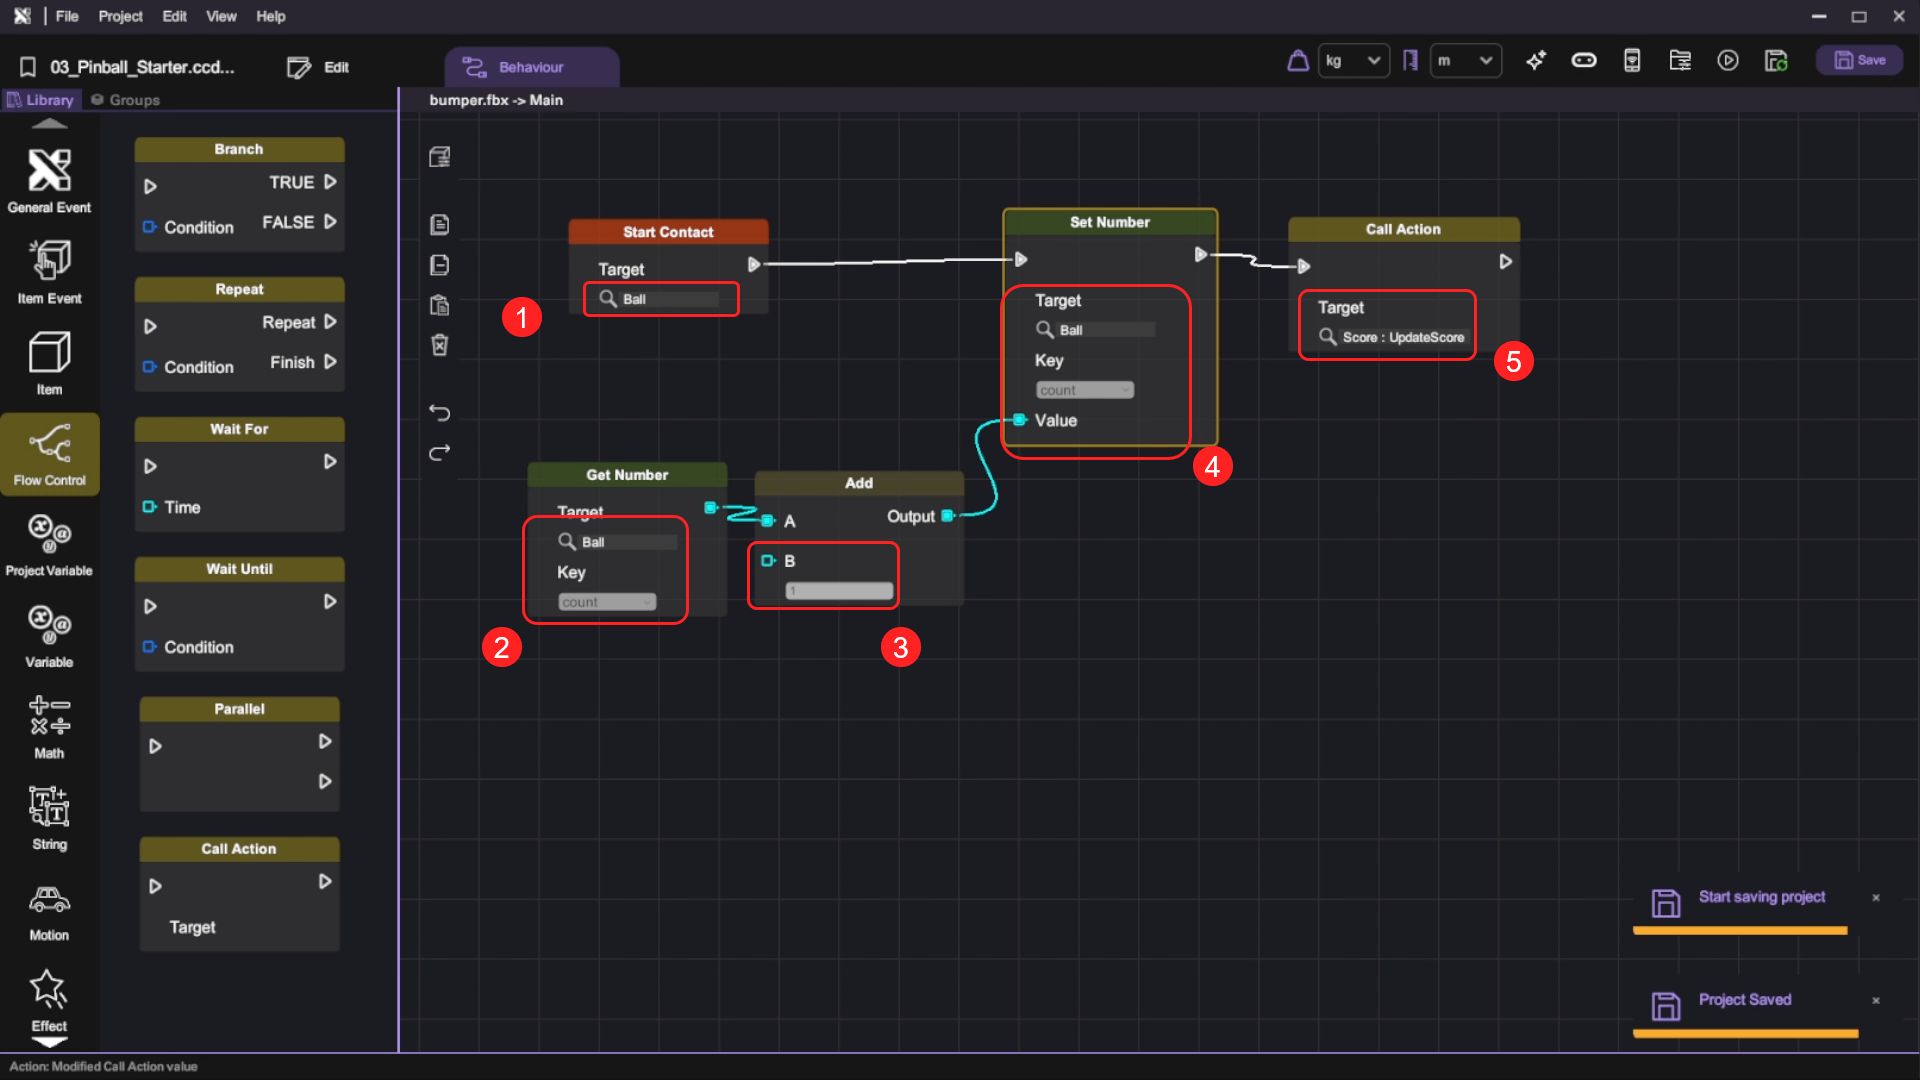
- We want to give some score to the player if the ball hits the bumpers and slingshots in the playfield. Using the left bumper as an example, open its behaviour panel and add a "Start Contact" block onto the canvas, set the Target to "Ball". Then add a "Set Number" block to update the score. To do so, use a "Get Number" block to retrieve the current score on the "Ball" object's "Count" variable then use an "Add" block to increment the score by 1. Finally, add a "Call Action" block and set its "Target Action" to the "Score" object's "UpdateScore" action, so the updated score will be displayed.
| Category | Behaviour |
|---|---|
| |
|  |
|  ! ! |
| |
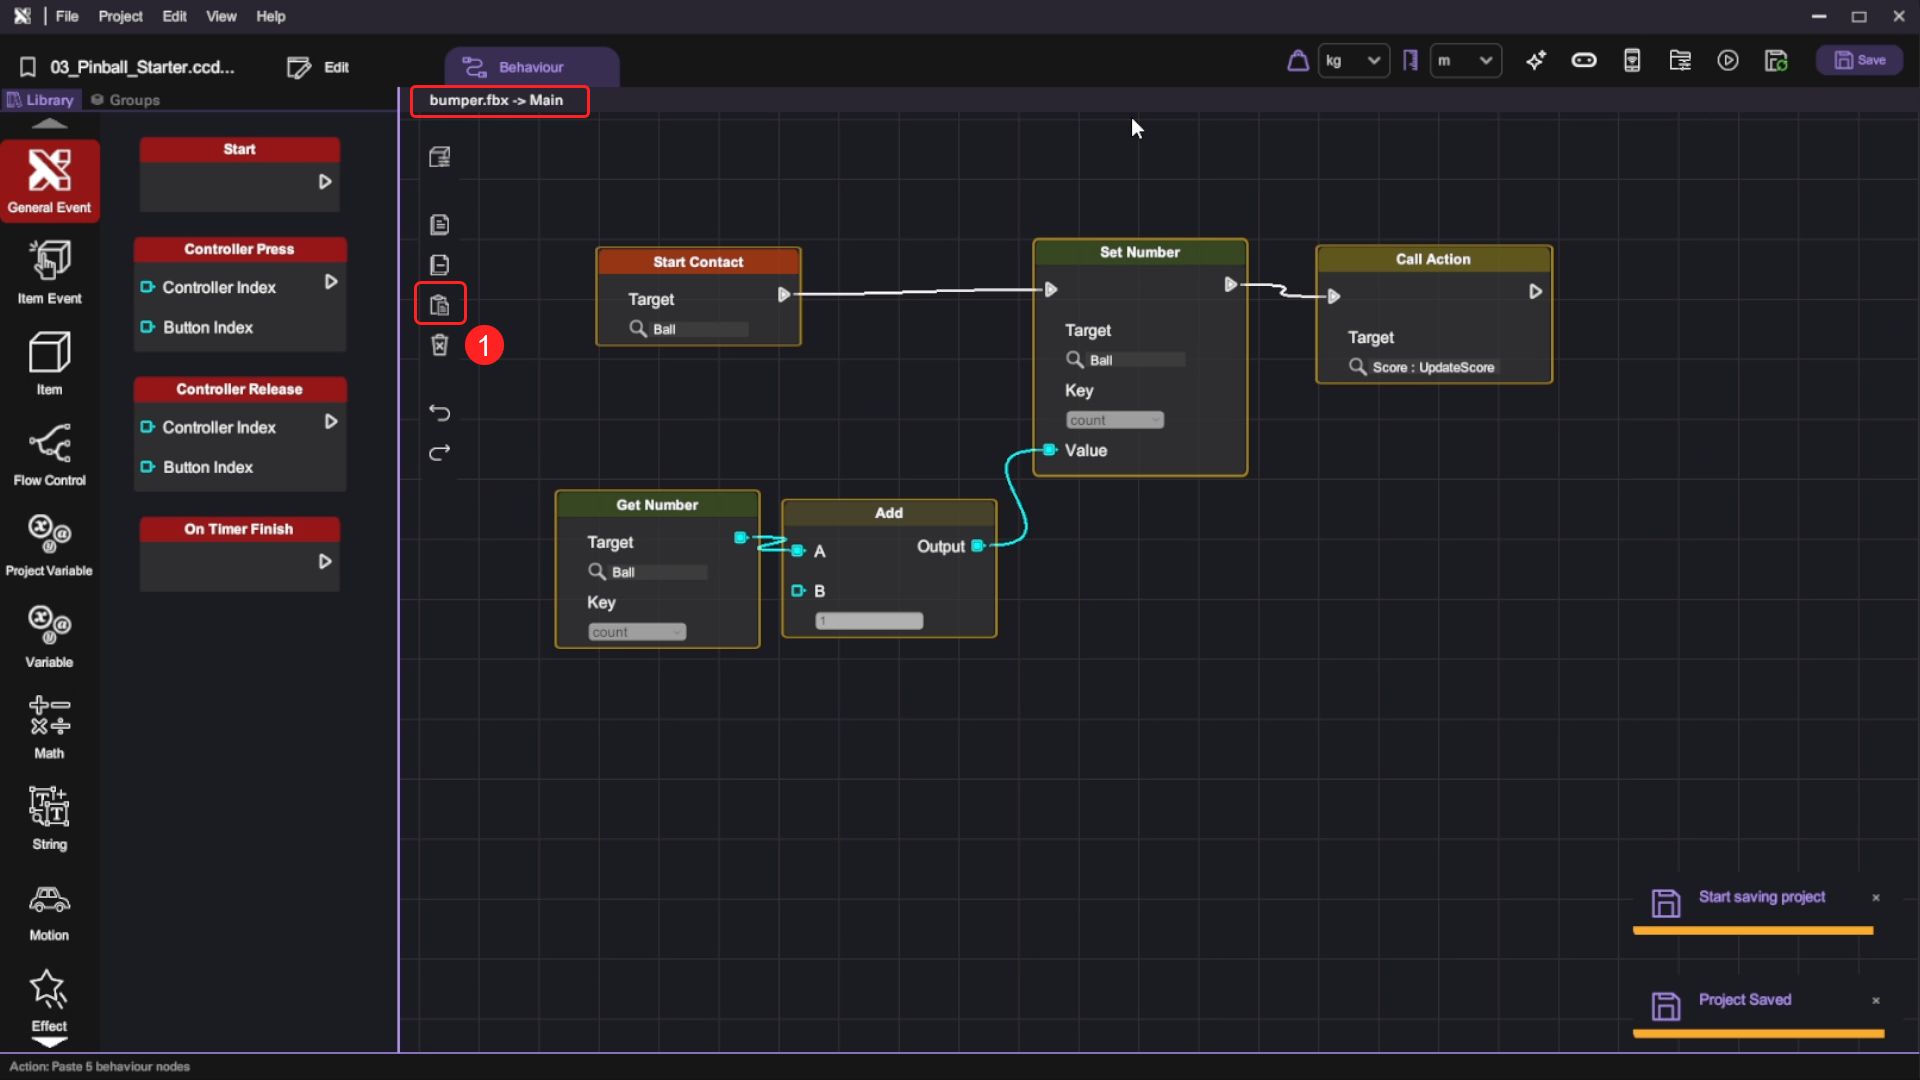
- Copy this behaviour flow and paste it to the other Bumpers and Slingshots canvas.
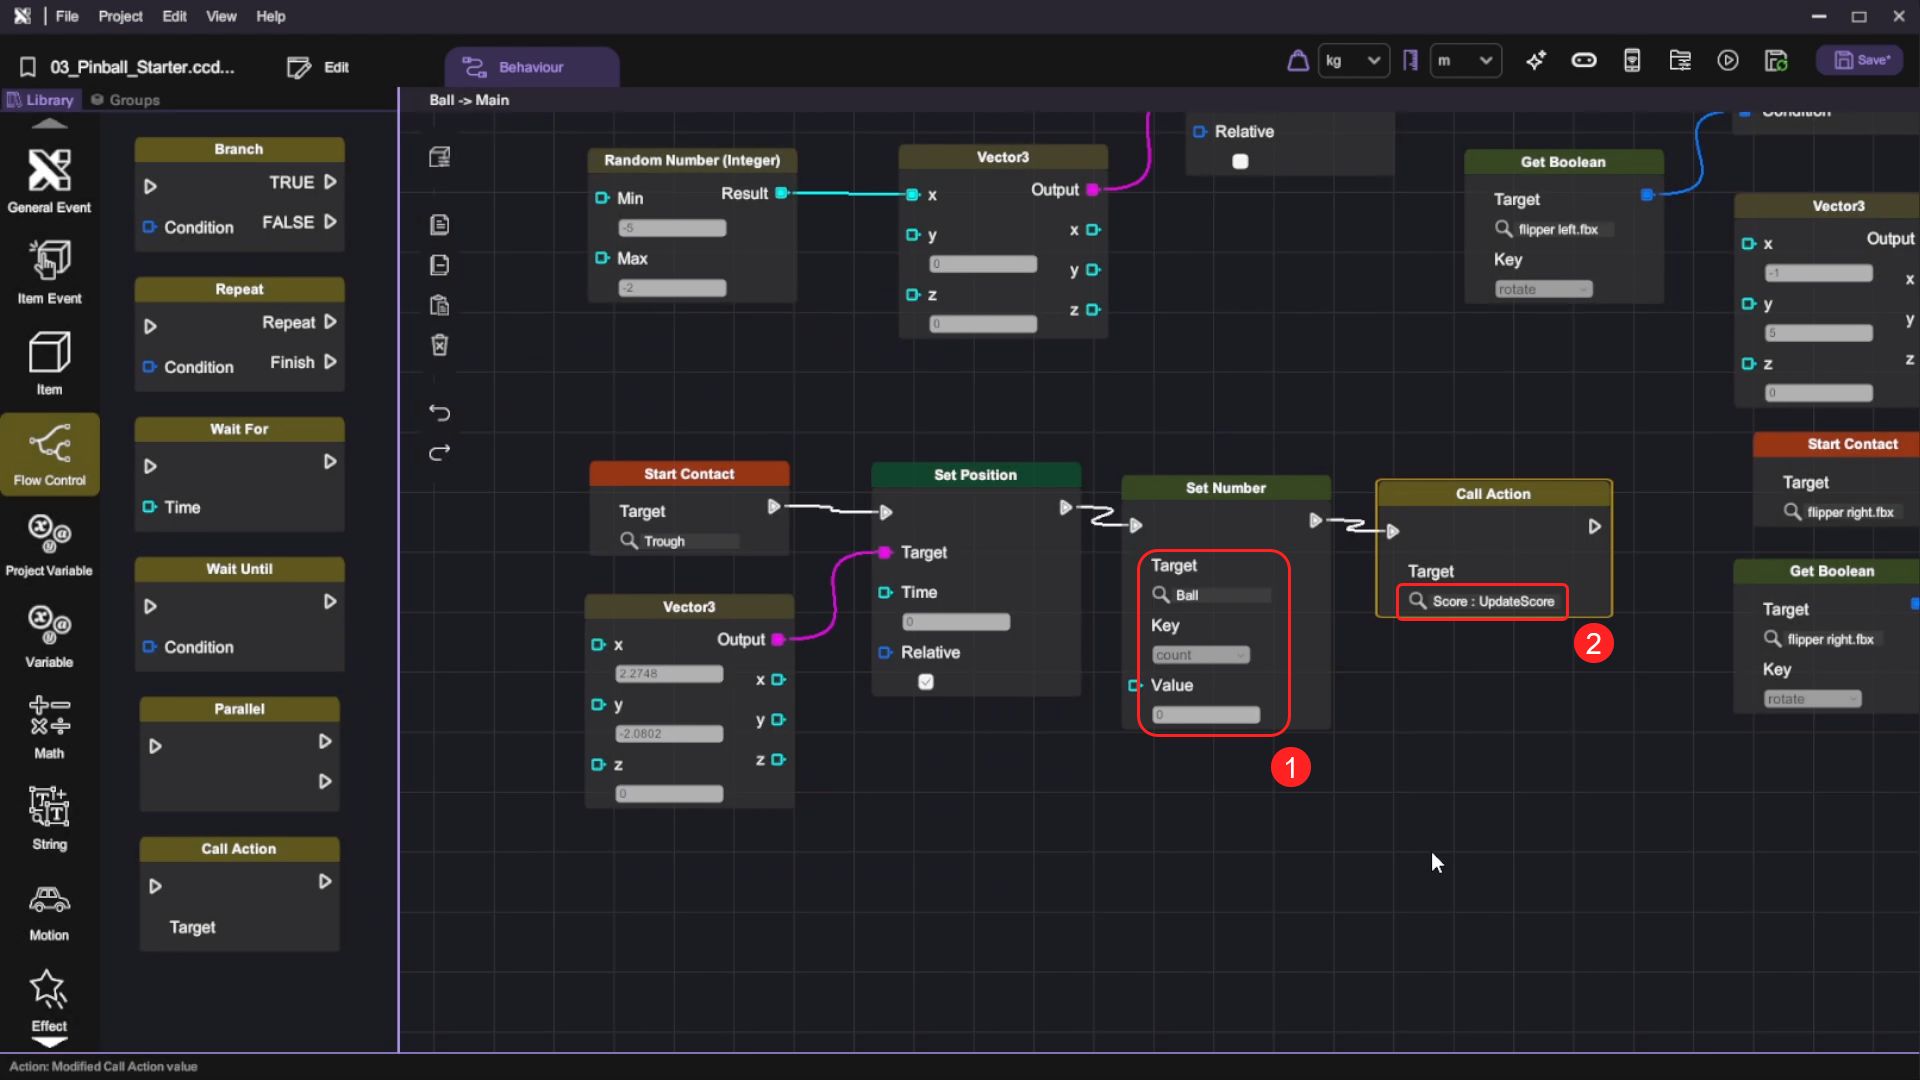
- Lastly, we want to reset the score to 0 when the ball hits the Trough. Open the Ball object's behaviour panel, add a "Set Number" block behind the "Set Position" block and use it to set the "Count" variable on the "Ball" object to 0. Then switch to the "Flow Control" category, drag and drop the "Call Action" block and set its "Target Action" to the "Score" object's "UpdateScore" action. When the ball contacts the Trough, the score will be reset to 0.
| Category | Behaviour |
|---|---|
| |
- Finally, press the "Play" button and test the counting system by pressing the "Shoot" button to shoot the ball and deflecting the ball with the flippers by pressing the "Rotate" button. Notice that if the ball makes contact with bumpers or slingshots, the score text should increase by one.