XRCC Tutorial - Microbit Paris Flight
Overview
In this tutorial, we'll guide you through how to make a small tutorial scene with a plane that physically rotates with your microcontroller board in XRCC.

To complete this project, you will need:
- A Microbit / ESP32 microcontroller
- Or any microcontroller with bluetooth / serial communication features
Techniques Covered
| Specific Techniques Covered | |
|---|---|
| |
|
Tutorial Project
You can download the project files for this tutorial in two formats: a starter project for step-by-step guidance and a completed project for your reference.
Gameplay Flow
- You are flying a plane on top of Paris
- You rotate the plane by physically rotating your microcontroller
You are encouraged to make adjustments to the project as you see fit — part of the fun in game-making is bringing your unique concepts to life!
Assets Provided in the Starter Project
The starter project for this tutorial provides a comprehensive set of assets and functionalities to get you started. This includes some 3D models for building the scene, including the Eiffel Tower, buildings of the city view and a plane. With these assets and functionalities in place, you'll be able to build this tutorial scene.
Set up the Propeller Plane
Let's start with adding the propeller plane into the scene.
Add the Plane Mesh
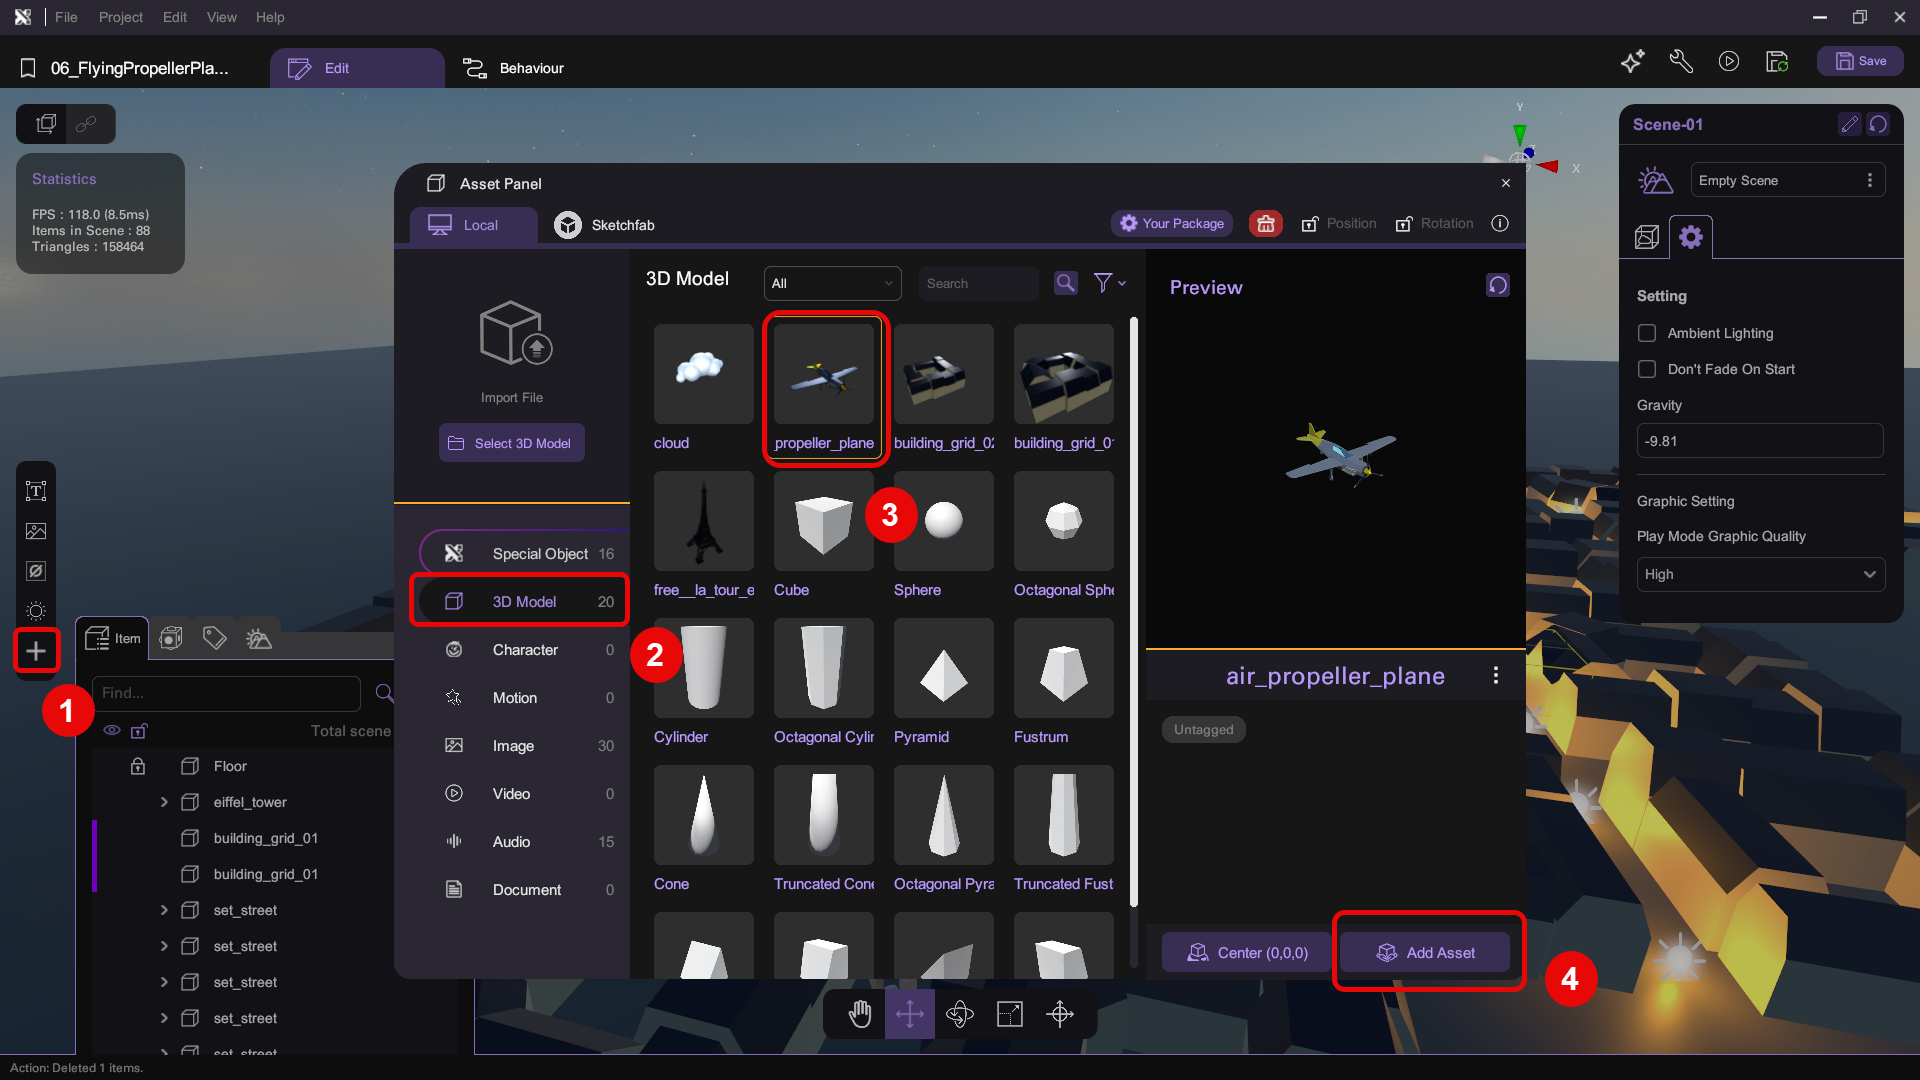
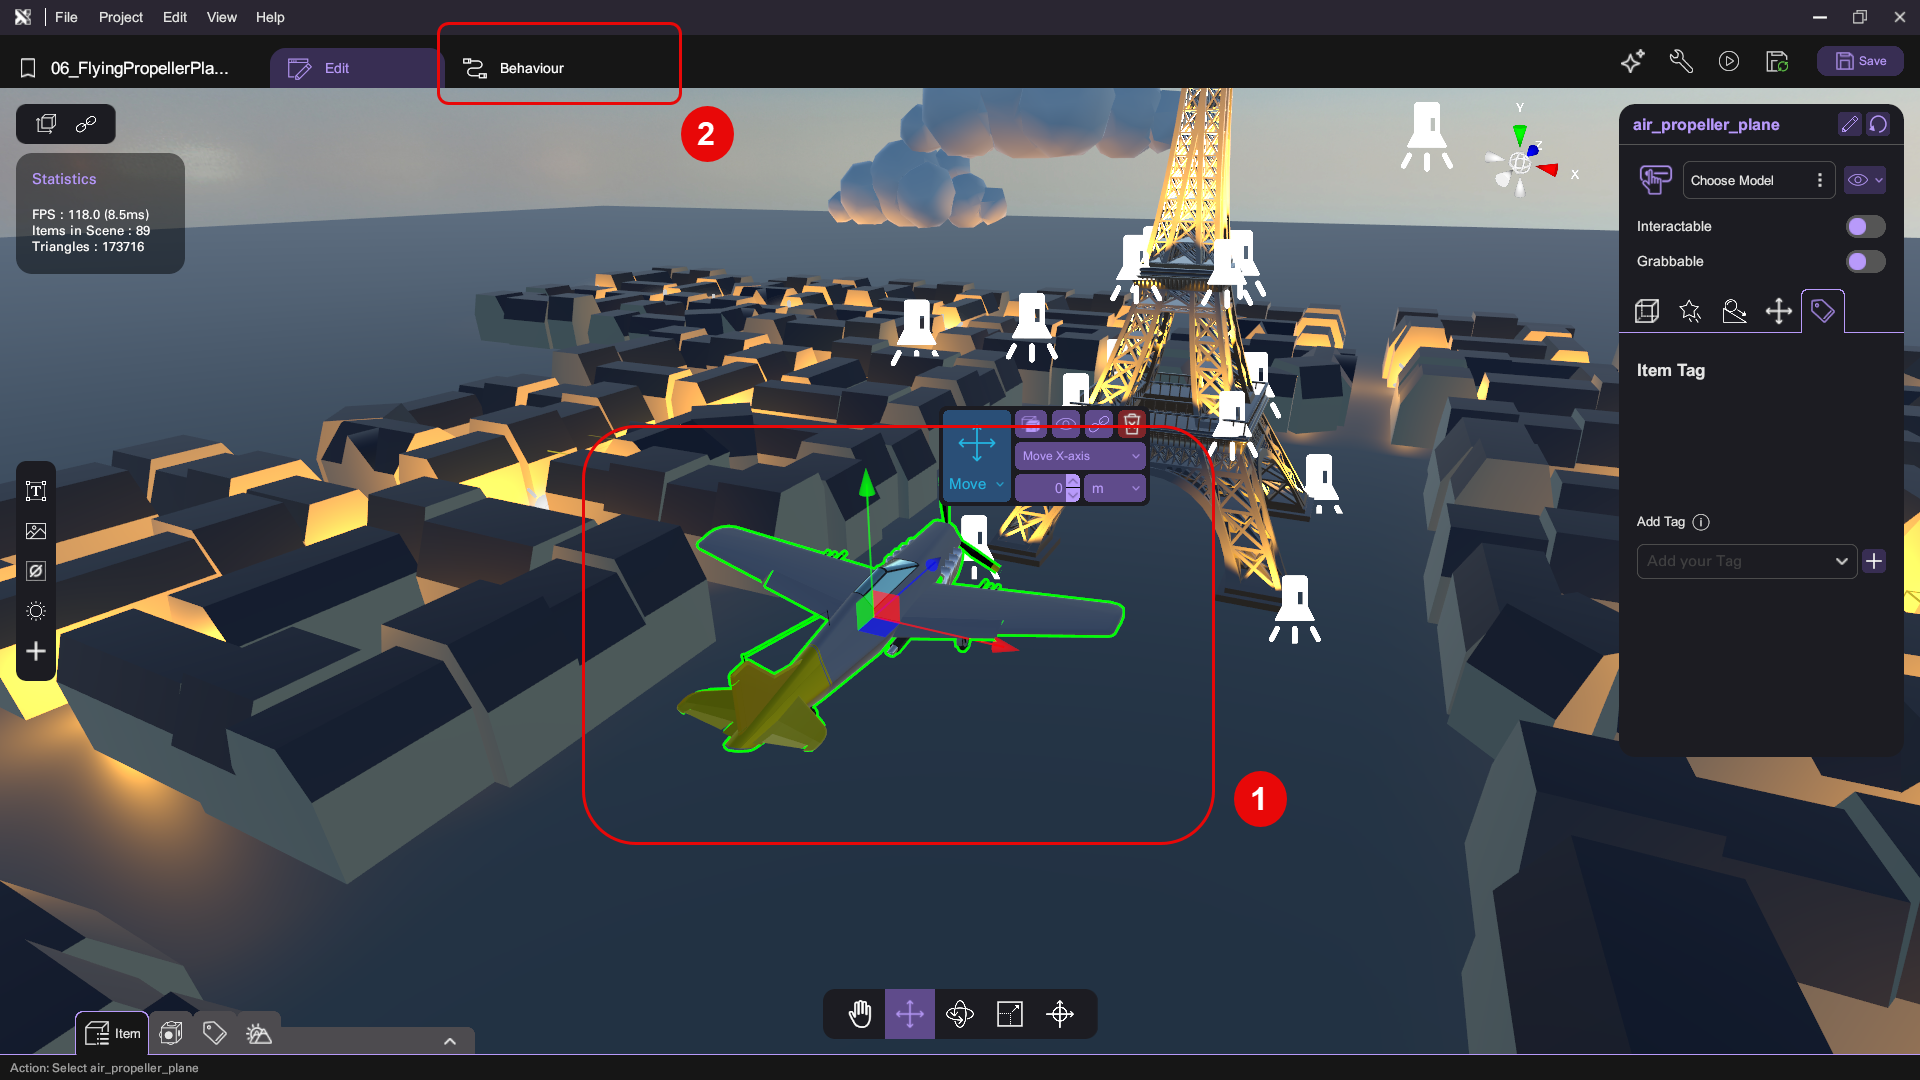
- Open the Asset Panel and select the propeller plane mesh at 3D Model > air_propeller_plane, then click Add Asset.
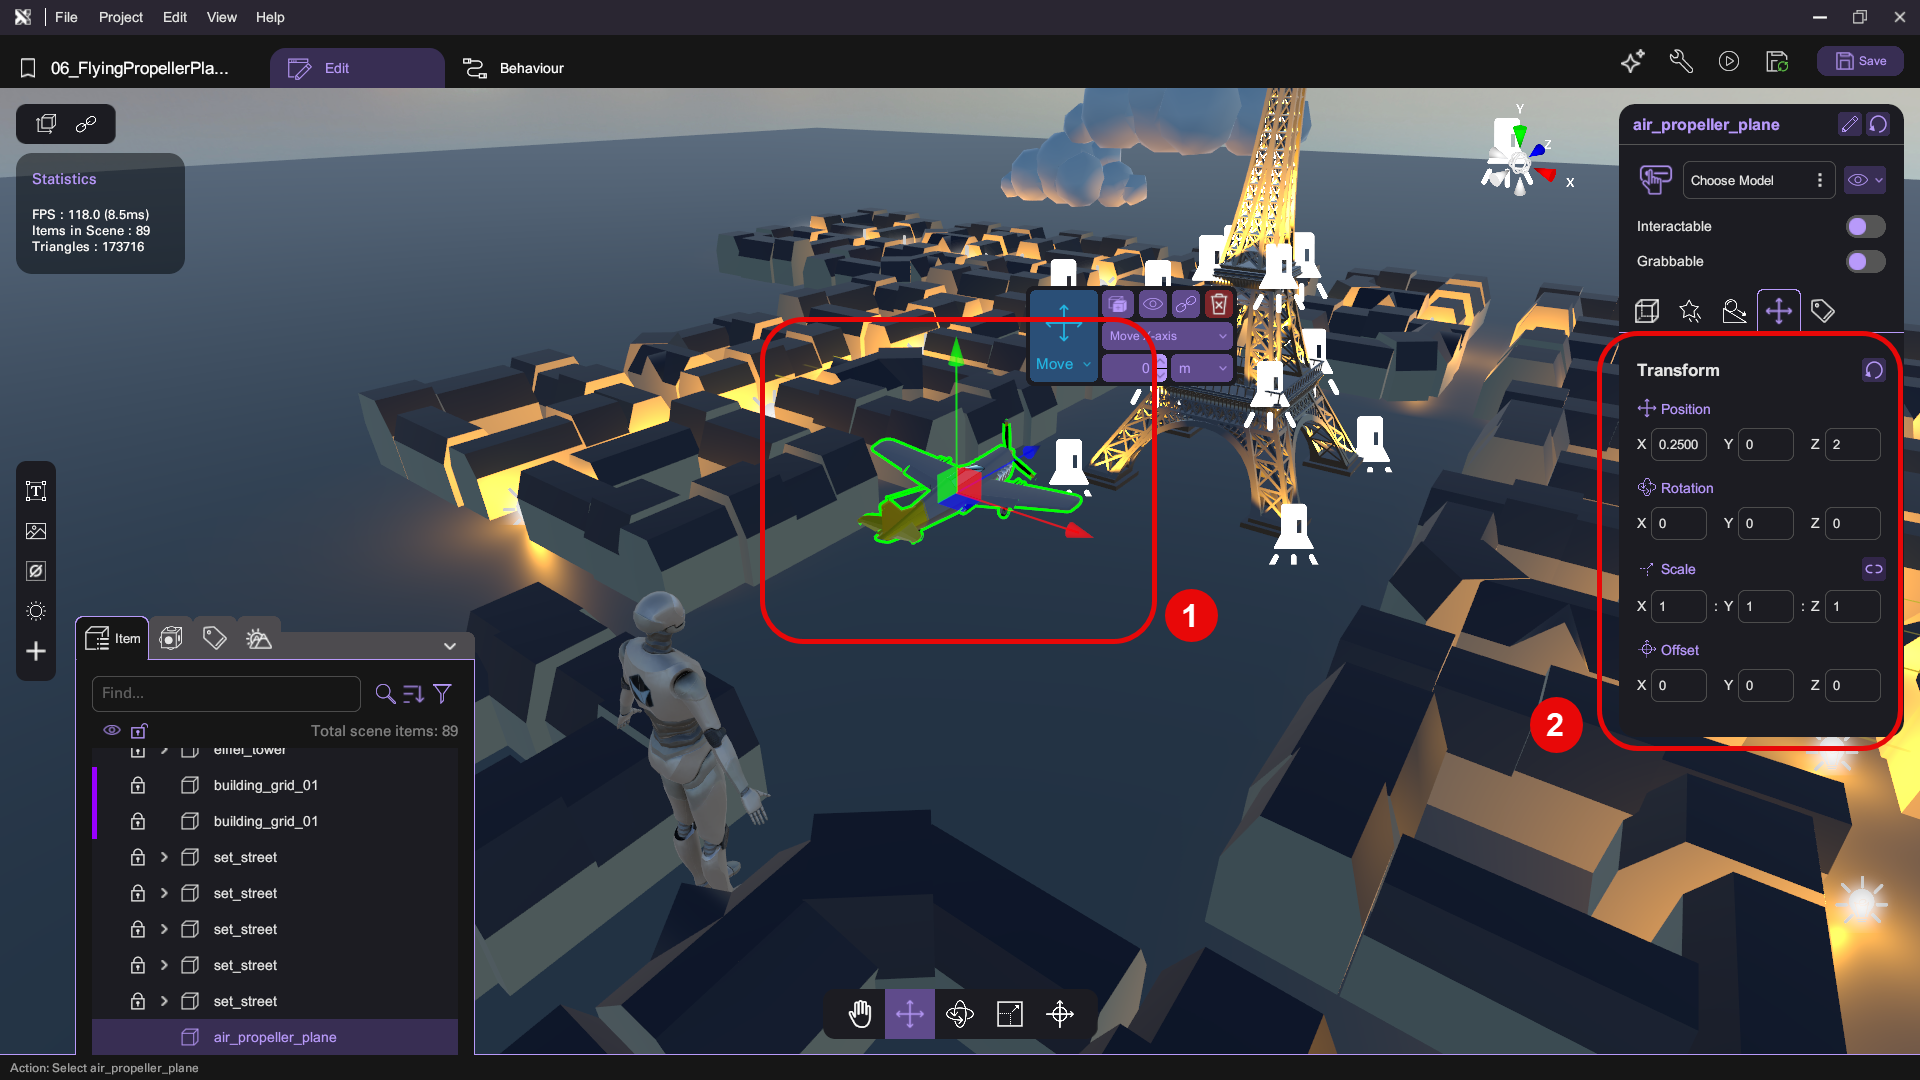
- Adjust the plane mesh's position so that it sits between the player and the Eiffel Tower. In the picture below, we have set the plane's position to (0.25, 0, 2), rotation to (0, 0, 0), scale to (1, 1, 1).
Any position works fine, as long as the plane remains within the player's line of sight
Set up XRCC-to-Microcontroller Communication
To pass sensor data from your microcontroller to your VR experience, you must first connect the microcontroller to XRCC, then implement communication behaviors on both sides.
Implement Sending Data on Microcontroller
Before XRCC can read anything, you need to program your microcontroller to transmit data. You can either use the pre-built example scripts we provide (available for Microbit and ESP32) or write and upload your own custom scripts.
- Microbit
- ESP32
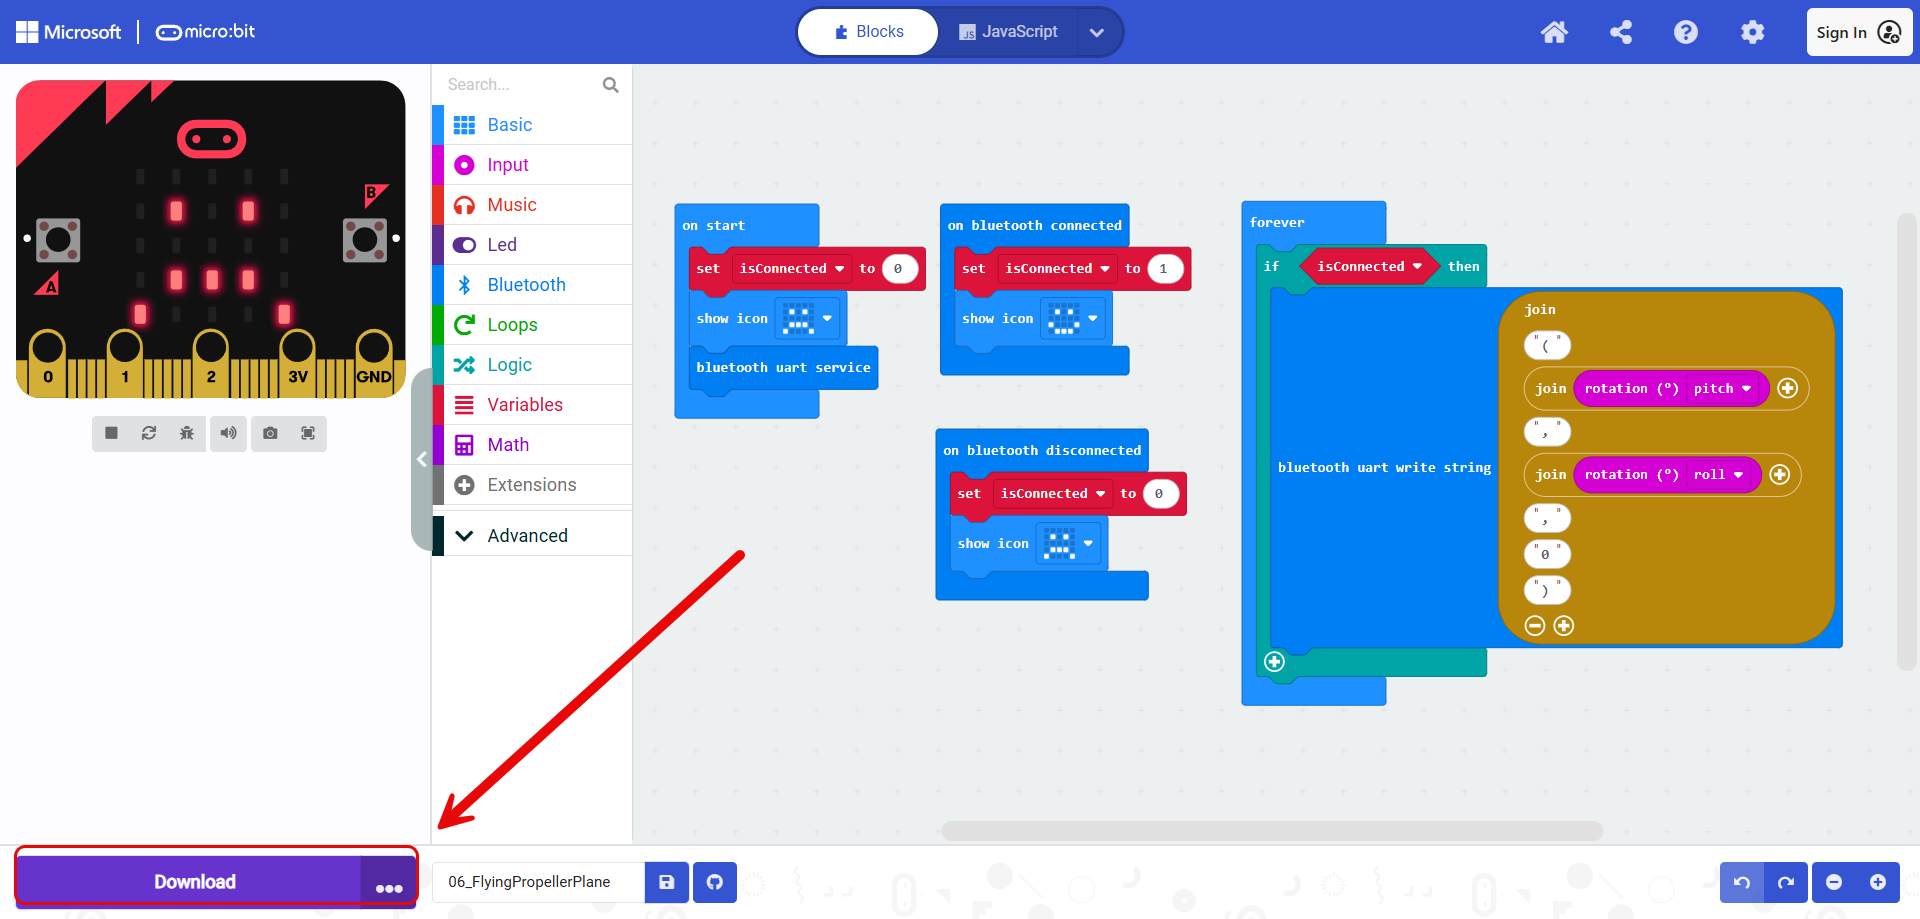
- Download the Microbit project file below. This file contains the code to enable the board's Bluetooth service and sends X-axis and Y-axis rotation data to XRCC.
Or if you feel confident enough about your skill, you can make it a challenge to write the Microbit code yourself.
-
Open the MakeCode platform in your browser. Then, open the downloaded Microbit project on the platform.
-
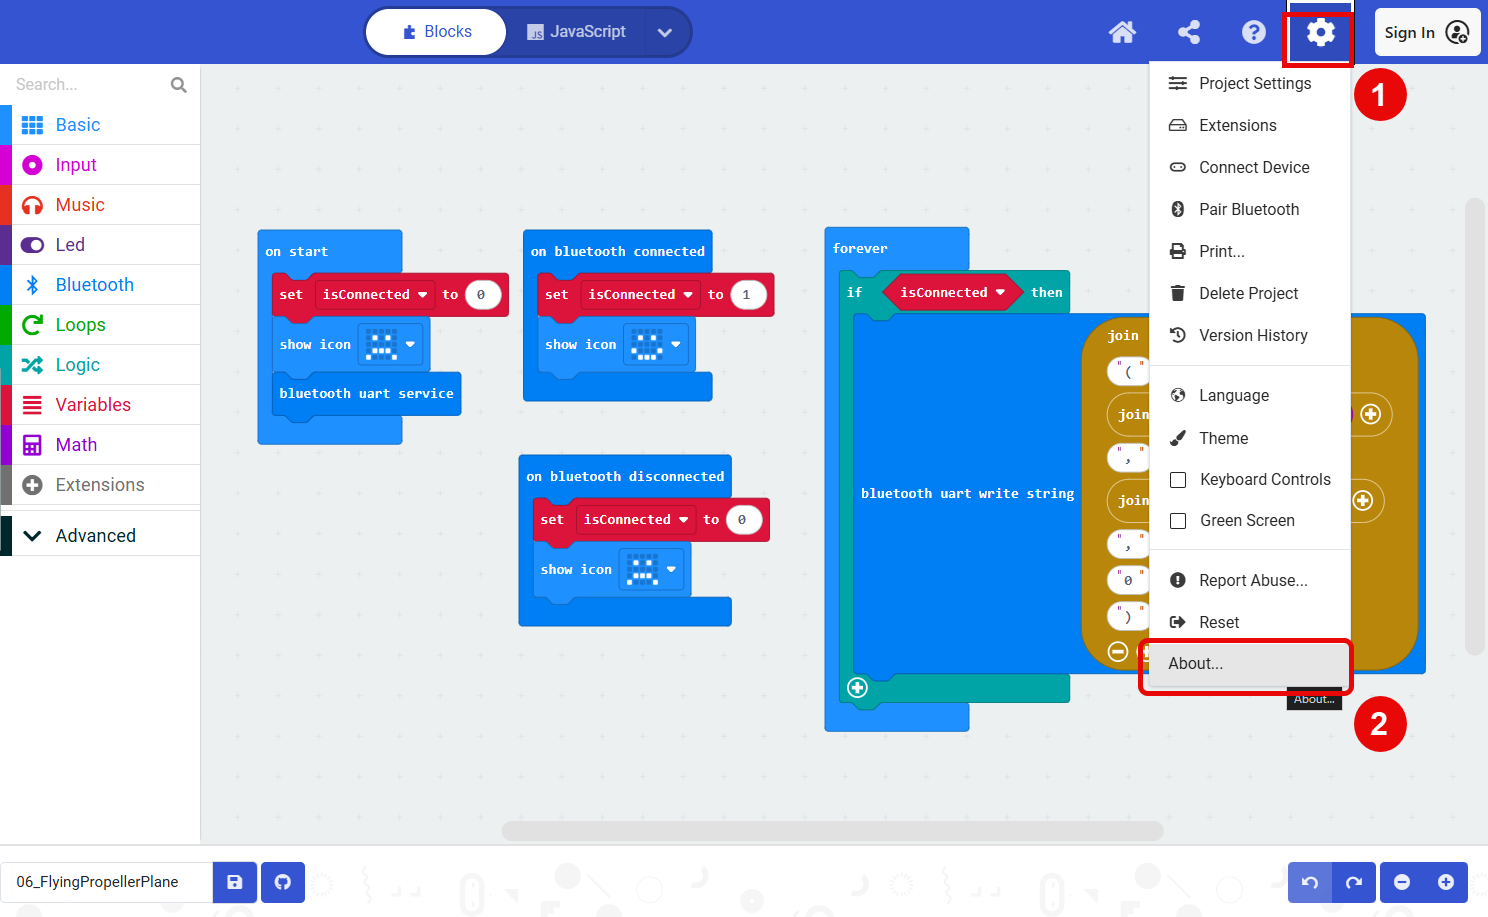
Go to Setting (gear icon, top-right) > About.
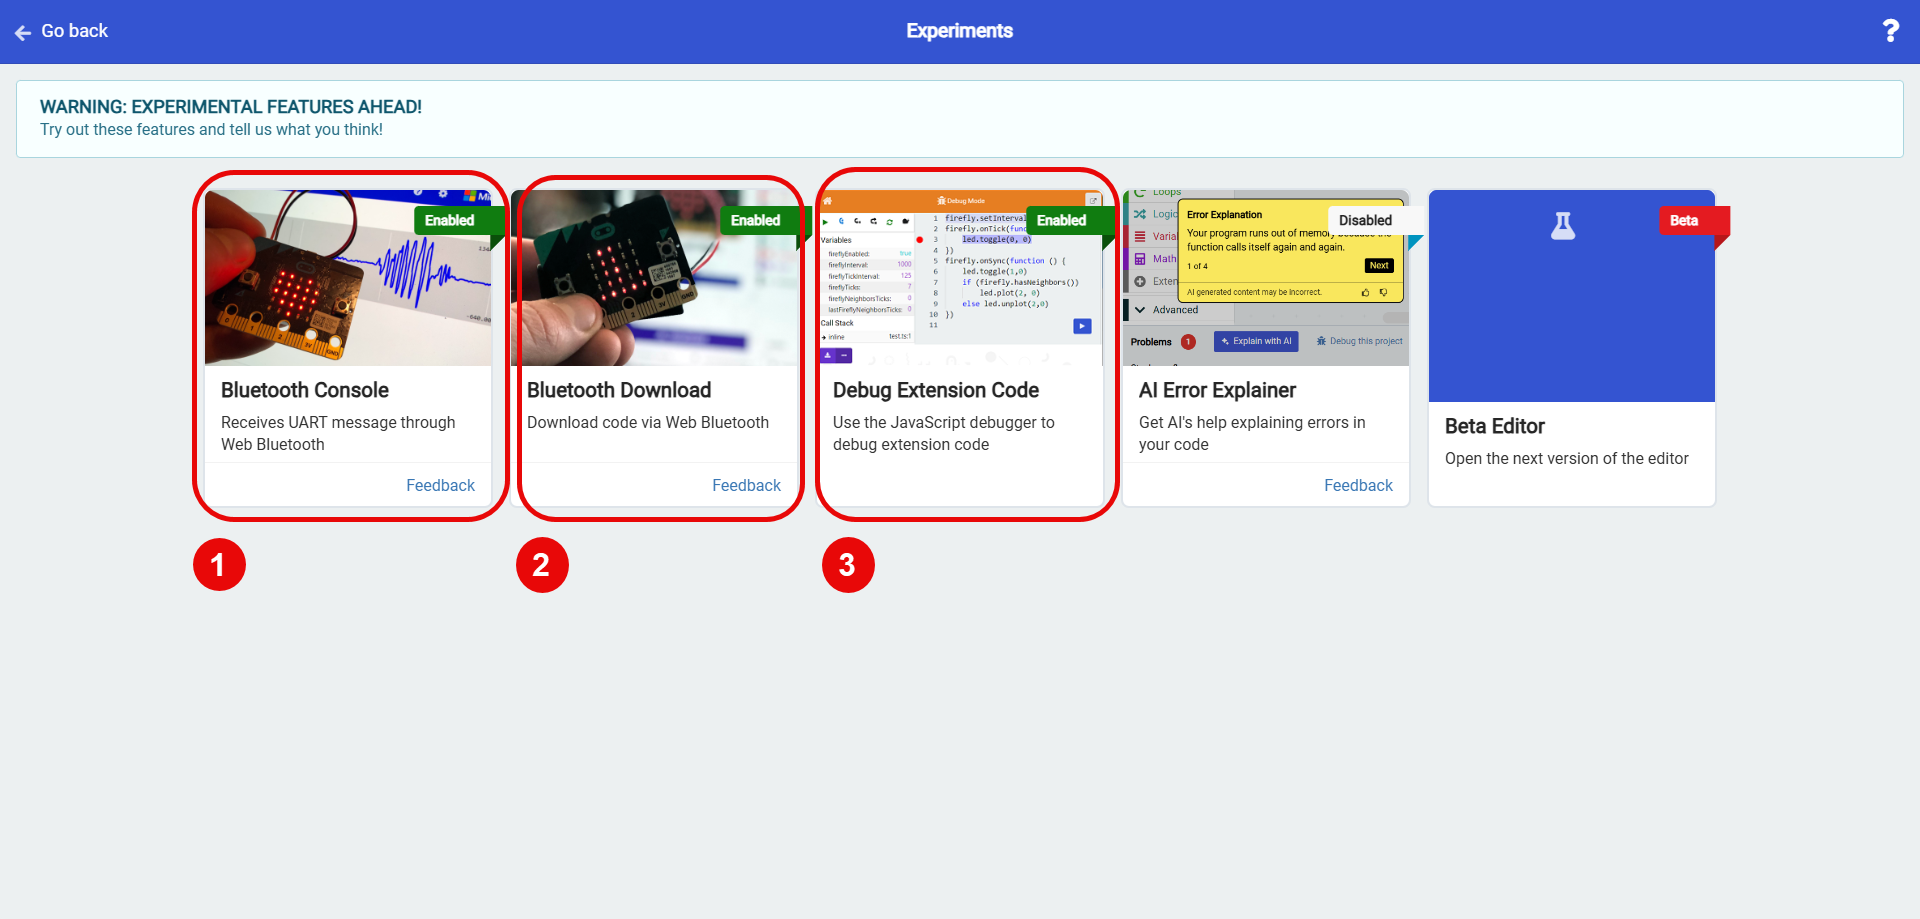
- Click Experiments. Then, enable the following:
- Bluetooth Console
- Bluetooth Download
- Debug Extension Code
- After the experiments are enabled, download the project code to your Microbit board.
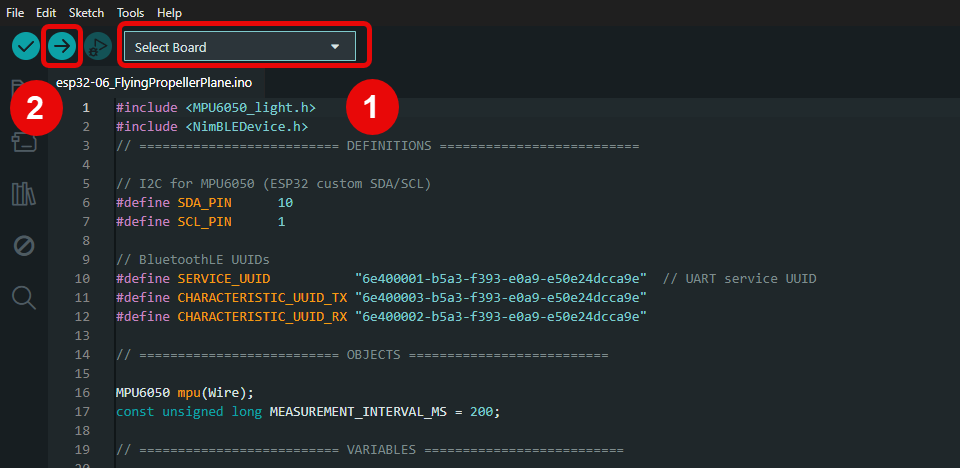
- Download the Ardruino IDE and the ESP32 project file below. This file contains the code to enable the board's Bluetooth service and sends X-axis and Y-axis rotation data to XRCC.
Or if you feel confident enough about your skill, you can make it a challenge to write the ESP32 code yourself.
- Open the downloaded project file on Ardruino IDE. Then select the appropriate board and click Upload (arrow icon, top-left) to upload project code to your ESP32 microcontroller.
Connect Microcontroller to XRCC
-
Connect your microcontroller to a power source (either your computer or an external battery pack).
-
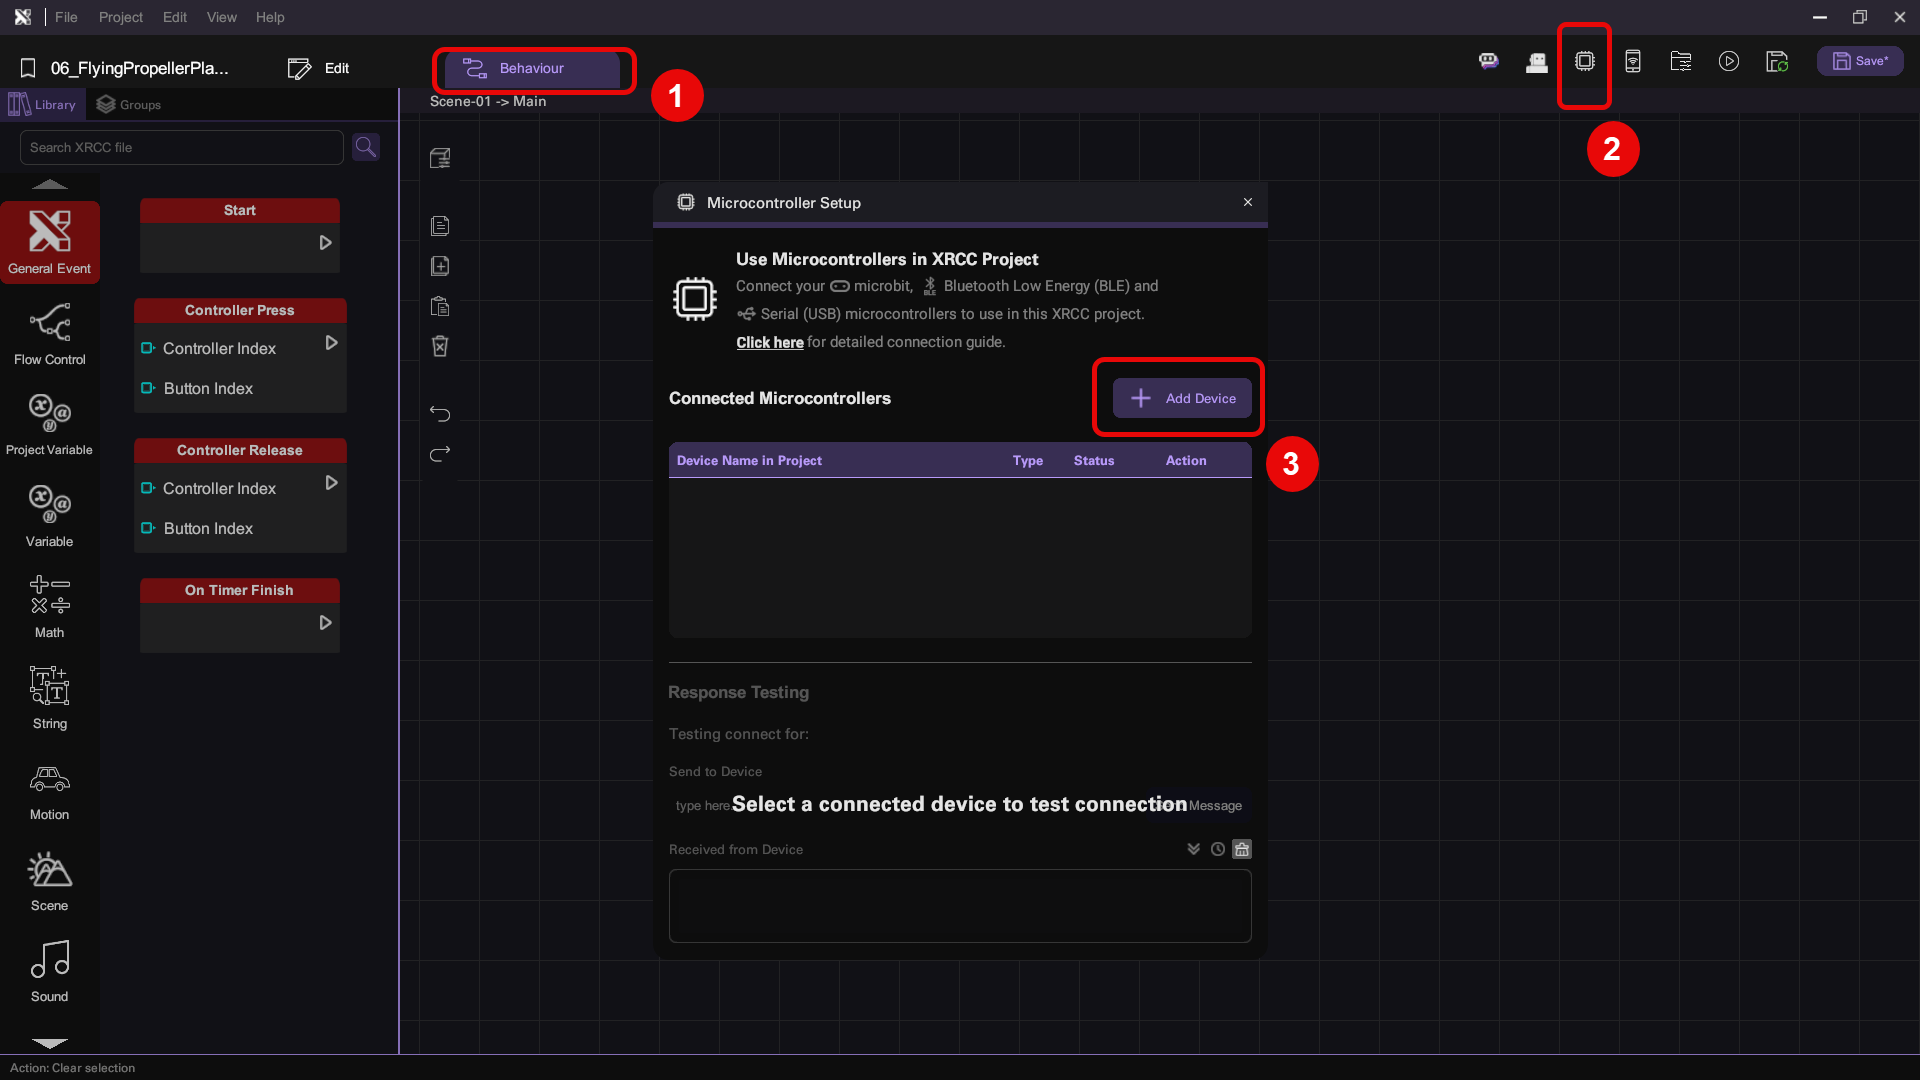
Go to Behavior tab and open up the Microcontroller Setup panel, then click Add Device.
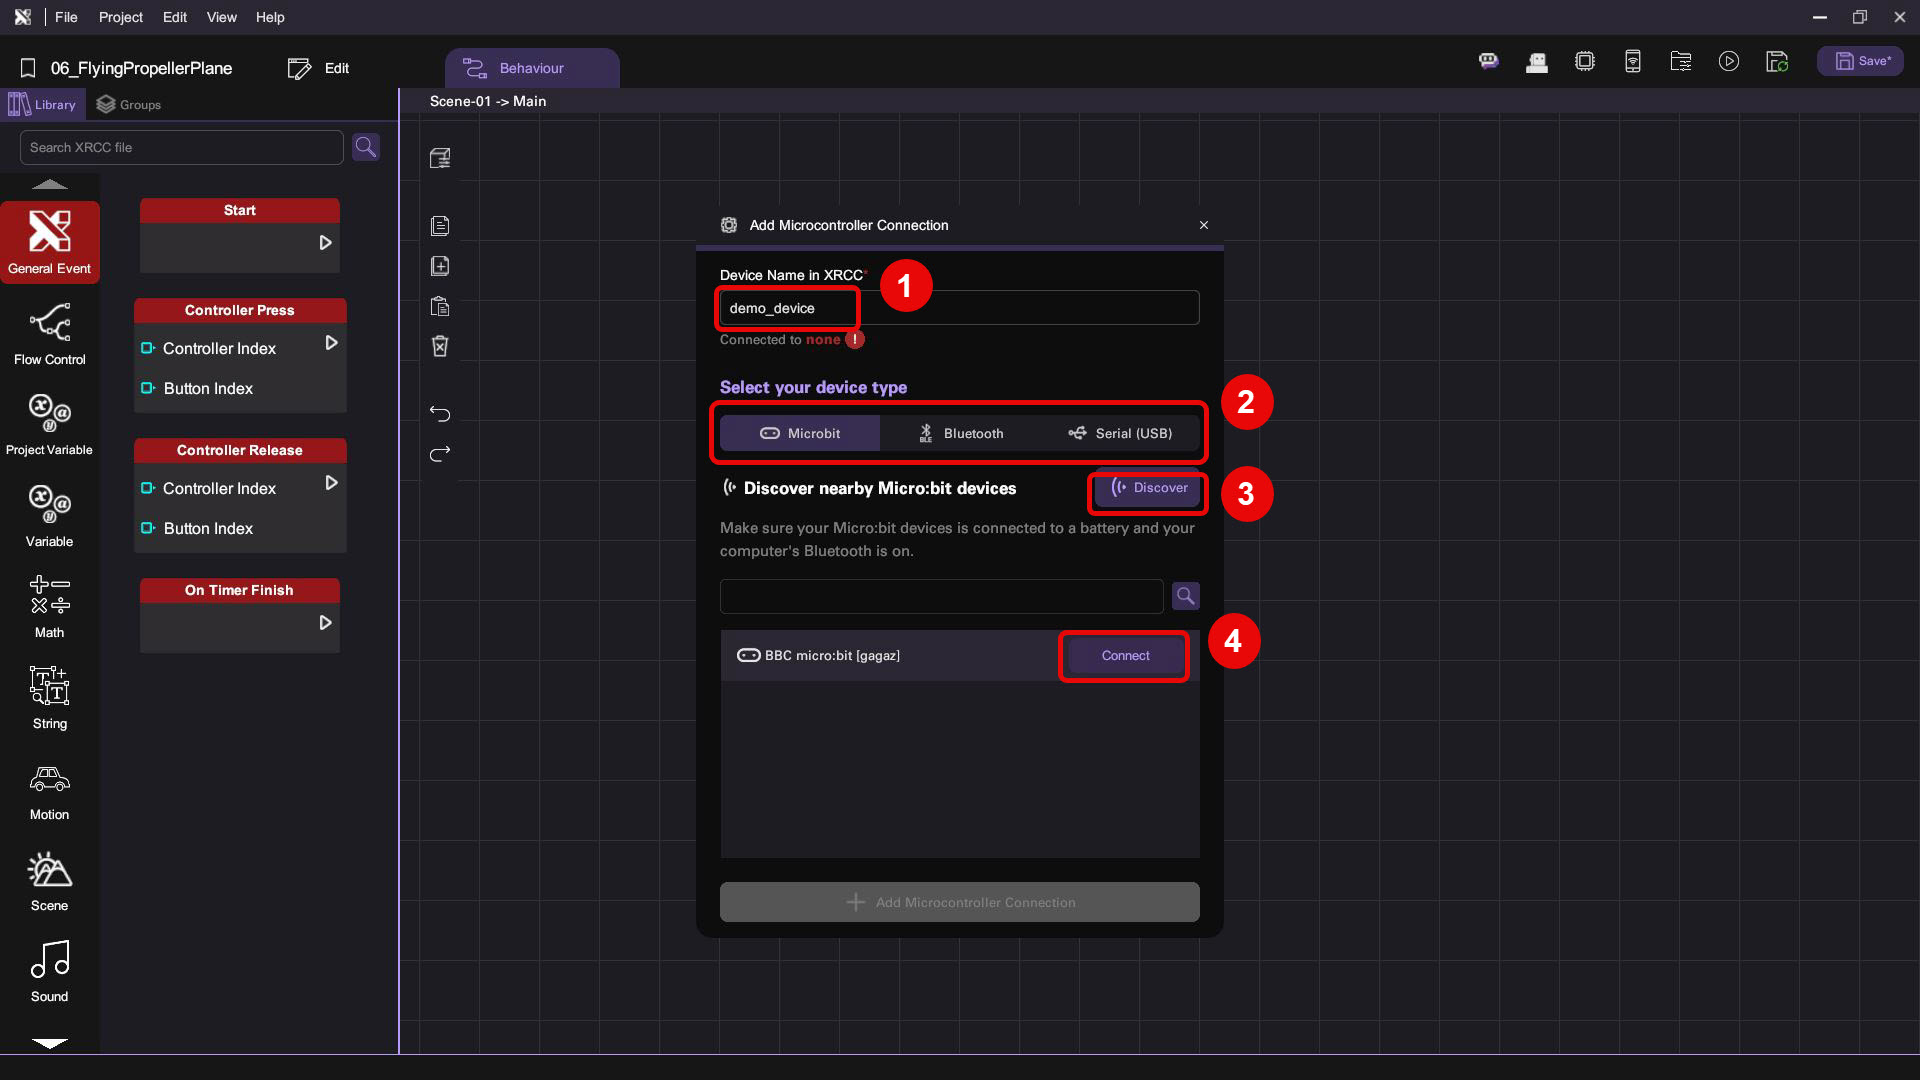
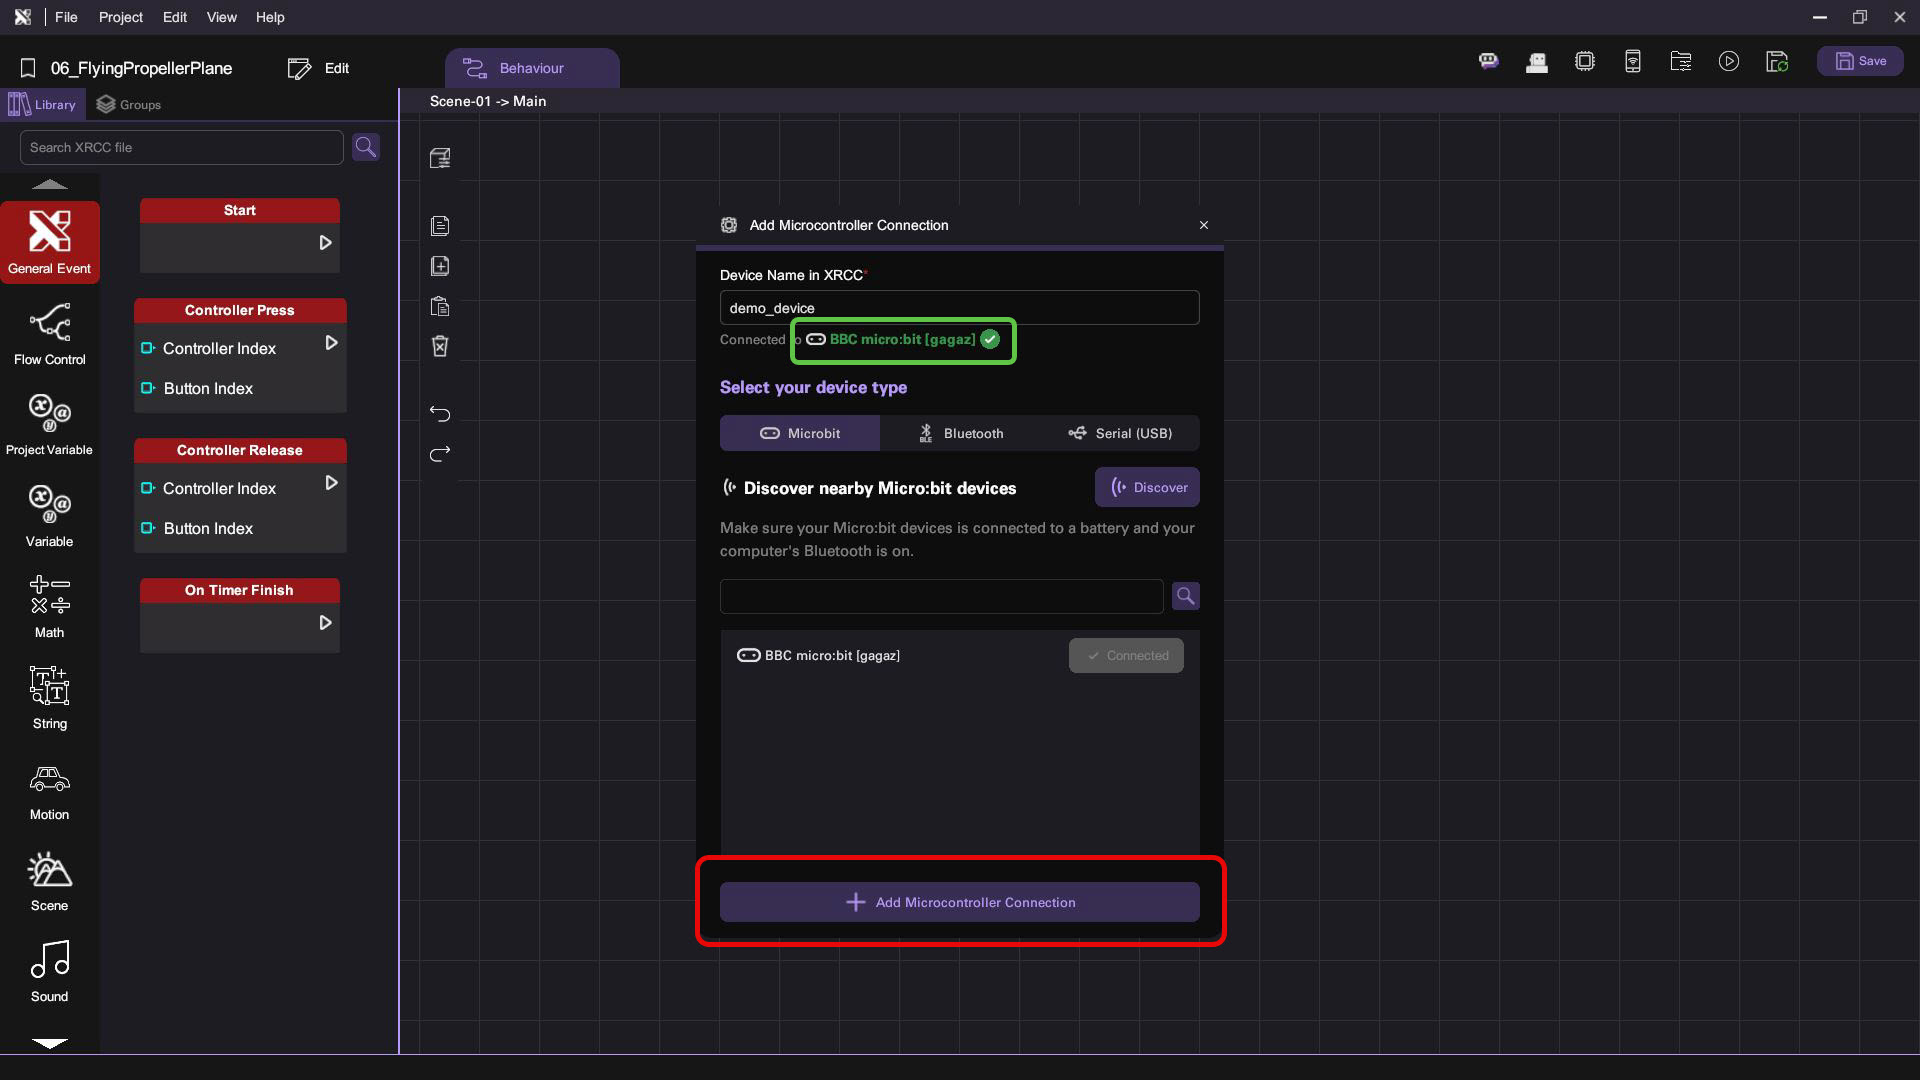
- You should now see the Add Microcontroller Connection panel. Enter a unique device name in the text box (in the example below, we used demo_device). Depending on your microcontroller's hardware configuration, navigate to either the Microbit, Bluetooth, or Serial tab and click Discover to search for nearby devices. Finally, select your microcontroller from the list and click Connect to establish a connection.
- Look for a green checkmark that indicates your device has successfully connected to XRCC. Once you see the checkmark, add the device by clicking Add Microcontroller Connection.
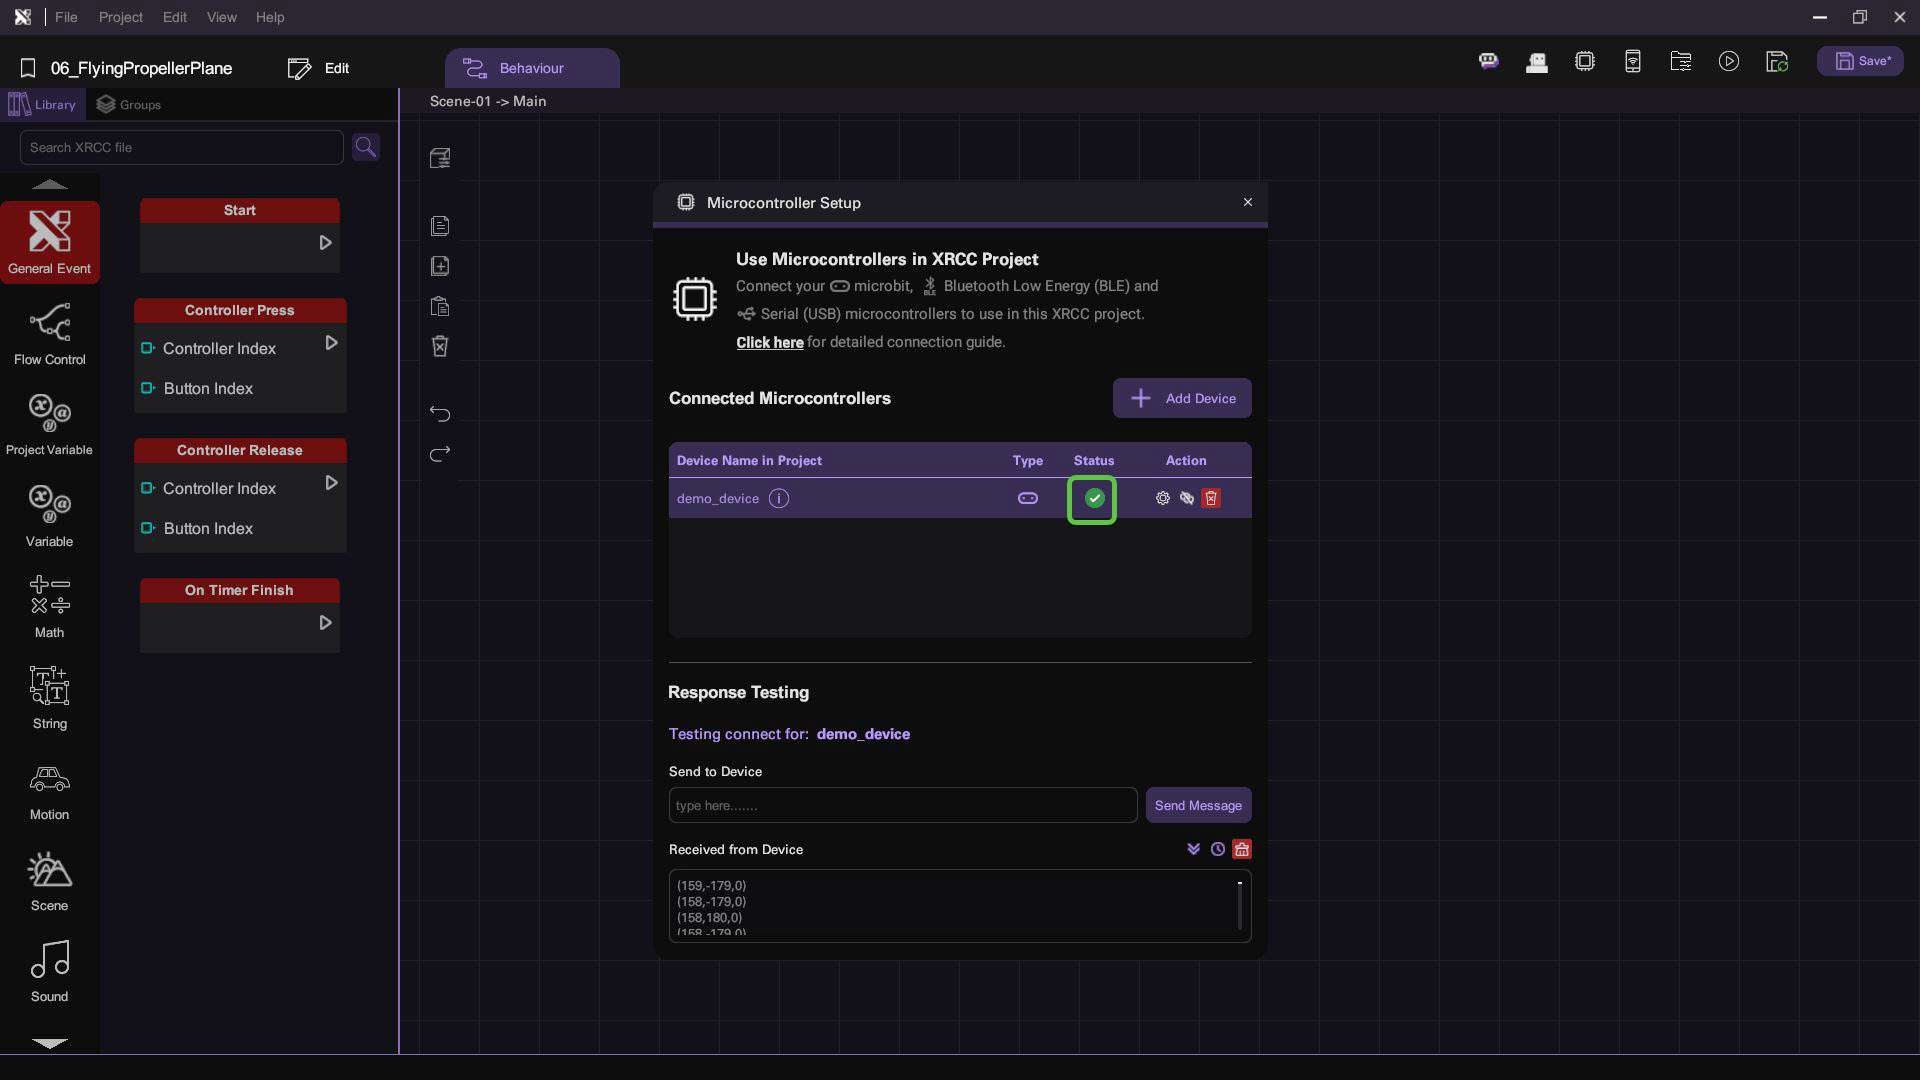
Check that your device is connected to XRCC. It should appear on the Connected Microcontroller list with a green checkmark.
If a connection failure has occured, you may try to:
- Unplug your microcontroller from your PC or power source, then plug it back in
- Press the Reset button on your microcontroller board
- Click Discover again in the Add Microcontroller Connection panel
Implement Receiving Data on XRCC
To let XRCC receive the incoming data, you need to use behavior blocks to set up the logic in your VR scene.
- Select the Air Propeller Plane in the scene.
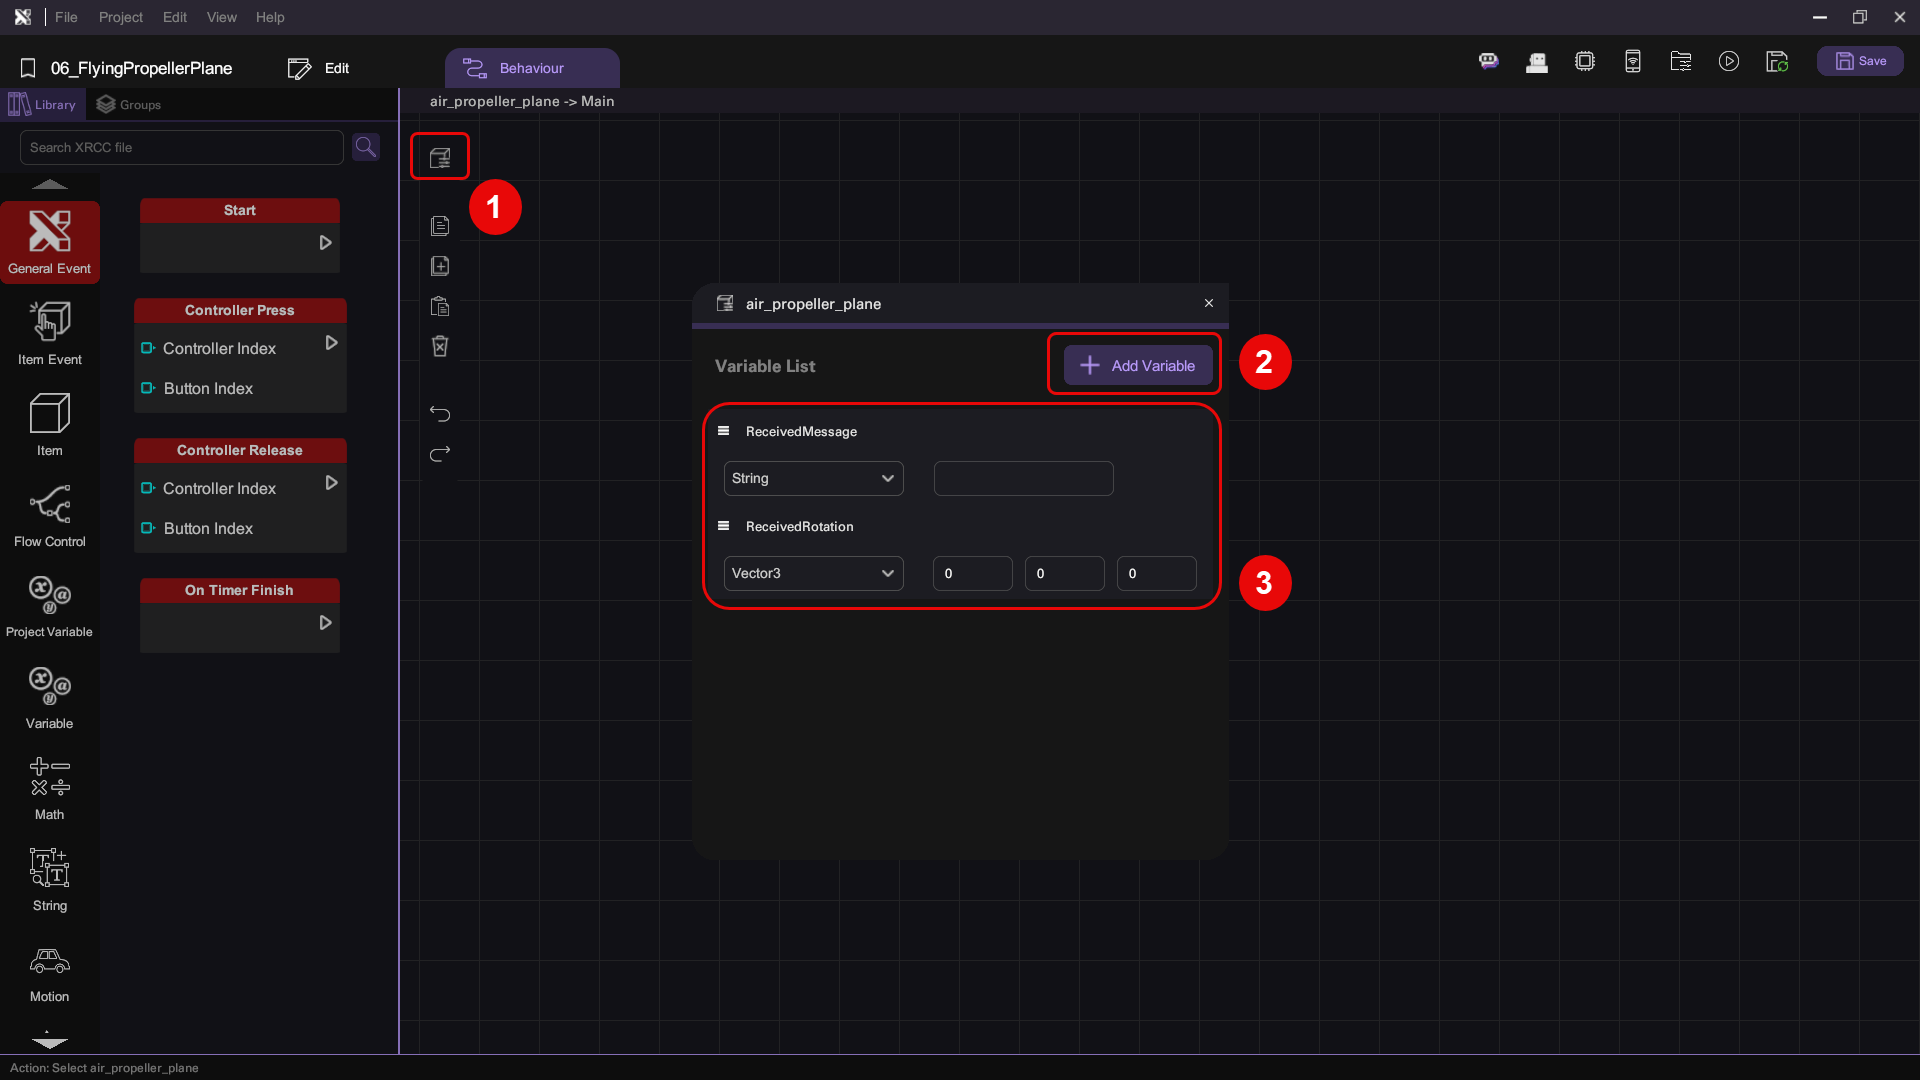
- Open the plane's Behavior tab. Create the following variables:
- A ReceivedMessage string variable
- A ReceivedRotation Vector3 variable
- When the plane receives rotation data from your microcontroller, you need to convert that data into a Vector3 format so it can be used in your game logic later. Implement the following logic:
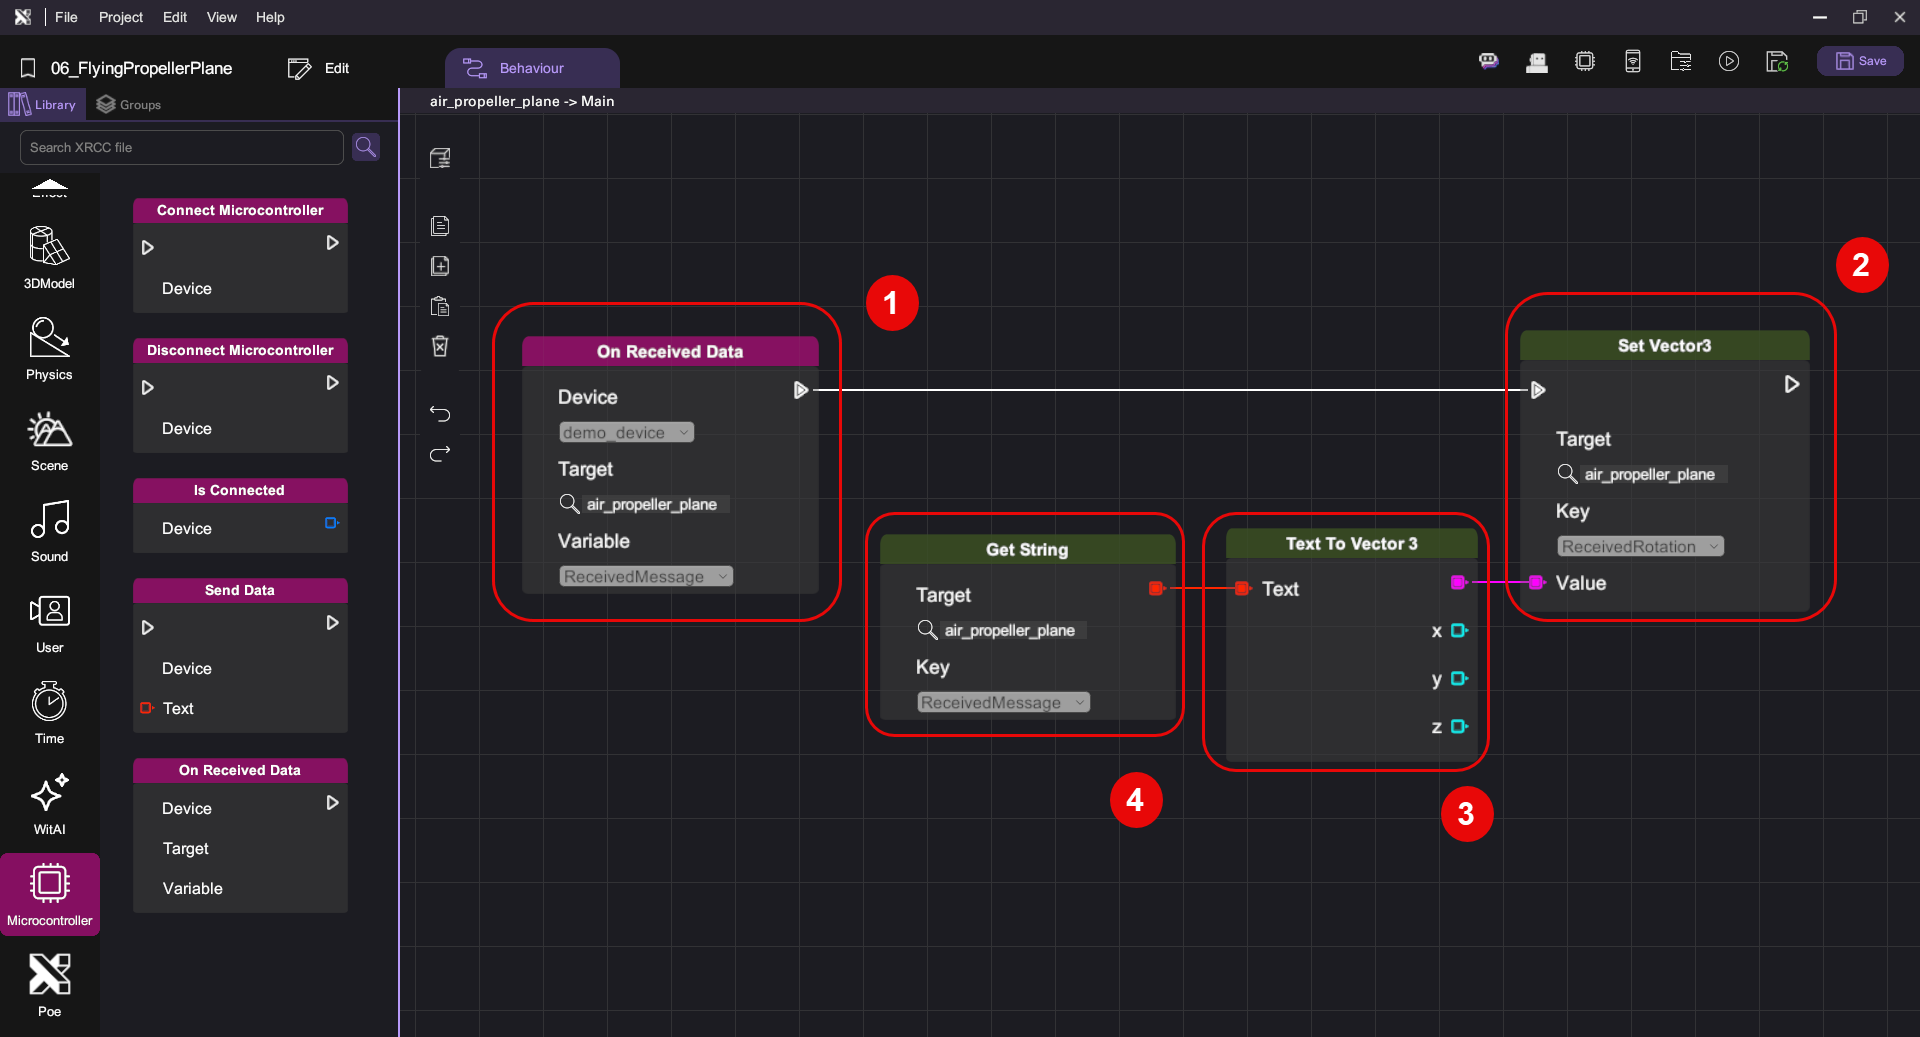
| Category | Behaviour |
|---|---|
 |    |
 |  |
Add Rotate-with-Microcontroller Behavior to the Plane
Next, you will implement behavior in the plane to mirror the physical movements of your microcontroller. In the Behavior tab of Air Propeller Plane, implement the following logic:
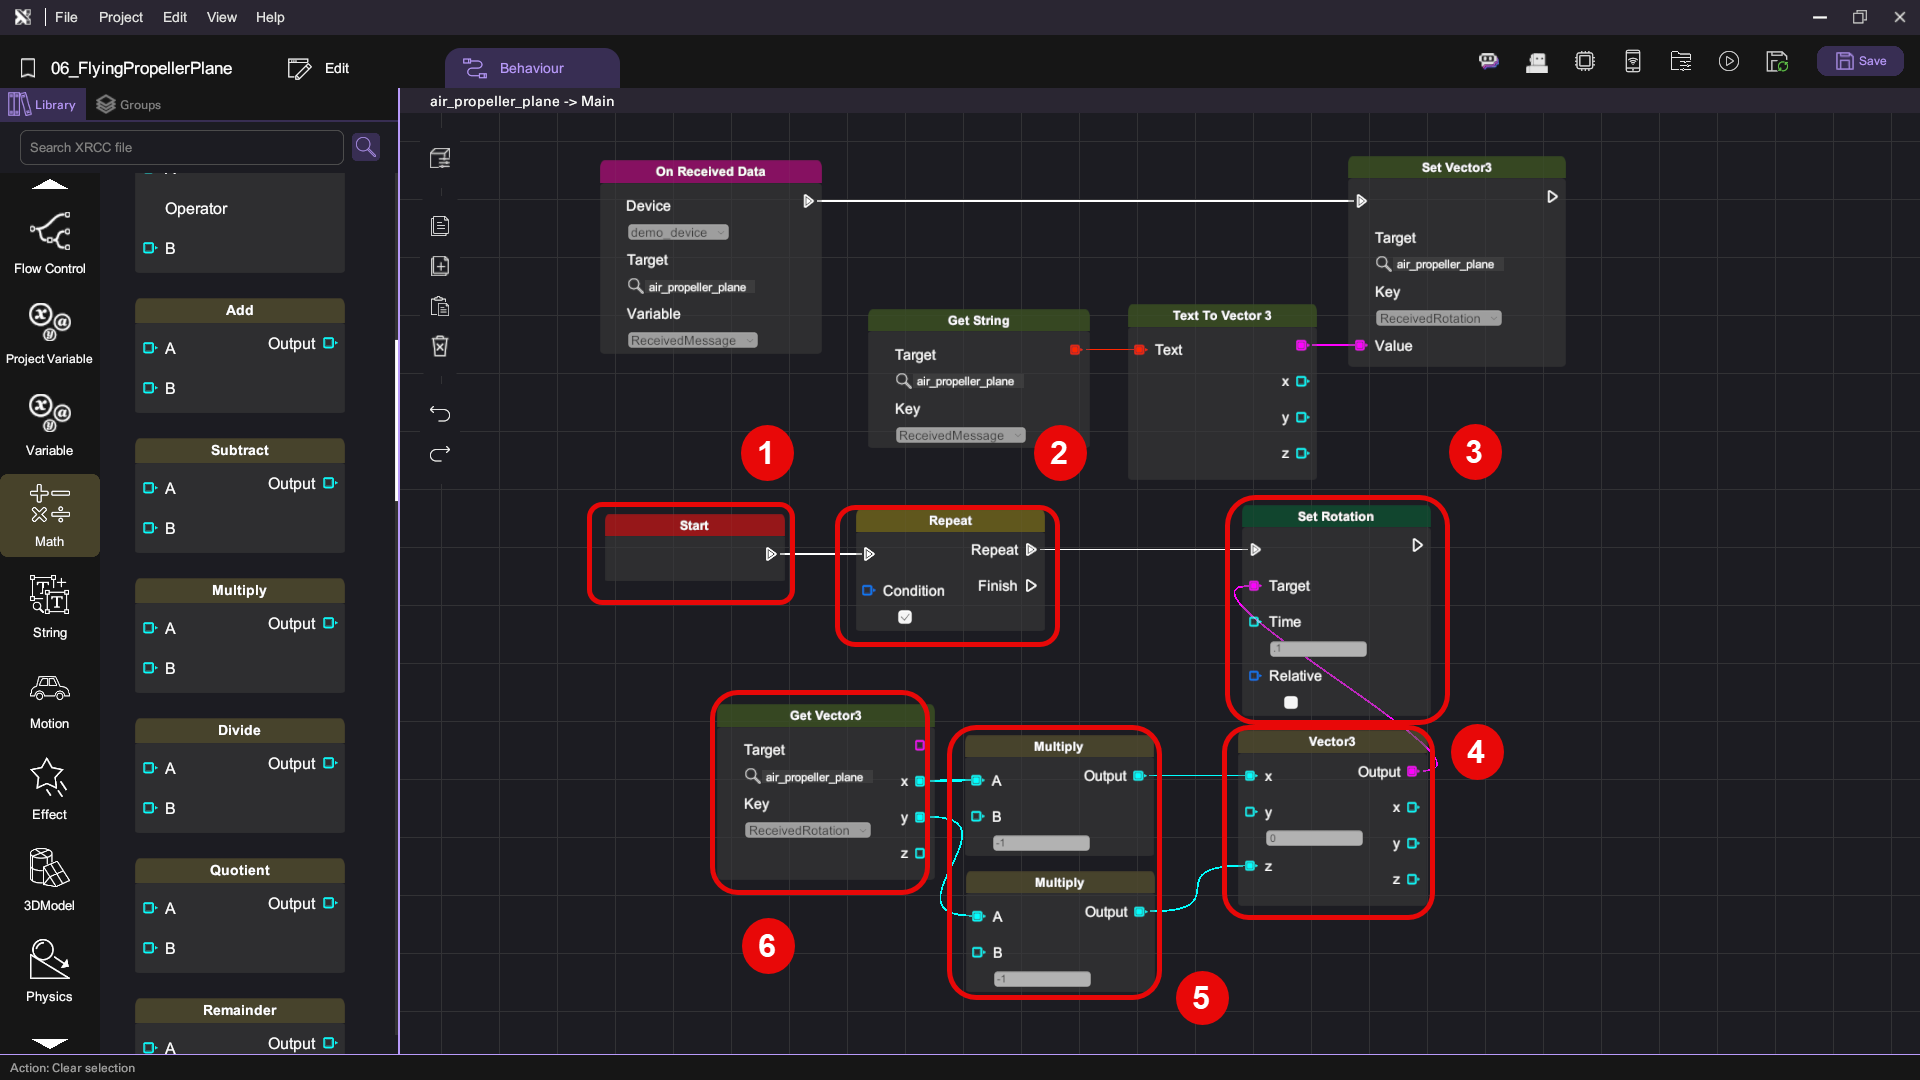
| Category | Behaviour |
|---|---|
 |  |
 |  |
|  |
 |   |
 |  |
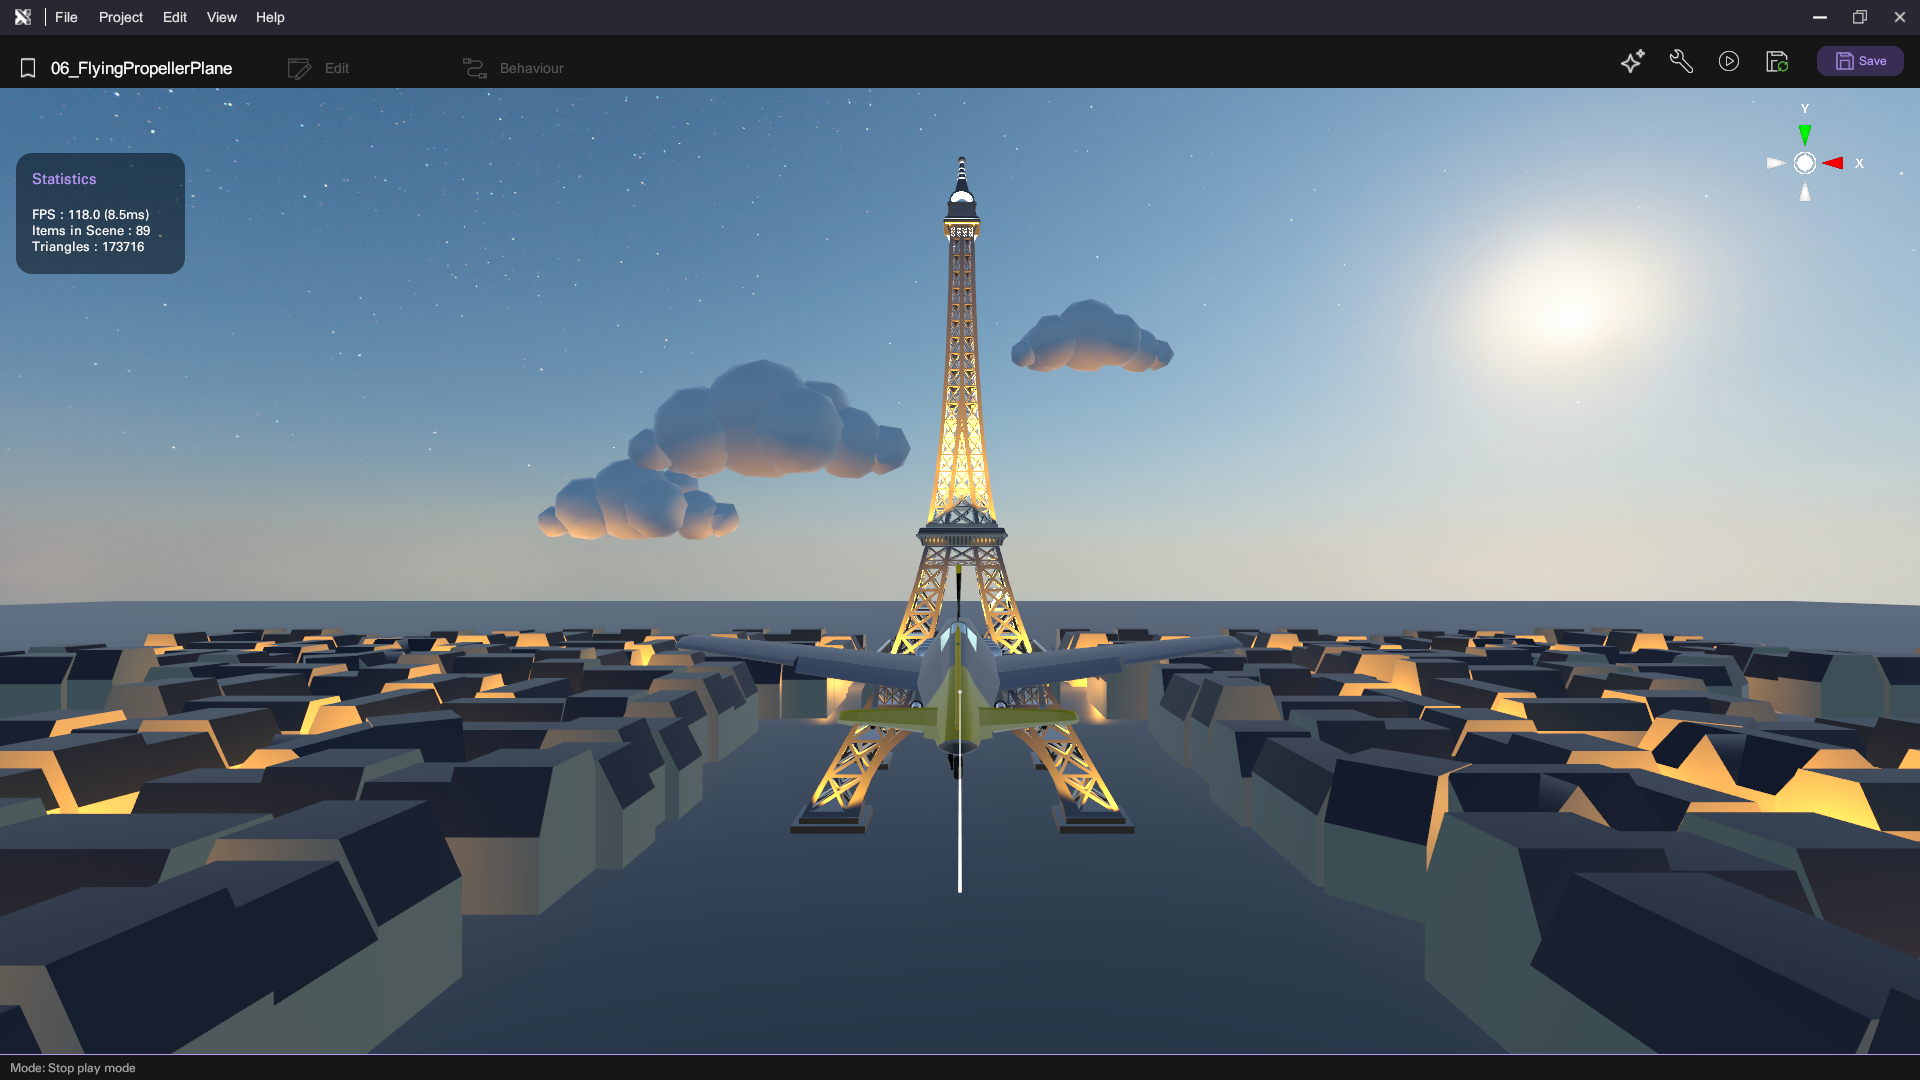
Run your project. Check that:
- When you rotate your microcontroller, the plane rotates with it
- It rotates in X and Y-axis
Mission Complete
Congratulations! You have completed this tutorial. Take what you have learned from this tutorial and go on to create other amazing VR experiences in XRCC.
Credits
This tutorial project is made possible thanks to the generous sharing of online assets from the following artists: